Download
Page 2
... SRS Labs, Inc. HDMI, the HDMI logo and High-Definition Multimedia Interface are incorporated under license from SRS Labs, Inc. Changing the factory default picture settings or enabling other features will increase power consumption that could exceed the limits necessary to qualify for ENERGY STAR in the "factory default...
... SRS Labs, Inc. HDMI, the HDMI logo and High-Definition Multimedia Interface are incorporated under license from SRS Labs, Inc. Changing the factory default picture settings or enabling other features will increase power consumption that could exceed the limits necessary to qualify for ENERGY STAR in the "factory default...
Download
Page 7
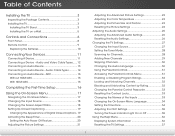
...Cable Types 14 Connecting an Audio Device - Table of the Inputs 33 Changing the On-Screen Menu Language 34 Setting the Time Zone 34 Adjusting the CEC Settings 35 Turning the Power Indicator Light On or Off 35 Using the Help Menu 36 Displaying System Information 36 ...23 Adjusting the Picture Size and Position 23 Resetting the Picture Settings 24 Adjusting the Audio Settings 25 Adjusting the Advanced Audio Settings 26 Resetting the Audio Settings 26 Changing the TV Settings 27 Changing the Input Source 27 Setting the Tuner Mode 28 Scanning for Channels 28 Adding New Channels...
...Cable Types 14 Connecting an Audio Device - Table of the Inputs 33 Changing the On-Screen Menu Language 34 Setting the Time Zone 34 Adjusting the CEC Settings 35 Turning the Power Indicator Light On or Off 35 Using the Help Menu 36 Displaying System Information 36 ...23 Adjusting the Picture Size and Position 23 Resetting the Picture Settings 24 Adjusting the Audio Settings 25 Adjusting the Advanced Audio Settings 26 Resetting the Audio Settings 26 Changing the TV Settings 27 Changing the Input Source 27 Setting the Tuner Mode 28 Scanning for Channels 28 Adding New Channels...

Download
Page 8
Restoring the TV to Factory Default Settings 37 Performing a Service Check 37 Using Guided Setup 38 Using the Info Window 39 Using the USB Media Player 40 Using the USB Media Player 40 Connecting a USB Thumb Drive to the TV 40 Playing USB Media 40 Troubleshooting & Technical Support 42 Specifications 45 Limited Warranty 47 Legal & Compliance 48 2
Restoring the TV to Factory Default Settings 37 Performing a Service Check 37 Using Guided Setup 38 Using the Info Window 39 Using the USB Media Player 40 Using the USB Media Player 40 Connecting a USB Thumb Drive to the TV 40 Playing USB Media 40 Troubleshooting & Technical Support 42 Specifications 45 Limited Warranty 47 Legal & Compliance 48 2

Download
Page 16
... TV can be used to match the connection you used (HDMI, Component, etc). Turn the TV and your device on the TV (HDMI, Component, etc). 2. Set the TV's input to display output from most devices. 1. Verify that your device has a video port that matches an available port on . Connect the appropriate...
... TV can be used to match the connection you used (HDMI, Component, etc). Turn the TV and your device on the TV (HDMI, Component, etc). 2. Set the TV's input to display output from most devices. 1. Verify that your device has a video port that matches an available port on . Connect the appropriate...
Download
Page 22
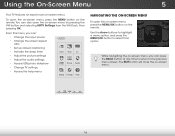
... the screen aspect ratio • Set up closed captioning • Activate the sleep timer • Adjust the picture settings • Adjust the audio settings • Access USB photo slideshow • Change TV settings • Access the help menu VIZIO ABC Input Wide CC Sleep Timer Picture... Audio Media Settings Help Navigating the On-Screen Menu To open...
... the screen aspect ratio • Set up closed captioning • Activate the sleep timer • Adjust the picture settings • Adjust the audio settings • Access USB photo slideshow • Change TV settings • Access the help menu VIZIO ABC Input Wide CC Sleep Timer Picture... Audio Media Settings Help Navigating the On-Screen Menu To open...
Download
Page 23
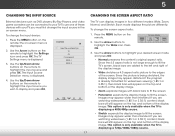
... Wide Zoom Normal Panoramic 3. Since the 4:3 aspect ratio is displayed. 2. This option is only available when the TV is displayed. 3. The TV Settings menu is displaying a 720p/1080i/1080p source. Screen Mode 2. Use the Arrow buttons to your desired screen mode and press OK: • Exit No2rDmal... the screen. The on the remote. Use the Up/Down Arrow buttons on the remote. Use the Arrow buttons to fill the screen. VIZIO Input Source Selection TV AV Component HDMI-1 HDMI-2 4. Use the Up/Down Arrow buttons on the remote to highlight the input source and...
... Wide Zoom Normal Panoramic 3. Since the 4:3 aspect ratio is displayed. 2. This option is only available when the TV is displayed. 3. The TV Settings menu is displaying a 720p/1080i/1080p source. Screen Mode 2. Use the Arrow buttons to your desired screen mode and press OK: • Exit No2rDmal... the screen. The on the remote. Use the Up/Down Arrow buttons on the remote. Use the Arrow buttons to fill the screen. VIZIO Input Source Selection TV AV Component HDMI-1 HDMI-2 4. Use the Up/Down Arrow buttons on the remote to highlight the input source and...
Download
Page 24
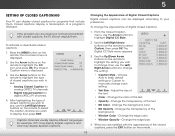
...8226; Opacity - Change the transparency of a program's dialogue. Closed captions display a transcription of the background. • Window Color - VIZIO Digital CC Style Caption Style Custom Text Size As Broadcast Color As Broadcast Opacity As Broadcast 3. Ne•tworkBGSetOtinpgsaciHtyelp- Change the edge color... channels usually display different languages. Use the Left/Right Arrow buttons on the remote. Choose Auto to keeABpC default settings or Custom to change each Input settWinidge . The Closed Caption menu is displayed. 3. The Digital CC Style menu...
...8226; Opacity - Change the transparency of a program's dialogue. Closed captions display a transcription of the background. • Window Color - VIZIO Digital CC Style Caption Style Custom Text Size As Broadcast Color As Broadcast Opacity As Broadcast 3. Ne•tworkBGSetOtinpgsaciHtyelp- Change the edge color... channels usually display different languages. Use the Left/Right Arrow buttons on the remote. Choose Auto to keeABpC default settings or Custom to change each Input settWinidge . The Closed Caption menu is displayed. 3. The Digital CC Style menu...

Download
Page 25
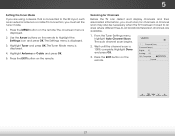
...to turn the TV off after which you want the TV to highlight Auto Power Off and press OK. Setting the Auto Power Off Feature To help save energy, your TV is VIZIO displayed. The WiAdeuto ZPooomwer-NOorfmf aml ePnaunoriasmdicisplayed. 2. The on the remote. The Sleep Timer menu is displayed... Timer menu, use the sleep timer: 1. Use the Up/Down Arrow buttons on the remote to highlight Timer and press OK. To set period of time after a set the Auto Power Off feature: 1. Press Exit. 5 Activating the Sleep Timer When activated, the TV's sleep timer will turn off: ...
...to turn the TV off after which you want the TV to highlight Auto Power Off and press OK. Setting the Auto Power Off Feature To help save energy, your TV is VIZIO displayed. The WiAdeuto ZPooomwer-NOorfmf aml ePnaunoriasmdicisplayed. 2. The on the remote. The Sleep Timer menu is displayed... Timer menu, use the sleep timer: 1. Use the Up/Down Arrow buttons on the remote to highlight Timer and press OK. To set period of time after a set the Auto Power Off feature: 1. Press Exit. 5 Activating the Sleep Timer When activated, the TV's sleep timer will turn off: ...
Download
Page 26
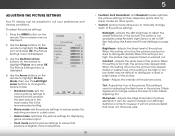
... washed out. Adjusts the edge sharpness of the picture. This is displayed. 2. To adjust the picture settings: 1. VIZIO Picture Settings Picture Mode Backlight Brightness Contrast Color Tint Sharpness Custom - + 50 - + 50 - + 50 - + 50 - +0 - +0 More 4. 5 Adjusting the Picture Settings Your TV display can be used to suit your preferences and viewing conditions. The on the...
... washed out. Adjusts the edge sharpness of the picture. This is displayed. 2. To adjust the picture settings: 1. VIZIO Picture Settings Picture Mode Backlight Brightness Contrast Color Tint Sharpness Custom - + 50 - + 50 - + 50 - + 50 - +0 - +0 More 4. 5 Adjusting the Picture Settings Your TV display can be used to suit your preferences and viewing conditions. The on the...
Download
Page 27
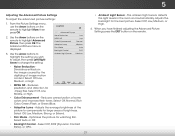
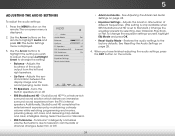
... or Extend. • Film Mode - Reduces oversaturation of image motion content. Adjusts the average brightness of the picture to change the setting: Ambient Light Sensor Medium • Noise Reduction Diminishes artifacts in the room and automatically adjusts the backlight for .mpeg files. Select Off... and distortion for the best picture. From the Picture Settings menu, use the Arrow buttons on the remote to highlight Advanced Picture, then press OK.The Advanced Picture menu is displayed. VIZIO Advanced Picture Noise Reduction Low MPEG NR Low Color Enhancement...
... or Extend. • Film Mode - Reduces oversaturation of image motion content. Adjusts the average brightness of the picture to change the setting: Ambient Light Sensor Medium • Noise Reduction Diminishes artifacts in the room and automatically adjusts the backlight for .mpeg files. Select Off... and distortion for the best picture. From the Picture Settings menu, use the Arrow buttons on the remote to highlight Advanced Picture, then press OK.The Advanced Picture menu is displayed. VIZIO Advanced Picture Noise Reduction Low MPEG NR Low Color Enhancement...
Download
Page 28
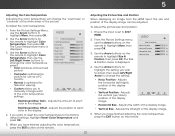
.... 22 Adjusting the Picture Size and Position When displaying an image from the HDMI input, the size and position of the color temperature settings: VIZIO Color Temperature Color Temperature Red Gain - Normal + 128 + 128 + 128 + 128 + 128 + 128 Reset Color Temperature Red/...down) position of the display NetworkimSaetgtineg.s Help • Vertical Position - The Size & Position menu is displayed. 3. From the Picture Settings menu, VIZIO use the Left/Right Arrow buttons to change the color temperature preset: • Cool produces a blue-hued picture. • Computer ...
.... 22 Adjusting the Picture Size and Position When displaying an image from the HDMI input, the size and position of the color temperature settings: VIZIO Color Temperature Color Temperature Red Gain - Normal + 128 + 128 + 128 + 128 + 128 + 128 Reset Color Temperature Red/...down) position of the display NetworkimSaetgtineg.s Help • Vertical Position - The Size & Position menu is displayed. 3. From the Picture Settings menu, VIZIO use the Left/Right Arrow buttons to change the color temperature preset: • Cool produces a blue-hued picture. • Computer ...
Download
Page 29
Highlight Yes and press OK. 4. From the Picture Settings menu, use the Arrow buttons to the factory defaults?" 3. The TV displays, "Are you sure you want to RESET Picture Settings to highlight More, then press OK. 2. Use the Arrow buttons on the remote. 23 Press the EXIT button on the remote to the factory default settings: 1. 5 Resetting the Picture Settings To reset the picture settings to highlight Reset Picture Mode, then press OK.
Highlight Yes and press OK. 4. From the Picture Settings menu, use the Arrow buttons to the factory defaults?" 3. The TV displays, "Are you sure you want to RESET Picture Settings to highlight More, then press OK. 2. Use the Arrow buttons on the remote. 23 Press the EXIT button on the remote to the factory default settings: 1. 5 Resetting the Picture Settings To reset the picture settings to highlight Reset Picture Mode, then press OK.
Download
Page 30
... fluctuations due to the factory defaults. Select On or Off. • Advanced Audio - The on the remote to change the setting: • Balance - Use the Arrow buttons to Standard.) Change the equalizer presets by maintaining a steady volume while watching programming and...clear, intelligible dialog. Select Surround or Standard. • SRS TruVolume - VIZIO Audio Audio Mode Balance - StudioSound HD™ is set to highlight the setting you have finished adjusting the audio settings, press the EXIT buttoAnBCon the remote. Adjusts the boost or attenuation of...
... fluctuations due to the factory defaults. Select On or Off. • Advanced Audio - The on the remote to change the setting: • Balance - Use the Arrow buttons to Standard.) Change the equalizer presets by maintaining a steady volume while watching programming and...clear, intelligible dialog. Select Surround or Standard. • SRS TruVolume - VIZIO Audio Audio Mode Balance - StudioSound HD™ is set to highlight the setting you have finished adjusting the audio settings, press the EXIT buttoAnBCon the remote. Adjusts the boost or attenuation of...
Download
Page 31
... Advanced Audio, then press OK. Use the Arrow buttons to highlight the setting you want to RESET Exit 2D 3D Audio Settings to a home theater audio system. Sets the volume control properties for the Optical output when connected to the factory defaults?" 4. VIZIO Advanced Audio Digital Audio Out Analog Audio Out PCM Fixed 3. From...
... Advanced Audio, then press OK. Use the Arrow buttons to highlight the setting you want to RESET Exit 2D 3D Audio Settings to a home theater audio system. Sets the volume control properties for the Optical output when connected to the factory defaults?" 4. VIZIO Advanced Audio Digital Audio Out Analog Audio Out PCM Fixed 3. From...

Download
Page 32
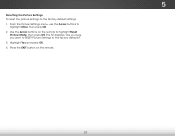
... the on the remote. Press the MENU button on -screen menu language • Set the time • Adjust the CEC settings • Adjust the Power Light settings VIZIO Settings Input Source Tuner Name Input Parental Controls Menu Language Time & Local Settings CEC Settings Power Light TV English On Changing the Input Source To change the input source...
... the on the remote. Press the MENU button on -screen menu language • Set the time • Adjust the CEC settings • Adjust the Power Light settings VIZIO Settings Input Source Tuner Name Input Parental Controls Menu Language Time & Local Settings CEC Settings Power Light TV English On Changing the Input Source To change the input source...
Download
Page 33
... press OK. 5. From the Tuner Settings menu, highlight Auto Channel Scan. The Tuner Mode menu is connected to -air broadcast television channels are using a device that is displayed. 4. The auto channel scan begins. 2. Highlight Done and press OK. 3. Press the EXIT button on the remote. VIZIO Channel Scan Channels found Digital: 0 Analog...
... press OK. 5. From the Tuner Settings menu, highlight Auto Channel Scan. The Tuner Mode menu is connected to -air broadcast television channels are using a device that is displayed. 4. The auto channel scan begins. 2. Highlight Done and press OK. 3. Press the EXIT button on the remote. VIZIO Channel Scan Channels found Digital: 0 Analog...
Download
Page 34
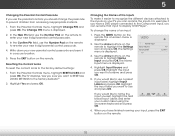
... Input Source menu, press the INPUT button on the remote. Highlight Enter Channel # and use the Number Pad on the remote to enter the channel.) 4. VIZIO Add Analog Channel Enter Channel # __ Add Channel 28 Highlight Add Channel and press OK. The partial channel search begins. 6. When the TV is 100... the Partial Channel Search and Add Analog Channel options. From the Tuner menu, highlight Partial Channel Search. Highlight Start and press OK. From the Tuner Settings menu, highlight Add Analog Channel and press OK.
... Input Source menu, press the INPUT button on the remote. Highlight Enter Channel # and use the Number Pad on the remote to enter the channel.) 4. VIZIO Add Analog Channel Enter Channel # __ Add Channel 28 Highlight Add Channel and press OK. The partial channel search begins. 6. When the TV is 100... the Partial Channel Search and Add Analog Channel options. From the Tuner menu, highlight Partial Channel Search. Highlight Start and press OK. From the Tuner Settings menu, highlight Add Analog Channel and press OK.
Download
Page 35
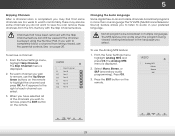
See on the remote. ABC Input Wide CC VIZIO Analog MTS Mono Stereo SAP Sleep Timer Picture Audio Network Settings Help 29 You can still be some channels are broadcast in multiple languages. The Skip Channel menu is displayed. 2..... To remove a channel: 1. 5 Skipping Channels After a channel scan is entered using the Number Pad. There may find that some channels you to listen to view. VIZIO Skip Channel 0 Test 0 x 0-1 Test 1 x 0-1 Test 2 x 0 Test 3 x 0-2 Test 4 x 0-3 Test 5 x Changing the Audio Language Some digital free-to-air and...
See on the remote. ABC Input Wide CC VIZIO Analog MTS Mono Stereo SAP Sleep Timer Picture Audio Network Settings Help 29 You can still be some channels are broadcast in multiple languages. The Skip Channel menu is displayed. 2..... To remove a channel: 1. 5 Skipping Channels After a channel scan is entered using the Number Pad. There may find that some channels you to listen to view. VIZIO Skip Channel 0 Test 0 x 0-1 Test 1 x 0-1 Test 2 x 0 Test 3 x 0-2 Test 4 x 0-3 Test 5 x Changing the Audio Language Some digital free-to-air and...

Download
Page 36
... language: English, French, or Spanish. AcWcidee ssinZogomthe NPoarmrael ntPaanloCramoinc trols Menu To access the Parental Controls menu: 1. The TV Settings menu is displayed. 2. STliEpm eeneaprtsesrcPyoiocdtuuerre,peanArtueednriottahlepdaesfsacuoldt,e0.0If0y0o. The Digital MTS menu is displayed. Press the MENU button on the...Control Passcode on the remote to highlight Parental Controls and press OK. 4. To use the Digital MTS feature: 1. VIZIO Digital MTS English French Spanish 5 Using the Parental Controls The TV's parental controls allow you to prevent the TV ...
... language: English, French, or Spanish. AcWcidee ssinZogomthe NPoarmrael ntPaanloCramoinc trols Menu To access the Parental Controls menu: 1. The TV Settings menu is displayed. 2. STliEpm eeneaprtsesrcPyoiocdtuuerre,peanArtueednriottahlepdaesfsacuoldt,e0.0If0y0o. The Digital MTS menu is displayed. Press the MENU button on the...Control Passcode on the remote to highlight Parental Controls and press OK. 4. To use the Digital MTS feature: 1. VIZIO Digital MTS English French Spanish 5 Using the Parental Controls The TV's parental controls allow you to prevent the TV ...
Download
Page 38
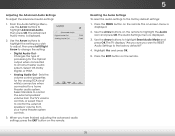
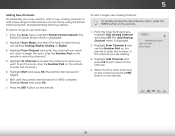
... is displayed. The Name Input menu is displayed. 3. In the New Pin field, use the Number Pad on the remote to the factory-default settings: 1. Press the EXIT button on -screen menu is displayed. 2. From the Parental Controls menu, highlight RESET LOCKS and press OK. Highlight Yes and press ... make it in a secure location. 5. Use the Arrow buttons on the remote to highlight the Settings icon and press OK. Use the Arrow buttons on the remote to highlight Name Input and press OK. VIZIO Name Input Input Source Input Labels TV TV Custom 4. If you would like to use a preset...
... is displayed. The Name Input menu is displayed. 3. In the New Pin field, use the Number Pad on the remote to the factory-default settings: 1. Press the EXIT button on -screen menu is displayed. 2. From the Parental Controls menu, highlight RESET LOCKS and press OK. Highlight Yes and press ... make it in a secure location. 5. Use the Arrow buttons on the remote to highlight the Settings icon and press OK. Use the Arrow buttons on the remote to highlight Name Input and press OK. VIZIO Name Input Input Source Input Labels TV TV Custom 4. If you would like to use a preset...


