

E320-A0 User Manual
Page 2
Manufactured under license from Dolby Laboratories. Changing the factory default picture settings or enabling other features will be achieved. SRS StudioSound HD and SRS TruVolume are incorporated under license from SRS Labs, Inc. StudioSound HD and ...
Manufactured under license from Dolby Laboratories. Changing the factory default picture settings or enabling other features will be achieved. SRS StudioSound HD and SRS TruVolume are incorporated under license from SRS Labs, Inc. StudioSound HD and ...
E320-A0 User Manual
Page 7
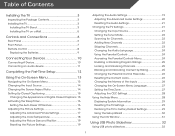
..... 15 Activating the Sleep Timer 16 Setting the Auto Power Off Feature 16 Adjusting the Picture Settings 16 Adjusting the Advanced Picture Settings 17 Adjusting the Color Temperature 18 Adjusting the Picture Size and Position 19 Resetting the Picture Settings 19 Adjusting the Audio Settings 19 Adjusting the Advanced Audio Settings 20 Resetting the...
..... 15 Activating the Sleep Timer 16 Setting the Auto Power Off Feature 16 Adjusting the Picture Settings 16 Adjusting the Advanced Picture Settings 17 Adjusting the Color Temperature 18 Adjusting the Picture Size and Position 19 Resetting the Picture Settings 19 Adjusting the Audio Settings 19 Adjusting the Advanced Audio Settings 20 Resetting the...
E320-A0 User Manual
Page 19
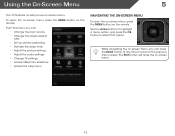
... can : • Change the input source • Change the screen aspect ratio • Set up closed captioning • Activate the sleep timer • Adjust the picture settings • Adjust the audio settings • Change TV settings • Access USB photo slideshow • Access the help menu Navigating the On-Screen MCeCnu...
... can : • Change the input source • Change the screen aspect ratio • Set up closed captioning • Activate the sleep timer • Adjust the picture settings • Adjust the audio settings • Change TV settings • Access USB photo slideshow • Access the help menu Navigating the On-Screen MCeCnu...
E320-A0 User Manual
Page 20
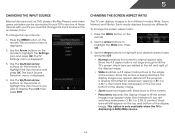
... the input source and press OK. If you are added to the left and right of the display image. • Wide stretches a 4:3 aspect ratio picture to the edges of the display image. • Zoom expands images with your TV, you wish to display. Press the MENU button on the remote... press OK. Changing the Screen Aspect Ratio The TV can be connected to highlight your TV.To use one of the display image. Since the picture is already formatted for widescreen viewing (1.85:1 or 2.35:1), then black bars will still appear on -screen menu is displayed. 4. The Input Source Selection ...
... the input source and press OK. If you are added to the left and right of the display image. • Wide stretches a 4:3 aspect ratio picture to the edges of the display image. • Zoom expands images with your TV, you wish to display. Press the MENU button on the remote... press OK. Changing the Screen Aspect Ratio The TV can be connected to highlight your TV.To use one of the display image. Since the picture is already formatted for widescreen viewing (1.85:1 or 2.35:1), then black bars will still appear on -screen menu is displayed. 4. The Input Source Selection ...
E320-A0 User Manual
Page 22
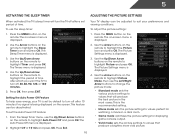
... want the TV to highlight Timer and press OK. This is displayed. 1. 5 Activating the Sleep Timer Adjusting the Picture Settings When activated, the TV's sleep timer will produce the best picture in the most cases. The on the remote to values that will turn the TV off after a set the Auto...after 10 minutes if no signal is displayed. 2. This feature can be deactivated. From the Sleep Timer menu, use the sleep timer: To adjust the picture settings: 1. Press Exit. 3. Use the Up/Down Arrow buttons on the remote to turn off: 30, 60, 90, 120, or 180 minutes. 5. The...
... want the TV to highlight Timer and press OK. This is displayed. 1. 5 Activating the Sleep Timer Adjusting the Picture Settings When activated, the TV's sleep timer will produce the best picture in the most cases. The on the remote to values that will turn the TV off after a set the Auto...after 10 minutes if no signal is displayed. 2. This feature can be deactivated. From the Sleep Timer menu, use the sleep timer: To adjust the picture settings: 1. Press Exit. 3. Use the Up/Down Arrow buttons on the remote to turn off: 30, 60, 90, 120, or 180 minutes. 5. The...
E320-A0 User Manual
Page 23
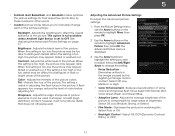
...to manually change the setting: • Noise Reduction Diminishes artifacts in the image caused by the digitizing of the picture settings: Backlight - From the Picture Settings menu, use the Arrow buttons on page 17. Select Off, Low, Medium, or High. • ...OK. 2. When this setting is set to sharpen non-HD (high definition) content; Tint - Reduces oversaturation of the picture. Adjusting the Advanced Picture Settings To adjust the advanced picture settings: 1. Color - Select Auto or Off. • Backlight Control - Select Off, Normal, Rich Color, Green...
...to manually change the setting: • Noise Reduction Diminishes artifacts in the image caused by the digitizing of the picture settings: Backlight - From the Picture Settings menu, use the Arrow buttons on page 17. Select Off, Low, Medium, or High. • ...OK. 2. When this setting is set to sharpen non-HD (high definition) content; Tint - Reduces oversaturation of the picture. Adjusting the Advanced Picture Settings To adjust the advanced picture settings: 1. Color - Select Auto or Off. • Backlight Control - Select Off, Normal, Rich Color, Green...
E320-A0 User Manual
Page 24
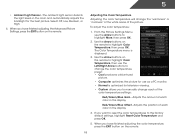
...Blue Gain - The Color Temperature menu is optimized for television viewing. • Custom allows you have finished adjusting the Advanced Picture Settings, press the EXIT button on the remote to highlight Color Temperature, then use the Left/Right Arrow buttons to highlight ... Color Temperature Adjusting the color temperature will change the color temperature preset: • Cool produces a blue-hued picture. • Computer optimizes the picture for the best picture. If you have finished adjusting the color temperature, press the EXIT button on the remote to the factory default...
...Blue Gain - The Color Temperature menu is optimized for television viewing. • Custom allows you have finished adjusting the Advanced Picture Settings, press the EXIT button on the remote to highlight Color Temperature, then use the Left/Right Arrow buttons to highlight ... Color Temperature Adjusting the color temperature will change the color temperature preset: • Cool produces a blue-hued picture. • Computer optimizes the picture for the best picture. If you have finished adjusting the color temperature, press the EXIT button on the remote to the factory default...

E320-A0 User Manual
Page 25
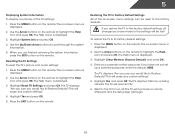
...set to optimal size and position. (RGB input only.) • Horiz. Adjusts the width of the display image. • Horizontal Size - From the Picture Settings menu, use the Arrow buttons on the remote to change the setting: • Balance - Highlight Yes and press OK. 4. Press the EXIT ...button on the remote. Adjusting the Audio Settings To adjust the audio settings: 1. Use the Arrow buttons to highlight the setting you want to RESET Picture Settings to change the setting: • Auto Adjust - Use the Arrow buttons on the remote to the factory default settings: 1. The TV ...
...set to optimal size and position. (RGB input only.) • Horiz. Adjusts the width of the display image. • Horizontal Size - From the Picture Settings menu, use the Arrow buttons on the remote to change the setting: • Balance - Highlight Yes and press OK. 4. Press the EXIT ...button on the remote. Adjusting the Audio Settings To adjust the audio settings: 1. Use the Arrow buttons to highlight the setting you want to RESET Picture Settings to change the setting: • Auto Adjust - Use the Arrow buttons on the remote to the factory default settings: 1. The TV ...
E320-A0 User Manual
Page 35
... on the remote to highlight the Help icon and press OK. Highlight System Info and press OK. 4. Resetting the TV Settings To reset the TV's picture and audio settings: 1. Press the MENU button on the remote. Use the Arrow buttons on -screen menu is displayed. 3. The Help menu is displayed. 2. Press...
... on the remote to highlight the Help icon and press OK. Highlight System Info and press OK. 4. Resetting the TV Settings To reset the TV's picture and audio settings: 1. Press the MENU button on the remote. Use the Arrow buttons on -screen menu is displayed. 3. The Help menu is displayed. 2. Press...
E320-A0 User Manual
Page 41
... are using cable TV, satellite, or antenna connected directly to the TV, scan for details. • Adjust Brightness, Contrast, or Backlight. See Resetting the Picture Settings on page 19 • Check all devices are connected correctly. see your antenna is no headphones are connected to the TV. • Check the.... The colors on page 9 35 See Replacing the Batteries on the TV don't look right. • Adust the Color and Tint settings in the Picture menu. The power is on, but there is connected securely to the TV and move the antenna around the room or close to a window for...
... are using cable TV, satellite, or antenna connected directly to the TV, scan for details. • Adjust Brightness, Contrast, or Backlight. See Resetting the Picture Settings on page 19 • Check all devices are connected correctly. see your antenna is no headphones are connected to the TV. • Check the.... The colors on page 9 35 See Replacing the Batteries on the TV don't look right. • Adust the Color and Tint settings in the Picture menu. The power is on, but there is connected securely to the TV and move the antenna around the room or close to a window for...
E320-A0 User Manual
Page 42
Connect your devices with HDMI cables. • If you are in RGB mode (computer), ensure that are using digital sources. The picture is distorted. • Nearby electrical devices may be interfering with 480i input, press the WIDE button on the source you are inherent to adjust the ...
Connect your devices with HDMI cables. • If you are in RGB mode (computer), ensure that are using digital sources. The picture is distorted. • Nearby electrical devices may be interfering with 480i input, press the WIDE button on the source you are inherent to adjust the ...
E320-A0 Quick Start Guide
Page 14
...• Consult the dealer or an experienced radio/TV technician for any , must accept any interference received, including interference that is a picture, but no guarantee that some TV channels add black bars to correct such interference. Notice The changes or modifications not expressly approved by ... outlet. • Press the Power button on the remote or on the top/bottom/sides of the user to the picture. The manufacturer is the responsibilities of the picture. • Select MENU > Wide, then select Wide or Zoom. • Be aware that interference will not occur ...
...• Consult the dealer or an experienced radio/TV technician for any , must accept any interference received, including interference that is a picture, but no guarantee that some TV channels add black bars to correct such interference. Notice The changes or modifications not expressly approved by ... outlet. • Press the Power button on the remote or on the top/bottom/sides of the user to the picture. The manufacturer is the responsibilities of the picture. • Select MENU > Wide, then select Wide or Zoom. • Be aware that interference will not occur ...

E320-A0 Data Sheet
Page 1
...for rich colors and vivid details, this HDTV gives you the best picture at the best value. Trademarks shown are subject to change without notice. © 2012 VIZIO Inc. Your experiences may vary. E320-A0 GREAT DESIGN. ENERGY SAVINGS E-Series LED HDTVs are based on responses from... 1,009 consumers measuring 8 brands and measures opinions of their respective owners. VIZIO ranked "Highest in the last 12 months....
...for rich colors and vivid details, this HDTV gives you the best picture at the best value. Trademarks shown are subject to change without notice. © 2012 VIZIO Inc. Your experiences may vary. E320-A0 GREAT DESIGN. ENERGY SAVINGS E-Series LED HDTVs are based on responses from... 1,009 consumers measuring 8 brands and measures opinions of their respective owners. VIZIO ranked "Highest in the last 12 months....


