E320-A0 User Manual
Page 1
USER GUIDE MMOODDEELLS // E3D320VX // E3ED43220V0X -A0 // E3D470VX Installing your new tv CONTROLS & CONNECTIONS connecting your devices using the on-screen menu using the usb media player TROUBLESHOOTING & SUPPORT Help, SPECs, warranty & LEGAL
USER GUIDE MMOODDEELLS // E3D320VX // E3ED43220V0X -A0 // E3D470VX Installing your new tv CONTROLS & CONNECTIONS connecting your devices using the on-screen menu using the usb media player TROUBLESHOOTING & SUPPORT Help, SPECs, warranty & LEGAL
E320-A0 User Manual
Page 7
... 29 Resetting the TV Settings 29 Restoring the TV to Factory Default Settings 29 Using the Setup Wizard 30 Using the Info Window 31 Using USB Photo Slideshow 32 Using USB photo slideshow 32 1
... 29 Resetting the TV Settings 29 Restoring the TV to Factory Default Settings 29 Using the Setup Wizard 30 Using the Info Window 31 Using USB Photo Slideshow 32 Using USB photo slideshow 32 1
E320-A0 User Manual
Page 8
Connecting a USB Thumb Drive to the TV 32 Playing USB Media 32 Troubleshooting & Technical Support 34 Specifications 37 Limited Warranty 38 Legal & Compliance 39 2
Connecting a USB Thumb Drive to the TV 32 Playing USB Media 32 Troubleshooting & Technical Support 34 Specifications 37 Limited Warranty 38 Legal & Compliance 39 2
E320-A0 User Manual
Page 12
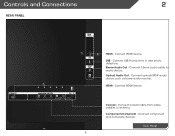
Controls and Connections 2 Rear Panel HDMI - Connect 3.5mm audio cable to view photo SIDE slideshow. Connect optical/SPDIF audio device, such as home audio receiver. Connect component and composite devices. Optical Audio Out - Rear Panel 6 USB - Coaxial - Connect HDMI device. Stereo Audio Out - Connect HDMI device. Connect coaxial cable from cable, satellite, or antenna. Connect USB thumb drive to audio device. HDMI - Component/Composite -
Controls and Connections 2 Rear Panel HDMI - Connect 3.5mm audio cable to view photo SIDE slideshow. Connect optical/SPDIF audio device, such as home audio receiver. Connect component and composite devices. Optical Audio Out - Rear Panel 6 USB - Coaxial - Connect HDMI device. Stereo Audio Out - Connect HDMI device. Connect coaxial cable from cable, satellite, or antenna. Connect USB thumb drive to audio device. HDMI - Component/Composite -
E320-A0 User Manual
Page 14
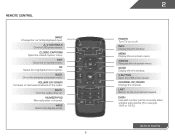
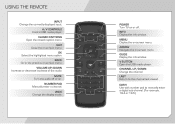
... of the audio. WIDE Switch the display mode. 8 2 Power Turn TV on or off or on. Guide Display the info window. V Button Open the USB photo viewer. Dash Use with number pad to the previous on -screen menu. Info Display the info window. Arrow Navigate the on -screen menu. Back... channel last viewed. Remote Control Input Change the currently-displayed input. Mute Turn the audio off . Channel Up/Down Change the channel. A/V Controls Control USB photo viewer. Closed Captions Open the closed caption menu. Exit Close the on -screen menu. Menu Display the on -screen menu.
... of the audio. WIDE Switch the display mode. 8 2 Power Turn TV on or off or on. Guide Display the info window. V Button Open the USB photo viewer. Dash Use with number pad to the previous on -screen menu. Info Display the info window. Arrow Navigate the on -screen menu. Back... channel last viewed. Remote Control Input Change the currently-displayed input. Mute Turn the audio off . Channel Up/Down Change the channel. A/V Controls Control USB photo viewer. Closed Captions Open the closed caption menu. Exit Close the on -screen menu. Menu Display the on -screen menu.
E320-A0 User Manual
Page 19
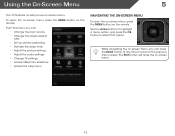
...; Set up closed captioning • Activate the sleep timer • Adjust the picture settings • Adjust the audio settings • Change TV settings • Access USB photo slideshow • Access the help menu Navigating the On-Screen MCeCnu To open the on-screen menu, press the MENU button on -screen menu...
...; Set up closed captioning • Activate the sleep timer • Adjust the picture settings • Adjust the audio settings • Change TV settings • Access USB photo slideshow • Access the help menu Navigating the On-Screen MCeCnu To open the on-screen menu, press the MENU button on -screen menu...
E320-A0 User Manual
Page 38
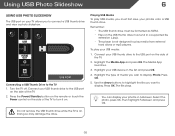
... button on the remote or touch the Power control on the side of the TV. 2. To play your photos onto a USB thumb drive. Connect your USB thumb drive to the USB port on the side of the TV to display: Photo. Select the photo, press OK, then highlight Fullscreen and press OK...display your photos in the list and press OK. 4. SIDE USB PORT Connecting a USB Thumb Drive to display. Do not remove the USB thumb drive while the TV is not designed to connect a USB thumb drive and view a photo slideshow. Playing USB Media To play USB media, you must end in a supported file extension (.jpg). ...
... button on the remote or touch the Power control on the side of the TV. 2. To play your photos onto a USB thumb drive. Connect your USB thumb drive to the USB port on the side of the TV to display: Photo. Select the photo, press OK, then highlight Fullscreen and press OK...display your photos in the list and press OK. 4. SIDE USB PORT Connecting a USB Thumb Drive to display. Do not remove the USB thumb drive while the TV is not designed to connect a USB thumb drive and view a photo slideshow. Playing USB Media To play USB media, you must end in a supported file extension (.jpg). ...

E320-A0 User Manual
Page 39
...source, highlight it and press OK. Back Button Highlight this area and pressing Left/Right Arrow. 33 PHOTO VIEWER 6 Connected Sources Displays connected USB devices. Back Button Highlight and press OK to return to the previous screen. You can browse between pages by Name or Date View Thumbnails/...List View Folder Settings Toggle Music/Photos Photo Infomation Displays name, resolution, and file size for currently selected photo. Page Information If your USB thumb drive has more files than can move between files using the Arrow and OK buttons on a single screen, you would like to...
...source, highlight it and press OK. Back Button Highlight this area and pressing Left/Right Arrow. 33 PHOTO VIEWER 6 Connected Sources Displays connected USB devices. Back Button Highlight and press OK to return to the previous screen. You can browse between pages by Name or Date View Thumbnails/...List View Folder Settings Toggle Music/Photos Photo Infomation Displays name, resolution, and file size for currently selected photo. Page Information If your USB thumb drive has more files than can move between files using the Arrow and OK buttons on a single screen, you would like to...
E320-A0 User Manual
Page 43
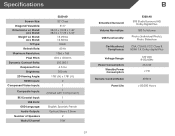
... Brightness: 2D Viewing Angle: HDMI Inputs: Component Video Inputs: Composite Inputs: RF/Coaxial Input: USB Ports: OSD Language: Audio Outputs: Number of Speakers Watts/Channel E320-A0 32" Class 31.5" 28.74 x 19.25 x 7.46" 28.74 x 17.25 x...1 1 English, Spanish, French Optical, Stereo 3.5mm 2 10W B Simulated Surround: Volume Normalizer: USB Functionality: Certifications/ Compliance: Voltage Range: Power Consumption: Standby Power Consumption: Remote Control Model: Panel Life: E320-A0 SRS StudioSurround HD, Dolby Digital Plus SRS TruVolume Photo (Individual Photo), Photo Slideshow CSA, CSA-US,...
... Brightness: 2D Viewing Angle: HDMI Inputs: Component Video Inputs: Composite Inputs: RF/Coaxial Input: USB Ports: OSD Language: Audio Outputs: Number of Speakers Watts/Channel E320-A0 32" Class 31.5" 28.74 x 19.25 x 7.46" 28.74 x 17.25 x...1 1 English, Spanish, French Optical, Stereo 3.5mm 2 10W B Simulated Surround: Volume Normalizer: USB Functionality: Certifications/ Compliance: Voltage Range: Power Consumption: Standby Power Consumption: Remote Control Model: Panel Life: E320-A0 SRS StudioSurround HD, Dolby Digital Plus SRS TruVolume Photo (Individual Photo), Photo Slideshow CSA, CSA-US,...
E320-A0 Quick Start Guide
Page 5
... -screen menu. VOLUME UP/DOWN Increase or decrease loudness of the audio. INFO Display the info window. GUIDE Display the info window. V BUTTON Open the USB media player. LAST Return to manually enter a digital sub-channel. (For example, 18-4 or 18-5.) CLOSED CAPTIONS Open the closed caption menu. ARROW Navigate the...
... -screen menu. VOLUME UP/DOWN Increase or decrease loudness of the audio. INFO Display the info window. GUIDE Display the info window. V BUTTON Open the USB media player. LAST Return to manually enter a digital sub-channel. (For example, 18-4 or 18-5.) CLOSED CAPTIONS Open the closed caption menu. ARROW Navigate the...

E320-A0 Data Sheet
Page 2
... can be used are the intellectual property of their respective owners. all -in streaming entertainment. VIZIO, the V logo, Where Vision Meets Value, Razor LED and other VIZIO trademarks are for high definition video, 3D, audio and Ethernet. rev 09242012 Trademarks shown are ...ENERGY STAR® 5.3 36W 100mm (V) x 100mm (H), M4 x 0.7mm x 10mm WARRANTY 1 year CONNECTIONS HDMI Inputs Component Video Inputs Composite Inputs RF Antenna Input USB Ports Stereo Audio (RCA) Number of Speakers / Watts Premium Audio 2 1 1 (shared with component) 1 1 1 2 x 5W SRS TruVolume™ SRS ...
... can be used are the intellectual property of their respective owners. all -in streaming entertainment. VIZIO, the V logo, Where Vision Meets Value, Razor LED and other VIZIO trademarks are for high definition video, 3D, audio and Ethernet. rev 09242012 Trademarks shown are ...ENERGY STAR® 5.3 36W 100mm (V) x 100mm (H), M4 x 0.7mm x 10mm WARRANTY 1 year CONNECTIONS HDMI Inputs Component Video Inputs Composite Inputs RF Antenna Input USB Ports Stereo Audio (RCA) Number of Speakers / Watts Premium Audio 2 1 1 (shared with component) 1 1 1 2 x 5W SRS TruVolume™ SRS ...


