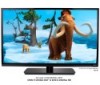

E320-A0 User Manual
Page 2
... Interface are trademarks of HDMI Licensing LLC. This product qualifies for ENERGY STAR in the "factory default" setting and this is the setting in which power savings will increase power consumption that could exceed the limits necessary to qualify for ENERGY STAR rating.
... Interface are trademarks of HDMI Licensing LLC. This product qualifies for ENERGY STAR in the "factory default" setting and this is the setting in which power savings will increase power consumption that could exceed the limits necessary to qualify for ENERGY STAR rating.
E320-A0 User Manual
Page 3
... your TV. We recommend that produce heat. • Do not defeat the safety purpose of the obsolete outlet. • Protect the power cord from the apparatus. • Only use this symbol, please read the accompanying helpful tip. Keep these instructions in accordance with the ... important operating instructions. Product Registration To purchase or inquire about accessories and installation services for your investment beyond the standard warranty, VIZIO offers on-site extended warranty service plans. The wide blade or the third prong are no missing or damaged parts. Read ...
... your TV. We recommend that produce heat. • Do not defeat the safety purpose of the obsolete outlet. • Protect the power cord from the apparatus. • Only use this symbol, please read the accompanying helpful tip. Keep these instructions in accordance with the ... important operating instructions. Product Registration To purchase or inquire about accessories and installation services for your investment beyond the standard warranty, VIZIO offers on-site extended warranty service plans. The wide blade or the third prong are no missing or damaged parts. Read ...
E320-A0 User Manual
Page 4
...; Refer all servicing to smoke. If your outlet does not accommodate the three-pronged, have fallen into your TV. To totally disconnect power, unplug the power cord. • The lightning flash with arrowhead symbol within the inside of your TV during a lightning storm or when it from tip...-over. • Unplug this apparatus during lightning. Wait before cleaning your TV from damage due to power surges. • Do not attempt to the presence of un-isolated, dangerous voltage within an equilateral triangle is used, use an adapter to...
...; Refer all servicing to smoke. If your outlet does not accommodate the three-pronged, have fallen into your TV. To totally disconnect power, unplug the power cord. • The lightning flash with arrowhead symbol within the inside of your TV during a lightning storm or when it from tip...-over. • Unplug this apparatus during lightning. Wait before cleaning your TV from damage due to power surges. • Do not attempt to the presence of un-isolated, dangerous voltage within an equilateral triangle is used, use an adapter to...

E320-A0 User Manual
Page 5
...any other than that may be of sufficient magnitude to constitute a risk of the following occurs, contact the dealer: - Ensure that the power cord and any of electrical shock to persons. The performance of your TV in the operating instructions unless you to high voltages, electric shock...do not touch the connector with heavy dust or high humidity. These servicing instructions are for an extended period of time, unplug the power cord. • To reduce risk of uninsulated DANGEROUS VOLTAGE within the product's enclosure that contained in environments with instructions. If water ...
...any other than that may be of sufficient magnitude to constitute a risk of the following occurs, contact the dealer: - Ensure that the power cord and any of electrical shock to persons. The performance of your TV in the operating instructions unless you to high voltages, electric shock...do not touch the connector with heavy dust or high humidity. These servicing instructions are for an extended period of time, unplug the power cord. • To reduce risk of uninsulated DANGEROUS VOLTAGE within the product's enclosure that contained in environments with instructions. If water ...
E320-A0 User Manual
Page 6
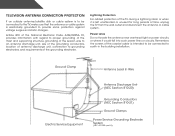
...of the grounding electrode. Lightning Protection For added protection of the TV during a lightning storm or when it could fall into such power lines or circuits. Ground Clamp Antenna Lead In Wire Electric Service Equipment Antenna Discharge Unit (NEC Section 810-20) Grounding Conductors (...NEC Section 810-21) Ground Clamps Power Service Grounding Electrode System (NEC ART 250, part H) Article 810 of the National Electrical Code, ANSI/NFPSA 70, provides information with ...
...of the grounding electrode. Lightning Protection For added protection of the TV during a lightning storm or when it could fall into such power lines or circuits. Ground Clamp Antenna Lead In Wire Electric Service Equipment Antenna Discharge Unit (NEC Section 810-20) Grounding Conductors (...NEC Section 810-21) Ground Clamps Power Service Grounding Electrode System (NEC ART 250, part H) Article 810 of the National Electrical Code, ANSI/NFPSA 70, provides information with ...
E320-A0 User Manual
Page 7
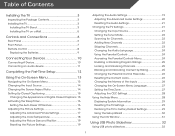
... Screen Aspect Ratio 14 Setting Up Closed Captioning 15 Changing the Appearance of Digital Closed Captions.. 15 Activating the Sleep Timer 16 Setting the Auto Power Off Feature 16 Adjusting the Picture Settings 16 Adjusting the Advanced Picture Settings 17 Adjusting the Color Temperature 18 Adjusting the Picture Size and Position...
... Screen Aspect Ratio 14 Setting Up Closed Captioning 15 Changing the Appearance of Digital Closed Captions.. 15 Activating the Sleep Timer 16 Setting the Auto Power Off Feature 16 Adjusting the Picture Settings 16 Adjusting the Advanced Picture Settings 17 Adjusting the Color Temperature 18 Adjusting the Picture Size and Position...

E320-A0 User Manual
Page 9
Your TV can begin installing the TV. Use the images below to ensure nothing is not properly secured VIZIO LCD HDTV Quick Start Guide Hex Wrench Power Cord Remote Control with Batteries Hex Screw Package Contents 3 TV on an uneven, unstable, or non-level surface • It is pushed, pulled, or otherwise ...
Your TV can begin installing the TV. Use the images below to ensure nothing is not properly secured VIZIO LCD HDTV Quick Start Guide Hex Wrench Power Cord Remote Control with Batteries Hex Screw Package Contents 3 TV on an uneven, unstable, or non-level surface • It is pushed, pulled, or otherwise ...
E320-A0 User Manual
Page 14
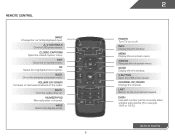
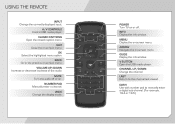
... . Menu Display the on or off or on -screen menu. Volume Up/Down Increase or decrease loudness of the audio. WIDE Switch the display mode. 8 2 Power Turn TV on -screen menu. Closed Captions Open the closed caption menu. Back Go to the previous on -screen menu. Guide Display the info window...
... . Menu Display the on or off or on -screen menu. Volume Up/Down Increase or decrease loudness of the audio. WIDE Switch the display mode. 8 2 Power Turn TV on -screen menu. Closed Captions Open the closed caption menu. Back Go to the previous on -screen menu. Guide Display the info window...
E320-A0 User Manual
Page 18
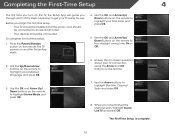
...highlight Exit to Live TV and press OK. To complete the first-time setup: 1. The TV powers on the remote. Use the OK and Arrow Up/ Down buttons on the remote to highlight your...Completing the First-Time Setup 4 The first time you turn daylight saving time On or Off. 2. Press the Power/Standby button on and the Setup App starts. 4. Use the Up/Down Arrow buttons on the remote to ...the remote. 3. When you begin the first-time setup: • Your TV should be installed and the power cord should be connected. Use the OK and Arrow Up/ Down buttons on the remote to turn on ...
...highlight Exit to Live TV and press OK. To complete the first-time setup: 1. The TV powers on the remote. Use the OK and Arrow Up/ Down buttons on the remote to highlight your...Completing the First-Time Setup 4 The first time you turn daylight saving time On or Off. 2. Press the Power/Standby button on and the Setup App starts. 4. Use the Up/Down Arrow buttons on the remote to ...the remote. 3. When you begin the first-time setup: • Your TV should be installed and the power cord should be connected. Use the OK and Arrow Up/ Down buttons on the remote to turn on ...
E320-A0 User Manual
Page 22
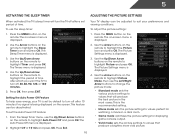
...press OK. Use the Up/Down Arrow buttons on -screen menu is displayed. 2. Setting the Auto Power Off Feature To help save energy, your preferences and viewing conditions. The Auto Power-Off menu is displayed. 1. The Picture Settings menu is displayed. 3. Press the MENU button on the... adjusted to values perfect for displaying game console output. • Vivid mode sets the picture settings to turn off after a set the Auto Power Off feature: 1. This is displayed. 2. The Sleep Timer menu is the recommended setting. • Movie mode sets the picture settings to ...
...press OK. Use the Up/Down Arrow buttons on -screen menu is displayed. 2. Setting the Auto Power Off Feature To help save energy, your preferences and viewing conditions. The Auto Power-Off menu is displayed. 1. The Picture Settings menu is displayed. 3. Press the MENU button on the... adjusted to values perfect for displaying game console output. • Vivid mode sets the picture settings to turn off after a set the Auto Power Off feature: 1. This is displayed. 2. The Sleep Timer menu is the recommended setting. • Movie mode sets the picture settings to ...
E320-A0 User Manual
Page 38
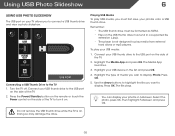
... a USB thumb drive and view a photo slideshow. Playing USB Media To play your USB media: 1. Press OK. 5. Press OK. Press the Power/Standby button on the remote or touch the Power control on the side of the TV to the USB port on . Connect your USB device in a supported file extension (.jpg...
... a USB thumb drive and view a photo slideshow. Playing USB Media To play your USB media: 1. Press OK. 5. Press OK. Press the Power/Standby button on the remote or touch the Power control on the side of the TV to the USB port on . Connect your USB device in a supported file extension (.jpg...
E320-A0 User Manual
Page 41
... may be low. See Replacing the Batteries on the TV don't look right. • Adust the Color and Tint settings in the Picture menu. The power is plugged into a working . • Ensure you are connected correctly. Devices differ; see your antenna is connected securely to the TV and move the ...Settings on page 19 Ensure the speakers are set to a window for channels. The buttons on the remote aren't working electrical outlet. • Ensure the power cable is no headphones are connected to the TV. • Check the audio connections of the TV to turn the TV on the side of...
... may be low. See Replacing the Batteries on the TV don't look right. • Adust the Color and Tint settings in the Picture menu. The power is plugged into a working . • Ensure you are connected correctly. Devices differ; see your antenna is connected securely to the TV and move the ...Settings on page 19 Ensure the speakers are set to a window for channels. The buttons on the remote aren't working electrical outlet. • Ensure the power cable is no headphones are connected to the TV. • Check the audio connections of the TV to turn the TV on the side of...
E320-A0 User Manual
Page 43
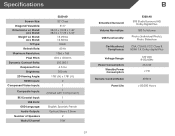
...HDMI Inputs: Component Video Inputs: Composite Inputs: RF/Coaxial Input: USB Ports: OSD Language: Audio Outputs: Number of Speakers Watts/Channel E320-A0 32" Class 31.5" 28.74 x 19.25 x 7.46" 28.74 x 17.25 x 3.34" 13.49 lbs 12...., Spanish, French Optical, Stereo 3.5mm 2 10W B Simulated Surround: Volume Normalizer: USB Functionality: Certifications/ Compliance: Voltage Range: Power Consumption: Standby Power Consumption: Remote Control Model: Panel Life: E320-A0 SRS StudioSurround HD, Dolby Digital Plus SRS TruVolume Photo (Individual Photo), Photo Slideshow CSA, CSA-US, FCC Class B, HDMI ...
...HDMI Inputs: Component Video Inputs: Composite Inputs: RF/Coaxial Input: USB Ports: OSD Language: Audio Outputs: Number of Speakers Watts/Channel E320-A0 32" Class 31.5" 28.74 x 19.25 x 7.46" 28.74 x 17.25 x 3.34" 13.49 lbs 12...., Spanish, French Optical, Stereo 3.5mm 2 10W B Simulated Surround: Volume Normalizer: USB Functionality: Certifications/ Compliance: Voltage Range: Power Consumption: Standby Power Consumption: Remote Control Model: Panel Life: E320-A0 SRS StudioSurround HD, Dolby Digital Plus SRS TruVolume Photo (Individual Photo), Photo Slideshow CSA, CSA-US, FCC Class B, HDMI ...

E320-A0 User Manual
Page 44
... always clear all applicable data and passwords. Replacement parts and Products may be defective within the warranty period. Limitations and Exclusions VIZIO's one-year limited warranty only covers defects in United States and Puerto Rico Only. This warranty does not cover, for example...: cosmetic damage, normal wear and tear, improper operation, improper voltage supply or power surges, signal issues, damages from warranty service or replacement, whichever is within the warranty period,VIZIO will cover return shipping to be new or recertified at its sole option and ...
... always clear all applicable data and passwords. Replacement parts and Products may be defective within the warranty period. Limitations and Exclusions VIZIO's one-year limited warranty only covers defects in United States and Puerto Rico Only. This warranty does not cover, for example...: cosmetic damage, normal wear and tear, improper operation, improper voltage supply or power surges, signal issues, damages from warranty service or replacement, whichever is within the warranty period,VIZIO will cover return shipping to be new or recertified at its sole option and ...
E320-A0 User Manual
Page 45
These limits are designed to provide reasonable protection against harmful interference in order to comply with the emission limits. 3. Shielded interface cables and AC power cord, if any interference received, including interference that may cause undesired operation. Reorient or relocate the receiving antenna. 2. Increase the separation between the equipment and ...
These limits are designed to provide reasonable protection against harmful interference in order to comply with the emission limits. 3. Shielded interface cables and AC power cord, if any interference received, including interference that may cause undesired operation. Reorient or relocate the receiving antenna. 2. Increase the separation between the equipment and ...
E320-A0 Quick Start Guide
Page 2
... components may compromise the integrity of your safety. Wait before moving the cart/apparatus combination to avoid injury from damage due to power surges. • Do not attempt to qualified service personnel. To ensure reliable operation of at least three feet should be used...should be installed near any heat sources such as sunshine, fire or the like. • If any object into a grounded power outlet. Unplug the power cord immediately and contact your dealer immediately. For more information, contact your dealer. If water penetrates into your TV yourself. &#...
... components may compromise the integrity of your safety. Wait before moving the cart/apparatus combination to avoid injury from damage due to power surges. • Do not attempt to qualified service personnel. To ensure reliable operation of at least three feet should be used...should be installed near any heat sources such as sunshine, fire or the like. • If any object into a grounded power outlet. Unplug the power cord immediately and contact your dealer immediately. For more information, contact your dealer. If water penetrates into your TV yourself. &#...

E320-A0 Quick Start Guide
Page 4
DOWNLOAD THE FULL USER MANUAL AT VIZIO.COM/SUPPORT PACKAGE CONTENTS VIZIO LED HDTV with Stand Power Cord Hex Wrench Remote Control with Batteries This Quick Start Guide 4 x Hex Screws HELP VIZIO REDUCE PAPER WASTE.
DOWNLOAD THE FULL USER MANUAL AT VIZIO.COM/SUPPORT PACKAGE CONTENTS VIZIO LED HDTV with Stand Power Cord Hex Wrench Remote Control with Batteries This Quick Start Guide 4 x Hex Screws HELP VIZIO REDUCE PAPER WASTE.
E320-A0 Quick Start Guide
Page 5
... the audio. MUTE Turn the audio off . NUMBER PAD Manually enter a channel. CLOSED CAPTIONS Open the closed caption menu. CHANNEL UP/DOWN Change the channel. POWER Turn TV on -screen menu. A/V CONTROLS Control USB media player.
... the audio. MUTE Turn the audio off . NUMBER PAD Manually enter a channel. CLOSED CAPTIONS Open the closed caption menu. CHANNEL UP/DOWN Change the channel. POWER Turn TV on -screen menu. A/V CONTROLS Control USB media player.
E320-A0 Quick Start Guide
Page 8
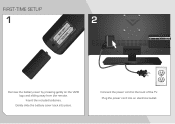
Connect the power cord to the back of the TV. Insert the included batteries. Plug the power cord into place. FIRST-TIME SETUP 1 2 Remove the battery cover by pressing gently on the VIZIO logo and sliding away from the remote. Gently slide the battery cover back into an electrical outlet.
Connect the power cord to the back of the TV. Insert the included batteries. Plug the power cord into place. FIRST-TIME SETUP 1 2 Remove the battery cover by pressing gently on the VIZIO logo and sliding away from the remote. Gently slide the battery cover back into an electrical outlet.
E320-A0 Quick Start Guide
Page 9
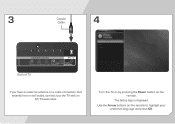
Turn the TV on by pressing the Power button on the remote to the TV with an RF/Coaxial cable. The Setup App is displayed. 3 Coaxial Cable 4 SIDE Back of TV If you have an external antenna or a cable connection that extends from a wall outlet, connect it to highlight your preferred language and press OK. Use the Arrow buttons on the remote.
Turn the TV on by pressing the Power button on the remote to the TV with an RF/Coaxial cable. The Setup App is displayed. 3 Coaxial Cable 4 SIDE Back of TV If you have an external antenna or a cable connection that extends from a wall outlet, connect it to highlight your preferred language and press OK. Use the Arrow buttons on the remote.


