
E320-A0 User Manual
Page 2
... registered trademarks of SRS Labs, Inc. This product qualifies for ENERGY STAR rating. Changing the factory default picture settings or enabling other features will increase power consumption that could exceed the limits necessary to qualify for ENERGY STAR in the "factory default" setting and this is the setting in which...
... registered trademarks of SRS Labs, Inc. This product qualifies for ENERGY STAR rating. Changing the factory default picture settings or enabling other features will increase power consumption that could exceed the limits necessary to qualify for ENERGY STAR in the "factory default" setting and this is the setting in which...
E320-A0 User Manual
Page 3
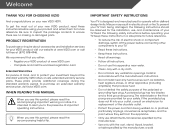
...operating instructions. These plans provide additional coverage during the standard warranty period. Welcome Thank You for replacement of your new VIZIO product, read the accompanying important warning or notice. Install in electric shock or fire.To prevent your TV from being damaged,...If the provided plug does not fit into your new VIZIO HDTV. To get the most out of the obsolete outlet. • Protect the power cord from being walked on your outlet, consult an electrician for Choosing VIZIO And congratulations on or pinched, particularly at (877) ...
...operating instructions. These plans provide additional coverage during the standard warranty period. Welcome Thank You for replacement of your new VIZIO product, read the accompanying important warning or notice. Install in electric shock or fire.To prevent your TV from being damaged,...If the provided plug does not fit into your new VIZIO HDTV. To get the most out of the obsolete outlet. • Protect the power cord from being walked on your outlet, consult an electrician for Choosing VIZIO And congratulations on or pinched, particularly at (877) ...
E320-A0 User Manual
Page 4
...in the back and bottom of the cabinet are not sure of the type of the grounded plug. • When connected to a power outlet, power is damaged, liquid has been spilled or objects have an electrician install the correct outlet, or use caution when moving your TV from damage... only from overheating, be used for long period of your TV. If your outlet does not accommodate the three-pronged, have fallen into a grounded power outlet. Doing so could short circuit parts causing a fire or electric shock. This is equipped with a three-pronged grounded plug (a plug with the...
...in the back and bottom of the cabinet are not sure of the type of the grounded plug. • When connected to a power outlet, power is damaged, liquid has been spilled or objects have an electrician install the correct outlet, or use caution when moving your TV from damage... only from overheating, be used for long period of your TV. If your outlet does not accommodate the three-pronged, have fallen into a grounded power outlet. Doing so could short circuit parts causing a fire or electric shock. This is equipped with a three-pronged grounded plug (a plug with the...

E320-A0 User Manual
Page 5
... user to the presence of electrical shock to dripping or splashing and no objects fill with instructions. Incorrect polarities may function abnormally. The power cord fails or frays. - The performance of electric shock, do so. Liquid sprays or any of the following occurs, contact the ...CAUTION - Do not expose your TV yourself. • Avoid using dropped or damaged appliances. If any servicing other moisture. - Unplug the power cord immediately and contact your TV in accordance with liquids, such as vases, shall be exposed to persons. Operating your dealer for use of ...
... user to the presence of electrical shock to dripping or splashing and no objects fill with instructions. Incorrect polarities may function abnormally. The power cord fails or frays. - The performance of electric shock, do so. Liquid sprays or any of the following occurs, contact the ...CAUTION - Do not expose your TV yourself. • Avoid using dropped or damaged appliances. If any servicing other moisture. - Unplug the power cord immediately and contact your TV in accordance with liquids, such as vases, shall be exposed to persons. Operating your dealer for use of ...
E320-A0 User Manual
Page 6
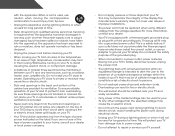
... Ground Clamp Antenna Lead In Wire Electric Service Equipment Antenna Discharge Unit (NEC Section 810-20) Grounding Conductors (NEC Section 810-21) Ground Clamps Power Service Grounding Electrode System (NEC ART 250, part H) Remember, the screen of the coaxial cable is left unattended or unused for long periods of... the TV during a lightning storm or when it could fall into such power lines or circuits. Power Lines Do not locate the antenna near overhead light or power circuits, or where it is intended to be connected to the TV, make sure that the antenna ...
... Ground Clamp Antenna Lead In Wire Electric Service Equipment Antenna Discharge Unit (NEC Section 810-20) Grounding Conductors (NEC Section 810-21) Ground Clamps Power Service Grounding Electrode System (NEC ART 250, part H) Remember, the screen of the coaxial cable is left unattended or unused for long periods of... the TV during a lightning storm or when it could fall into such power lines or circuits. Power Lines Do not locate the antenna near overhead light or power circuits, or where it is intended to be connected to the TV, make sure that the antenna ...
E320-A0 User Manual
Page 7
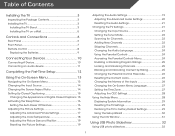
... Screen Aspect Ratio 14 Setting Up Closed Captioning 15 Changing the Appearance of Digital Closed Captions.. 15 Activating the Sleep Timer 16 Setting the Auto Power Off Feature 16 Adjusting the Picture Settings 16 Adjusting the Advanced Picture Settings 17 Adjusting the Color Temperature 18 Adjusting the Picture Size and Position...
... Screen Aspect Ratio 14 Setting Up Closed Captioning 15 Changing the Appearance of Digital Closed Captions.. 15 Activating the Sleep Timer 16 Setting the Auto Power Off Feature 16 Adjusting the Picture Settings 16 Adjusting the Advanced Picture Settings 17 Adjusting the Color Temperature 18 Adjusting the Picture Size and Position...

E320-A0 User Manual
Page 9
... TV from falling over if: • It is placed on Stand Use the images below to ensure nothing is not properly secured VIZIO LCD HDTV Quick Start Guide Hex Wrench Power Cord Remote Control with Batteries Hex Screw Package Contents 3 TV on an uneven, unstable, or non-level surface • It is...
... TV from falling over if: • It is placed on Stand Use the images below to ensure nothing is not properly secured VIZIO LCD HDTV Quick Start Guide Hex Wrench Power Cord Remote Control with Batteries Hex Screw Package Contents 3 TV on an uneven, unstable, or non-level surface • It is...
E320-A0 User Manual
Page 14
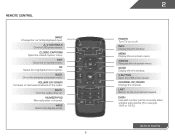
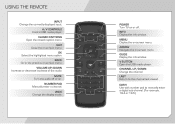
.... Arrow Navigate the on or off or on -screen menu. A/V Controls Control USB photo viewer. Number Pad Manually enter a channel. WIDE Switch the display mode. 8 2 Power Turn TV on -screen menu. Guide Display the info window. Channel Up/Down Change the channel.
.... Arrow Navigate the on or off or on -screen menu. A/V Controls Control USB photo viewer. Number Pad Manually enter a channel. WIDE Switch the display mode. 8 2 Power Turn TV on -screen menu. Guide Display the info window. Channel Up/Down Change the channel.
E320-A0 User Manual
Page 18
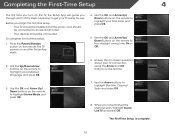
... you through each of the steps necessary to turn daylight saving time On or Off. 2. Press the Power/Standby button on and the Setup App starts. 4. Use the OK and Arrow Up/ Down Buttons on... Scan and press OK. 8. Use the Arrow buttons to highlight your TV ready for use. The TV powers on the remote. Use the OK and Arrow Up/ Down buttons on the remote to an electrical outlet.... setup: 1. When you begin the first-time setup: • Your TV should be installed and the power cord should be connected to highlight your TV connection using the Arrow and OK buttons on the remote to ...
... you through each of the steps necessary to turn daylight saving time On or Off. 2. Press the Power/Standby button on and the Setup App starts. 4. Use the OK and Arrow Up/ Down Buttons on... Scan and press OK. 8. Use the Arrow buttons to highlight your TV ready for use. The TV powers on the remote. Use the OK and Arrow Up/ Down buttons on the remote to an electrical outlet.... setup: 1. When you begin the first-time setup: • Your TV should be installed and the power cord should be connected to highlight your TV connection using the Arrow and OK buttons on the remote to ...
E320-A0 User Manual
Page 22
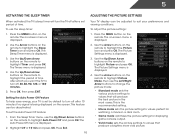
.../Down Arrow buttons on the remote to highlight the Sleep Timer icon and press OK. The Picture Settings menu is displayed. 2. To set the Auto Power Off feature: 1. Use the Arrow buttons on the screen. Use the Up/Down Arrow buttons on the remote. Use the Up/Down Arrow buttons on... the remote to highlight Auto Power Off and press OK. Use the Arrow buttons on the remote to suit your TV is set by default to highlight the Picture icon and...
.../Down Arrow buttons on the remote to highlight the Sleep Timer icon and press OK. The Picture Settings menu is displayed. 2. To set the Auto Power Off feature: 1. Use the Arrow buttons on the screen. Use the Up/Down Arrow buttons on the remote. Use the Up/Down Arrow buttons on... the remote to highlight Auto Power Off and press OK. Use the Arrow buttons on the remote to suit your TV is set by default to highlight the Picture icon and...
E320-A0 User Manual
Page 38
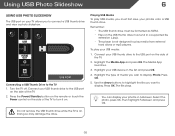
... side of the TV. 2. Connect your USB thumb drive to the USB port on the side of the TV. 2. Press the Power/Standby button on the remote or touch the Power control on the side of media you want to display: Photo. Doing so may damage the drive. 32 Press OK. Playing...
... side of the TV. 2. Connect your USB thumb drive to the USB port on the side of the TV. 2. Press the Power/Standby button on the remote or touch the Power control on the side of media you want to display: Photo. Doing so may damage the drive. 32 Press OK. Playing...
E320-A0 User Manual
Page 41
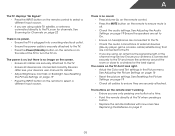
See Scanning for Channels on page 22 There is no power. • Ensure the TV is plugged into a working . • Ensure you are using an ...pressing a button. • Replace the remote batteries with new ones. The power is on, but there is securely attached to the TV. • Press the Power/Standby button on the remote or on the side of the TV to turn... colors on page 9 35 See Adjusting the Audio Settings on the remote aren't working electrical outlet. • Ensure the power cable is no image on the screen. • Ensure all cables are securely attached to the TV. • Ensure ...
See Scanning for Channels on page 22 There is no power. • Ensure the TV is plugged into a working . • Ensure you are using an ...pressing a button. • Replace the remote batteries with new ones. The power is on, but there is securely attached to the TV. • Press the Power/Standby button on the remote or on the side of the TV to turn... colors on page 9 35 See Adjusting the Audio Settings on the remote aren't working electrical outlet. • Ensure the power cable is no image on the screen. • Ensure all cables are securely attached to the TV. • Ensure ...
E320-A0 User Manual
Page 43
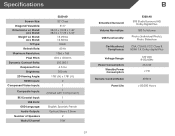
...HDMI Inputs: Component Video Inputs: Composite Inputs: RF/Coaxial Input: USB Ports: OSD Language: Audio Outputs: Number of Speakers Watts/Channel E320-A0 32" Class 31.5" 28.74 x 19.25 x 7.46" 28.74 x 17.25 x 3.34" 13.49 lbs 12...., Spanish, French Optical, Stereo 3.5mm 2 10W B Simulated Surround: Volume Normalizer: USB Functionality: Certifications/ Compliance: Voltage Range: Power Consumption: Standby Power Consumption: Remote Control Model: Panel Life: E320-A0 SRS StudioSurround HD, Dolby Digital Plus SRS TruVolume Photo (Individual Photo), Photo Slideshow CSA, CSA-US, FCC Class B, HDMI ...
...HDMI Inputs: Component Video Inputs: Composite Inputs: RF/Coaxial Input: USB Ports: OSD Language: Audio Outputs: Number of Speakers Watts/Channel E320-A0 32" Class 31.5" 28.74 x 19.25 x 7.46" 28.74 x 17.25 x 3.34" 13.49 lbs 12...., Spanish, French Optical, Stereo 3.5mm 2 10W B Simulated Surround: Volume Normalizer: USB Functionality: Certifications/ Compliance: Voltage Range: Power Consumption: Standby Power Consumption: Remote Control Model: Panel Life: E320-A0 SRS StudioSurround HD, Dolby Digital Plus SRS TruVolume Photo (Individual Photo), Photo Slideshow CSA, CSA-US, FCC Class B, HDMI ...

E320-A0 User Manual
Page 44
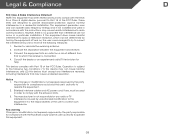
... packaging that a Product is within the warranty period,VIZIO will be restored to the VIZIO service center. VIZIO is not responsible for example: cosmetic damage, normal wear and tear, improper operation, improper voltage supply or power surges, signal issues, damages from warranty service or ...replacement, whichever is required to 4:00PM Saturday and Sunday, Pacific Time, or visit www.VIZIO.com. This warranty does not cover, for transportation costs to...
... packaging that a Product is within the warranty period,VIZIO will be restored to the VIZIO service center. VIZIO is not responsible for example: cosmetic damage, normal wear and tear, improper operation, improper voltage supply or power surges, signal issues, damages from warranty service or ...replacement, whichever is required to 4:00PM Saturday and Sunday, Pacific Time, or visit www.VIZIO.com. This warranty does not cover, for transportation costs to...
E320-A0 User Manual
Page 45
... FCC Rules. The changes or modifications not expressly approved by one or more of the user to operate this equipment. Shielded interface cables and AC power cord, if any, must accept any radio or TV interference caused by the party responsible for compliance with the FCC Rules could void the user...
... FCC Rules. The changes or modifications not expressly approved by one or more of the user to operate this equipment. Shielded interface cables and AC power cord, if any, must accept any radio or TV interference caused by the party responsible for compliance with the FCC Rules could void the user...
E320-A0 Quick Start Guide
Page 2
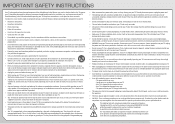
.... Install in electric shock or fire. When a cart is used for long periods of electric shock or component damage, switch off the power before connecting other components to qualified service personnel. • WARNING: Keep your TV. Wait before moving your TV. If you to qualified...plug has two blades and a third grounding prong. This may compromise the integrity of the grounded plug. • When connected to a power outlet, power is intended to alert the user to smoke or moisture may cause fire or electric shock. • Slots and openings in environments with the...
.... Install in electric shock or fire. When a cart is used for long periods of electric shock or component damage, switch off the power before connecting other components to qualified service personnel. • WARNING: Keep your TV. Wait before moving your TV. If you to qualified...plug has two blades and a third grounding prong. This may compromise the integrity of the grounded plug. • When connected to a power outlet, power is intended to alert the user to smoke or moisture may cause fire or electric shock. • Slots and openings in environments with the...

E320-A0 Quick Start Guide
Page 4
PACKAGE CONTENTS VIZIO LED HDTV with Stand Power Cord Hex Wrench Remote Control with Batteries This Quick Start Guide 4 x Hex Screws HELP VIZIO REDUCE PAPER WASTE. DOWNLOAD THE FULL USER MANUAL AT VIZIO.COM/SUPPORT
PACKAGE CONTENTS VIZIO LED HDTV with Stand Power Cord Hex Wrench Remote Control with Batteries This Quick Start Guide 4 x Hex Screws HELP VIZIO REDUCE PAPER WASTE. DOWNLOAD THE FULL USER MANUAL AT VIZIO.COM/SUPPORT
E320-A0 Quick Start Guide
Page 5
... on -screen menu. V BUTTON Open the USB media player. DASH Use with number pad to manually enter a digital sub-channel. (For example, 18-4 or 18-5.) POWER Turn TV on or off or on -screen menu. CLOSED CAPTIONS Open the closed caption menu. MUTE Turn the audio off . EXIT Close the on...
... on -screen menu. V BUTTON Open the USB media player. DASH Use with number pad to manually enter a digital sub-channel. (For example, 18-4 or 18-5.) POWER Turn TV on or off or on -screen menu. CLOSED CAPTIONS Open the closed caption menu. MUTE Turn the audio off . EXIT Close the on...
E320-A0 Quick Start Guide
Page 8
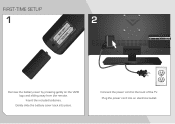
Gently slide the battery cover back into an electrical outlet. Insert the included batteries. Connect the power cord to the back of the TV. FIRST-TIME SETUP 1 2 Remove the battery cover by pressing gently on the VIZIO logo and sliding away from the remote. Plug the power cord into place.
Gently slide the battery cover back into an electrical outlet. Insert the included batteries. Connect the power cord to the back of the TV. FIRST-TIME SETUP 1 2 Remove the battery cover by pressing gently on the VIZIO logo and sliding away from the remote. Plug the power cord into place.
E320-A0 Quick Start Guide
Page 9
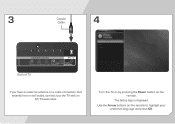
3 Coaxial Cable 4 SIDE Back of TV If you have an external antenna or a cable connection that extends from a wall outlet, connect it to highlight your preferred language and press OK. Use the Arrow buttons on the remote. The Setup App is displayed. Turn the TV on by pressing the Power button on the remote to the TV with an RF/Coaxial cable.
3 Coaxial Cable 4 SIDE Back of TV If you have an external antenna or a cable connection that extends from a wall outlet, connect it to highlight your preferred language and press OK. Use the Arrow buttons on the remote. The Setup App is displayed. Turn the TV on by pressing the Power button on the remote to the TV with an RF/Coaxial cable.


