User Manual
Page 1
All rights reserved. All other trademarks are registered trademarks of their respective companies. Windows and the Windows logo are the property of Microsoft Corporation. ViviCam F128 Digital Camera User Manual © 2009-2011 Sakar International, Inc.
All rights reserved. All other trademarks are registered trademarks of their respective companies. Windows and the Windows logo are the property of Microsoft Corporation. ViviCam F128 Digital Camera User Manual © 2009-2011 Sakar International, Inc.
User Manual
Page 3
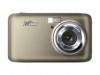
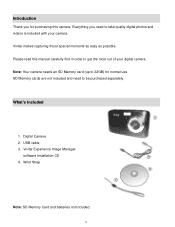
... first in order to get the most out of your camera. Digital Camera 2. SD Memory cards are not included and need to take quality digital photos and videos is included with your digital camera. What's Included 1. USB cable 3. Vivitar makes capturing those special moments as easy as possible. Vivitar Experience Image Manager software Installation CD 4. Introduction Thank you...
... first in order to get the most out of your camera. Digital Camera 2. SD Memory cards are not included and need to take quality digital photos and videos is included with your digital camera. What's Included 1. USB cable 3. Vivitar makes capturing those special moments as easy as possible. Vivitar Experience Image Manager software Installation CD 4. Introduction Thank you...
User Manual
Page 4
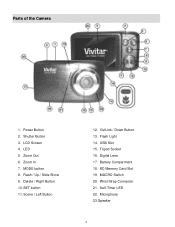
MODE button 8. SET button 11. Battery Compartment 18. Power Button 2. LED 5. Parts of the Camera 1. ViviLink / Down Button 13. Tripod Socket 16. Self-Timer LED 22. Zoom Out 6. Flash / Up / Slide Show 9. LCD Screen 4. Zoom In 7. Delete / Right Button 10. Digital Lens 17. Microphone 23. SD Memory Card Slot 19. Flash Light 14. USB Slot 15. Wrist Strap Connector 21. MACRO Switch 20. Speaker 3 Scene / Left Button 12. Shutter Button 3.
MODE button 8. SET button 11. Battery Compartment 18. Power Button 2. LED 5. Parts of the Camera 1. ViviLink / Down Button 13. Tripod Socket 16. Self-Timer LED 22. Zoom Out 6. Flash / Up / Slide Show 9. LCD Screen 4. Zoom In 7. Delete / Right Button 10. Digital Lens 17. Microphone 23. SD Memory Card Slot 19. Flash Light 14. USB Slot 15. Wrist Strap Connector 21. MACRO Switch 20. Speaker 3 Scene / Left Button 12. Shutter Button 3.

User Manual
Page 6
... card not included.) To properly insert the SD Card: Push the SD card into your digital camera, according to the polarity shown inside the battery compartment. When powering the camera ON for an extended period. Do not mix alkaline and non-alkaline batteries. Some features, such as ... the SD card slot). Alkaline batteries are recommended. (Batteries not included.) Note: Remove the batteries from the camera when not in use for the first time the camera will automatically turn off a few seconds later. The energy status of the power is low the battery icon...
... card not included.) To properly insert the SD Card: Push the SD card into your digital camera, according to the polarity shown inside the battery compartment. When powering the camera ON for an extended period. Do not mix alkaline and non-alkaline batteries. Some features, such as ... the SD card slot). Alkaline batteries are recommended. (Batteries not included.) Note: Remove the batteries from the camera when not in use for the first time the camera will automatically turn off a few seconds later. The energy status of the power is low the battery icon...
User Manual
Page 9
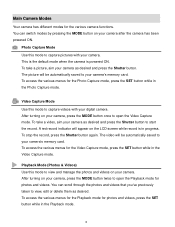
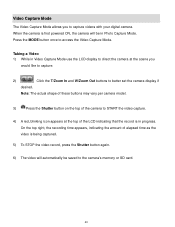
... stop the record, press the Shutter button again. To take a video, aim your camera as desired and press the Shutter button to capture pictures with your digital camera. After turning on your camera‟s memory card. Playback Mode (Photos & Videos) Use this mode to open the ...Video Capture mode. A red record indicator will appear on your camera‟s memory card. You can switch ...
... stop the record, press the Shutter button again. To take a video, aim your camera as desired and press the Shutter button to capture pictures with your digital camera. After turning on your camera‟s memory card. Playback Mode (Photos & Videos) Use this mode to open the ...Video Capture mode. A red record indicator will appear on your camera‟s memory card. You can switch ...

User Manual
Page 10
Mac OSX v10.5.x and above 3 * AAA (1.5V) batteries 0~40C 9 Camera Technical Specifications Image Sensor Image Resolution Video Resolution File Format Internal Memory External Memory LCD Display Lens Zoom Exposure White Balance ISO Scene Flash Self-...) / 320 x 240 pixels QVGA (30 fps) JPEG (Photo) /AVI (Video) 1 Test Photo Use Only SD Card (up to 32GB) 2.7 Inch TFT f=8.15 mm F3.0 4X Digital Zoom -3.0EV ~ +3.0EV Auto, Daylight, Cloudy, Fluorescent , Incandescent Auto / 100 / 200 / 400 Auto, Scenery, Portrait, Night Scenery, Night Portrait, High Sensitivity, Beach No Flash, Forced...
Mac OSX v10.5.x and above 3 * AAA (1.5V) batteries 0~40C 9 Camera Technical Specifications Image Sensor Image Resolution Video Resolution File Format Internal Memory External Memory LCD Display Lens Zoom Exposure White Balance ISO Scene Flash Self-...) / 320 x 240 pixels QVGA (30 fps) JPEG (Photo) /AVI (Video) 1 Test Photo Use Only SD Card (up to 32GB) 2.7 Inch TFT f=8.15 mm F3.0 4X Digital Zoom -3.0EV ~ +3.0EV Auto, Daylight, Cloudy, Fluorescent , Incandescent Auto / 100 / 200 / 400 Auto, Scenery, Portrait, Night Scenery, Night Portrait, High Sensitivity, Beach No Flash, Forced...
User Manual
Page 12
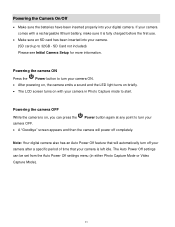
... on with a rechargeable lithium battery, make sure it is left idle. If your camera comes with your digital camera. Powering the camera ON Press the Power button to turn your camera ON. After powering on, the camera emits a sound and the LED light turns on briefly. The LCD screen ...61623; Make sure an SD card has been inserted into your camera in either Photo Capture Mode or Video Capture Mode). 11 SD Card not included) Please see Initial Camera Setup for more information. Note: Your digital camera also has an Auto Power Off feature that will automatically turn off...
... on with a rechargeable lithium battery, make sure it is left idle. If your camera comes with your digital camera. Powering the camera ON Press the Power button to turn your camera ON. After powering on, the camera emits a sound and the LED light turns on briefly. The LCD screen ...61623; Make sure an SD card has been inserted into your camera in either Photo Capture Mode or Video Capture Mode). 11 SD Card not included) Please see Initial Camera Setup for more information. Note: Your digital camera also has an Auto Power Off feature that will automatically turn off...

User Manual
Page 17
... indicating bar moves up to use the following features of your videos. Refer to the „Camera Specifications‟ section to redisplay the icons on the screen. 16 Press the T out. Digital Zoom Option You can be turned OFF when you Zoom Out (W). Display: Hide/Show the LCD...subject up when you Zoom In (T) and moves down when you want to 4 times using the digital zoom while capturing your photos and recording your camera: Flash, Face Detect, Smile Capture. Not all cameras included these features. NOTE: The Macro mode must be hidden or visible as desired. ...
... indicating bar moves up to use the following features of your videos. Refer to the „Camera Specifications‟ section to redisplay the icons on the screen. 16 Press the T out. Digital Zoom Option You can be turned OFF when you Zoom Out (W). Display: Hide/Show the LCD...subject up when you Zoom In (T) and moves down when you want to 4 times using the digital zoom while capturing your photos and recording your camera: Flash, Face Detect, Smile Capture. Not all cameras included these features. NOTE: The Macro mode must be hidden or visible as desired. ...
User Manual
Page 18
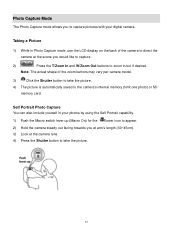
...You can also include yourself in your digital camera. Taking a Picture 1) While in /out if desired. Note: The actual shape of the camera to direct the camera at the scene you would like to capture. 2) Press the T/Zoom In and W/Zoom Out buttons to the camera‟s internal memory (limit one photo)...1) Push the Macro switch lever up (Macro On) for the flower icon to appear. 2) Hold the camera steady out facing towards you at arm‟s length (30~45cm). 3) Look at the camera lens. 4) Press the Shutter button to take the picture. 4) The picture is automatically saved to zoom in...
...You can also include yourself in your digital camera. Taking a Picture 1) While in /out if desired. Note: The actual shape of the camera to direct the camera at the scene you would like to capture. 2) Press the T/Zoom In and W/Zoom Out buttons to the camera‟s internal memory (limit one photo)...1) Push the Macro switch lever up (Macro On) for the flower icon to appear. 2) Hold the camera steady out facing towards you at arm‟s length (30~45cm). 3) Look at the camera lens. 4) Press the Shutter button to take the picture. 4) The picture is automatically saved to zoom in...
User Manual
Page 19
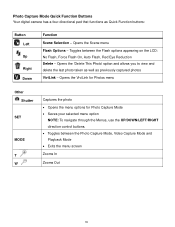
... the last photo taken as well as Quick Function buttons: Button Left Up Right Down Function Scene Selection - Photo Capture Mode Quick Function Buttons Your digital camera has a four-directional pad that functions as previously captured photos ViviLink -
... the last photo taken as well as Quick Function buttons: Button Left Up Right Down Function Scene Selection - Photo Capture Mode Quick Function Buttons Your digital camera has a four-directional pad that functions as previously captured photos ViviLink -
User Manual
Page 33
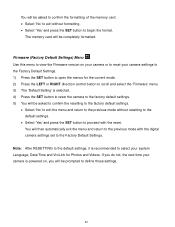
...8222;No‟ to exit without resetting to the default settings. Select „Yes‟ and press the SET button to proceed with the digital camera settings set to the Factory Default Settings. Firmware (Factory Default Settings) Menu Use this menu to view the Firmware version on your... camera or to reset your camera settings to the Factory Default Settings. 1) Press the SET button to open the menus for the current mode. 2) Press the LEFT or RIGHT ...
...8222;No‟ to exit without resetting to the default settings. Select „Yes‟ and press the SET button to proceed with the digital camera settings set to the Factory Default Settings. Firmware (Factory Default Settings) Menu Use this menu to view the Firmware version on your... camera or to reset your camera settings to the Factory Default Settings. 1) Press the SET button to open the menus for the current mode. 2) Press the LEFT or RIGHT ...

User Manual
Page 35
Views all the Photos as Quick Function buttons. NEXT - Photo Playback Mode Quick Function Buttons Your digital camera has a four-directional pad that functions as a Slide Show with 3, 5 or 10 second intervals. Opens the ViviLink for Photos menu Other W/Zoom out SET Opens ...
Views all the Photos as Quick Function buttons. NEXT - Photo Playback Mode Quick Function Buttons Your digital camera has a four-directional pad that functions as a Slide Show with 3, 5 or 10 second intervals. Opens the ViviLink for Photos menu Other W/Zoom out SET Opens ...
User Manual
Page 41
...red, blinking icon appears at the scene you to the camera‟s memory or SD card. 40 When the camera is being captured. 5) To STOP the video record, press the Shutter button again. 6) The video will be saved to capture videos with your digital camera. Press the MODE button once to direct the... camera at the top of elapsed time as the video is first powered ON, the camera will automatically be in Photo Capture Mode. On the top right, the ...
...red, blinking icon appears at the scene you to the camera‟s memory or SD card. 40 When the camera is being captured. 5) To STOP the video record, press the Shutter button again. 6) The video will be saved to capture videos with your digital camera. Press the MODE button once to direct the... camera at the top of elapsed time as the video is first powered ON, the camera will automatically be in Photo Capture Mode. On the top right, the ...
User Manual
Page 42
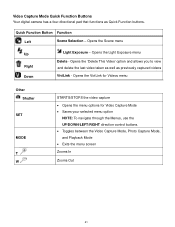
Video Capture Mode Quick Function Buttons Your digital camera has a four-directional pad that functions as previously captured videos ViviLink - Opens the ViviLink for Videos menu Other Shutter SET MODE T W STARTS/STOPS the video ...
Video Capture Mode Quick Function Buttons Your digital camera has a four-directional pad that functions as previously captured videos ViviLink - Opens the ViviLink for Videos menu Other Shutter SET MODE T W STARTS/STOPS the video ...

User Manual
Page 53
If you do not, the next time your camera is recommended to select your system Language, Date/Time and ViviLink for Photos and Videos. You will be prompted to the Factory Default Settings. NOTE: After RESETTING to the default settings, it is powered on, you will then automatically exit the menu and return to the previous mode with the digital camera settings set to define those settings. 52
If you do not, the next time your camera is recommended to select your system Language, Date/Time and ViviLink for Photos and Videos. You will be prompted to the Factory Default Settings. NOTE: After RESETTING to the default settings, it is powered on, you will then automatically exit the menu and return to the previous mode with the digital camera settings set to define those settings. 52

User Manual
Page 55
... the image full size. 4) Once the selected video is full size you can play and view the video. Video Playback Mode Quick Function Buttons Your digital camera has a four-directional pad that functions as Quick Function buttons. Opens the ViviLink for Photo Playback Mode Saves your selected menu option NOTE: To...
... the image full size. 4) Once the selected video is full size you can play and view the video. Video Playback Mode Quick Function Buttons Your digital camera has a four-directional pad that functions as Quick Function buttons. Opens the ViviLink for Photo Playback Mode Saves your selected menu option NOTE: To...

User Manual
Page 64
... and videos to import and to organize them into the dock connector port on your iPad, and then attach your digital camera using an iPad Camera Connector: Plug the Camera Connector into albums. Camera Maintenance The digital camera is a delicate device. This allows you make the connection, your iPad automatically opens the „Photos‟ application. Transferring...
... and videos to import and to organize them into the dock connector port on your iPad, and then attach your digital camera using an iPad Camera Connector: Plug the Camera Connector into albums. Camera Maintenance The digital camera is a delicate device. This allows you make the connection, your iPad automatically opens the „Photos‟ application. Transferring...


