User Manual
Page 3
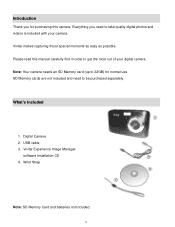
... Camera 2. What's Included 1. Wrist Strap Note: SD Memory Card and batteries not included. 2 Vivitar Experience Image Manager software Installation CD 4. Introduction Thank you need to be purchased separately. Please read this camera. USB cable 3. SD Memory cards are not included and need to get the most out ...of your camera. Vivitar makes capturing those special moments as easy as possible. Note: Your camera needs an SD Memory card (up to 32GB) for purchasing this manual ...
... Camera 2. What's Included 1. Wrist Strap Note: SD Memory Card and batteries not included. 2 Vivitar Experience Image Manager software Installation CD 4. Introduction Thank you need to be purchased separately. Please read this camera. USB cable 3. SD Memory cards are not included and need to get the most out ...of your camera. Vivitar makes capturing those special moments as easy as possible. Note: Your camera needs an SD Memory card (up to 32GB) for purchasing this manual ...
User Manual
Page 4
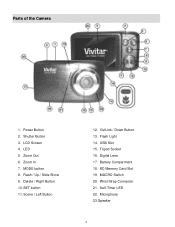
Shutter Button 3. Zoom Out 6. Scene / Left Button 12. Flash Light 14. Zoom In 7. MACRO Switch 20. Wrist Strap Connector 21. ViviLink / Down Button 13. SD Memory Card Slot 19. Microphone 23. LCD Screen 4. Delete / Right Button 10. Battery Compartment 18. LED 5. Speaker 3 Parts of the Camera 1. Power Button 2. MODE button 8. Flash / Up / Slide Show 9. SET button 11. USB Slot 15. Tripod Socket 16. Digital Lens 17. Self-Timer LED 22.
Shutter Button 3. Zoom Out 6. Scene / Left Button 12. Flash Light 14. Zoom In 7. MACRO Switch 20. Wrist Strap Connector 21. ViviLink / Down Button 13. SD Memory Card Slot 19. Microphone 23. LCD Screen 4. Delete / Right Button 10. Battery Compartment 18. LED 5. Speaker 3 Parts of the Camera 1. Power Button 2. MODE button 8. Flash / Up / Slide Show 9. SET button 11. USB Slot 15. Tripod Socket 16. Digital Lens 17. Self-Timer LED 22.
User Manual
Page 5
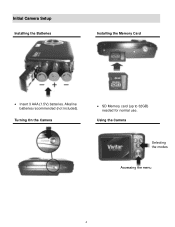
Using the Camera Selecting the modes Accessing the menu 4 Alkaline batteries recommended (not included). Turning On the Camera SD Memory card (up to 32GB) needed for normal use. Initial Camera Setup Installing the Batteries Installing the Memory Card Insert 3 AAA (1.5V) batteries.
Using the Camera Selecting the modes Accessing the menu 4 Alkaline batteries recommended (not included). Turning On the Camera SD Memory card (up to 32GB) needed for normal use. Initial Camera Setup Installing the Batteries Installing the Memory Card Insert 3 AAA (1.5V) batteries.
User Manual
Page 9
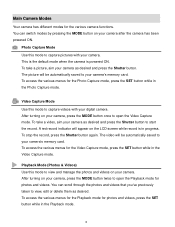
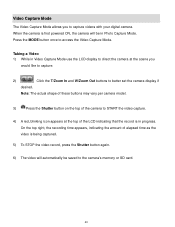
... while in the Playback mode. 8 The video will be automatically saved to view and manage the photos and videos on your camera‟s memory card. After turning on the LCD screen while record is powered ON. A red record indicator will appear on your camera as desired and press ...the Shutter button. Video Capture Mode Use this mode to your camera. To take a picture, aim your camera‟s memory card. After turning on your camera, press the MODE button twice to view, edit or delete them as desired. To access the various menus for...
... while in the Playback mode. 8 The video will be automatically saved to view and manage the photos and videos on your camera‟s memory card. After turning on the LCD screen while record is powered ON. A red record indicator will appear on your camera as desired and press ...the Shutter button. Video Capture Mode Use this mode to your camera. To take a picture, aim your camera‟s memory card. After turning on your camera, press the MODE button twice to view, edit or delete them as desired. To access the various menus for...

User Manual
Page 10
...above 3 * AAA (1.5V) batteries 0~40C 9 Camera Technical Specifications Image Sensor Image Resolution Video Resolution File Format Internal Memory External Memory LCD Display Lens Zoom Exposure White Balance ISO Scene Flash Self-Timer Anti-Shake Face Detect Print Photos Microphone Macro Interface System Requirements... fps) / 640 x 480 pixels VGA (30 fps) / 320 x 240 pixels QVGA (30 fps) JPEG (Photo) /AVI (Video) 1 Test Photo Use Only SD Card (up to 32GB) 2.7 Inch TFT f=8.15 mm F3.0 4X Digital Zoom -3.0EV ~ +3.0EV Auto, Daylight, Cloudy, Fluorescent , Incandescent Auto / 100 / 200 / 400...
...above 3 * AAA (1.5V) batteries 0~40C 9 Camera Technical Specifications Image Sensor Image Resolution Video Resolution File Format Internal Memory External Memory LCD Display Lens Zoom Exposure White Balance ISO Scene Flash Self-Timer Anti-Shake Face Detect Print Photos Microphone Macro Interface System Requirements... fps) / 640 x 480 pixels VGA (30 fps) / 320 x 240 pixels QVGA (30 fps) JPEG (Photo) /AVI (Video) 1 Test Photo Use Only SD Card (up to 32GB) 2.7 Inch TFT f=8.15 mm F3.0 4X Digital Zoom -3.0EV ~ +3.0EV Auto, Daylight, Cloudy, Fluorescent , Incandescent Auto / 100 / 200 / 400...
User Manual
Page 18
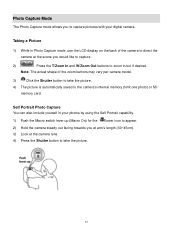
... at arm‟s length (30~45cm). 3) Look at the scene you to take the picture. 4) The picture is automatically saved to the camera‟s internal memory (limit one photo) or SD memory card.
... at arm‟s length (30~45cm). 3) Look at the scene you to take the picture. 4) The picture is automatically saved to the camera‟s internal memory (limit one photo) or SD memory card.
User Manual
Page 32
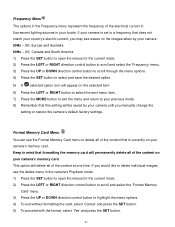
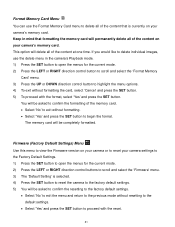
...Frequency Menu The options in the Frequency menu represent the frequency of the electrical current in fluorescent lighting sources in mind that formatting the memory card will permanently delete all of the content on your camera until you manually change the setting or restore the camera‟s default factory... settings. This option will be saved by your locale. Format Memory Card Menu You can use the delete menu in the camera‟s Playback mode. 1) Press the SET button to open the menus for...
...Frequency Menu The options in the Frequency menu represent the frequency of the electrical current in fluorescent lighting sources in mind that formatting the memory card will permanently delete all of the content on your camera until you manually change the setting or restore the camera‟s default factory... settings. This option will be saved by your locale. Format Memory Card Menu You can use the delete menu in the camera‟s Playback mode. 1) Press the SET button to open the menus for...
User Manual
Page 33
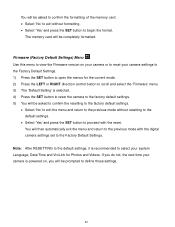
If you will be prompted to define those settings. 32 You will be asked to confirm the formatting of the memory card. Select „No‟ to exit without resetting to the default settings. Select „Yes‟ and press the SET button to proceed ... camera is recommended to select your camera settings to the Factory Default Settings. 1) Press the SET button to the previous mode with the reset. The memory card will then automatically exit the menu and return to open the menus for Photos and Videos.
If you will be prompted to define those settings. 32 You will be asked to confirm the formatting of the memory card. Select „No‟ to exit without resetting to the default settings. Select „Yes‟ and press the SET button to proceed ... camera is recommended to select your camera settings to the Factory Default Settings. 1) Press the SET button to the previous mode with the reset. The memory card will then automatically exit the menu and return to open the menus for Photos and Videos.
User Manual
Page 34
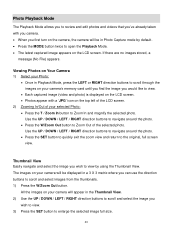
...; Press the SET button to quickly exit the zoom view and return to the original, full screen view. All the images on your camera‟s memory card until you find the image you would like to view. Each captured image (video and photo) is displayed on the LCD screen. Photos...
...; Press the SET button to quickly exit the zoom view and return to the original, full screen view. All the images on your camera‟s memory card until you find the image you would like to view. Each captured image (video and photo) is displayed on the LCD screen. Photos...
User Manual
Page 36
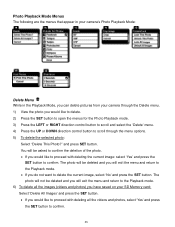
... the menus that appear in your camera‟s Photo Playback Mode: Delete Menu While in the Playback Mode, you can delete pictures from your SD Memory card: Select „Delete All Images‟ and press the SET button. If you would like to delete. 2) Press the SET button to open the...
... the menus that appear in your camera‟s Photo Playback Mode: Delete Menu While in the Playback Mode, you can delete pictures from your SD Memory card: Select „Delete All Images‟ and press the SET button. If you would like to delete. 2) Press the SET button to open the...

User Manual
Page 38
... left. 8) When you would like to rotate. 2) Press the SET button to open the Crop option. 6) The Crop window opens on your camera with your memory card. 37 If you would like to exit without cropping, press the SET button. 9) When you see the cropped picture appear, press the Shutter button again...
... left. 8) When you would like to rotate. 2) Press the SET button to open the Crop option. 6) The Crop window opens on your camera with your memory card. 37 If you would like to exit without cropping, press the SET button. 9) When you see the cropped picture appear, press the Shutter button again...
User Manual
Page 41
... ON, the camera will automatically be in progress. When the camera is in Photo Capture Mode. Press the MODE button once to the camera‟s memory or SD card. 40
... ON, the camera will automatically be in progress. When the camera is in Photo Capture Mode. Press the MODE button once to the camera‟s memory or SD card. 40
User Manual
Page 52
...8222;Default Setting‟ is currently on your camera‟s memory card. If you would like to delete individual images, use the Format Memory Card menu to delete all of the content that formatting the memory card will permanently delete all of the memory card. Select „No‟ to exit without resetting...the SET button. You will be asked to confirm the formatting of the content on your camera or to reset your camera's memory card. Format Memory Card Menu You can use the delete menu in mind that is selected. 4) Press the SET button to reset the camera to ...
...8222;Default Setting‟ is currently on your camera‟s memory card. If you would like to delete individual images, use the Format Memory Card menu to delete all of the content that formatting the memory card will permanently delete all of the memory card. Select „No‟ to exit without resetting...the SET button. You will be asked to confirm the formatting of the content on your camera or to reset your camera's memory card. Format Memory Card Menu You can use the delete menu in mind that is selected. 4) Press the SET button to reset the camera to ...

User Manual
Page 54
... Camera 1) Select your Video: Once in Playback mode, press the LEFT or RIGHT direction buttons to scroll through the images on your camera‟s memory card until you find the video you would like to view. Each captured image (video and photo) is playing all the icons on the top...
... Camera 1) Select your Video: Once in Playback mode, press the LEFT or RIGHT direction buttons to scroll through the images on your camera‟s memory card until you find the video you would like to view. Each captured image (video and photo) is playing all the icons on the top...

User Manual
Page 56
.... Remember: All images will appear. To 55 The video will not be deleted and you will be asked to confirm the deletion of your SD Memory card: Select „Delete All Images‟ and press the SET button. If you would like to proceed with deleting the current image: select „...
.... Remember: All images will appear. To 55 The video will not be deleted and you will be asked to confirm the deletion of your SD Memory card: Select „Delete All Images‟ and press the SET button. If you would like to proceed with deleting the current image: select „...

User Manual
Page 64
... models that are compatible with the iPad, photos and videos can be purchased separately. 2) Using an iPad SD Card Reader: Connect the SD Card Reader to your iPad, then insert your digital camera's SD Memory card into the dock connector port on your iPad, and then attach your digital camera using an iPad Camera... from your camera with the iPad. This allows you to choose which photos and videos to import and to heat sources. NOTE: The iPad SD Card Reader is not included.
... models that are compatible with the iPad, photos and videos can be purchased separately. 2) Using an iPad SD Card Reader: Connect the SD Card Reader to your iPad, then insert your digital camera's SD Memory card into the dock connector port on your iPad, and then attach your digital camera using an iPad Camera... from your camera with the iPad. This allows you to choose which photos and videos to import and to heat sources. NOTE: The iPad SD Card Reader is not included.
User Manual
Page 66
...F128 -TA-122211ver2 FW1900FKGNMD51F01 65 E-mail us at support@vivitar.com and one of our technical support team members will happen to prevent unintentional data loss. I get a message that I recover images that the images were successfully transferred but the photos do not appear on the SD memory card...use. All images deleted using the Vivitar Experience Image Manager. Can‟t find manuals, software and FAQ‟s at www.vivitar.com. These photos should appear. You can be uploaded quickly before you would like to the SD memory card then all the photos should be ...
...F128 -TA-122211ver2 FW1900FKGNMD51F01 65 E-mail us at support@vivitar.com and one of our technical support team members will happen to prevent unintentional data loss. I get a message that I recover images that the images were successfully transferred but the photos do not appear on the SD memory card...use. All images deleted using the Vivitar Experience Image Manager. Can‟t find manuals, software and FAQ‟s at www.vivitar.com. These photos should appear. You can be uploaded quickly before you would like to the SD memory card then all the photos should be ...


