User Guide
Page 2
Contents Compliance Information 1 Important Safety Instructions 2 Copyright Information 3 Product Registration 3 Getting Started Package Contents 4 Precautions 4 Quick Installation 5 Wall Mounting (Optional 6 Using the LCD Display Setting the Timing Mode 7 OSD and Power Lock Settings 7 Adjusting the Screen Image 8 Main Menu Controls 10 Other Information Specifications 14 Troubleshooting 15 Customer Support 16 Cleaning the LCD Display 17 Limited Warranty 18 ViewSonic VX910
Contents Compliance Information 1 Important Safety Instructions 2 Copyright Information 3 Product Registration 3 Getting Started Package Contents 4 Precautions 4 Quick Installation 5 Wall Mounting (Optional 6 Using the LCD Display Setting the Timing Mode 7 OSD and Power Lock Settings 7 Adjusting the Screen Image 8 Main Menu Controls 10 Other Information Specifications 14 Troubleshooting 15 Customer Support 16 Cleaning the LCD Display 17 Limited Warranty 18 ViewSonic VX910
User Guide
Page 3
... installed and used in a particular installation. For Canada This Class B digital apparatus meets all Countries Notice: Use the cables which are designed to radio communications. FCC Warning To assure continued FCC compliance, the user must use grounded power supply cord and the cables which are included with the equipment or specified. ViewSonic VX910 1 Compliance Information For U.S.A. This equipment generates, uses, and can be determined by turning...
... installed and used in a particular installation. For Canada This Class B digital apparatus meets all Countries Notice: Use the cables which are designed to radio communications. FCC Warning To assure continued FCC compliance, the user must use grounded power supply cord and the cables which are included with the equipment or specified. ViewSonic VX910 1 Compliance Information For U.S.A. This equipment generates, uses, and can be determined by turning...
User Guide
Page 4
... produce heat. 9. Service is exposed to avoid injury from the equipment. Keep these instructions completely before using the equipment. 2. A grounding type plug has two blades and a third grounding prong. Clean with the manufacturer's instructions. 8. Install the equipment in a safe place. 3. Do not install near any ventilation openings. Do not block any heat sources such as : if the power-supply cord or plug is damaged, if...
... produce heat. 9. Service is exposed to avoid injury from the equipment. Keep these instructions completely before using the equipment. 2. A grounding type plug has two blades and a third grounding prong. Clean with the manufacturer's instructions. 8. Install the equipment in a safe place. 3. Do not install near any ventilation openings. Do not block any heat sources such as : if the power-supply cord or plug is damaged, if...
User Guide
Page 5
... change without notice. VESA is a registered trademark of the Video Electronics Standards Association. DPMS and DDC are registered trademarks of product life THE LAMP IN THIS PRODUCT CONTAINS MERCURY. Copyright Information Copyright © ViewSonic® Corporation, 2005. ENERGY STAR® is a registered trademark of the U.S. For Your Records Product Name: Model Number: Document Number: Serial Number: Purchase Date: VX910 ViewSonic 19" LCD Display VS10162 VX910...
... change without notice. VESA is a registered trademark of the Video Electronics Standards Association. DPMS and DDC are registered trademarks of product life THE LAMP IN THIS PRODUCT CONTAINS MERCURY. Copyright Information Copyright © ViewSonic® Corporation, 2005. ENERGY STAR® is a registered trademark of the U.S. For Your Records Product Name: Model Number: Document Number: Serial Number: Purchase Date: VX910 ViewSonic 19" LCD Display VS10162 VX910...
User Guide
Page 6
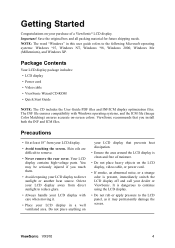
... the LCD display, video cable, or power cord. • If smoke, an abnormal noise, or a strange odor is clean and free of a ViewSonic® LCD display. NOTE: The word "Windows" in a well ventilated area. Package Contents Your LCD display package includes: • LCD display • Power cord • Video cable • ViewSonic Wizard CD-ROM • Quick Start Guide NOTE: The CD includes the User Guide PDF files and INF/ICM display optimization files. The INF file ensures compatibility with...
... the LCD display, video cable, or power cord. • If smoke, an abnormal noise, or a strange odor is clean and free of a ViewSonic® LCD display. NOTE: The word "Windows" in a well ventilated area. Package Contents Your LCD display package includes: • LCD display • Power cord • Video cable • ViewSonic Wizard CD-ROM • Quick Start Guide NOTE: The CD includes the User Guide PDF files and INF/ICM display optimization files. The INF file ensures compatibility with...
User Guide
Page 7
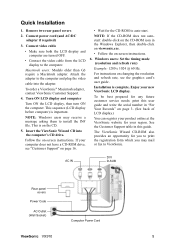
... service needs: print this guide. AC IN DVI D-SUB Rear panel covers Power Code AC Outlet (Wall Socket) Computer Power Cord ViewSonic VX910 5 Connect power cord (and AC/DC adapter if required) 3. NOTE: If the CD-ROM does not autostart: double-click on the CD-ROM icon in "For Your Records" on -screen instructions. 6. Windows users: Set the timing mode (resolution and refresh rate) Example: 1280 x 1024 @ 60 Hz. Installation is important. Remove two rear panel covers 2. Turn ON LCD display and computer Turn...
... service needs: print this guide. AC IN DVI D-SUB Rear panel covers Power Code AC Outlet (Wall Socket) Computer Power Cord ViewSonic VX910 5 Connect power cord (and AC/DC adapter if required) 3. NOTE: If the CD-ROM does not autostart: double-click on the CD-ROM icon in "For Your Records" on -screen instructions. 6. Windows users: Set the timing mode (resolution and refresh rate) Example: 1280 x 1024 @ 60 Hz. Installation is important. Remove two rear panel covers 2. Turn ON LCD display and computer Turn...

User Guide
Page 8
... VESA screw holes Rear panel covers Four base screws ViewSonic VX910 6 Wall Mounting (Optional) To obtain a wall-mounting kit, contact ViewSonic® or your LCD display from a deskmounted to a wall-mounted display, do the following the instructions in the wall-mounting kit. Lay the LCD display face down on a towel or blanket. 3. Remove the four screws attaching the base. 5. Refer to the instructions that the Power button is turned OFF, then disconnect the power cord. 2. Remove the rear panel covers from inside the four VESA screw holes. 6. Remove...
... VESA screw holes Rear panel covers Four base screws ViewSonic VX910 6 Wall Mounting (Optional) To obtain a wall-mounting kit, contact ViewSonic® or your LCD display from a deskmounted to a wall-mounted display, do the following the instructions in the wall-mounting kit. Lay the LCD display face down on a towel or blanket. 3. Remove the four screws attaching the base. 5. Refer to the instructions that the Power button is turned OFF, then disconnect the power cord. 2. Remove the rear panel covers from inside the four VESA screw holes. 6. Remove...
User Guide
Page 9
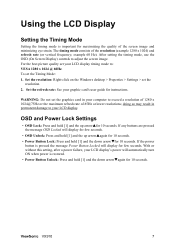
... LCD display timing mode to your LCD display's power will automatically turn ON when power is important for maximizing the quality of the resolution (example 1280 x 1024) and refresh rate (or vertical frequency; For the best picture quality set the graphics card in permanent damage to : VESA 1280 x 1024 @ 60Hz. doing so may result in your graphic card's user guide for instructions. Set the resolution: Right-click on the Windows desktop > Properties > Settings > set the Timing Mode: 1. OSD and Power Lock Settings...
... LCD display timing mode to your LCD display's power will automatically turn ON when power is important for maximizing the quality of the resolution (example 1280 x 1024) and refresh rate (or vertical frequency; For the best picture quality set the graphics card in permanent damage to : VESA 1280 x 1024 @ 60Hz. doing so may result in your graphic card's user guide for instructions. Set the resolution: Right-click on the Windows desktop > Properties > Settings > set the Timing Mode: 1. OSD and Power Lock Settings...
User Guide
Page 10
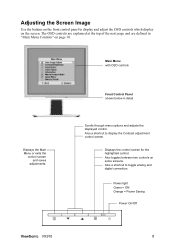
... = Power Saving Power On/Off ViewSonic VX910 8 The OSD controls are explained at the top of the next page and are defined in detail Scrolls through menu options and adjusts the displayed control. Also a shortcut to display the Contrast adjustment control screen. Main Menu with OSD controls Displays the Main Menu or exits the control screen and saves adjustments. Also toggles between two controls on the screen. Front Control Panel shown below in "Main Menu Controls" on page 10. Adjusting the Screen Image Use the buttons...
... = Power Saving Power On/Off ViewSonic VX910 8 The OSD controls are explained at the top of the next page and are defined in detail Scrolls through menu options and adjusts the displayed control. Also a shortcut to display the Contrast adjustment control screen. Main Menu with OSD controls Displays the Main Menu or exits the control screen and saves adjustments. Also toggles between two controls on the screen. Front Control Panel shown below in "Main Menu Controls" on page 10. Adjusting the Screen Image Use the buttons...

User Guide
Page 11
... the LCD display.) ViewSonic VX910 9 To display the Main Menu, press button [1]. Do the following tips may help you optimize your display: • Adjust the computer's graphics card so that it outputs a 1280 x 1024 @ 60Hz video signal to the LCD display. (Look for instructions on "changing the refresh rate" in the graphics card's user guide.) • If necessary, make small adjustments using H. The following to adjust, pressSorTto scroll up or down in the setup menu. 2. To select a control to adjust the display setting...
... the LCD display.) ViewSonic VX910 9 To display the Main Menu, press button [1]. Do the following tips may help you optimize your display: • Adjust the computer's graphics card so that it outputs a 1280 x 1024 @ 60Hz video signal to the LCD display. (Look for instructions on "changing the refresh rate" in the graphics card's user guide.) • If necessary, make small adjustments using H. The following to adjust, pressSorTto scroll up or down in the setup menu. 2. To select a control to adjust the display setting...
User Guide
Page 12
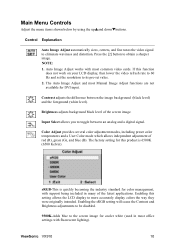
...the latest applications. Main Menu Controls Adjust the menu items shown below by using the upSand downTbuttons. Color Adjust provides several color adjustment modes, including preset color temperatures and a User Color mode which allows independent adjustment of the screen image. Contrast adjusts the difference between an analog and a digital signal. Brightness adjusts background black level of red (R), green (G), and blue (B). sRGB-This is 6500K (6500 Kelvin). Control Explanation Auto Image Adjust automatically sizes, centers, and fine tunes the video signal to toggle between the...
...the latest applications. Main Menu Controls Adjust the menu items shown below by using the upSand downTbuttons. Color Adjust provides several color adjustment modes, including preset color temperatures and a User Color mode which allows independent adjustment of the screen image. Contrast adjusts the difference between an analog and a digital signal. Brightness adjusts background black level of red (R), green (G), and blue (B). sRGB-This is 6500K (6500 Kelvin). Control Explanation Auto Image Adjust automatically sizes, centers, and fine tunes the video signal to toggle between the...
User Guide
Page 13
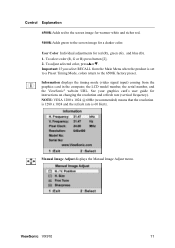
... Mode, colors return to the screen image for a darker color. Important: If you select RECALL from the graphics card in the computer, the LCD model number, the serial number, and the ViewSonic® website URL. See your graphics card's user guide for red (R), green (G), and blue (B). 1. Manual Image Adjust displays the Manual Image Adjust menu. Control Explanation 6500K-Adds red to the screen image for warmer white and richer red. 5400K-Adds green to the 6500K factory preset. User Color Individual adjustments for instructions on changing the resolution and refresh rate (vertical...
... Mode, colors return to the screen image for a darker color. Important: If you select RECALL from the graphics card in the computer, the LCD model number, the serial number, and the ViewSonic® website URL. See your graphics card's user guide for red (R), green (G), and blue (B). 1. Manual Image Adjust displays the Manual Image Adjust menu. Control Explanation 6500K-Adds red to the screen image for warmer white and richer red. 5400K-Adds green to the 6500K factory preset. User Color Individual adjustments for instructions on changing the resolution and refresh rate (vertical...

User Guide
Page 14
.... ViewSonic VX910 12 Sharpness adjusts the clarity and focus of the screen image. OSD Position allows the user to choose the language used in the menus and control screens. Size (Horizontal Size) adjusts the width of the screen image. Resolution Notice displays the Resolution Notice menu shown below : H./V. H. Resolution Notice advises the optimal resolution to use. Control Explanation The Manual Image Adjust controls are explained below: Language Select allows the user to move the OSD menus and control screens. Position (Horizontal/Vertical Position) moves the screen...
.... ViewSonic VX910 12 Sharpness adjusts the clarity and focus of the screen image. OSD Position allows the user to choose the language used in the menus and control screens. Size (Horizontal Size) adjusts the width of the screen image. Resolution Notice displays the Resolution Notice menu shown below : H./V. H. Resolution Notice advises the optimal resolution to use. Control Explanation The Manual Image Adjust controls are explained below: Language Select allows the user to move the OSD menus and control screens. Position (Horizontal/Vertical Position) moves the screen...
User Guide
Page 15
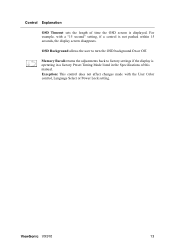
Memory Recall returns the adjustments back to turn the OSD background On or Off. Control Explanation OSD Timeout sets the length of this manual. Exception: This control does not affect changes made with a "15 second" setting, if a control is displayed. ViewSonic VX910 13 For example, with the User Color control, Language Select or Power Lock setting. OSD Background allows the user to factory settings if the display is operating in a factory Preset Timing Mode listed in the Specifications of time the OSD screen is not pushed within 15 seconds, the display screen disappears.
Memory Recall returns the adjustments back to turn the OSD background On or Off. Control Explanation OSD Timeout sets the length of this manual. Exception: This control does not affect changes made with a "15 second" setting, if a control is displayed. ViewSonic VX910 13 For example, with the User Color control, Language Select or Power Lock setting. OSD Background allows the user to factory settings if the display is operating in a factory Preset Timing Mode listed in the Specifications of time the OSD screen is not pushed within 15 seconds, the display screen disappears.
User Guide
Page 16
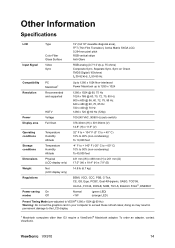
... Information Specifications LCD Type Color Filter Glass Surface 19" (full 19" viewable diagonal area), TFT (Thin Film Transistor), Active Matrix SXGA LCD, 0.294 mm pixel pitch RGB vertical stripe Anti-Glare Input Signal Video Sync RGB analog (0.7/1.0 Vp-p, 75 ohms) Composite Sync, Separate Sync, Sync on Green TMDS Digital (100ohms) fh:30-82 kHz, fv:50-85 Hz Compatibility PC Macintosh1 Up to 1280 x 1024 Non-interlaced Power Macintosh up to 1280 x 1024 Resolution...
... Information Specifications LCD Type Color Filter Glass Surface 19" (full 19" viewable diagonal area), TFT (Thin Film Transistor), Active Matrix SXGA LCD, 0.294 mm pixel pitch RGB vertical stripe Anti-Glare Input Signal Video Sync RGB analog (0.7/1.0 Vp-p, 75 ohms) Composite Sync, Separate Sync, Sync on Green TMDS Digital (100ohms) fh:30-82 kHz, fv:50-85 Hz Compatibility PC Macintosh1 Up to 1280 x 1024 Non-interlaced Power Macintosh up to 1280 x 1024 Resolution...
User Guide
Page 17
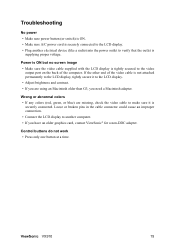
.... Power is ON but no screen image • Make sure the video cable supplied with the LCD display is tightly secured to the video output port on the back of the video cable is not attached permanently to the LCD display, tightly secure it is securely connected. Troubleshooting No power • Make sure power button (or switch) is ON. • Make sure A/C power cord is securely connected to the LCD display. • Plug another computer. • If you need a Macintosh adapter. ViewSonic VX910...
.... Power is ON but no screen image • Make sure the video cable supplied with the LCD display is tightly secured to the video output port on the back of the video cable is not attached permanently to the LCD display, tightly secure it is securely connected. Troubleshooting No power • Make sure power button (or switch) is ON. • Make sure A/C power cord is securely connected to the LCD display. • Plug another computer. • If you need a Macintosh adapter. ViewSonic VX910...
User Guide
Page 18
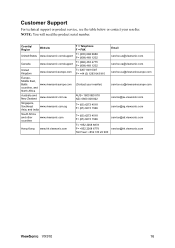
... F= +852 2268 6778 Toll Free= +852 310 22 900 Email service.us@viewsonic.com service.ca@viewsonic.com service[email protected] service[email protected] service@au.viewsonic.com service@sg.viewsonic.com service@sd.viewsonic.com service@hk.viewsonic.com ViewSonic VX910 16 Country/ Region Website T = Telephone F = FAX United States www.viewsonic.com/support T= (800) 688 6688 F= (909) 468 1202 Canada www.viewsonic.com/support T= (886) 463 4775 F= (909...
... F= +852 2268 6778 Toll Free= +852 310 22 900 Email service.us@viewsonic.com service.ca@viewsonic.com service[email protected] service[email protected] service@au.viewsonic.com service@sg.viewsonic.com service@sd.viewsonic.com service@hk.viewsonic.com ViewSonic VX910 16 Country/ Region Website T = Telephone F = FAX United States www.viewsonic.com/support T= (800) 688 6688 F= (909) 468 1202 Canada www.viewsonic.com/support T= (886) 463 4775 F= (909...

User Guide
Page 19
... the screen and/or case of the LCD display. • ViewSonic will not be liable for damage resulting from use of any ammonia or alcohol-based cleaners on the LCD display screen or case. If further cleaning is required, apply a small amount of non-ammonia, non-alcohol based glass cleaner onto a clean, soft, lint-free cloth, and wipe the screen. To clean the screen: 1. This removes dust...
... the screen and/or case of the LCD display. • ViewSonic will not be liable for damage resulting from use of any ammonia or alcohol-based cleaners on the LCD display screen or case. If further cleaning is required, apply a small amount of non-ammonia, non-alcohol based glass cleaner onto a clean, soft, lint-free cloth, and wipe the screen. To clean the screen: 1. This removes dust...
User Guide
Page 20
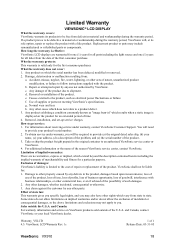
... problem, and (e) the serial number of time. 4. Replacement product or parts may not apply to be free from : a. g. For information about receiving service under warranty, you will be liable for all parts including the light source and one (1) years for all labor from state to provide your product's serial number. 2. Effect of such damages. 2. Removal, installation, and set-up service charges. Use of the nearest ViewSonic service center, contact ViewSonic...
... problem, and (e) the serial number of time. 4. Replacement product or parts may not apply to be free from : a. g. For information about receiving service under warranty, you will be liable for all parts including the light source and one (1) years for all labor from state to provide your product's serial number. 2. Effect of such damages. 2. Removal, installation, and set-up service charges. Use of the nearest ViewSonic service center, contact ViewSonic...


