
User Guide
Page 2
Contents Product Registration 2 For Your Records 2 Getting Started Package Contents 3 Precautions 3 Quick Installation 4 Installation of Wall Mount (Optional 5 Using the LCD Display Setting the Timing Mode 6 OSD and Power Lock Settings 6 Adjusting the Screen Image 7 Main Menu Controls 9 Other Information Specifications 13 Troubleshooting 14 Customer Support 15 Cleaning the LCD Display 16 Limited Warranty 17 Appendix Safety Guidelines 18 Compliance Information for U.S.A 19 CE Conformity for Europe 19 03/22/04 D ViewSonic VX900 1
Contents Product Registration 2 For Your Records 2 Getting Started Package Contents 3 Precautions 3 Quick Installation 4 Installation of Wall Mount (Optional 5 Using the LCD Display Setting the Timing Mode 6 OSD and Power Lock Settings 6 Adjusting the Screen Image 7 Main Menu Controls 9 Other Information Specifications 13 Troubleshooting 14 Customer Support 15 Cleaning the LCD Display 16 Limited Warranty 17 Appendix Safety Guidelines 18 Compliance Information for U.S.A 19 CE Conformity for Europe 19 03/22/04 D ViewSonic VX900 1
User Guide
Page 4
...-screen colors. Orient your LCD display away from your LCD display in this user guide refers to remove. • Never remove the rear cover. ViewSonic VX900 3 Do not place anything on your LCD display that you touch them. • Avoid exposing your LCD display to continue using the LCD display. It is present, immediately switch the LCD display off and call your purchase of moisture. • Do not place heavy objects on the LCD display, video cable, or power cord...
...-screen colors. Orient your LCD display away from your LCD display in this user guide refers to remove. • Never remove the rear cover. ViewSonic VX900 3 Do not place anything on your LCD display that you touch them. • Avoid exposing your LCD display to continue using the LCD display. It is present, immediately switch the LCD display off and call your purchase of moisture. • Do not place heavy objects on the LCD display, video cable, or power cord...
User Guide
Page 5
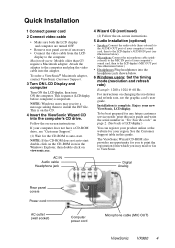
... refresh rate) Example: 1280 x 1024 @ 60 Hz. NOTE: Windows users may mail or fax to install the INF file. Enjoy your computer's sound card, then to the computer Macintosh users: Models older than G3 require a Macintosh adapter. The ViewSonic Wizard CD-ROM also provides an opportunity for any future customer service needs: print this guide. Quick Installation 1 Connect power cord 2 Connect video cable • Make sure both the LCD display and computer are turned OFF • Remove...
... refresh rate) Example: 1280 x 1024 @ 60 Hz. NOTE: Windows users may mail or fax to install the INF file. Enjoy your computer's sound card, then to the computer Macintosh users: Models older than G3 require a Macintosh adapter. The ViewSonic Wizard CD-ROM also provides an opportunity for any future customer service needs: print this guide. Quick Installation 1 Connect power cord 2 Connect video cable • Make sure both the LCD display and computer are turned OFF • Remove...
User Guide
Page 6
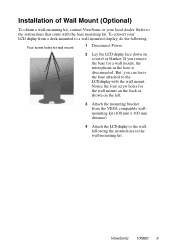
... the instructions that come with the wall mount. ViewSonic VX900 5 To convert your local dealer. Notice the four screw holes for the wall mount on the back as shown on a towel or blanket. But, you remove the base for a wall mount, the microphone in the wall-mounting kit. Refer to the LCD display with the base mounting kit. Installation of Wall Mount (Optional) To obtain a wall-mounting kit, contact ViewSonic or your LCD display from the VESA compatible...
... the instructions that come with the wall mount. ViewSonic VX900 5 To convert your local dealer. Notice the four screw holes for the wall mount on the back as shown on a towel or blanket. But, you remove the base for a wall mount, the microphone in the wall-mounting kit. Refer to the LCD display with the base mounting kit. Installation of Wall Mount (Optional) To obtain a wall-mounting kit, contact ViewSonic or your LCD display from the VESA compatible...
User Guide
Page 7
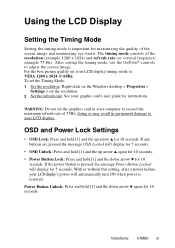
.... ViewSonic VX900 6 Using the LCD Display Setting the Timing Mode Setting the timing mode is important for 5 seconds. After setting the timing mode, use the OnView® controls to : VESA 1280 x 1024 @ 60Hz. With or without this setting, after a power failure, your LCD display's power will display for 5 seconds. • OSD Unlock: Press and hold [1] and the up arrow ▲ for instructions. The timing mode consists of 75Hz; For the best picture quality set your LCD display . If any buttons...
.... ViewSonic VX900 6 Using the LCD Display Setting the Timing Mode Setting the timing mode is important for 5 seconds. After setting the timing mode, use the OnView® controls to : VESA 1280 x 1024 @ 60Hz. With or without this setting, after a power failure, your LCD display's power will display for 5 seconds. • OSD Unlock: Press and hold [1] and the up arrow ▲ for instructions. The timing mode consists of 75Hz; For the best picture quality set your LCD display . If any buttons...
User Guide
Page 8
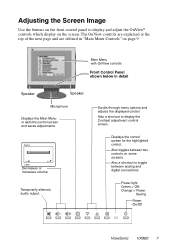
... controls Front Control Panel shown below in "Main Menu Controls" on the screen. Scrolls through menu options and adjusts the displayed control. Also toggles between analog and digital connections. Also a shortcut to display the Contrast adjustment control screen. Temporarily silences audio output. The OnView controls are explained at the top of the next page and are defined in detail Speaker Speaker Microphone Displays the Main Menu or exits the control screen and saves adjustments. Power light Green = ON Orange = Power Saving Power On/Off ViewSonic VX900...
... controls Front Control Panel shown below in "Main Menu Controls" on the screen. Scrolls through menu options and adjusts the displayed control. Also toggles between analog and digital connections. Also a shortcut to display the Contrast adjustment control screen. Temporarily silences audio output. The OnView controls are explained at the top of the next page and are defined in detail Speaker Speaker Microphone Displays the Main Menu or exits the control screen and saves adjustments. Power light Green = ON Orange = Power Saving Power On/Off ViewSonic VX900...
User Guide
Page 9
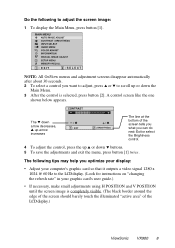
Do the following tips may help you optimize your display: • Adjust your computer's graphic card so that it outputs a video signal 1280 x 1024 @ 60 Hz to the LCD display. (Look for instructions on "changing the refresh rate" in your graphic card's user guide.) • If necessary, make small adjustments using H POSITION and V POSITION until the screen image is selected, press button [2]. NOTE: All OnView menus and adjustment screens disappear automatically after about 30 seconds. 2 To select...
Do the following tips may help you optimize your display: • Adjust your computer's graphic card so that it outputs a video signal 1280 x 1024 @ 60 Hz to the LCD display. (Look for instructions on "changing the refresh rate" in your graphic card's user guide.) • If necessary, make small adjustments using H POSITION and V POSITION until the screen image is selected, press button [2]. NOTE: All OnView menus and adjustment screens disappear automatically after about 30 seconds. 2 To select...
User Guide
Page 10
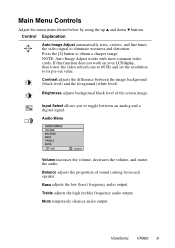
...; buttons. NOTE: Auto Image Adjust works with most common video cards. Bass adjusts the low (bass) frequency audio output. Mute temporarily silences audio output. Control Explanation Auto Image Adjust automatically sizes, centers, and fine tunes the video signal to toggle between the image background (black level) and the foreground (white level). If this function does not work on your LCDdisplay, then lower the video refresh rate to 60 Hz and set value. ViewSonic VX900 9 Audio Menu Volume increases the volume, decreases the volume...
...; buttons. NOTE: Auto Image Adjust works with most common video cards. Bass adjusts the low (bass) frequency audio output. Mute temporarily silences audio output. Control Explanation Auto Image Adjust automatically sizes, centers, and fine tunes the video signal to toggle between the image background (black level) and the foreground (white level). If this function does not work on your LCDdisplay, then lower the video refresh rate to 60 Hz and set value. ViewSonic VX900 9 Audio Menu Volume increases the volume, decreases the volume...

User Guide
Page 11
The factory setting for cooler white (used in most office settings with fluorescent lighting). 6500K - Adds blue to the screen image for this product is set to a Preset Timing Mode, colors return to the 6500K factory preset. Control Explanation Color Adjust provides several color adjustment modes: preset color temperatures and RGB which allows you select RECALL from the Main Menu when the product is 6500K (6500 Kelvin). 9300K - ViewSonic VX900 10 User - Adds green to the screen image for...
The factory setting for cooler white (used in most office settings with fluorescent lighting). 6500K - Adds blue to the screen image for this product is set to a Preset Timing Mode, colors return to the 6500K factory preset. Control Explanation Color Adjust provides several color adjustment modes: preset color temperatures and RGB which allows you select RECALL from the Main Menu when the product is 6500K (6500 Kelvin). 9300K - ViewSonic VX900 10 User - Adds green to the screen image for...
User Guide
Page 12
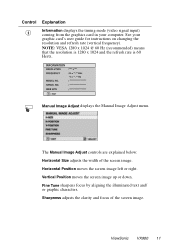
... image up or down. ViewSonic VX900 11 Control Explanation Information displays the timing mode (video signal input) coming from the graphics card in your graphic card's user guide for instructions on changing the resolution and refresh rate (vertical frequency). Sharpness adjusts the clarity and focus of the screen image. Fine Tune sharpens focus by aligning the illuminated text and/ or graphic characters. The Manual Image Adjust controls are explained below: Horizontal Size adjusts the width of the screen image. Manual Image Adjust displays the Manual Image Adjust menu...
... image up or down. ViewSonic VX900 11 Control Explanation Information displays the timing mode (video signal input) coming from the graphics card in your graphic card's user guide for instructions on changing the resolution and refresh rate (vertical frequency). Sharpness adjusts the clarity and focus of the screen image. Fine Tune sharpens focus by aligning the illuminated text and/ or graphic characters. The Manual Image Adjust controls are explained below: Horizontal Size adjusts the width of the screen image. Manual Image Adjust displays the Manual Image Adjust menu...
User Guide
Page 13
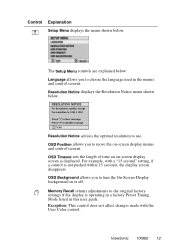
... Setup Menu displays the menu shown below : Language allows you to choose the language used in this user guide. OSD Position allows you to use. Memory Recall returns adjustments to move the on or off. Resolution Notice advises the optimal resolution to turn the On-Screen-Display background on -screen display menus and control screens. OSD Background allows you to the original factory settings if the display is operating in a factory Preset Timing Mode listed in the menus and control screens. ViewSonic VX900...
... Setup Menu displays the menu shown below : Language allows you to choose the language used in this user guide. OSD Position allows you to use. Memory Recall returns adjustments to move the on or off. Resolution Notice advises the optimal resolution to turn the On-Screen-Display background on -screen display menus and control screens. OSD Background allows you to the original factory settings if the display is operating in a factory Preset Timing Mode listed in the menus and control screens. ViewSonic VX900...

User Guide
Page 14
Other Information Specifications LCD Input signal Compatibility Resolution Power Display area Operating conditions Storage conditions Dimensions Type Color Filter Glass surface Video Sync PC Macintosh1 Recommended and supported Voltage Full Scan Temperature Humidity Altitude Temperature Humidity Altitude Physical (LCD display only) 19" (full 19" viewable diagonal area), TFT (Thin Film Transistor), Active Matrix SXGA LCD, 0.294 mm pixel pitch RGB vertical stripe Anti-Glare RGB analog (0.7/1.0 Vp-p, 75 ohms) Composite Sync, Separate Sync, Sync on Green fh:30...
Other Information Specifications LCD Input signal Compatibility Resolution Power Display area Operating conditions Storage conditions Dimensions Type Color Filter Glass surface Video Sync PC Macintosh1 Recommended and supported Voltage Full Scan Temperature Humidity Altitude Temperature Humidity Altitude Physical (LCD display only) 19" (full 19" viewable diagonal area), TFT (Thin Film Transistor), Active Matrix SXGA LCD, 0.294 mm pixel pitch RGB vertical stripe Anti-Glare RGB analog (0.7/1.0 Vp-p, 75 ohms) Composite Sync, Separate Sync, Sync on Green fh:30...
User Guide
Page 15
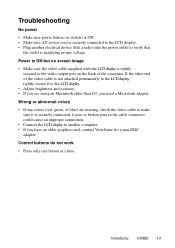
... any colors (red, green, or blue) are using an Macintosh older than G3, you need a Macintosh adapter. Power is ON but no screen image • Make sure the video cable supplied with the LCD display is tightly secured to the video output port on the back of the video cable is not attached permanently to the LCD display, tightly secure it to the LCD display. • Adjust brightness and contrast. • If you are missing, check the video cable to make...
... any colors (red, green, or blue) are using an Macintosh older than G3, you need a Macintosh adapter. Power is ON but no screen image • Make sure the video cable supplied with the LCD display is tightly secured to the video output port on the back of the video cable is not attached permanently to the LCD display, tightly secure it to the LCD display. • Adjust brightness and contrast. • If you are missing, check the video cable to make...
User Guide
Page 17
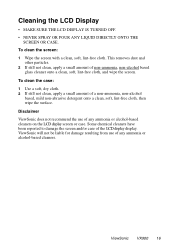
... LCD display display. To clean the screen: 1 Wipe the screen with a clean, soft, lint-free cloth. ViewSonic VX900 16 Disclaimer ViewSonic does not recommend the use of a non-ammonia, non-alcohol based, mild non-abrasive detergent onto a clean, soft, lint-free cloth, then wipe the surface. Some chemical cleaners have been reported to damage the screen and/or case of any ammonia or alcohol-based cleaners. This removes...
... LCD display display. To clean the screen: 1 Wipe the screen with a clean, soft, lint-free cloth. ViewSonic VX900 16 Disclaimer ViewSonic does not recommend the use of a non-ammonia, non-alcohol based, mild non-abrasive detergent onto a clean, soft, lint-free cloth, then wipe the surface. Some chemical cleaners have been reported to damage the screen and/or case of any ammonia or alcohol-based cleaners. This removes...
User Guide
Page 18
..., or other cause which the serial number has been defaced, modified or removed. 2. Removal, installation, and set-up service charges. Some states do not allow limitations on which does not relate to an authorized ViewSonic service center or ViewSonic. 4. What the warranty does not cover: 1. e. If a product proves to be required to state. g. ViewSonic LCD Warranty (V3.0) Release Date: 01-29-2002 ViewSonic VX900 17
..., or other cause which the serial number has been defaced, modified or removed. 2. Removal, installation, and set-up service charges. Some states do not allow limitations on which does not relate to an authorized ViewSonic service center or ViewSonic. 4. What the warranty does not cover: 1. e. If a product proves to be required to state. g. ViewSonic LCD Warranty (V3.0) Release Date: 01-29-2002 ViewSonic VX900 17
User Guide
Page 19
...: THIS APPLIANCE MUST BE EARTHED. SEV Britain BASE/BS Japan Electric Appliance Control Act IMPORTANT NOTICE CONCERNING POWER CORD SELECTION The power cord set is coloured BROWN must be fitted, please observe the wiring code as follows: The wire which is coloured GREEN-AND-YELLOW must be used . Use the following code: Green-and-Yellow: Earth Blue: Neutral Brown: Live If the coloured wires...
...: THIS APPLIANCE MUST BE EARTHED. SEV Britain BASE/BS Japan Electric Appliance Control Act IMPORTANT NOTICE CONCERNING POWER CORD SELECTION The power cord set is coloured BROWN must be fitted, please observe the wiring code as follows: The wire which is coloured GREEN-AND-YELLOW must be used . Use the following code: Green-and-Yellow: Earth Blue: Neutral Brown: Live If the coloured wires...
User Guide
Page 20
... cause harmful interference to part 15 of the FCC Rules. ViewSonic VX900 19 This equipment has been tested and found to comply with bonded ferrite cores. FCC Warning To assure continued FCC compliance, the user must use only a shielded BNC(5) cable. Compliance Information for a Class B digital device, pursuant to radio communications. CE Conformity for help. If this device. These...
... cause harmful interference to part 15 of the FCC Rules. ViewSonic VX900 19 This equipment has been tested and found to comply with bonded ferrite cores. FCC Warning To assure continued FCC compliance, the user must use only a shielded BNC(5) cable. Compliance Information for a Class B digital device, pursuant to radio communications. CE Conformity for help. If this device. These...
Quick Start Guide
Page 1
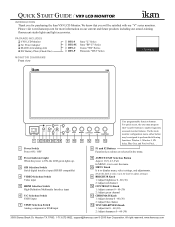
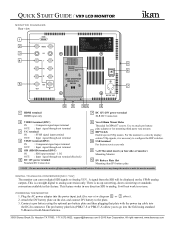
.... QUICK START GUIDE / VX9 LCD MONITOR INTRODUCTION Thank you will be assigned to perform the following functions: Window 1, Window 2, HV delay, Blue Gun, and Pixel to Pixel, . 1 Power Switch Power ON / OFF 8 F1 and F2 Buttons Function key actions are selected in the menu. 2 Power Indicator Light When the power is ON, the LED green lights up. 3 SDI Selection Switch Serial digital interface input (HD/SD compatible) 4 VIDEO Selection Switch Video input 5 HDMI Selection Switch High-Definition Multimedia Interface input 6 Y/C Selection Switch SVHS input 7 YPbPr...
.... QUICK START GUIDE / VX9 LCD MONITOR INTRODUCTION Thank you will be assigned to perform the following functions: Window 1, Window 2, HV delay, Blue Gun, and Pixel to Pixel, . 1 Power Switch Power ON / OFF 8 F1 and F2 Buttons Function key actions are selected in the menu. 2 Power Indicator Light When the power is ON, the LED green lights up. 3 SDI Selection Switch Serial digital interface input (HD/SD compatible) 4 VIDEO Selection Switch Video input 5 HDMI Selection Switch High-Definition Multimedia Interface input 6 Y/C Selection Switch SVHS input 7 YPbPr...
Quick Start Guide
Page 2
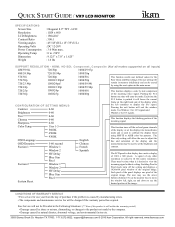
... right reserved. The user must turn the monitor off before making changes to Analog YUV. www.ikancorp.com DIGITAL TO ANALOG CONVERSION [SDI > YUV] The monitor can convert digital SDI signals to the DIP switches. There is no up converting, down converting or standards conversion available in one direction SDI to analog conversion only. This feature works in this feature. QUICK START GUIDE / VX9 LCD MONITOR MONITOR DIAGRAMS Rear view HDMI 1 2 VIDEO 3 Y/C Switch On 4 1 50p...
... right reserved. The user must turn the monitor off before making changes to Analog YUV. www.ikancorp.com DIGITAL TO ANALOG CONVERSION [SDI > YUV] The monitor can convert digital SDI signals to the DIP switches. There is no up converting, down converting or standards conversion available in one direction SDI to analog conversion only. This feature works in this feature. QUICK START GUIDE / VX9 LCD MONITOR MONITOR DIAGRAMS Rear view HDMI 1 2 VIDEO 3 Y/C Switch On 4 1 50p...
Quick Start Guide
Page 3
... Sharpness 0-60 This function displays the blanking portion of the original image. Each pixel of the panel displays one year from the day of the display or set the brightness and Fuction 1 Window 1 French contrast. Free Service will be Provided in this native resolution. Use Window 1 for 16:9 signals and Window 2 for one pixel of the incoming signal. Color Temp. The blue only setting will allow the user to adjust the hue and saturation of...
... Sharpness 0-60 This function displays the blanking portion of the original image. Each pixel of the panel displays one year from the day of the display or set the brightness and Fuction 1 Window 1 French contrast. Free Service will be Provided in this native resolution. Use Window 1 for 16:9 signals and Window 2 for one pixel of the incoming signal. Color Temp. The blue only setting will allow the user to adjust the hue and saturation of...


