User Guide
Page 2
Contents Product Registration 2 For Your Records 2 Getting Started Package Contents 3 Precautions 3 Quick Installation 4 Installation of Wall Mount (Optional 5 Using the LCD Display Setting the Timing Mode 6 OSD and Power Lock Settings 6 Adjusting the Screen Image 7 Main Menu Controls 9 Other Information Specifications 13 Troubleshooting 14 Customer Support 15 Cleaning the LCD Display 16 Limited Warranty 17 Appendix Safety Guidelines 18 Compliance Information for U.S.A 19 CE Conformity for Europe 19 12/29/03 B ViewSonic VG900_VG900b 1
Contents Product Registration 2 For Your Records 2 Getting Started Package Contents 3 Precautions 3 Quick Installation 4 Installation of Wall Mount (Optional 5 Using the LCD Display Setting the Timing Mode 6 OSD and Power Lock Settings 6 Adjusting the Screen Image 7 Main Menu Controls 9 Other Information Specifications 13 Troubleshooting 14 Customer Support 15 Cleaning the LCD Display 16 Limited Warranty 17 Appendix Safety Guidelines 18 Compliance Information for U.S.A 19 CE Conformity for Europe 19 12/29/03 B ViewSonic VG900_VG900b 1
User Guide
Page 3
...: Model Number: Document Number: Serial Number: Purchase Date: ViewSonic VG900 / VG900b VLCDS24020-3W/ VLCDS24020-2W A-CD-VG900-1/ A-CD-VG900b-1 Product disposal at end of product life ViewSonic is concerned about proper disposal. ViewSonic VG900_VG900b 2 In the interest of VESA. Product Registration To meet your product on the Internet at the end of ViewSonic Corporation. Your local waste disposal company may change product specifications without...
...: Model Number: Document Number: Serial Number: Purchase Date: ViewSonic VG900 / VG900b VLCDS24020-3W/ VLCDS24020-2W A-CD-VG900-1/ A-CD-VG900b-1 Product disposal at end of product life ViewSonic is concerned about proper disposal. ViewSonic VG900_VG900b 2 In the interest of VESA. Product Registration To meet your product on the Internet at the end of ViewSonic Corporation. Your local waste disposal company may change product specifications without...
User Guide
Page 4
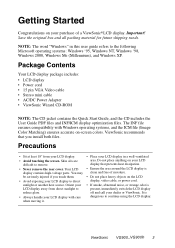
... your LCD display. • Avoid touching the screen. Orient your LCD display away from your LCD display in this user guide refers to continue using the LCD display. Package Contents Your LCD display package includes: • LCD display • Power cord • 15 pin VGA Video cable • Stereo mini cable • AC/DC Power Adapter • ViewSonic Wizard CD-ROM NOTE: The CD jacket contains the Quick Start Guide, and the CD includes the User Guide PDF files and INF/ICM display optimization...
... your LCD display. • Avoid touching the screen. Orient your LCD display away from your LCD display in this user guide refers to continue using the LCD display. Package Contents Your LCD display package includes: • LCD display • Power cord • 15 pin VGA Video cable • Stereo mini cable • AC/DC Power Adapter • ViewSonic Wizard CD-ROM NOTE: The CD jacket contains the Quick Start Guide, and the CD includes the User Guide PDF files and INF/ICM display optimization...
User Guide
Page 5
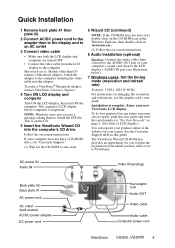
... guide. To order a ViewSonic® Macintosh adapter, contact ViewSonic Customer Support. 4 Turn ON LCD display and computer Turn ON the LCD display, then turn ON the computer. Enjoy your region. DC power IN Audio IN Video IN (analog) Back plate #2 Back plate #1 AC power cord AC outlet (wall socket) AC/DC power adapter DC power cord Kensington lock Audio OUT Video cable Audio cable Computer power cord ViewSonic VG900_VG900b 4 Installation is important. See the Customer Support table in this user guide and write the serial number in the Windows...
... guide. To order a ViewSonic® Macintosh adapter, contact ViewSonic Customer Support. 4 Turn ON LCD display and computer Turn ON the LCD display, then turn ON the computer. Enjoy your region. DC power IN Audio IN Video IN (analog) Back plate #2 Back plate #1 AC power cord AC outlet (wall socket) AC/DC power adapter DC power cord Kensington lock Audio OUT Video cable Audio cable Computer power cord ViewSonic VG900_VG900b 4 Installation is important. See the Customer Support table in this user guide and write the serial number in the Windows...

User Guide
Page 6
... a wall-mounted display, do the following: Four screw holes for the wall mount on the back as shown on a towel or blanket. Installation of Wall Mount (Optional) To obtain a wall-mounting kit, contact ViewSonic or your LCD display from the VESA compatible wallmounting kit (100 mm x 100 mm distance). 4 Attach the LCD display to the wall, following the instructions in the wall-mounting kit. ViewSonic VG900_VG900b 5 Refer to the instructions that come with the base mounting...
... a wall-mounted display, do the following: Four screw holes for the wall mount on the back as shown on a towel or blanket. Installation of Wall Mount (Optional) To obtain a wall-mounting kit, contact ViewSonic or your LCD display from the VESA compatible wallmounting kit (100 mm x 100 mm distance). 4 Attach the LCD display to the wall, following the instructions in the wall-mounting kit. ViewSonic VG900_VG900b 5 Refer to the instructions that come with the base mounting...
User Guide
Page 7
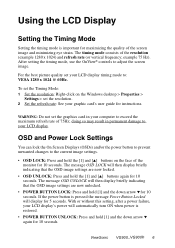
... unwanted changes to exceed the maximum refresh rate of the resolution (example 1280 x 1024) and refresh rate (or vertical frequency; Using the LCD Display Setting the Timing Mode Setting the timing mode is pressed the message Power Button Locked will display for 5 seconds. The timing mode consists of 75Hz; After setting the timing mode, use the OnView® controls to your LCD display. With or without this setting, after a power failure, your computer to the current image settings. • OSD LOCK: Press...
... unwanted changes to exceed the maximum refresh rate of the resolution (example 1280 x 1024) and refresh rate (or vertical frequency; Using the LCD Display Setting the Timing Mode Setting the timing mode is pressed the message Power Button Locked will display for 5 seconds. The timing mode consists of 75Hz; After setting the timing mode, use the OnView® controls to your LCD display. With or without this setting, after a power failure, your computer to the current image settings. • OSD LOCK: Press...

User Guide
Page 8
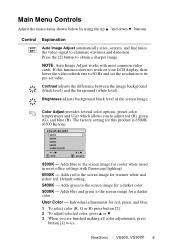
...detail Speaker Speaker Displays the Main Menu or exits the control screen and saves adjustments Decreases or increases volume Temporarily silences audio output Scrolls through menu options and adjusts the displayed control. Power light Green = ON Orange = Power Saving Power On/Off ViewSonic VG900_VG900b 7 Adjusting the Screen Image Use the buttons on the front control panel to display the Contrast adjustment control screen. Also toggles between two controls on page 9. Displays the control screen for the highlighted control. Main Menu with OnView controls Front Control Panel shown...
...detail Speaker Speaker Displays the Main Menu or exits the control screen and saves adjustments Decreases or increases volume Temporarily silences audio output Scrolls through menu options and adjusts the displayed control. Power light Green = ON Orange = Power Saving Power On/Off ViewSonic VG900_VG900b 7 Adjusting the Screen Image Use the buttons on the front control panel to display the Contrast adjustment control screen. Also toggles between two controls on page 9. Displays the control screen for the highlighted control. Main Menu with OnView controls Front Control Panel shown...
User Guide
Page 9
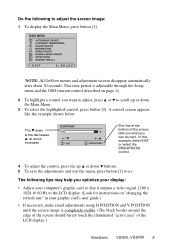
Do the following tips may help you optimize your display: • Adjust your graphic card's user guide.) • If necessary, make small adjustments using H POSITION and V POSITION until the screen image is adjustable through the Setup menu and the OSD timeout control described on "changing the refresh rate" in this example, either EXIT or select the BRIGHTNESS control. 4 To adjust the control, press the up or down ▼ buttons. 5 To save the adjustments and exit the menu, press button [1] twice. The ▼...
Do the following tips may help you optimize your display: • Adjust your graphic card's user guide.) • If necessary, make small adjustments using H POSITION and V POSITION until the screen image is adjustable through the Setup menu and the OSD timeout control described on "changing the refresh rate" in this example, either EXIT or select the BRIGHTNESS control. 4 To adjust the control, press the up or down ▼ buttons. 5 To save the adjustments and exit the menu, press button [1] twice. The ▼...
User Guide
Page 10
... making all color adjustments, press button [1] twice. The factory setting for a darker color. Default setting. 5400K - Adds blue and green to its pre-set value. If this function does not work on your LCD display, then lower the video refresh rate to 60 Hz and set the resolution to the screen image for this product is 6500K (6500 Kelvin). 9300K - User Color - Main Menu Controls Adjust the menu items shown below by using the up ▲ and down ▼ buttons. ViewSonic...
... making all color adjustments, press button [1] twice. The factory setting for a darker color. Default setting. 5400K - Adds blue and green to its pre-set value. If this function does not work on your LCD display, then lower the video refresh rate to 60 Hz and set the resolution to the screen image for this product is 6500K (6500 Kelvin). 9300K - User Color - Main Menu Controls Adjust the menu items shown below by using the up ▲ and down ▼ buttons. ViewSonic...
User Guide
Page 11
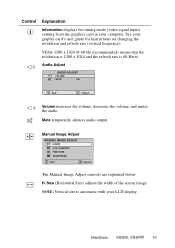
... computer. ViewSonic VG900_VG900b 10 VESA 1280 x 1024 @ 60 Hz (recommended) means that the resolution is 1280 x 1024 and the refresh rate is automatic with your LCD display. Mute temporarily silences audio output. Audio Adjust AUDIO ADJUST VOLUME MUTE ON 1 : Exit 2 : Select Volume increases the volume, decreases the volume, and mutes the audio. Control Explanation Information displays the timing mode (video signal input) coming from the graphics card in your graphic card's user guide for instructions on changing the resolution and refresh rate (vertical frequency).
... computer. ViewSonic VG900_VG900b 10 VESA 1280 x 1024 @ 60 Hz (recommended) means that the resolution is 1280 x 1024 and the refresh rate is automatic with your LCD display. Mute temporarily silences audio output. Audio Adjust AUDIO ADJUST VOLUME MUTE ON 1 : Exit 2 : Select Volume increases the volume, decreases the volume, and mutes the audio. Control Explanation Information displays the timing mode (video signal input) coming from the graphics card in your graphic card's user guide for instructions on changing the resolution and refresh rate (vertical frequency).
User Guide
Page 12
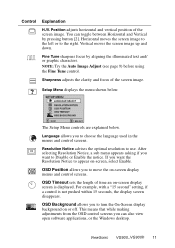
... -screen, select Enable. Position adjusts horizontal and vertical position of the screen image. You can also view open software applications, or the Windows desktop. Vertical moves the screen image up and down. Sharpness adjusts the clarity and focus of the screen image. If you to appear on or off. Horizontal moves the screen image to the left or to use. Fine Tune sharpens focus by pressing button [2]. Setup Menu displays the menu shown below . Resolution Notice advises the optimal resolution...
... -screen, select Enable. Position adjusts horizontal and vertical position of the screen image. You can also view open software applications, or the Windows desktop. Vertical moves the screen image up and down. Sharpness adjusts the clarity and focus of the screen image. If you to appear on or off. Horizontal moves the screen image to the left or to use. Fine Tune sharpens focus by pressing button [2]. Setup Menu displays the menu shown below . Resolution Notice advises the optimal resolution...
User Guide
Page 13
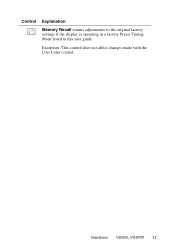
ViewSonic VG900_VG900b 12 Control Explanation Memory Recall returns adjustments to the original factory settings if the display is operating in a factory Preset Timing Mode listed in this user guide. Exception: This control does not affect changes made with the User Color control.
ViewSonic VG900_VG900b 12 Control Explanation Memory Recall returns adjustments to the original factory settings if the display is operating in a factory Preset Timing Mode listed in this user guide. Exception: This control does not affect changes made with the User Color control.
User Guide
Page 14
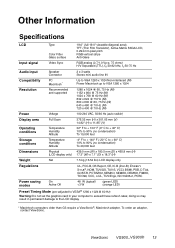
... Specifications LCD Type Color Filter Glass surface 19.0" (full 19.0" viewable diagonal area), TFT (Thin Film Transistor), Active Matrix SXGA LCD, 0.294 mm pixel pitch RGB vertical stripe Anti-Glare Input signal Video Sync RGB analog (0.7/1.0 Vp-p, 75 ohms) H/V Separated (TTL), fh:30-82 kHz, fv:50-75 Hz Audio input Speaker Connector 2 x 3 watts Stereo mini audio line IN Compatibility PC Macintosh* Up to VGA 1280 x 1024 Non-interlaced (NI) Power Macintosh up to VGA...
... Specifications LCD Type Color Filter Glass surface 19.0" (full 19.0" viewable diagonal area), TFT (Thin Film Transistor), Active Matrix SXGA LCD, 0.294 mm pixel pitch RGB vertical stripe Anti-Glare Input signal Video Sync RGB analog (0.7/1.0 Vp-p, 75 ohms) H/V Separated (TTL), fh:30-82 kHz, fv:50-75 Hz Audio input Speaker Connector 2 x 3 watts Stereo mini audio line IN Compatibility PC Macintosh* Up to VGA 1280 x 1024 Non-interlaced (NI) Power Macintosh up to VGA...
User Guide
Page 15
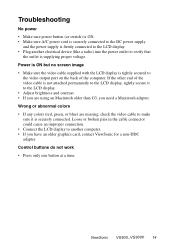
...; Adjust brightness and contrast. • If you are missing, check the video cable to verify that the outlet is supplying proper voltage. Troubleshooting No power • Make sure power button (or switch) is ON. • Make sure A/C power cord is securely connected to the DC power supply and the power supply is firmly connected to the LCD display. • Plug another computer. • If you have an older graphics card, contact ViewSonic for a non-DDC adapter. Control buttons do not work...
...; Adjust brightness and contrast. • If you are missing, check the video cable to verify that the outlet is supplying proper voltage. Troubleshooting No power • Make sure power button (or switch) is ON. • Make sure A/C power cord is securely connected to the DC power supply and the power supply is firmly connected to the LCD display. • Plug another computer. • If you have an older graphics card, contact ViewSonic for a non-DDC adapter. Control buttons do not work...
User Guide
Page 16
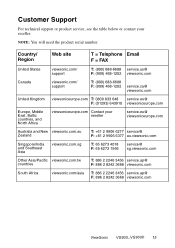
....com Contact your reseller. NOTE: You will need the product serial number. Customer Support For technical support or product service, see the table below or contact your reseller service.eu@ viewsoniceurope.com Australia and New viewsonic.com.au Zealand T: +61 2 9906 6277 service@ F: +61 2 9906 6377 au.viewsonic.com Singapore/India and Southeast Asia viewsonic.com.sg T: 65 6273 4018 F: 65...
....com Contact your reseller. NOTE: You will need the product serial number. Customer Support For technical support or product service, see the table below or contact your reseller service.eu@ viewsoniceurope.com Australia and New viewsonic.com.au Zealand T: +61 2 9906 6277 service@ F: +61 2 9906 6377 au.viewsonic.com Singapore/India and Southeast Asia viewsonic.com.sg T: 65 6273 4018 F: 65...
User Guide
Page 17
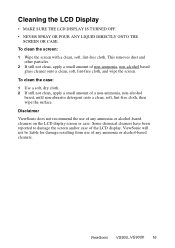
... chemical cleaners have been reported to damage the screen and/or case of any ammonia or alcohol-based cleaners. ViewSonic will not be liable for damage resulting from use of the LCD display. ViewSonic VG900_VG900b 16 To clean the screen: 1 Wipe the screen with a clean, soft, lint-free cloth. Cleaning the LCD Display • MAKE SURE THE LCD DISPLAY IS TURNED OFF. • NEVER SPRAY OR POUR ANY LIQUID...
... chemical cleaners have been reported to damage the screen and/or case of any ammonia or alcohol-based cleaners. ViewSonic will not be liable for damage resulting from use of the LCD display. ViewSonic VG900_VG900b 16 To clean the screen: 1 Wipe the screen with a clean, soft, lint-free cloth. Cleaning the LCD Display • MAKE SURE THE LCD DISPLAY IS TURNED OFF. • NEVER SPRAY OR POUR ANY LIQUID...
User Guide
Page 18
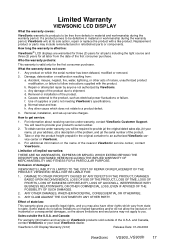
... instructions supplied with a like product. Any damage of supplies or parts not meeting ViewSonic's specifications. e. Use of the product due to shipment. Normal wear and tear. Any other acts of the product. 3. Removal, installation, and set-up service charges. ANY OTHER DAMAGES, WHETHER INCIDENTAL, CONSEQUENTIAL OR OTHERWISE. 3. ViewSonic LCD Display Warranty (V3.0) Release Date: 01-29-2002 ViewSonic VG900_VG900b 17 Limited Warranty VIEWSONIC LCD DISPLAY What the warranty covers: ViewSonic...
... instructions supplied with a like product. Any damage of supplies or parts not meeting ViewSonic's specifications. e. Use of the product due to shipment. Normal wear and tear. Any other acts of the product. 3. Removal, installation, and set-up service charges. ANY OTHER DAMAGES, WHETHER INCIDENTAL, CONSEQUENTIAL OR OTHERWISE. 3. ViewSonic LCD Display Warranty (V3.0) Release Date: 01-29-2002 ViewSonic VG900_VG900b 17 Limited Warranty VIEWSONIC LCD DISPLAY What the warranty covers: ViewSonic...
User Guide
Page 19
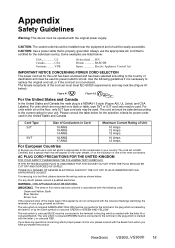
... BROWN must be used in the plug which sit on the insulation of one of destination and must be connected to the current rating for power cords used . CAUTION: The socket-outlet should be installed near the equipment and should be operated with the letter N or coloured BLACK. VDE Switzerland ..... Cord Type SJT SVT Size of Conductors in Cord 18 AWG 16...
... BROWN must be used in the plug which sit on the insulation of one of destination and must be connected to the current rating for power cords used . CAUTION: The socket-outlet should be installed near the equipment and should be operated with the letter N or coloured BLACK. VDE Switzerland ..... Cord Type SJT SVT Size of Conductors in Cord 18 AWG 16...
User Guide
Page 20
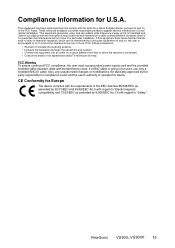
... harmful interference in a residential installation. This equipment generates, uses, and can be used in a particular installation. If a BNC cable is going to be determined by turning the equipment off and on a circuit different from that to which can radiate radio frequency energy, and if not installed and used , use grounded power supply cord and the provided shielded video interface cable with regard to radio or...
... harmful interference in a residential installation. This equipment generates, uses, and can be used in a particular installation. If a BNC cable is going to be determined by turning the equipment off and on a circuit different from that to which can radiate radio frequency energy, and if not installed and used , use grounded power supply cord and the provided shielded video interface cable with regard to radio or...


