

User Guide
Page 1
... is also found on our web site at http://www.viewsonic.com in English, or in specific languages using the Regional selection box in the upper right corner of our website. VG2455/VG2755 Display User Guide IMPORTANT: Please read this User Guide will describe your product for future service. "Antes de operar su equipo lea cu idadosamente las instrucciones en este manual" Model No.
... is also found on our web site at http://www.viewsonic.com in English, or in specific languages using the Regional selection box in the upper right corner of our website. VG2455/VG2755 Display User Guide IMPORTANT: Please read this User Guide will describe your product for future service. "Antes de operar su equipo lea cu idadosamente las instrucciones en este manual" Model No.

User Guide
Page 4
If the device shuts down automatically, please turn on your monitor's resolution and refresh rate. When using ear-/headphones, adjust the volume to moisture ͫ if the unit does not operate normally or has been dropped • NOTICE: LISTENING THROUGH EAR-/HEADPHONES AT A HIGH VOLUME FOR EXTENDED PERIODS CAN CAUSE HEARING DAMAGE/HEARING LOSS. Service will be required when the unit...
If the device shuts down automatically, please turn on your monitor's resolution and refresh rate. When using ear-/headphones, adjust the volume to moisture ͫ if the unit does not operate normally or has been dropped • NOTICE: LISTENING THROUGH EAR-/HEADPHONES AT A HIGH VOLUME FOR EXTENDED PERIODS CAN CAUSE HEARING DAMAGE/HEARING LOSS. Service will be required when the unit...

User Guide
Page 5
... 7 Package Contents...7 Product Overview - VG2455 / VG2755 8 Initial Setup 9 Installing the Stand 9 Wall Mounting...12 Using the Security Slot 14 Making Connections 15 Connecting to Power 15 Connecting External Devices 16 HDMI Connection 16 DisplayPort Connection 17 VGA Connection...18 USB Connection...19 Using the Monitor 20 Adjusting the Viewing Angle 20 Height Adjustment 20 Tilt Angle Adjustment 21 Screen Orientation Adjustment (Monitor Pivot 21 Swivel Angle Adjustment 23 Turning the Device On/Off 24 Using the Control Panel Keys 25 Quick Menu...25 Hot Keys...27 Configuring...
... 7 Package Contents...7 Product Overview - VG2455 / VG2755 8 Initial Setup 9 Installing the Stand 9 Wall Mounting...12 Using the Security Slot 14 Making Connections 15 Connecting to Power 15 Connecting External Devices 16 HDMI Connection 16 DisplayPort Connection 17 VGA Connection...18 USB Connection...19 Using the Monitor 20 Adjusting the Viewing Angle 20 Height Adjustment 20 Tilt Angle Adjustment 21 Screen Orientation Adjustment (Monitor Pivot 21 Swivel Angle Adjustment 23 Turning the Device On/Off 24 Using the Control Panel Keys 25 Quick Menu...25 Hot Keys...27 Configuring...

User Guide
Page 9
Installing the Stand 1. Remove the monitor stand's base and neck. Place the box on the monitor stand's base with the monitor stand's neck. 3. Align and connect the three (3) points on a flat, stable surface and open the front flap of the box to reveal the contents. Use the captured screw in a user friendly box to the monitor stand's neck. 1 2 9 Remove the top tray. 2. NOTE: The monitor comes packaged in the monitor stand's base and secure it to make installation easy. Initial Setup This section provides detailed instructions for setting up your monitor.
Installing the Stand 1. Remove the monitor stand's base and neck. Place the box on the monitor stand's base with the monitor stand's neck. 3. Align and connect the three (3) points on a flat, stable surface and open the front flap of the box to reveal the contents. Use the captured screw in a user friendly box to the monitor stand's neck. 1 2 9 Remove the top tray. 2. NOTE: The monitor comes packaged in the monitor stand's base and secure it to make installation easy. Initial Setup This section provides detailed instructions for setting up your monitor.

User Guide
Page 24
To turn on the monitor. 3. NOTE: The monitor will still consume some power as long as the power cord is not being used for a long period of time, please disconnect the power plug from the power outlet. 24 If the monitor is connected to turn the monitor off, press the Power button again. Press the Power button to the power outlet. Plug the power cord into a power outlet. 2. Turning the Device On/Off 1.
To turn on the monitor. 3. NOTE: The monitor will still consume some power as long as the power cord is not being used for a long period of time, please disconnect the power plug from the power outlet. 24 If the monitor is connected to turn the monitor off, press the Power button again. Press the Power button to the power outlet. Plug the power cord into a power outlet. 2. Turning the Device On/Off 1.

User Guide
Page 26
Main Menu Exit Contrast/Brightness Adjust the contrast or brightness level. s D-Sub HDMI DisplayPort Main Menu Enter the On-Screen Display (OSD) Menu. Input Select Audio Adjust ViewMode Color Adjust Manual Image Setup Menu Adjust VGA HDMI DisplayPort Type C Exit Exit the Quick Menu. 1920 X 1080@60Hz 26 mode ast/Brightness Select Menu Contrast 70 Brightness 100 Input Select Select the input source.
Main Menu Exit Contrast/Brightness Adjust the contrast or brightness level. s D-Sub HDMI DisplayPort Main Menu Enter the On-Screen Display (OSD) Menu. Input Select Audio Adjust ViewMode Color Adjust Manual Image Setup Menu Adjust VGA HDMI DisplayPort Type C Exit Exit the Quick Menu. 1920 X 1080@60Hz 26 mode ast/Brightness Select Menu Contrast 70 Brightness 100 Input Select Select the input source.

User Guide
Page 29
Input Select Audio Adjust ViewMode Color Adjust Manual Image Setup Menu Adjust VGA HDMI DisplayPort Type C 1920 X 1080@60Hz 2. Input Select Audio Adjust ViewMode Color Adjust Manual Image Setup Menu Adjust Volume 50 Mute 29 1920 X 1080@60Hz Then press the 4 key to select the main menu. Press the 1(ViewMode) or 2 key to display the OSD Menu. Then press the 3 key to display the Quick Menu. Press the 2/3/4/5 key to enter the selected menu. Configuring the Settings General Operations 1920 X 1080@60Hz 1920 X 1080@60Hz Key Guide 1.
Input Select Audio Adjust ViewMode Color Adjust Manual Image Setup Menu Adjust VGA HDMI DisplayPort Type C 1920 X 1080@60Hz 2. Input Select Audio Adjust ViewMode Color Adjust Manual Image Setup Menu Adjust Volume 50 Mute 29 1920 X 1080@60Hz Then press the 4 key to select the main menu. Press the 1(ViewMode) or 2 key to display the OSD Menu. Then press the 3 key to display the Quick Menu. Press the 2/3/4/5 key to enter the selected menu. Configuring the Settings General Operations 1920 X 1080@60Hz 1920 X 1080@60Hz Key Guide 1.

User Guide
Page 30
Then press the 3 key to confirm. Input Select Audio Adjust ViewMode Color Adjust Manual Image Setup Menu Adjust Volume On Mute Off 1920 X 1080@60Hz 4. Then press the 3 key to enter the sub-menu. Press the 1(ViewMode) or 2 key to select the desired menu option. Input Select Audio Adjust ViewMode Color Adjust Manual Image Setup Menu Adjust Volume On Mute Off 1920 X 1080@60Hz 30 Press the 1(ViewMode) or 2 key to adjust/select the setting. 3.
Then press the 3 key to confirm. Input Select Audio Adjust ViewMode Color Adjust Manual Image Setup Menu Adjust Volume On Mute Off 1920 X 1080@60Hz 4. Then press the 3 key to enter the sub-menu. Press the 1(ViewMode) or 2 key to select the desired menu option. Input Select Audio Adjust ViewMode Color Adjust Manual Image Setup Menu Adjust Volume On Mute Off 1920 X 1080@60Hz 30 Press the 1(ViewMode) or 2 key to adjust/select the setting. 3.
User Guide
Page 37
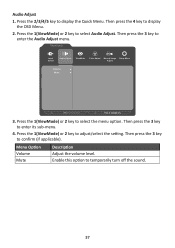
... to enter its sub-menu. 4. Then press the 3 key to display the Quick Menu. Enable this option to display the OSD Menu. 2. Menu Option Volume Mute Description Adjust the volume level. Then press the 4 key to temporarily turn off the sound. 37 Press the 1(ViewMode) or 2 key to select the menu option. Press the 1(ViewMode) or 2 key to select Audio Adjust. Input Select Audio Adjust ViewMode Color Adjust Manual Image Setup Menu Adjust Volume Mute 1920 X 1080...
... to enter its sub-menu. 4. Then press the 3 key to display the Quick Menu. Enable this option to display the OSD Menu. 2. Menu Option Volume Mute Description Adjust the volume level. Then press the 4 key to temporarily turn off the sound. 37 Press the 1(ViewMode) or 2 key to select the menu option. Press the 1(ViewMode) or 2 key to select Audio Adjust. Input Select Audio Adjust ViewMode Color Adjust Manual Image Setup Menu Adjust Volume Mute 1920 X 1080...
User Guide
Page 38
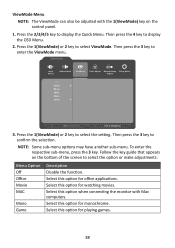
... key guide that appears on the control panel. 1. Select this option when connecting the monitor with the 1(ViewMode) key on the bottom of the screen to select the option or make adjustments. Press the 1(ViewMode) or 2 key to enter the ViewMode menu. Input Select Audio Adjust ViewMode Color Adjust Manual Image Setup Menu Adjust Off Office Movie MAC Mono Game 1920 X 1080@60Hz 3. Press the 1(ViewMode) or 2 key to display the Quick Menu...
... key guide that appears on the control panel. 1. Select this option when connecting the monitor with the 1(ViewMode) key on the bottom of the screen to select the option or make adjustments. Press the 1(ViewMode) or 2 key to enter the ViewMode menu. Input Select Audio Adjust ViewMode Color Adjust Manual Image Setup Menu Adjust Off Office Movie MAC Mono Game 1920 X 1080@60Hz 3. Press the 1(ViewMode) or 2 key to display the Quick Menu...
User Guide
Page 39
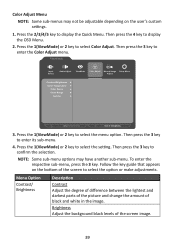
... enter its sub-menu. 4. Then press the 3 key to display the OSD Menu. 2. Then press the 3 key to select the setting. Press the 1(ViewMode) or 2 key to confirm the selection. Follow the key guide that appears on the user's custom settings. 1. Input Select Audio Adjust ViewMode Color Adjust Manual Image Setup Menu Adjust Contrast/Brightness Color Temperature Color Space Color Range Gamma 1920 X 1080@60Hz 3. Brightness Adjust the background black levels of black and white in the image. Color Adjust Menu NOTE: Some...
... enter its sub-menu. 4. Then press the 3 key to display the OSD Menu. 2. Then press the 3 key to select the setting. Press the 1(ViewMode) or 2 key to confirm the selection. Follow the key guide that appears on the user's custom settings. 1. Input Select Audio Adjust ViewMode Color Adjust Manual Image Setup Menu Adjust Contrast/Brightness Color Temperature Color Space Color Range Gamma 1920 X 1080@60Hz 3. Brightness Adjust the background black levels of black and white in the image. Color Adjust Menu NOTE: Some...

User Guide
Page 41
... Color Adjust Manual Image Setup Menu Adjust Auto Image Adjust Horizontal Size H./V. Horizontal Size Stretch or shorten the screen on its sub-menu. 4. Position Adjust the screen horizontally and/or vertically. Fine Tune Improve distorted image quality from an analog signal. Sharpness Adjust the sharpness and picture quality of the monitor. Then press the 3 key to adjust/select the setting. Blue Light Filter Adjust the filter that fills the screen. Then press the 4 key to confirm (if applicable). Then press the 3 key to display...
... Color Adjust Manual Image Setup Menu Adjust Auto Image Adjust Horizontal Size H./V. Horizontal Size Stretch or shorten the screen on its sub-menu. 4. Position Adjust the screen horizontally and/or vertically. Fine Tune Improve distorted image quality from an analog signal. Sharpness Adjust the sharpness and picture quality of the monitor. Then press the 3 key to adjust/select the setting. Blue Light Filter Adjust the filter that fills the screen. Then press the 4 key to confirm (if applicable). Then press the 3 key to display...

User Guide
Page 42
Input Select Audio Adjust ViewMode Color Adjust Manual Image Setup Menu Adjust Language Select Resolution Notice Information OSD Timeout OSD Background OSD Pivot Power Indicator Auto Power Off Sleep ECO Mode DisplayPort 1.2 720P60 3. Press the 1(ViewMode) or 2 key to select Setup Menu. Press the 1(ViewMode) or 2 key to select the setting. Then press the 3 key to enter the Setup Menu menu. Then press the 3 key to confirm the selection. Press the 1(ViewMode) or 2 key to display the Quick Menu. NOTE...
Input Select Audio Adjust ViewMode Color Adjust Manual Image Setup Menu Adjust Language Select Resolution Notice Information OSD Timeout OSD Background OSD Pivot Power Indicator Auto Power Off Sleep ECO Mode DisplayPort 1.2 720P60 3. Press the 1(ViewMode) or 2 key to select Setup Menu. Press the 1(ViewMode) or 2 key to select the setting. Then press the 3 key to enter the Setup Menu menu. Then press the 3 key to confirm the selection. Press the 1(ViewMode) or 2 key to display the Quick Menu. NOTE...
User Guide
Page 44
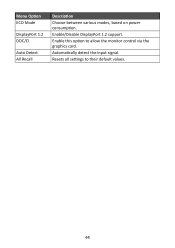
Enable this option to their default values. 44 Automatically detect the input signal. Resets all settings to allow the monitor control via the graphics card. Menu Option ECO Mode DisplayPort 1.2 DDC/CI Auto Detect All Recall Description Choose between various modes, based on power consumption. Enable/Disable DisplayPort 1.2 support.
Enable this option to their default values. 44 Automatically detect the input signal. Resets all settings to allow the monitor control via the graphics card. Menu Option ECO Mode DisplayPort 1.2 DDC/CI Auto Detect All Recall Description Choose between various modes, based on power consumption. Enable/Disable DisplayPort 1.2 support.
User Guide
Page 47
... "Power Lock setting". Blue Light Filter Adjusts the filter that blocks high-energy blue light for an ideal viewing experience. Auto Detect If the current input source has no signal, the monitor will automatically switch to make the black blacker in a dark scene, and make the white whiter in alphabetical order. All terms are listed in a bright environment. Audio Adjust Adjusts the volume, mutes the sound, or toggles between inputs if you have more comfortable viewing experience. Auto Image Adjust...
... "Power Lock setting". Blue Light Filter Adjusts the filter that blocks high-energy blue light for an ideal viewing experience. Auto Detect If the current input source has no signal, the monitor will automatically switch to make the black blacker in a dark scene, and make the white whiter in alphabetical order. All terms are listed in a bright environment. Audio Adjust Adjusts the volume, mutes the sound, or toggles between inputs if you have more comfortable viewing experience. Auto Image Adjust...
User Guide
Page 49
..., the LCD model number, the serial number, and the ViewSonic® website URL. There are available for instructions on its horizontal axis. NOTE: VESA 1024 x 768 @ 60Hz (example) means that are six selections: 1.8, 2.0, 2.2, 2.4, 2.6 and 2.8. You can select the appropriate speed for your graphics card's user guide for the monitor. Horizontal Size Manually stretch or shorten the screen image on changing the resolution and refresh rate (vertical frequency). Gamma Allows users to manually adjust the brightness level of each color (red, green, blue...
..., the LCD model number, the serial number, and the ViewSonic® website URL. There are available for instructions on its horizontal axis. NOTE: VESA 1024 x 768 @ 60Hz (example) means that are six selections: 1.8, 2.0, 2.2, 2.4, 2.6 and 2.8. You can select the appropriate speed for your graphics card's user guide for the monitor. Horizontal Size Manually stretch or shorten the screen image on changing the resolution and refresh rate (vertical frequency). Gamma Allows users to manually adjust the brightness level of each color (red, green, blue...

User Guide
Page 50
..., creating smooth images without a pivot. +90° Sets the OSD Menu with a +90° pivot. -90° Sets the OSD Menu with a -90° pivot. Red, green, and blue light are added together to reopen the menu. Setup Menu Adjusts On-Screen Display (OSD) settings. Sharpness Adjusts the picture quality of each color (red, green, blue, cyan, magenta, and yellow). Options Description 0° Sets the OSD Menu without streaking, blurring or ghosting. Resolution Notice The notice tells users that you...
..., creating smooth images without a pivot. +90° Sets the OSD Menu with a +90° pivot. -90° Sets the OSD Menu with a -90° pivot. Red, green, and blue light are added together to reopen the menu. Setup Menu Adjusts On-Screen Display (OSD) settings. Sharpness Adjusts the picture quality of each color (red, green, blue, cyan, magenta, and yellow). Options Description 0° Sets the OSD Menu without streaking, blurring or ghosting. Resolution Notice The notice tells users that you...

User Guide
Page 52
...; Adjust the brightness and contrast settings. • Make sure the correct input source is selected. • If any colors (red, green, or blue) are missing, check the video cable to make sure it is properly and securely connected. Loose or broken pins in the cable connector could cause an improper connection. • Connect the monitor to another electrical device into the power outlet to verify that you may experience when using the monitor. The screen image...
...; Adjust the brightness and contrast settings. • Make sure the correct input source is selected. • If any colors (red, green, or blue) are missing, check the video cable to make sure it is properly and securely connected. Loose or broken pins in the cable connector could cause an improper connection. • Connect the monitor to another electrical device into the power outlet to verify that you may experience when using the monitor. The screen image...

User Guide
Page 53
...; Turn off the monitor, unplug the power cord, plug it back in the OSD • Restart the computer. • Adjust the ViewMode or the input source. • Reset the monitor to 0. • Check the Audio Input setting. not work • Make sure the USB cable is connected properly. • Try changing to the monitor do • Press only one key at a time. The screen appears yellow • Make sure the "Blue Light Filter" is Off. USB devices connected...
...; Turn off the monitor, unplug the power cord, plug it back in the OSD • Restart the computer. • Adjust the ViewMode or the input source. • Reset the monitor to 0. • Check the Audio Input setting. not work • Make sure the USB cable is connected properly. • Try changing to the monitor do • Press only one key at a time. The screen appears yellow • Make sure the "Blue Light Filter" is Off. USB devices connected...
User Guide
Page 64
... the display through inappropriate cleaning as described in the product User Guide. • Removal, installation, and set-up service charges, including wall-mounting of the nearest ViewSonic® service center, contact ViewSonic®. How to get service: • For information about receiving service under warranty, contact ViewSonic® Customer Support (Please refer to the "Customer Service" page). You will need to provide your product's serial number. • To obtain warranty service, you...
... the display through inappropriate cleaning as described in the product User Guide. • Removal, installation, and set-up service charges, including wall-mounting of the nearest ViewSonic® service center, contact ViewSonic®. How to get service: • For information about receiving service under warranty, contact ViewSonic® Customer Support (Please refer to the "Customer Service" page). You will need to provide your product's serial number. • To obtain warranty service, you...


