

User Guide
Page 2
... Important Safety Warnings ...3 Projector Components ...3 Setting up the Projector ...4 Connecting Input and Output Devices ...5 Positioning the Projector ...6 Adjusting the Projector Angle ...7 Using The Projector ...8 Control Buttons ...8 OnView Menus ...10 Setup Main Menu ...10 Input Menu ...11 Image Menu ...11 Options Menu ...12 No Signal Menu ...13 E N G L I S H Other Information Specifications ...14 Timing Chart ...15 Troubleshooting ...16 Power Indicator Lights ...18 Screen Messages ...19 Maintenance ...20 Projector Lamp ...20 Remote Control Batteries ...21 Cleaning Instructions ...21...
... Important Safety Warnings ...3 Projector Components ...3 Setting up the Projector ...4 Connecting Input and Output Devices ...5 Positioning the Projector ...6 Adjusting the Projector Angle ...7 Using The Projector ...8 Control Buttons ...8 OnView Menus ...10 Setup Main Menu ...10 Input Menu ...11 Image Menu ...11 Options Menu ...12 No Signal Menu ...13 E N G L I S H Other Information Specifications ...14 Timing Chart ...15 Troubleshooting ...16 Power Indicator Lights ...18 Screen Messages ...19 Maintenance ...20 Projector Lamp ...20 Remote Control Batteries ...21 Cleaning Instructions ...21...
User Guide
Page 3
Figures E N G L I S H Figure: 1 Figure: 2 Figure: 3 Figure: 4 Figure: 5 Figure: 6 Figure: 7 Figure: 8 Figure: 9 Package Contents...2 ViewSonic PJ750 Projector...3 System Setup...5 Recommended Projector Distances...6 Angle Adjustment ...7 Projector and Remote Controls...8 Lamp Replacement ...20 Installing the Batteries...21 Attaching the Handle...22 ii ViewSonic PJ750
Figures E N G L I S H Figure: 1 Figure: 2 Figure: 3 Figure: 4 Figure: 5 Figure: 6 Figure: 7 Figure: 8 Figure: 9 Package Contents...2 ViewSonic PJ750 Projector...3 System Setup...5 Recommended Projector Distances...6 Angle Adjustment ...7 Projector and Remote Controls...8 Lamp Replacement ...20 Installing the Batteries...21 Attaching the Handle...22 ii ViewSonic PJ750

User Guide
Page 7
... projector. Remove the lens cap. Turn on the Projector. • Turn on the Power Switch on page 8. Setting up the Projector 1 Connect the Power Cord and Input/Output Devices. 2 E N G L I S H 3 4 5 Make sure that you have properly connected the power and input cables before turning on a level and stable surface. The power LED flashes orange and the unit remains in the lower right section of the screen. 7 Adjust the image size. • Turn the Zoom ring to adjust the size of the projector. The power indicator (LED) lights...
... projector. Remove the lens cap. Turn on the Projector. • Turn on the Power Switch on page 8. Setting up the Projector 1 Connect the Power Cord and Input/Output Devices. 2 E N G L I S H 3 4 5 Make sure that you have properly connected the power and input cables before turning on a level and stable surface. The power LED flashes orange and the unit remains in the lower right section of the screen. 7 Adjust the image size. • Turn the Zoom ring to adjust the size of the projector. The power indicator (LED) lights...
User Guide
Page 11
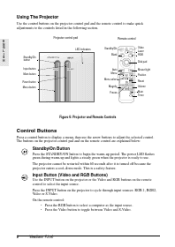
...Using The Projector Use the control buttons on the remote control to select the input source. Projector control pad E N G L I S H Remote control LED indicators Standby/On Blank Video Laser RGB Disk pad Standby/On button STANDBY/ON Input button Mute button Reset button Menu button MUTE RESET Auto Menu Menu select Mouse/right Position Reset Magnify Freeze TIMER Volume Mute Timer Figure 6: Projector and Remote Controls Control Buttons Press a control button to display a menu, then use . The projector cannot be restarted within 60 seconds after it is turned off because the projector...
...Using The Projector Use the control buttons on the remote control to select the input source. Projector control pad E N G L I S H Remote control LED indicators Standby/On Blank Video Laser RGB Disk pad Standby/On button STANDBY/ON Input button Mute button Reset button Menu button MUTE RESET Auto Menu Menu select Mouse/right Position Reset Magnify Freeze TIMER Volume Mute Timer Figure 6: Projector and Remote Controls Control Buttons Press a control button to display a menu, then use . The projector cannot be restarted within 60 seconds after it is turned off because the projector...
User Guide
Page 12
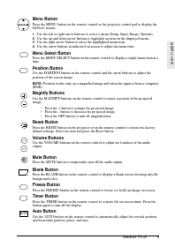
... displayed menu. button to restore the factory default settings. Reset Button Press the RESET button on the projector or on the remote control to temporarily turn off the audio output. Mute Button Press the MUTE button to display a blank screen showing only the background color. Blank Button Press the BLANK button on the remote control to decrease the projected image. - Press the button again to automatically adjust the vertical position and horizontal position, phase, and size. AUTO Auto Button Use the AUTO button on a magnified image...
... displayed menu. button to restore the factory default settings. Reset Button Press the RESET button on the projector or on the remote control to temporarily turn off the audio output. Mute Button Press the MUTE button to display a blank screen showing only the background color. Blank Button Press the BLANK button on the remote control to decrease the projected image. - Press the button again to automatically adjust the vertical position and horizontal position, phase, and size. AUTO Auto Button Use the AUTO button on a magnified image...
User Guide
Page 13
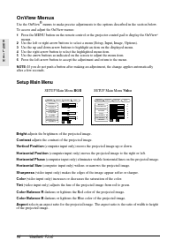
OnView Menus Use the OnView® menus to make precise adjustments to display the OnView® E N G L I S H 2 3 4 5 6 menus. Contrast adjusts the contrast of the projected image. 10 ViewSonic PJ750 Horizontal Phase (computer input only) eliminates visible horizontal lines on the screen to select a menu (Setup, Input, Image, Options). The aspect ratio is the ratio of width to highlight an item on the remote control or the projector control pad to...
OnView Menus Use the OnView® menus to make precise adjustments to display the OnView® E N G L I S H 2 3 4 5 6 menus. Contrast adjusts the contrast of the projected image. 10 ViewSonic PJ750 Horizontal Phase (computer input only) eliminates visible horizontal lines on the screen to select a menu (Setup, Input, Image, Options). The aspect ratio is the ratio of width to highlight an item on the remote control or the projector control pad to...
User Guide
Page 15
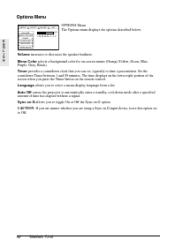
... using a Sync on -screen menus (Orange, Yellow, Green, Blue, Purple, Gray, Black). Auto Off causes the projector to select a menu-display language from a list. Set the countdown Timer between 1 and 99 minutes. Language allows you to automatically enter a standby, cool-down mode after a specified amount of the screen when you to toggle On or Off the Sync on the remote control. Sync on G allows you press the Timer button on G option. Options Menu SETUP INPUT IMAGE...
... using a Sync on -screen menus (Orange, Yellow, Green, Blue, Purple, Gray, Black). Auto Off causes the projector to select a menu-display language from a list. Set the countdown Timer between 1 and 99 minutes. Language allows you to automatically enter a standby, cool-down mode after a specified amount of the screen when you to toggle On or Off the Sync on the remote control. Sync on G allows you press the Timer button on G option. Options Menu SETUP INPUT IMAGE...
User Guide
Page 16
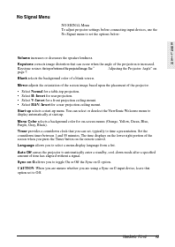
... the projected image. The time displays on the remote control. No Signal Menu NO SIGNAL Menu To adjust projector settings before connecting input devices, use the No Signal menu to set , typically to time a presentation. Start up selects a start -up menu. Set the countdown timer between 1 and 99 minutes. Sync on -screen menus (Orange, Yellow, Green, Blue, Purple, Gray, Black). Select H&V: Invert for a table-top projection. Select V: Invert for on G allows you can select or deselect the ViewSonic Welcome menu to display automatically at start -up . Menu Color selects...
... the projected image. The time displays on the remote control. No Signal Menu NO SIGNAL Menu To adjust projector settings before connecting input devices, use the No Signal menu to set , typically to time a presentation. Start up selects a start -up menu. Set the countdown timer between 1 and 99 minutes. Sync on -screen menus (Orange, Yellow, Green, Blue, Purple, Gray, Black). Select H&V: Invert for a table-top projection. Select V: Invert for on G allows you can select or deselect the ViewSonic Welcome menu to display automatically at start -up . Menu Color selects...

User Guide
Page 17
...°F) 10% to 85% (no condensation) 0 to 2,100 m (0 to 7,000 feet) 3.25 kgs (7.2 lbs) 298 x 228 x 76 mm FCC class B, UL, C-UL, CE/TUV Lens Display Lamp Audio Input signal Frequency Compatibility PC Macintosh1 Video Angle Distance Maximum Recommended RGB Video S-video Audio Serial control Voltage Consumption Temperature Humidity Altitude Temperature Humidity Altitude Projector Remote range Resolution Input ports Power Operating conditions Storage conditions Dimensions and weight Regulations 1 May require a Macintosh adapter 14 ViewSonic PJ750
...°F) 10% to 85% (no condensation) 0 to 2,100 m (0 to 7,000 feet) 3.25 kgs (7.2 lbs) 298 x 228 x 76 mm FCC class B, UL, C-UL, CE/TUV Lens Display Lamp Audio Input signal Frequency Compatibility PC Macintosh1 Video Angle Distance Maximum Recommended RGB Video S-video Audio Serial control Voltage Consumption Temperature Humidity Altitude Temperature Humidity Altitude Projector Remote range Resolution Input ports Power Operating conditions Storage conditions Dimensions and weight Regulations 1 May require a Macintosh adapter 14 ViewSonic PJ750

User Guide
Page 19
... the projector displays only the logo • Make sure the input source is connected. The LED should be steady green. Make sure ventilation openings are clean. Replace the lamp module. The lamp shuts off • A minor power surge can cause the lamp to shut off the Power switch. Turn off . Let the projector cool down . Power is on . Make sure air-filters are clear. Allow the projector to reset factory defaults. See the manufacturer's instructions for your specific input device...
... the projector displays only the logo • Make sure the input source is connected. The LED should be steady green. Make sure ventilation openings are clean. Replace the lamp module. The lamp shuts off • A minor power surge can cause the lamp to shut off the Power switch. Turn off . Let the projector cool down . Power is on . Make sure air-filters are clear. Allow the projector to reset factory defaults. See the manufacturer's instructions for your specific input device...
User Guide
Page 21
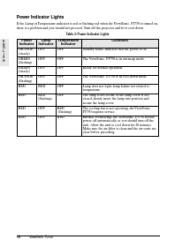
... is a problem and you should not proceed. RED RED RED (flashing) RED 18 ViewSonic PJ750 Power Indicator Lights If the Lamp or Temperature indicator is red or flashing red when the ViewSonic PJ750 is turned on . The ViewSonic PJ750 is clean and the air vents are clear before preceding. Lamp does not light-lamp failure not related to cool down mode. The lamp is not secure or the lamp cover is not operating-the ViewSonic PJ750 requires service. Turn off the unit. Make sure the air-filter is in...
... is a problem and you should not proceed. RED RED RED (flashing) RED 18 ViewSonic PJ750 Power Indicator Lights If the Lamp or Temperature indicator is red or flashing red when the ViewSonic PJ750 is turned on . The ViewSonic PJ750 is clean and the air vents are clear before preceding. Lamp does not light-lamp failure not related to cool down mode. The lamp is not secure or the lamp cover is not operating-the ViewSonic PJ750 requires service. Turn off the unit. Make sure the air-filter is in...
User Guide
Page 22
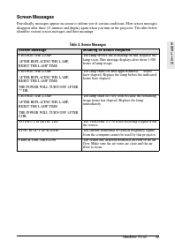
... 4: Screen Messages Screen Message CHANGE THE LAMP AFTER REPLACING THE LAMP, RESET THE LAMP TIME CHANGE THE LAMP AFTER REPLACING THE LAMP, RESET THE LAMP TIME THE POWER WILL TURN OFF AFTER ** HR. The table below identifies various screen messages and their meanings. NO INPUT IS DETECTED SYNC IS OUT OF RANGE CHECK THE AIR FLOW Meaning or Action Required The lamp service life is clean. Screen Messages Periodically, messages appear on-screen to inform you turn on the projector. Replace the lamp before the indicated hours have elapsed. E N G L I S H The lamp shuts...
... 4: Screen Messages Screen Message CHANGE THE LAMP AFTER REPLACING THE LAMP, RESET THE LAMP TIME CHANGE THE LAMP AFTER REPLACING THE LAMP, RESET THE LAMP TIME THE POWER WILL TURN OFF AFTER ** HR. The table below identifies various screen messages and their meanings. NO INPUT IS DETECTED SYNC IS OUT OF RANGE CHECK THE AIR FLOW Meaning or Action Required The lamp service life is clean. Screen Messages Periodically, messages appear on-screen to inform you turn on the projector. Replace the lamp before the indicated hours have elapsed. E N G L I S H The lamp shuts...
User Guide
Page 23
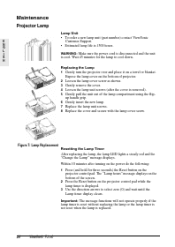
... is replaced. 20 ViewSonic PJ750 Figure 7: Lamp Replacement Resetting the Lamp Timer After replacing the lamp, the lamp LED lights a steady red and the "Change the Lamp" message displays. Within 10 minutes after the cover is removed). 5 Gently pull the unit out of the screen. 2 Press the Reset button on the bottom of the lamp compartment using the flipup handle grip. 6 Gently insert the new lamp. 7 Replace the lamp unit screws. 8 Replace the cover and secure with the lamp cover screw. E N G L I S H Replacing the Lamp 1 Gently turn the projector over...
... is replaced. 20 ViewSonic PJ750 Figure 7: Lamp Replacement Resetting the Lamp Timer After replacing the lamp, the lamp LED lights a steady red and the "Change the Lamp" message displays. Within 10 minutes after the cover is removed). 5 Gently pull the unit out of the screen. 2 Press the Reset button on the bottom of the lamp compartment using the flipup handle grip. 6 Gently insert the new lamp. 7 Replace the lamp unit screws. 8 Replace the cover and secure with the lamp cover screw. E N G L I S H Replacing the Lamp 1 Gently turn the projector over...
Service Manual
Page 8
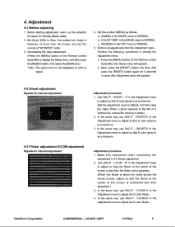
... (Set the adjustment value to display the Adjustment menu. ViewSonic Corporation CONFIDENTIAL -- Before starting adjustment, warm up the projector for internal adjustment Adjustment procedure 1. a. Next, press the [RESET] button one time. GHOST-B: in the Adjustment menu to Max. Use DAC-P - V.COM-G: in the Adjustment menu to adjust the B color flicker. Set Zoom Wide to adjust the G color flicker. 4. WHISPER in 4-2 Ghost adjustment. 2. GHOST - In the same way, use DAC-P - Adjustment procedure 1. Set the another [MENU] as follows. COLOR TEMP. Press the [MENU] button of...
... (Set the adjustment value to display the Adjustment menu. ViewSonic Corporation CONFIDENTIAL -- Before starting adjustment, warm up the projector for internal adjustment Adjustment procedure 1. a. Next, press the [RESET] button one time. GHOST-B: in the Adjustment menu to Max. Use DAC-P - V.COM-G: in the Adjustment menu to adjust the B color flicker. Set Zoom Wide to adjust the G color flicker. 4. WHISPER in 4-2 Ghost adjustment. 2. GHOST - In the same way, use DAC-P - Adjustment procedure 1. Set the another [MENU] as follows. COLOR TEMP. Press the [MENU] button of...

Service Manual
Page 21
... distributor. Switch the projector power supply OFF, and remove the power cord from the power outlet before beginning mainte- Remove the old filter. 3. ViewSonic Corporation CONFIDENTIAL -- SUPPLIER I I G Panel Return ( Replacement of G Panel -> Reconditioning • Air Filter Cleaning the Air filter The air filter should not replace separately the parts of separate parts is damaged. 1. Please read the separate "SAFETY INSTRUCTIONS" thoroughly to you. Set the new filter and filter cover. Therefore, regarding these parts, you can either replace part, LCD / Lens Prism...
... distributor. Switch the projector power supply OFF, and remove the power cord from the power outlet before beginning mainte- Remove the old filter. 3. ViewSonic Corporation CONFIDENTIAL -- SUPPLIER I I G Panel Return ( Replacement of G Panel -> Reconditioning • Air Filter Cleaning the Air filter The air filter should not replace separately the parts of separate parts is damaged. 1. Please read the separate "SAFETY INSTRUCTIONS" thoroughly to you. Set the new filter and filter cover. Therefore, regarding these parts, you can either replace part, LCD / Lens Prism...

Service Manual
Page 22
... lamp. The image will become darker, and hues will become weaker, after a lamp has been used lamp, treat according to the instruction of community authorities. • Since the lamp is covered by scattered broken pieces of time. Also, do not scratch it is probable that the lamp has exploded (explosive sound is also red when the lamp unit reaches high temperature. Before replacing the lamp, switch power OFF, remove the power cord...
... lamp. The image will become darker, and hues will become weaker, after a lamp has been used lamp, treat according to the instruction of community authorities. • Since the lamp is covered by scattered broken pieces of time. Also, do not scratch it is probable that the lamp has exploded (explosive sound is also red when the lamp unit reaches high temperature. Before replacing the lamp, switch power OFF, remove the power cord...

Service Manual
Page 23
... switching power ON. When the lamp has been replaced after replacing the lamp. Touching the inside of the screen. 2. Replace the lamp cover in the diagram, and remove the lamp cover. Press the MENU button on the remote control transmitter, or the RESET button on the bottom of the lamp case may result in injury or accidents. • Do not use the projector with the lamp cover removed. ViewSonic Corporation CONFIDENTIAL -- Switch the projector OFF, remove the power cord from the power...
... switching power ON. When the lamp has been replaced after replacing the lamp. Touching the inside of the screen. 2. Replace the lamp cover in the diagram, and remove the lamp cover. Press the MENU button on the remote control transmitter, or the RESET button on the bottom of the lamp case may result in injury or accidents. • Do not use the projector with the lamp cover removed. ViewSonic Corporation CONFIDENTIAL -- Switch the projector OFF, remove the power cord from the power...

Service Manual
Page 24
... the projector, the lamp may be displayed. Replace. DO NOT COPY PJ750-2 21 SENSOR or connect CNTH. ViewSonic Corporation CONFIDENTIAL -- "SYNC IS OUT OF RANGE" The horizontal or vertical frequency of the input signal exceeds the range of "CHANGE THE LAMP" "AFTER REPLACING LAMP, RESET THE LAMP TIMER" "THE POWER WILL TURN OFF AFTER 0 Hr." ON indicator LAMP indicator TEMP indicator Meaning Lights orange Goes off Goes off Standby mode Blinks green Goes off Goes off During warming up Remedy Lights green Blinks orange Lights red...
... the projector, the lamp may be displayed. Replace. DO NOT COPY PJ750-2 21 SENSOR or connect CNTH. ViewSonic Corporation CONFIDENTIAL -- "SYNC IS OUT OF RANGE" The horizontal or vertical frequency of the input signal exceeds the range of "CHANGE THE LAMP" "AFTER REPLACING LAMP, RESET THE LAMP TIMER" "THE POWER WILL TURN OFF AFTER 0 Hr." ON indicator LAMP indicator TEMP indicator Meaning Lights orange Goes off Goes off Standby mode Blinks green Goes off Goes off During warming up Remedy Lights green Blinks orange Lights red...

Service Manual
Page 55
... power supply is switched ON, and when the lamp is returned, please send the same command again. Using the projector default settings (Reset Command) (1)The computer sends the default setting code Header + Command data ('06H'+'00H'+ type (2 bytes) +'00H'+'00H') to the projector. (2) The projector changes the specified setting to the default value. (3) The projector returns the response code '06H' to the computer. Some times, the projector ignores RS-232C commands during warm-up. If the error command...
... power supply is switched ON, and when the lamp is returned, please send the same command again. Using the projector default settings (Reset Command) (1)The computer sends the default setting code Header + Command data ('06H'+'00H'+ type (2 bytes) +'00H'+'00H') to the projector. (2) The projector changes the specified setting to the default value. (3) The projector returns the response code '06H' to the computer. Some times, the projector ignores RS-232C commands during warm-up. If the error command...
Service Manual
Page 57
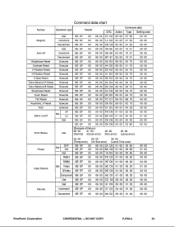
Command data chart Names Operation type Header Command data CRC Action Type Setting code Get BE...Size Reset Execute BE EF 03 06 00 68 D2 06 00 04 70 00 00 Color Balance R Reset Execute BE EF 03 06 00 94 D3 06 00 05 70 00 00 Color Balance B Reset...00 00 Error Status (Example of Return) 00 00 01 00 02 00 03 00 Get (Normal) (Cover-error) (Fan-error) (Lamp-error) Power OFF Set ON Get RGB1 04 00 05 00 06 00 (Temp-error) (Air flow-error) (Lamp-Time-over)... BE EF 03 06 00 3E DO 01 00 00 20 04 00 Input Source Set Video BE EF SVideo BE EF Component BE EF Get BE EF Get BE ...
Command data chart Names Operation type Header Command data CRC Action Type Setting code Get BE...Size Reset Execute BE EF 03 06 00 68 D2 06 00 04 70 00 00 Color Balance R Reset Execute BE EF 03 06 00 94 D3 06 00 05 70 00 00 Color Balance B Reset...00 00 Error Status (Example of Return) 00 00 01 00 02 00 03 00 Get (Normal) (Cover-error) (Fan-error) (Lamp-error) Power OFF Set ON Get RGB1 04 00 05 00 06 00 (Temp-error) (Air flow-error) (Lamp-Time-over)... BE EF 03 06 00 3E DO 01 00 00 20 04 00 Input Source Set Video BE EF SVideo BE EF Component BE EF Get BE EF Get BE ...


