User Manual
Page 2
... Package Contents 5 Front View of the Product 6 Rear View of the Product 7 Remote Control 8 Installation 10 OSD Functions Basic operation 16 Advanced Operation 18 E Adjust the Video 18 N Adjust the Graphics 19 G L Adjust the Audio 20 I Adjust the Display 21 S To setup the Setting 22 H Adjust the PIP 24 Adjust the Option 26 Other Information Specifications 27 Troubleshooting 28 Customer Support 29 Limited Warranty 30 Appendix Safety Guidelines 31 CE Conformity for Europe 31 ViewSonic N2750w 1
... Package Contents 5 Front View of the Product 6 Rear View of the Product 7 Remote Control 8 Installation 10 OSD Functions Basic operation 16 Advanced Operation 18 E Adjust the Video 18 N Adjust the Graphics 19 G L Adjust the Audio 20 I Adjust the Display 21 S To setup the Setting 22 H Adjust the PIP 24 Adjust the Option 26 Other Information Specifications 27 Troubleshooting 28 Customer Support 29 Limited Warranty 30 Appendix Safety Guidelines 31 CE Conformity for Europe 31 ViewSonic N2750w 1
User Manual
Page 4
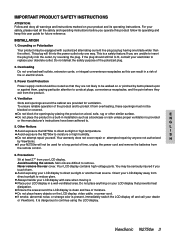
.... Do not defeat the safety purpose of time, unplug the power cord and remove the batteries from the remote control. 6. Ventilation Slots and openings around the LCD display is dangerous to protect it . IMPORTANT PRODUCT SAFETY INSTRUCTIONS ATTENTION: Follow and obey all the safety and operating instructions before you operate this product follow its operating instructions. INSTALLATION 1. This plug will not be equipped with care when...
.... Do not defeat the safety purpose of time, unplug the power cord and remove the batteries from the remote control. 6. Ventilation Slots and openings around the LCD display is dangerous to protect it . IMPORTANT PRODUCT SAFETY INSTRUCTIONS ATTENTION: Follow and obey all the safety and operating instructions before you operate this product follow its operating instructions. INSTALLATION 1. This plug will not be equipped with care when...
User Manual
Page 5
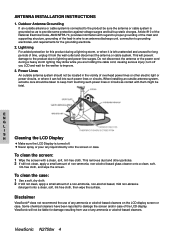
..., connection to grounding electrodes, and requirements for the wether to keep from the wall outlet and disconnect the antenna or cable system. ANTENNA INSTALLATION INSTRUCTIONS 1. Never spray or pour any ammonia or alcohol-based cleaners. ViewSonic N2750w 4 E N G L I S H Cleaning the LCD Display Make sure the LCD Display is left unattended and unused for damage resulting from use of the lead-in the vicinity of overhead power lines...
..., connection to grounding electrodes, and requirements for the wether to keep from the wall outlet and disconnect the antenna or cable system. ANTENNA INSTALLATION INSTRUCTIONS 1. Never spray or pour any ammonia or alcohol-based cleaners. ViewSonic N2750w 4 E N G L I S H Cleaning the LCD Display Make sure the LCD Display is left unattended and unused for damage resulting from use of the lead-in the vicinity of overhead power lines...
User Manual
Page 7
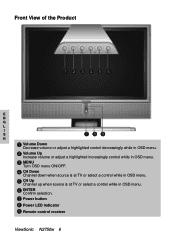
Front View of the Product 1 23456 E N G L I S 789 H 1 Volume Down Decrease volume or adjust a highlighted control decreasingly while in OSD menu. 2 Volume Up Increase volume or adjust a highlighted increasingly control while in OSD menu. 3 MENU Turn OSD menu ON/OFF. 4 CH Down Channel down when source is at TV or select a control while in OSD menu. 5 CH Up Channel up when source is at TV or select a control while in OSD menu. 6 ENTER Confirm selection. 7 Power button 8 Power LED indicator 9 Remote control receiver ViewSonic N2750w 6
Front View of the Product 1 23456 E N G L I S 789 H 1 Volume Down Decrease volume or adjust a highlighted control decreasingly while in OSD menu. 2 Volume Up Increase volume or adjust a highlighted increasingly control while in OSD menu. 3 MENU Turn OSD menu ON/OFF. 4 CH Down Channel down when source is at TV or select a control while in OSD menu. 5 CH Up Channel up when source is at TV or select a control while in OSD menu. 6 ENTER Confirm selection. 7 Power button 8 Power LED indicator 9 Remote control receiver ViewSonic N2750w 6
User Manual
Page 8
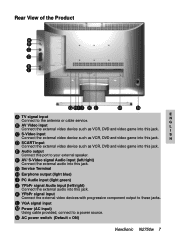
... (light green) J YPbPr signal Audio input (left /right) Connect the external audio into this port to these jacks. E Audio output Connect this jack. L VGA signal input M Power (AC input) Using cable provided, connect to the antenna or cable service. N AC power switch (Default = ON) ViewSonic N2750w 7 G Service Terminal H Earphone output (light blue) I C S-Video input S Connect the external video device such as VCR, DVD and video game into this jack. N G B AV Video input L Connect the external video device such as VCR, DVD and video game into this jack. Rear View...
... (light green) J YPbPr signal Audio input (left /right) Connect the external audio into this port to these jacks. E Audio output Connect this jack. L VGA signal input M Power (AC input) Using cable provided, connect to the antenna or cable service. N AC power switch (Default = ON) ViewSonic N2750w 7 G Service Terminal H Earphone output (light blue) I C S-Video input S Connect the external video device such as VCR, DVD and video game into this jack. N G B AV Video input L Connect the external video device such as VCR, DVD and video game into this jack. Rear View...
User Manual
Page 10
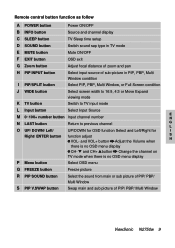
Remote control button function as follow A POWER button Power ON/OFF B INFO button Source and channel display C SLEEP button TV Sleep time setup D SOUND button Switch sound sap type in TV mode E MUTE button Mute ON/OFF F EXIT button OSD exit G Zoom button Adjust focal distance of zoom and pan H PIP INPUT button Select input source of PIP/ PBP/ Multi Window ViewSonic N2750w 9 and CH+ button Change the channel on TV mode when there is no OSD menu display P Menu button Select OSD menu Q FREEZE button Freeze picture R PIP SOUND button Select the sound from main or ...
Remote control button function as follow A POWER button Power ON/OFF B INFO button Source and channel display C SLEEP button TV Sleep time setup D SOUND button Switch sound sap type in TV mode E MUTE button Mute ON/OFF F EXIT button OSD exit G Zoom button Adjust focal distance of zoom and pan H PIP INPUT button Select input source of PIP/ PBP/ Multi Window ViewSonic N2750w 9 and CH+ button Change the channel on TV mode when there is no OSD menu display P Menu button Select OSD menu Q FREEZE button Freeze picture R PIP SOUND button Select the sound from main or ...
User Manual
Page 11
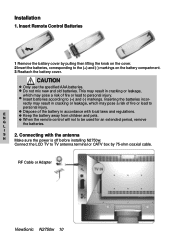
... injury. Connect the LCD TV to TV antenna terminal or CATV box by pulling then lifting the knob on the cover. 2 Insert the batteries, corresponding to personal injury. RF Cable or Adapter ViewSonic N2750w 10 CAUTION Only use the specified AAA batteries. N When the remote control will not to (+) and (-) markings. Insert batteries according to be used for an extended period, remove G the...
... injury. Connect the LCD TV to TV antenna terminal or CATV box by pulling then lifting the knob on the cover. 2 Insert the batteries, corresponding to personal injury. RF Cable or Adapter ViewSonic N2750w 10 CAUTION Only use the specified AAA batteries. N When the remote control will not to (+) and (-) markings. Insert batteries according to be used for an extended period, remove G the...
User Manual
Page 12
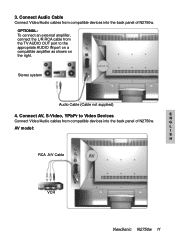
Connect AV, S-Video, YPbPr to the appropriate AUDIO IN port on a compatible amplifier as shown on the right. G AV model: L I S H RCA A/V Cable VCR ViewSonic N2750w 11 OPTIONAL: To connect an external amplifier, connect the L/R RCA cable from the TV AUDIO OUT port to Video Devices E N Connect Video/Audio cables from compatible devices into the back panel of N2750w. Connect Audio Cable Connect Video/Audio cables from compatible devices into the back panel of N2750w. Stereo system Audio Cable (Cable not supplied) 4. 3.
Connect AV, S-Video, YPbPr to the appropriate AUDIO IN port on a compatible amplifier as shown on the right. G AV model: L I S H RCA A/V Cable VCR ViewSonic N2750w 11 OPTIONAL: To connect an external amplifier, connect the L/R RCA cable from the TV AUDIO OUT port to Video Devices E N Connect Video/Audio cables from compatible devices into the back panel of N2750w. Connect Audio Cable Connect Video/Audio cables from compatible devices into the back panel of N2750w. Stereo system Audio Cable (Cable not supplied) 4. 3.
User Manual
Page 16
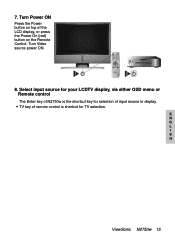
Select input source for your LCDTV display, via either OSD menu or Remote control The Enter key of N2750w is shortcut for selection of input source to display. E N G L I S H ViewSonic N2750w 15 TV key of the LCD display, or press the Power On (red) button on top of remote control is the shortcut key for TV selection. 7. Turn Video source power ON. 8. Turn Power ON Press the Power button on the Remote Control.
Select input source for your LCDTV display, via either OSD menu or Remote control The Enter key of N2750w is shortcut for selection of input source to display. E N G L I S H ViewSonic N2750w 15 TV key of the LCD display, or press the Power On (red) button on top of remote control is the shortcut key for TV selection. 7. Turn Video source power ON. 8. Turn Power ON Press the Power button on the Remote Control.

User Manual
Page 17
... button to select your remote control to turn on/off the TV. Connect external equipment properly. 3. The power LED indicator lights up the favorite channels, please reference page 20. Volume Adjust Press or VOL(音量)-/+ to adjust the volume. Insert the power plug. 2. After auto scanning all the available channels, the ordinal of favorite channel is 80. OSD Functions Basic operation To adjust the function of your LCD TV, you want to set input sources...
... button to select your remote control to turn on/off the TV. Connect external equipment properly. 3. The power LED indicator lights up the favorite channels, please reference page 20. Volume Adjust Press or VOL(音量)-/+ to adjust the volume. Insert the power plug. 2. After auto scanning all the available channels, the ordinal of favorite channel is 80. OSD Functions Basic operation To adjust the function of your LCD TV, you want to set input sources...
User Manual
Page 18
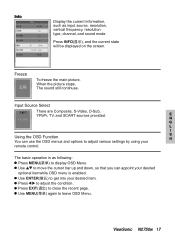
... desired optional itemwhile OSD menu is as input source, resolution, vertical frequency, resolution type, channel, and sound mode. Press EXIT(退出) to leave OSD Menu. The basic operation is enabled. Press to adjust the condition. ViewSonic N2750w 17 Freeze To freeze the main picture. Info Display the current information, such as following: Press MENU(菜单) to display OSD Menu. Input Source Select There are Composite, S-Video, D-Sub, YPbPr, TV, and...
... desired optional itemwhile OSD menu is as input source, resolution, vertical frequency, resolution type, channel, and sound mode. Press EXIT(退出) to leave OSD Menu. The basic operation is enabled. Press to adjust the condition. ViewSonic N2750w 17 Freeze To freeze the main picture. Info Display the current information, such as following: Press MENU(菜单) to display OSD Menu. Input Source Select There are Composite, S-Video, D-Sub, YPbPr, TV, and...
User Manual
Page 20
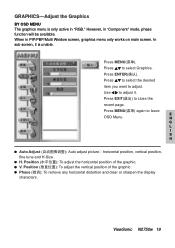
... H-Size . Press to adjust. Use to leave E OSD Menu. ViewSonic N2750w 19 Press MENU(菜单). Press MENU(菜单) again to adjust it is only active in "RGB." Press EXIT(退出) to close the recent page. Position To adjust the horizontal position of the graphic. In sub screen, it . However, in PIP/PBP/Multi Window screen, graphics menu only works on main screen. When in "Component" mode...
... H-Size . Press to adjust. Use to leave E OSD Menu. ViewSonic N2750w 19 Press MENU(菜单). Press MENU(菜单) again to adjust it is only active in "RGB." Press EXIT(退出) to close the recent page. Position To adjust the horizontal position of the graphic. In sub screen, it . However, in PIP/PBP/Multi Window screen, graphics menu only works on main screen. When in "Component" mode...
User Manual
Page 23
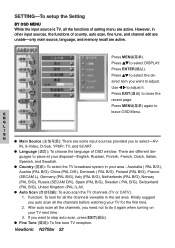
... time. 2. After auto scan all the channels viewable in your TV next time. 3. Fine Tune (微调): To fine tune TV reception. ViewSonic N2750w 22 Use to E leave OSD Menu. IN, S-Video, D-Sub, YPbPr, TV, and SCART. Language (语言): To choose the language of setting menu are some input sources provided you need not to adjust. Press MENU(菜单) again to adjust it again when turning...
... time. 2. After auto scan all the channels viewable in your TV next time. 3. Fine Tune (微调): To fine tune TV reception. ViewSonic N2750w 22 Use to E leave OSD Menu. IN, S-Video, D-Sub, YPbPr, TV, and SCART. Language (语言): To choose the language of setting menu are some input sources provided you need not to adjust. Press MENU(菜单) again to adjust it again when turning...

User Manual
Page 24
... program the position according to set up. To edit the name for the appointed channel. Press the green INPUT(信号源) button. 3. Definition: 1. Channel (频道): Indicate the original channel number. 2. How to be the favorite channel. 2. Use to move your remote control. 4. while pressing red (PIP/ Split) button, pressing ENTER(确认) button to confirm, press EXIT(退出) button to do? 1. Auto scan...
... program the position according to set up. To edit the name for the appointed channel. Press the green INPUT(信号源) button. 3. Definition: 1. Channel (频道): Indicate the original channel number. 2. How to be the favorite channel. 2. Use to move your remote control. 4. while pressing red (PIP/ Split) button, pressing ENTER(确认) button to confirm, press EXIT(退出) button to do? 1. Auto scan...

User Manual
Page 27
... close the recent page. OSD Timeout The OSD will automatically turn off timer of TV-15min, 30min, 45min, 60min, or 90min. Press EXIT(退出) to leave OSD Menu. Use to 5 seconds, 15 seconds, 45 seconds, or 60 seconds. Sleep (休眠): To set up the off if there is active in all input sources. BY REMOTE CONTROL SLEEP (休眠): To set...
... close the recent page. OSD Timeout The OSD will automatically turn off timer of TV-15min, 30min, 45min, 60min, or 90min. Press EXIT(退出) to leave OSD Menu. Use to 5 seconds, 15 seconds, 45 seconds, or 60 seconds. Sleep (休眠): To set up the off if there is active in all input sources. BY REMOTE CONTROL SLEEP (休眠): To set...
User Manual
Page 28
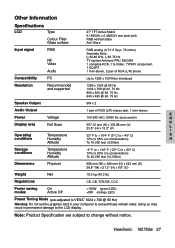
... component, 1 SCART 1 mini-stereo, 2 pair of RCA (L/R) stereo Compatibility PC Up to 1280 x 1024 Non-interlaced Resolution Recommended and supported 1280 x 1024 @ 60 Hz 1024 x 768 @ 60, 75 Hz 800 x 600 @ 60, 75 Hz 640 x 480 @ 60, 75 Hz Speaker Output 5W x 2 Audio Output 1 pair of RCA (L/R) stereo jack, 1 mini-stereo E Power Voltage 100-240 VAC, 50/60 Hz (auto switch) N Display...
... component, 1 SCART 1 mini-stereo, 2 pair of RCA (L/R) stereo Compatibility PC Up to 1280 x 1024 Non-interlaced Resolution Recommended and supported 1280 x 1024 @ 60 Hz 1024 x 768 @ 60, 75 Hz 800 x 600 @ 60, 75 Hz 640 x 480 @ 60, 75 Hz Speaker Output 5W x 2 Audio Output 1 pair of RCA (L/R) stereo jack, 1 mini-stereo E Power Voltage 100-240 VAC, 50/60 Hz (auto switch) N Display...

User Manual
Page 29
... the video cable supplied with the LCD TV. Batteries could cause an improper connection. Make sure A/C power cord is ON. I Check TV/CATV selection. Press the Volume + key on screen L Check your remote controller. NO SCART Check your remote control button for composite video input/ output, RGB inputs and stereo audio input/ output. Plug another Video source. Check Source settings. Loose or broken pins in the cable connector could be weak, replace batteries. N G Snow appears on your antenna connection. ViewSonic N2750w 28 Adjust...
... the video cable supplied with the LCD TV. Batteries could cause an improper connection. Make sure A/C power cord is ON. I Check TV/CATV selection. Press the Volume + key on screen L Check your remote controller. NO SCART Check your remote control button for composite video input/ output, RGB inputs and stereo audio input/ output. Plug another Video source. Check Source settings. Loose or broken pins in the cable connector could be weak, replace batteries. N G Snow appears on your antenna connection. ViewSonic N2750w 28 Adjust...
User Manual
Page 31
... workmanship during the warranty period, ViewSonic will need to provide your address, (d) a description of the problem, and (e) the serial number of incidental or consequential damages, so the above limitations and exclusions may not apply to be free from state to follow instructions supplied with a like product. c. H Limitation of supplies or parts not meeting ViewSonic's specifications. How long the warranty is effective: ViewSonic N2750w is valid only...
... workmanship during the warranty period, ViewSonic will need to provide your address, (d) a description of the problem, and (e) the serial number of incidental or consequential damages, so the above limitations and exclusions may not apply to be free from state to follow instructions supplied with a like product. c. H Limitation of supplies or parts not meeting ViewSonic's specifications. How long the warranty is effective: ViewSonic N2750w is valid only...
Brochure
Page 1
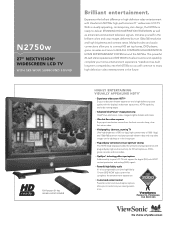
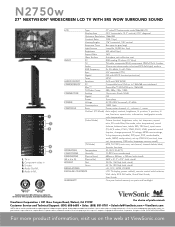
... and analog (VGA) signals. > Powerful high-fidelity audio It's all accompanied by true 1366x768 resolution and high brightness and contrast ratios. ViewSonic has built long term compatibility into the N2750w so you to your LCD TV with support for digital (DVI) with ViewSonic's N2750w high-performance 27" widescreen LCD TV. N2750w 27" NEXTVISION® WIDESCREEN LCD TV WITH SRS WOW SURROUND SOUND Brilliant entertainment. Multiple video and audio connections allow...
... and analog (VGA) signals. > Powerful high-fidelity audio It's all accompanied by true 1366x768 resolution and high brightness and contrast ratios. ViewSonic has built long term compatibility into the N2750w so you to your LCD TV with support for digital (DVI) with ViewSonic's N2750w high-performance 27" widescreen LCD TV. N2750w 27" NEXTVISION® WIDESCREEN LCD TV WITH SRS WOW SURROUND SOUND Brilliant entertainment. Multiple video and audio connections allow...
Brochure
Page 2
.... Component video in 2. S-video 4. Audio Out R/L 5. Specifications subject to change password, TV ratings, MPAA movie ratings, V-chip temporary disable), PIP (input, POP, mode disable, audio, SWAP, size/position), set up to 1360x768 non-interlaced Mac®** Power Mac™ G3/G4/G5 up (OSD H/V position), time out, transparency, OSD color, language, memory recall) (TV Mode) MTS, TV/CATV, auto scan, set -top box required. **Adapter may vary by the British Standards Institution. TV in 3. Audio In R/L LCD Type...
.... Component video in 2. S-video 4. Audio Out R/L 5. Specifications subject to change password, TV ratings, MPAA movie ratings, V-chip temporary disable), PIP (input, POP, mode disable, audio, SWAP, size/position), set up to 1360x768 non-interlaced Mac®** Power Mac™ G3/G4/G5 up (OSD H/V position), time out, transparency, OSD color, language, memory recall) (TV Mode) MTS, TV/CATV, auto scan, set -top box required. **Adapter may vary by the British Standards Institution. TV in 3. Audio In R/L LCD Type...


