User Manual
Page 2
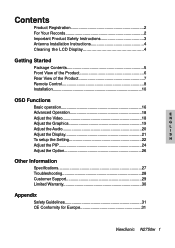
... Adjust the Option 26 Other Information Specifications 27 Troubleshooting 28 Customer Support 29 Limited Warranty 30 Appendix Safety Guidelines 31 CE Conformity for Europe 31 ViewSonic N2750w 1
... Adjust the Option 26 Other Information Specifications 27 Troubleshooting 28 Customer Support 29 Limited Warranty 30 Appendix Safety Guidelines 31 CE Conformity for Europe 31 ViewSonic N2750w 1

User Manual
Page 3
...ViewSonic N2750w 2 For Your Records E Product Name: ViewSonic N2750w N Model Number: VS10576-1E G L Serial Number: I Purchase Date: S H Product disposal at end of product life ViewSonic is concerned about proper disposal. Your local waste disposal company may be liable for incidental or consequential damages resulting from ViewSonic Corporation. ViewSonic... and to change product specifications without notice. All rights reserved. Copyright © ViewSonic Corporation, 2005. Information in this document may change without prior written permission from ...
...ViewSonic N2750w 2 For Your Records E Product Name: ViewSonic N2750w N Model Number: VS10576-1E G L Serial Number: I Purchase Date: S H Product disposal at end of product life ViewSonic is concerned about proper disposal. Your local waste disposal company may be liable for incidental or consequential damages resulting from ViewSonic Corporation. ViewSonic... and to change product specifications without notice. All rights reserved. Copyright © ViewSonic Corporation, 2005. Information in this document may change without prior written permission from ...
User Manual
Page 4
..., unplug the power cord and remove the batteries from the product. 4. Avoid touching the screen. Do not block the openings by ViewSonic. Your LCD display contains high-voltage parts. Ensure the area around the cabinet are not likely to replace your LCD display to direct... is present, immediately switch the LCD display off and call your LCD display. Orient your LCD display away from your dealer or ViewSonic. ViewSonic N2750w 3 Grounding or Polarization Your product may be equipped with care when moving it from overheating, these openings must not be walked on...
..., unplug the power cord and remove the batteries from the product. 4. Avoid touching the screen. Do not block the openings by ViewSonic. Your LCD display contains high-voltage parts. Ensure the area around the cabinet are not likely to replace your LCD display to direct... is present, immediately switch the LCD display off and call your LCD display. Orient your LCD display away from your dealer or ViewSonic. ViewSonic N2750w 3 Grounding or Polarization Your product may be equipped with care when moving it from overheating, these openings must not be walked on...
User Manual
Page 5
...and supporting structure, grounding of non-ammonia, non-alcohol based glass cleaner onto a clean, soft, lint-free cloth, and wipe the screen. ViewSonic N2750w 4 Outdoor Antenna Grounding If an outside antenna or cable system is connected to the product be sure the antenna or cable system is left ...unattended and unused for the grounding electrode. 2. ViewSonic will prevent damage to the product due to grounding electrodes, and requirements for long periods of the LCD display. Do not disconnect the ...
...and supporting structure, grounding of non-ammonia, non-alcohol based glass cleaner onto a clean, soft, lint-free cloth, and wipe the screen. ViewSonic N2750w 4 Outdoor Antenna Grounding If an outside antenna or cable system is connected to the product be sure the antenna or cable system is left ...unattended and unused for the grounding electrode. 2. ViewSonic will prevent damage to the product due to grounding electrodes, and requirements for long periods of the LCD display. Do not disconnect the ...

User Manual
Page 6
Package Contents Your LCD TV display package includes: LCD TV Display Power Cable ViewSonic User Guide RF Cable VGA Cable SCART Adaptor A/V Cable 32-Key Remote Control with batteries Quick Start Guide E N G L I S H ViewSonic N2750w 5 Save the original box and all packing material for future shipping needs. Important! Getting Started Congratulations on your purchase of a ViewSonic® LCD TV display.
Package Contents Your LCD TV display package includes: LCD TV Display Power Cable ViewSonic User Guide RF Cable VGA Cable SCART Adaptor A/V Cable 32-Key Remote Control with batteries Quick Start Guide E N G L I S H ViewSonic N2750w 5 Save the original box and all packing material for future shipping needs. Important! Getting Started Congratulations on your purchase of a ViewSonic® LCD TV display.
User Manual
Page 7
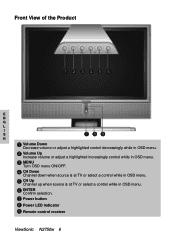
Front View of the Product 1 23456 E N G L I S 789 H 1 Volume Down Decrease volume or adjust a highlighted control decreasingly while in OSD menu. 2 Volume Up Increase volume or adjust a highlighted increasingly control while in OSD menu. 3 MENU Turn OSD menu ON/OFF. 4 CH Down Channel down when source is at TV or select a control while in OSD menu. 5 CH Up Channel up when source is at TV or select a control while in OSD menu. 6 ENTER Confirm selection. 7 Power button 8 Power LED indicator 9 Remote control receiver ViewSonic N2750w 6
Front View of the Product 1 23456 E N G L I S 789 H 1 Volume Down Decrease volume or adjust a highlighted control decreasingly while in OSD menu. 2 Volume Up Increase volume or adjust a highlighted increasingly control while in OSD menu. 3 MENU Turn OSD menu ON/OFF. 4 CH Down Channel down when source is at TV or select a control while in OSD menu. 5 CH Up Channel up when source is at TV or select a control while in OSD menu. 6 ENTER Confirm selection. 7 Power button 8 Power LED indicator 9 Remote control receiver ViewSonic N2750w 6
User Manual
Page 8
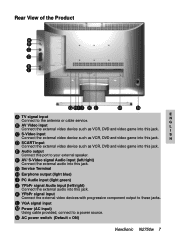
... these jacks. K YPbPr signal input Connect the external video devices with progressive component output to the antenna or cable service. N AC power switch (Default = ON) ViewSonic N2750w 7 F AV/ S-Video signal Audio input (left /right) Connect the external audio into this jack. H D SCART input Connect the external video device such as VCR, DVD...
... these jacks. K YPbPr signal input Connect the external video devices with progressive component output to the antenna or cable service. N AC power switch (Default = ON) ViewSonic N2750w 7 F AV/ S-Video signal Audio input (left /right) Connect the external audio into this jack. H D SCART input Connect the external video device such as VCR, DVD...
User Manual
Page 10
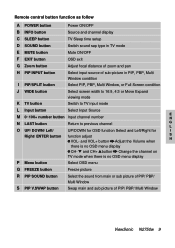
.../OFF F EXIT button OSD exit G Zoom button Adjust focal distance of zoom and pan H PIP INPUT button Select input source of PIP/ PBP/ Multi Window ViewSonic N2750w 9 Remote control button function as follow A POWER button Power ON/OFF B INFO button Source and channel display C SLEEP button TV Sleep time setup D SOUND button...
.../OFF F EXIT button OSD exit G Zoom button Adjust focal distance of zoom and pan H PIP INPUT button Select input source of PIP/ PBP/ Multi Window ViewSonic N2750w 9 Remote control button function as follow A POWER button Power ON/OFF B INFO button Source and channel display C SLEEP button TV Sleep time setup D SOUND button...
User Manual
Page 11
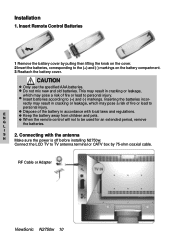
... the specified AAA batteries. Inserting the batteries incor- Dispose of the battery in accordance with the antenna H Make sure the power is off before installing N2750w. Do not mix new and old batteries. This may result in cracking or leakage, which may pose a risk of fire or lead to the (+) and... batteries according to be used for an extended period, remove G the batteries. N When the remote control will not to (+) and (-) markings. RF Cable or Adapter ViewSonic N2750w 10
... the specified AAA batteries. Inserting the batteries incor- Dispose of the battery in accordance with the antenna H Make sure the power is off before installing N2750w. Do not mix new and old batteries. This may result in cracking or leakage, which may pose a risk of fire or lead to the (+) and... batteries according to be used for an extended period, remove G the batteries. N When the remote control will not to (+) and (-) markings. RF Cable or Adapter ViewSonic N2750w 10
User Manual
Page 12
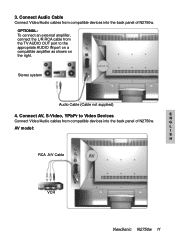
Stereo system Audio Cable (Cable not supplied) 4. Connect Audio Cable Connect Video/Audio cables from the TV AUDIO OUT port to Video Devices E N Connect Video/Audio cables from compatible devices into the back panel of N2750w. G AV model: L I S H RCA A/V Cable VCR ViewSonic N2750w 11 OPTIONAL: To connect an external amplifier, connect the L/R RCA cable from compatible devices into the back panel of N2750w. 3. Connect AV, S-Video, YPbPr to the appropriate AUDIO IN port on a compatible amplifier as shown on the right.
Stereo system Audio Cable (Cable not supplied) 4. Connect Audio Cable Connect Video/Audio cables from the TV AUDIO OUT port to Video Devices E N Connect Video/Audio cables from compatible devices into the back panel of N2750w. G AV model: L I S H RCA A/V Cable VCR ViewSonic N2750w 11 OPTIONAL: To connect an external amplifier, connect the L/R RCA cable from compatible devices into the back panel of N2750w. 3. Connect AV, S-Video, YPbPr to the appropriate AUDIO IN port on a compatible amplifier as shown on the right.
User Manual
Page 14
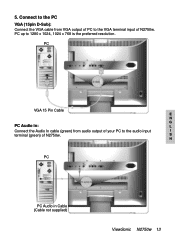
S H PC PC Audio in : L Connect the Audio In cable (green) from VGA output of PC to the VGA terminal input of N2750w. 5. PC up to the audio input I terminal (green) of N2750w. PC VGA 15 Pin Cable E N G PC Audio in Cable (Cable not supplied) ViewSonic N2750w 13 Connect to the PC VGA (15pin D-Sub): Connect the VGA cable from audio output of your PC to 1280 x 1024, 1024 x 768 is the preferred resolution.
S H PC PC Audio in : L Connect the Audio In cable (green) from VGA output of PC to the VGA terminal input of N2750w. 5. PC up to the audio input I terminal (green) of N2750w. PC VGA 15 Pin Cable E N G PC Audio in Cable (Cable not supplied) ViewSonic N2750w 13 Connect to the PC VGA (15pin D-Sub): Connect the VGA cable from audio output of your PC to 1280 x 1024, 1024 x 768 is the preferred resolution.
User Manual
Page 15
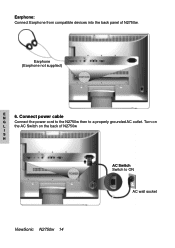
Turn on L the AC Switch on the back of N2750w. Earphone: Connect Earphone from compatible devices into the back panel of N2750w I S H AC Switch Switch to a properly grounded AC outlet. Connect power cable G Connect the power cord to the N2750w then to ON AC wall socket ViewSonic N2750w 14 Earphone (Earphone not supplied) E N 6.
Turn on L the AC Switch on the back of N2750w. Earphone: Connect Earphone from compatible devices into the back panel of N2750w I S H AC Switch Switch to a properly grounded AC outlet. Connect power cable G Connect the power cord to the N2750w then to ON AC wall socket ViewSonic N2750w 14 Earphone (Earphone not supplied) E N 6.
User Manual
Page 16
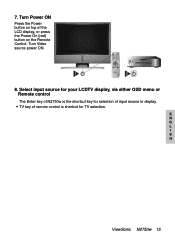
Select input source for your LCDTV display, via either OSD menu or Remote control The Enter key of N2750w is the shortcut key for selection of remote control is shortcut for TV selection. TV key of input source to display. Turn Power ON Press the Power button on top of the LCD display, or press the Power On (red) button on the Remote Control. E N G L I S H ViewSonic N2750w 15 Turn Video source power ON. 8. 7.
Select input source for your LCDTV display, via either OSD menu or Remote control The Enter key of N2750w is the shortcut key for selection of remote control is shortcut for TV selection. TV key of input source to display. Turn Power ON Press the Power button on top of the LCD display, or press the Power On (red) button on the Remote Control. E N G L I S H ViewSonic N2750w 15 Turn Video source power ON. 8. 7.

User Manual
Page 17
... your LCD TV to set up when the LCD TV is 8. Powering the LCD TV Before using the LCD TV: 1. E N G L I S Channel Select H Press number key. ViewSonic N2750w 16 Connect external equipment properly. 3. Volume Adjust Press or VOL(音量)-/+ to adjust the volume. Press 8. OSD Functions Basic operation To adjust the function...
... your LCD TV to set up when the LCD TV is 8. Powering the LCD TV Before using the LCD TV: 1. E N G L I S Channel Select H Press number key. ViewSonic N2750w 16 Connect external equipment properly. 3. Volume Adjust Press or VOL(音量)-/+ to adjust the volume. Press 8. OSD Functions Basic operation To adjust the function...
User Manual
Page 18
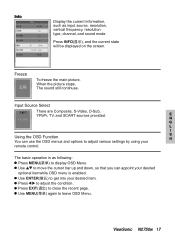
... optional itemwhile OSD menu is as input source, resolution, vertical frequency, resolution type, channel, and sound mode. Press EXIT(退出) to leave OSD Menu. ViewSonic N2750w 17
... optional itemwhile OSD menu is as input source, resolution, vertical frequency, resolution type, channel, and sound mode. Press EXIT(退出) to leave OSD Menu. ViewSonic N2750w 17
User Manual
Page 19
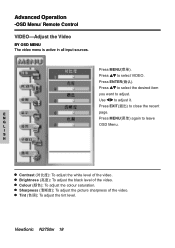
.... Tint (色调): To adjust the tint level. Press ENTER(确认). Press to leave G L OSD Menu. N Press MENU(菜单) again to select VIDEO. ViewSonic N2750w 18 Use to close the recent E page. Brightness (亮度): To adjust the black level of the video. Press EXIT(退出) to adjust it...
.... Tint (色调): To adjust the tint level. Press ENTER(确认). Press to leave G L OSD Menu. N Press MENU(菜单) again to select VIDEO. ViewSonic N2750w 18 Use to close the recent E page. Brightness (亮度): To adjust the black level of the video. Press EXIT(退出) to adjust it...
User Manual
Page 20
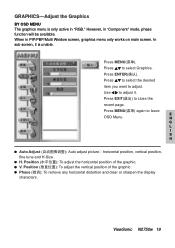
... page. Position To adjust the horizontal position of the graphic. Phase (微调): To remove any horizontal distortion and clear or sharpen the display characters. H. ViewSonic N2750w 19 V. Press MENU(菜单) again to adjust. Position To adjust the vertical position of the graphic. However, in PIP/PBP/Multi Window screen, graphics...
... page. Position To adjust the horizontal position of the graphic. Phase (微调): To remove any horizontal distortion and clear or sharpen the display characters. H. ViewSonic N2750w 19 V. Press MENU(菜单) again to adjust. Position To adjust the vertical position of the graphic. However, in PIP/PBP/Multi Window screen, graphics...
User Manual
Page 21
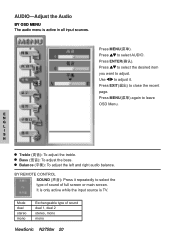
... bass. Press to close the recent page. Use to adjust it repeatedly to select the type of sound of sound dual 1, dual 2 stereo, mono mono ViewSonic N2750w 20 Mode dual stereo mono Exchangeable type of full screen or main screen. Press EXIT(退出) to select AUDIO. It is only active while...
... bass. Press to close the recent page. Use to adjust it repeatedly to select the type of sound of sound dual 1, dual 2 stereo, mono mono ViewSonic N2750w 20 Mode dual stereo mono Exchangeable type of full screen or main screen. Press EXIT(退出) to select AUDIO. It is only active while...
User Manual
Page 22
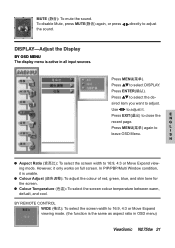
... the sound. Press ENTER(确认). MUTE (静音): To mute the sound. In PIP/PBP/Multi Window condition, it is active in OSD menu) ViewSonic N2750w 21 directly to 16:9, 4:3 or Move Expand viewing mode. (the function is the same as aspect ratio in all input sources. Press EXIT(退出...
... the sound. Press ENTER(确认). MUTE (静音): To mute the sound. In PIP/PBP/Multi Window condition, it is active in OSD menu) ViewSonic N2750w 21 directly to 16:9, 4:3 or Move Expand viewing mode. (the function is the same as aspect ratio in all input sources. Press EXIT(退出...
User Manual
Page 23
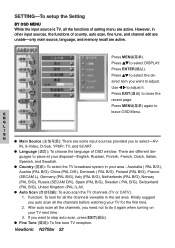
... (SECAM L), Germany (PAL B/G), Italy (PAL B/G), Netherlands (PAL B/G), Norway (PAL B/G), Russia (SECAM D/K), Spain (PAL B/G), Sweden ( PAL B/G), Switzerland (PAL B/G), United Kingdom (PAL I S H Main Source There are active. ViewSonic N2750w 22 Press to E leave OSD Menu. Press MENU(菜单) again to select the de- Function: To look for the first time. 2. If you...
... (SECAM L), Germany (PAL B/G), Italy (PAL B/G), Netherlands (PAL B/G), Norway (PAL B/G), Russia (SECAM D/K), Spain (PAL B/G), Sweden ( PAL B/G), Switzerland (PAL B/G), United Kingdom (PAL I S H Main Source There are active. ViewSonic N2750w 22 Press to E leave OSD Menu. Press MENU(菜单) again to select the de- Function: To look for the first time. 2. If you...


