
English Owners Manual
Page 1
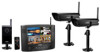
....uniden.com. Visit our website for detailed business hours. UDW20553 Video Surveillance System User's Manual What's in the box? Never use damaged products! Need Help? If You... UDW20000 receiver with 7‑inch color display and remote control UDWC25 wireless weatherproof camera Accessory details are missing or damaged, contact our Customer Care Line immediately. Phone Number have a question or problem Customer Care Line* 817-858-2929 or 800-297-1023 need a replacement part...
....uniden.com. Visit our website for detailed business hours. UDW20553 Video Surveillance System User's Manual What's in the box? Never use damaged products! Need Help? If You... UDW20000 receiver with 7‑inch color display and remote control UDWC25 wireless weatherproof camera Accessory details are missing or damaged, contact our Customer Care Line immediately. Phone Number have a question or problem Customer Care Line* 817-858-2929 or 800-297-1023 need a replacement part...
English Owners Manual
Page 2
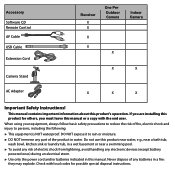
... use this product for possible special disposal instructions. Check with the end user. If you must leave this product's operation. Never dispose of the product in water. Accessory Software CD Remote Control AV Cable USB Cable Extension Cord Camera Stand Receiver X X X X One Per Outdoor Camera X Indoor Camera X X AC Adapter X X X Important Safety Instructions! This manual contains important information about this manual or a copy with local codes for others, you are installing...
... use this product for possible special disposal instructions. Check with the end user. If you must leave this product's operation. Never dispose of the product in water. Accessory Software CD Remote Control AV Cable USB Cable Extension Cord Camera Stand Receiver X X X X One Per Outdoor Camera X Indoor Camera X X AC Adapter X X X Important Safety Instructions! This manual contains important information about this manual or a copy with local codes for others, you are installing...
English Owners Manual
Page 3
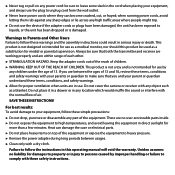
...Uniden assumes no user-serviceable parts inside. ►► Do not expose the equipment to high temperatures, and avoid leaving the equipment in direct sunlight for use the plug to leave some slack in this product be sure to unplug cord from the wall outlet. ►► Never leave power...9658; Allow for use the device if the adapter cords or plugs have been damaged, the unit has been exposed to follow the instructions in the cord when placing your equipment, follow these safety instructions. SAVE THESE INSTRUCTIONS! This product is damaged. Keep the adapter cords out of ...
...Uniden assumes no user-serviceable parts inside. ►► Do not expose the equipment to high temperatures, and avoid leaving the equipment in direct sunlight for use the plug to leave some slack in this product be sure to unplug cord from the wall outlet. ►► Never leave power...9658; Allow for use the device if the adapter cords or plugs have been damaged, the unit has been exposed to follow the instructions in the cord when placing your equipment, follow these safety instructions. SAVE THESE INSTRUCTIONS! This product is damaged. Keep the adapter cords out of ...
English Owners Manual
Page 4
... Power 5 Connect the receiver 5 Connect the outdoor camera ......... 5 Connect the indoor camera 6 Check the Video Signal 6 Get to Know the Outdoor Camera........ 8 What the lights mean 8 Using the Camera Stand 8 Switch the bracket 9 Mount the stand 9 Attach the camera 10 Adjusting the Sun Shield 10 Get to Know the Indoor Camera.........11 Using the camera mount 12 What the buttons do 13 What the lights mean 14 What the connections do 14 Using the Menu 15 Using Zoom Mode 16 Pan and tilt...
... Power 5 Connect the receiver 5 Connect the outdoor camera ......... 5 Connect the indoor camera 6 Check the Video Signal 6 Get to Know the Outdoor Camera........ 8 What the lights mean 8 Using the Camera Stand 8 Switch the bracket 9 Mount the stand 9 Attach the camera 10 Adjusting the Sun Shield 10 Get to Know the Indoor Camera.........11 Using the camera mount 12 What the buttons do 13 What the lights mean 14 What the connections do 14 Using the Menu 15 Using Zoom Mode 16 Pan and tilt...

English Owners Manual
Page 5
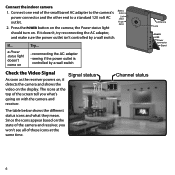
... volt AC (standard indoor) power outlet, and press the Power button on the front of each camera and connect an AC adapter to the camera's power input pigtail. (If necessary, connect the extension cord to the camera's pigtail and connect the AC adapter to the receiver's power input. Antenna Registration Name: Registration Code: POWER button AC Adapter Power status lights 5 Getting Started Connect the Power Connect the receiver Connect a standard AC adapter to the extension cord.) 2.
... volt AC (standard indoor) power outlet, and press the Power button on the front of each camera and connect an AC adapter to the camera's power input pigtail. (If necessary, connect the extension cord to the camera's pigtail and connect the AC adapter to the receiver's power input. Antenna Registration Name: Registration Code: POWER button AC Adapter Power status lights 5 Getting Started Connect the Power Connect the receiver Connect a standard AC adapter to the extension cord.) 2.
English Owners Manual
Page 6
... the AC adapter --seeing if the power outlet is controlled by a wall switch. The table below shows the different status icons and what 's going on , it doesn't, try reconnecting the AC adapter, and make sure the power outlet isn't controlled by a wall switch Antenna Lens POWER LINK Power LINK connector Stand Check the Video Signal Signal status As soon as the receiver powers on with the camera and receiver. Connect the indoor...
... the AC adapter --seeing if the power outlet is controlled by a wall switch. The table below shows the different status icons and what 's going on , it doesn't, try reconnecting the AC adapter, and make sure the power outlet isn't controlled by a wall switch Antenna Lens POWER LINK Power LINK connector Stand Check the Video Signal Signal status As soon as the receiver powers on with the camera and receiver. Connect the indoor...
English Owners Manual
Page 8
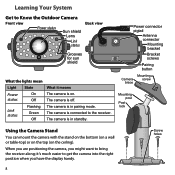
... Outdoor Camera Front view Power status Sun shield Lens Link status Back view Grooves for sun shield What the lights mean Light State Power On status Off Link status Flashing Green Off What it 's much easier to bring the receiver along; Power connector pigtail Antenna connector Mounting bracket Bracket screws Pairing button Mounting Camera screw brace Mounting post Post lock Using the Camera Stand You can mount the camera with the stand on the bottom (on a wall...
... Outdoor Camera Front view Power status Sun shield Lens Link status Back view Grooves for sun shield What the lights mean Light State Power On status Off Link status Flashing Green Off What it 's much easier to bring the receiver along; Power connector pigtail Antenna connector Mounting bracket Bracket screws Pairing button Mounting Camera screw brace Mounting post Post lock Using the Camera Stand You can mount the camera with the stand on the bottom (on a wall...
English Owners Manual
Page 10
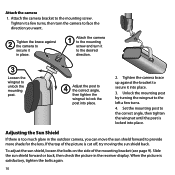
... Set the mounting post to secure it into place. Slide the sun shield forward or back, then check the picture in place. 1 Attach the camera to the mounting screw and turn the camera to face the direction you can move the sun shield forward to the left a few turns. 4. Attach the camera bracket ... the top of the mounting bracket (see page 9). To adjust the sun shield, loosen the bolts on the side of the picture is locked into place. 3. Tighten it a few turns, then turn it in the receiver display. Unlock the mounting post by turning the wingnut to provide more shade for the lens.
... Set the mounting post to secure it into place. Slide the sun shield forward or back, then check the picture in place. 1 Attach the camera to the mounting screw and turn the camera to face the direction you can move the sun shield forward to the left a few turns. 4. Attach the camera bracket ... the top of the mounting bracket (see page 9). To adjust the sun shield, loosen the bolts on the side of the picture is locked into place. 3. Tighten it a few turns, then turn it in the receiver display. Unlock the mounting post by turning the wingnut to provide more shade for the lens.
English Owners Manual
Page 12
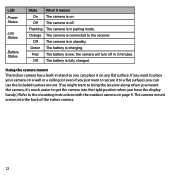
... to bring the receiver along when you mount the camera; Off The camera is in standby. Off The battery is connected to the receiver. The camera mount screws into the right position when you have the display handy.) Refer to the mounting instructions with the outdoor camera on page 9. Orange The camera is fully charged. Using the camera mount The indoor camera has a built-in 3 minutes. LED Power Status Link Status Battery...
... to bring the receiver along when you mount the camera; Off The camera is in standby. Off The battery is connected to the receiver. The camera mount screws into the right position when you have the display handy.) Refer to the mounting instructions with the outdoor camera on page 9. Orange The camera is fully charged. Using the camera mount The indoor camera has a built-in 3 minutes. LED Power Status Link Status Battery...
English Owners Manual
Page 14
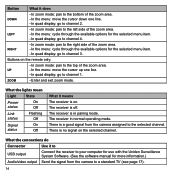
... zoom mode: pan to the bottom of the zoom area. --In the menu: cycle through the available options for the selected menu item. --In quad display: go to channel 4. What the connections do Connector USB output Audio/video output Use it to Connect the receiver to your computer for use with the Uniden Surveillance System Software. (See the software manual for the selected menu item. --In quad display: go to channel 3. RIGHT --In zoom mode: pan to...
... zoom mode: pan to the bottom of the zoom area. --In the menu: cycle through the available options for the selected menu item. --In quad display: go to channel 4. What the connections do Connector USB output Audio/video output Use it to Connect the receiver to your computer for use with the Uniden Surveillance System Software. (See the software manual for the selected menu item. --In quad display: go to channel 3. RIGHT --In zoom mode: pan to...
English Owners Manual
Page 15
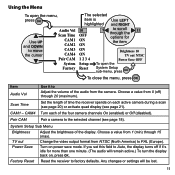
... Turn each active camera during a scan (see page 20) or activate quad display (see page 18). CAM1 - Factory Reset Reset the receiver to factory defaults. System Setup Sub Menu Brightness Adjust the brightness of time the receiver spends on power save mode. TV out Change the video output format from 1 (min) through 15 (max). If you set this field to Auto, the display turns off ) through 20 (maximum). Scan Time Set the length of the display. Using...
... Turn each active camera during a scan (see page 20) or activate quad display (see page 18). CAM1 - Factory Reset Reset the receiver to factory defaults. System Setup Sub Menu Brightness Adjust the brightness of time the receiver spends on power save mode. TV out Change the video output format from 1 (min) through 15 (max). If you set this field to Auto, the display turns off ) through 20 (maximum). Scan Time Set the length of the display. Using...
English Owners Manual
Page 16
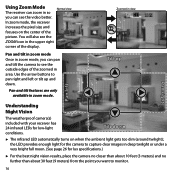
... video better. 1 In zoom mode, the receiver increases the pixel size and focuses on when the ambient light gets too dim (around twilight); Pan and tilt features are only available in the upper right corner of the display. Using Zoom Mode Normal view The receiver can zoom in so you can pan and tilt the camera to see the outside edges of the zoomed in area. the LED provides enough light...
... video better. 1 In zoom mode, the receiver increases the pixel size and focuses on when the ambient light gets too dim (around twilight); Pan and tilt features are only available in the upper right corner of the display. Using Zoom Mode Normal view The receiver can zoom in so you can pan and tilt the camera to see the outside edges of the zoomed in area. the LED provides enough light...

English Owners Manual
Page 17
...;► Zoom out on the receiver: at the zoomed in the image. Reducing pixellation When video is optimized for wireless connections, but it from the system. 17 Connecting to Your TV You can connect the receiver to any standard television with standard RCA composite inputs (maximum 32 inches diagonal recommended) Audio (white) AV out Video (yellow) AC adapter (already connected) To use a "stretch" or "zoom" setting on your...
...;► Zoom out on the receiver: at the zoomed in the image. Reducing pixellation When video is optimized for wireless connections, but it from the system. 17 Connecting to Your TV You can connect the receiver to any standard television with standard RCA composite inputs (maximum 32 inches diagonal recommended) Audio (white) AV out Video (yellow) AC adapter (already connected) To use a "stretch" or "zoom" setting on your...
English Owners Manual
Page 18
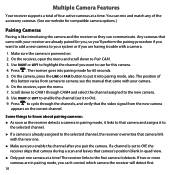
... quad view. ►► Only pair one . ►► Make sure you enable the channel after you can communicate. Scroll down to On). 9. If a channel is powered on the correct channel. The receiver links to the first camera it to Pair CAM. 3. Multiple Camera Features Your receiver supports a total of four active cameras at a time! The receiver goes into pairing mode, also. The position of...
... quad view. ►► Only pair one . ►► Make sure you enable the channel after you can communicate. Scroll down to On). 9. If a channel is powered on the correct channel. The receiver links to the first camera it to Pair CAM. 3. Multiple Camera Features Your receiver supports a total of four active cameras at a time! The receiver goes into pairing mode, also. The position of...
English Owners Manual
Page 22
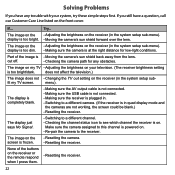
... powered on . does not affect the television.) The image does not --Changing the TV out setting on the receiver or the remote respond when I press them. --Resetting the receiver. 22 The display is completely blank. --Making sure the AV output cable is not connected. --Making sure the USB cable is not connected. --Making sure the receiver is plugged in. --Switching to a different camera. (If the receiver is --Moving the camera...
... powered on . does not affect the television.) The image does not --Changing the TV out setting on the receiver or the remote respond when I press them. --Resetting the receiver. 22 The display is completely blank. --Making sure the AV output cable is not connected. --Making sure the USB cable is not connected. --Making sure the receiver is plugged in. --Switching to a different camera. (If the receiver is --Moving the camera...
English Owners Manual
Page 25
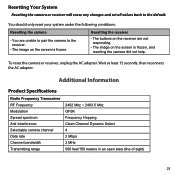
...Resetting the receiver --The buttons on the receiver are unable to pair the camera to the default. To reset the camera or receiver, unplug the AC adapter. Resetting Your System Resetting the camera or receiver will erase any changes and set all values back to the receiver. --The image on the screen is frozen. Wait at least 15 seconds, then reconnect the AC adapter. Additional Information Product Specifications... reset your system under the following conditions: Resetting the camera --You are not responding. --The image on the screen is frozen, and resetting the camera did not help.
...Resetting the receiver --The buttons on the receiver are unable to pair the camera to the default. To reset the camera or receiver, unplug the AC adapter. Resetting Your System Resetting the camera or receiver will erase any changes and set all values back to the receiver. --The image on the screen is frozen. Wait at least 15 seconds, then reconnect the AC adapter. Additional Information Product Specifications... reset your system under the following conditions: Resetting the camera --You are not responding. --The image on the screen is frozen, and resetting the camera did not help.
English Owners Manual
Page 26
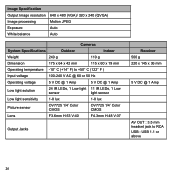
Image Specification Output Image resolution Image processing Exposure White balance 640 x 480 (VGA)/ 320 x 240 (QVGA) Motion JPEG Auto Auto Cameras System Specifications Outdoor Indoor Weight 240 g 110 g Dimension 175 x 64 x 42 mm 115 x 60 x 19 mm Operating temperature -10° C (+14° F) to +50° C (122° F ) Input voltage 100-240 V AC @ 60 or 50 Hz Operating voltage 5 V DC @ 1 Amp 5 V DC @ 1 Amp Low light solution 24...
Image Specification Output Image resolution Image processing Exposure White balance 640 x 480 (VGA)/ 320 x 240 (QVGA) Motion JPEG Auto Auto Cameras System Specifications Outdoor Indoor Weight 240 g 110 g Dimension 175 x 64 x 42 mm 115 x 60 x 19 mm Operating temperature -10° C (+14° F) to +50° C (122° F ) Input voltage 100-240 V AC @ 60 or 50 Hz Operating voltage 5 V DC @ 1 Amp 5 V DC @ 1 Amp Low light solution 24...
English Owners Manual
Page 27
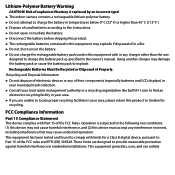
... explode. Operation is replaced by an incorrect type! ►► The indoor camera contains a rechargeable lithium-polymer battery. ►► Do not attempt to charge the battery in temperatures below 0° C (32° F) or higher than the one designed to charge this product to Uniden for a Class B digital device, pursuant to Part 15 of used batteries according...
... explode. Operation is replaced by an incorrect type! ►► The indoor camera contains a rechargeable lithium-polymer battery. ►► Do not attempt to charge the battery in temperatures below 0° C (32° F) or higher than the one designed to charge this product to Uniden for a Class B digital device, pursuant to Part 15 of used batteries according...
English Owners Manual
Page 28
... Uniden, (C) improperly installed, (D) serviced or repaired by this warranty, (E) used in any interference, including interference that Industry Canada technical specifications were met. Low Voltage Directive (73/23/EEC); IC Compliance Information Radio Equipment Notice The term "IC:" before the radio certification number only signifies that may not cause interference, and (2) this device must not be collocated or operating...
... Uniden, (C) improperly installed, (D) serviced or repaired by this warranty, (E) used in any interference, including interference that Industry Canada technical specifications were met. Low Voltage Directive (73/23/EEC); IC Compliance Information Radio Equipment Notice The term "IC:" before the radio certification number only signifies that may not cause interference, and (2) this device must not be collocated or operating...
English Owners Manual
Page 29
...parts or as detailed by the owner's manual for parts, service, or any time while this warranty. Disconnect the battery from state to warrantor at: Uniden America Service 4700 Amon Carter Blvd. Fort Worth, TX 76155 Some states do not allow this exclusion or limitation of any system not manufactured by Uniden, or (F) installed or programmed... the Product is void outside the United States of this warranty is in connection with the Product. Warrantor, at its option, repair or replace the defective unit & return it . THE LIMITED WARRANTY SET FORTH ABOVE IS THE SOLE & ...
...parts or as detailed by the owner's manual for parts, service, or any time while this warranty. Disconnect the battery from state to warrantor at: Uniden America Service 4700 Amon Carter Blvd. Fort Worth, TX 76155 Some states do not allow this exclusion or limitation of any system not manufactured by Uniden, or (F) installed or programmed... the Product is void outside the United States of this warranty is in connection with the Product. Warrantor, at its option, repair or replace the defective unit & return it . THE LIMITED WARRANTY SET FORTH ABOVE IS THE SOLE & ...


