
English Owners Manual
Page 1
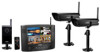
...) * During regular business hours, Central Standard Time. UDWDC23 wireless indoor camera If any items are listed on page 2. Never use damaged products! Visit our website for detailed business hours. Need Help? Contact Uniden's... Get answers 24/7 at our website: www.uniden.com. UDW20553 Video Surveillance System User's Manual What's in the box? If You...
...) * During regular business hours, Central Standard Time. UDWDC23 wireless indoor camera If any items are listed on page 2. Never use damaged products! Visit our website for detailed business hours. Need Help? Contact Uniden's... Get answers 24/7 at our website: www.uniden.com. UDW20553 Video Surveillance System User's Manual What's in the box? If You...
English Owners Manual
Page 2
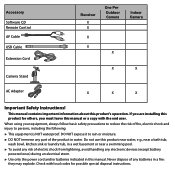
... indicated in a fire: they may explode. Check with the end user. Accessory Software CD Remote Control AV Cable USB Cable Extension Cord Camera Stand Receiver X X X X One Per Outdoor Camera X Indoor Camera X X AC Adapter X X X Important Safety Instructions! If you are installing this product for others, you must leave this manual or a copy with local...
... indicated in a fire: they may explode. Check with the end user. Accessory Software CD Remote Control AV Cable USB Cable Extension Cord Camera Stand Receiver X X X X One Per Outdoor Camera X Indoor Camera X X AC Adapter X X X Important Safety Instructions! If you are installing this product for others, you must leave this manual or a copy with local...
English Owners Manual
Page 3
... normal flow of the equipment. Always be used as a substitution for medial or parental supervision. Do not cover the camera or receiver with a dry cloth. Heat can become crushed, cut, or frayed; Uniden assumes no user-serviceable parts inside. ►► Do not expose the equipment to comply with these safety instructions...
... normal flow of the equipment. Always be used as a substitution for medial or parental supervision. Do not cover the camera or receiver with a dry cloth. Heat can become crushed, cut, or frayed; Uniden assumes no user-serviceable parts inside. ►► Do not expose the equipment to comply with these safety instructions...
English Owners Manual
Page 4
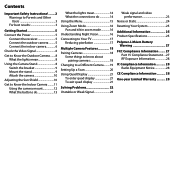
...Power 5 Connect the receiver 5 Connect the outdoor camera ......... 5 Connect the indoor camera 6 Check the Video Signal 6 Get to Know the Outdoor Camera........ 8 What the lights mean 8 Using the Camera Stand 8 Switch the bracket 9 Mount the stand 9 Attach the camera 10 Adjusting the Sun Shield 10 Get to ...16 Understanding Night Vision 16 Connecting to Your TV 17 Reducing pixellation 17 Multiple Camera Features 18 Pairing Cameras 18 Some things to know about pairing cameras 18 Changing to a Different Camera.........19 Setting Up a Scan 20 Using Quad Display 21 To enter quad ...
...Power 5 Connect the receiver 5 Connect the outdoor camera ......... 5 Connect the indoor camera 6 Check the Video Signal 6 Get to Know the Outdoor Camera........ 8 What the lights mean 8 Using the Camera Stand 8 Switch the bracket 9 Mount the stand 9 Attach the camera 10 Adjusting the Sun Shield 10 Get to ...16 Understanding Night Vision 16 Connecting to Your TV 17 Reducing pixellation 17 Multiple Camera Features 18 Pairing Cameras 18 Some things to know about pairing cameras 18 Changing to a Different Camera.........19 Setting Up a Scan 20 Using Quad Display 21 To enter quad ...

English Owners Manual
Page 5
... cord.) 2. Attach an antenna to the rear of the receiver or on the front of each camera and connect an AC adapter to the camera's power input pigtail. (If necessary, connect the extension cord to the camera's pigtail and connect the AC adapter to the receiver's power input. Antenna Registration Name: Registration Code...
... cord.) 2. Attach an antenna to the rear of the receiver or on the front of each camera and connect an AC adapter to the camera's power input pigtail. (If necessary, connect the extension cord to the camera's pigtail and connect the AC adapter to the receiver's power input. Antenna Registration Name: Registration Code...
English Owners Manual
Page 6
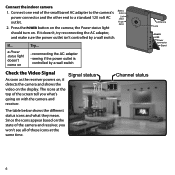
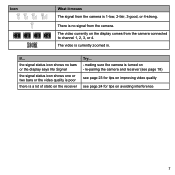
... the AC adapter --seeing if the power outlet is controlled by a wall switch. Since the icons appear based on the display. Connect the indoor camera 1. Channel status 1 6 the Power status light should turn on the camera; If... The table below shows the different status icons and what 's going on with the...Power LINK connector Stand Check the Video Signal Signal status As soon as the receiver powers on, it detects the camera and shows the video on the state of the camera and receiver, you won't see all of these icons at the top of the small barrel AC adapter to the...
... the AC adapter --seeing if the power outlet is controlled by a wall switch. Since the icons appear based on the display. Connect the indoor camera 1. Channel status 1 6 the Power status light should turn on the camera; If... The table below shows the different status icons and what 's going on with the...Power LINK connector Stand Check the Video Signal Signal status As soon as the receiver powers on, it detects the camera and shows the video on the state of the camera and receiver, you won't see all of these icons at the top of the small barrel AC adapter to the...
English Owners Manual
Page 7
... one or two bars or the video quality is poor there is a lot of static on the receiver Try... --making sure the camera is turned on --re-pairing the camera and receiver (see page 18) see page 23 for tips on improving video quality see page 24 for tips on the display... comes from the camera is 1-low, 2-fair, 3-good, or 4-strong. the signal status icon shows no signal from the camera. 1 2 3 4 The video currently on avoiding interference 7 Icon What it means The signal from the...
... one or two bars or the video quality is poor there is a lot of static on the receiver Try... --making sure the camera is turned on --re-pairing the camera and receiver (see page 18) see page 23 for tips on improving video quality see page 24 for tips on the display... comes from the camera is 1-low, 2-fair, 3-good, or 4-strong. the signal status icon shows no signal from the camera. 1 2 3 4 The video currently on avoiding interference 7 Icon What it means The signal from the...
English Owners Manual
Page 8
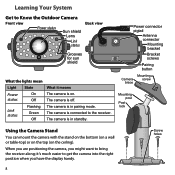
... Flashing Green Off What it 's much easier to get the camera into the right position when you might want to the receiver. The camera is connected to bring the receiver along; it means The camera is in standby. The camera is off. The camera is in pairing mode. Power connector pigtail Antenna connector Mounting bracket...
... Flashing Green Off What it 's much easier to get the camera into the right position when you might want to the receiver. The camera is connected to bring the receiver along; it means The camera is in standby. The camera is off. The camera is in pairing mode. Power connector pigtail Antenna connector Mounting bracket...
English Owners Manual
Page 9
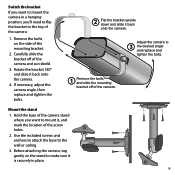
... 'll need to flip the bracket to the top of the mounting bracket. 2. Remove the bolts on the stand to mount the camera in place. 9 Hold the base of the camera stand where you want to mount it is securely in a hanging position, you want to make sure it , and mark the... the bolts. 1 Remove the bolts and slide the mounting bracket off of the screw holes. 2. Carefully slide the bracket off of the camera. Before attaching the camera, tug gently on the side of the camera: 1. Adjust the camera to the wall or ceiling. 3. Rotate the bracket 180° and slide it back onto the...
... 'll need to flip the bracket to the top of the mounting bracket. 2. Remove the bolts on the stand to mount the camera in place. 9 Hold the base of the camera stand where you want to mount it is securely in a hanging position, you want to make sure it , and mark the... the bolts. 1 Remove the bolts and slide the mounting bracket off of the screw holes. 2. Carefully slide the bracket off of the camera. Before attaching the camera, tug gently on the side of the camera: 1. Adjust the camera to the wall or ceiling. 3. Rotate the bracket 180° and slide it back onto the...
English Owners Manual
Page 10
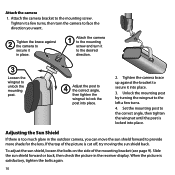
... there is cut off, try moving the sun shield back. Slide the sun shield forward or back, then check the picture in place. 1 Attach the camera to the mounting screw and turn it to the desired direction. 3 Loosen the wingnut to unlock the mounting post. 4 Adjust the post to the correct... the post into place. 3. To adjust the sun shield, loosen the bolts on the side of the picture is too much glare in the outdoor camera, you want. 2 Tighten the brace against the bracket to provide more shade for the lens. Unlock the mounting post by turning the wingnut to the...
... there is cut off, try moving the sun shield back. Slide the sun shield forward or back, then check the picture in place. 1 Attach the camera to the mounting screw and turn it to the desired direction. 3 Loosen the wingnut to unlock the mounting post. 4 Adjust the post to the correct... the post into place. 3. To adjust the sun shield, loosen the bolts on the side of the picture is too much glare in the outdoor camera, you want. 2 Tighten the brace against the bracket to provide more shade for the lens. Unlock the mounting post by turning the wingnut to the...
English Owners Manual
Page 11
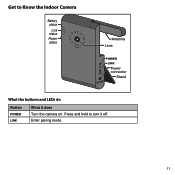
Press and hold to Know the Indoor Camera Battery status Link status Power status Antenna Lens POWER LINK Power LINK connector Stand What the buttons and LEDs do Button POWER Link What it off. Enter pairing mode. 11 Get to turn it does Turn the camera on.
Press and hold to Know the Indoor Camera Battery status Link status Power status Antenna Lens POWER LINK Power LINK connector Stand What the buttons and LEDs do Button POWER Link What it off. Enter pairing mode. 11 Get to turn it does Turn the camera on.
English Owners Manual
Page 12
.... Using the camera mount The indoor camera has a built-in pairing mode. Orange The camera is in stand so you can use the included camera mount. (You might want to bring the receiver along when you mount the camera; the camera will turn off . it on page 9. Off The camera is charging. ...Green The battery is in 3 minutes. Red The battery is fully charged. If you want to place your camera on . The camera mount screws into the right position when ...
.... Using the camera mount The indoor camera has a built-in pairing mode. Orange The camera is in stand so you can use the included camera mount. (You might want to bring the receiver along when you mount the camera; the camera will turn off . it on page 9. Off The camera is charging. ...Green The battery is in 3 minutes. Red The battery is fully charged. If you want to place your camera on . The camera mount screws into the right position when ...

English Owners Manual
Page 13
Get to the selected camera. SELECT CAMERA --Cycle through the active cameras and quad display. --From the pairing menu: link to Know the Receiver and Remote Display Antenna Link status Signal status Speakers IR sensor SELECT MENU/ DOWN LEFT CAMERA OK ZOOM POWER OK RIGHT UP What the buttons do Button What it off. Press and hold to turn it does POWER --Turn the receiver on. MENU/ok --Open and close the menu 13
Get to the selected camera. SELECT CAMERA --Cycle through the active cameras and quad display. --From the pairing menu: link to Know the Receiver and Remote Display Antenna Link status Signal status Speakers IR sensor SELECT MENU/ DOWN LEFT CAMERA OK ZOOM POWER OK RIGHT UP What the buttons do Button What it off. Press and hold to turn it does POWER --Turn the receiver on. MENU/ok --Open and close the menu 13
English Owners Manual
Page 14
... Off Signal On status Off What it to Connect the receiver to your computer for use with the Uniden Surveillance System Software. (See the software manual for more information.) Send the signal from the camera assigned to channel 4. LEFT --In zoom mode: pan to the left side of the zoom area. ...the available options for the selected menu item. --In quad display: go to a standard TV (see page 17). 14 There is a good signal from the camera to channel 1. Up --In the menu: move the cursor down one line. --In quad display: go to channel 2. There is no signal on the ...
... Off Signal On status Off What it to Connect the receiver to your computer for use with the Uniden Surveillance System Software. (See the software manual for more information.) Send the signal from the camera assigned to channel 4. LEFT --In zoom mode: pan to the left side of the zoom area. ...the available options for the selected menu item. --In quad display: go to a standard TV (see page 17). 14 There is a good signal from the camera to channel 1. Up --In the menu: move the cursor down one line. --In quad display: go to channel 2. There is no signal on the ...
English Owners Manual
Page 15
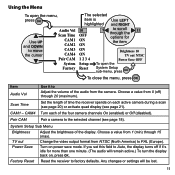
... a scan (see page 20) or activate quad display (see page 18). Power Save Turn on each of the four camera channels On (enabled) or Off (disabled). System Setup Sub Menu Brightness Adjust the brightness of the audio from NTSC (North America) to Auto, the ... power save mode. Factory Reset Reset the receiver to the selected channel (see page 21). Choose a value from 1 (min) through 20 (maximum). Pair CAM Pair a camera to factory defaults. Choose a value from 0 (off if it's idle for the item ON ON ON 1 2 3 4 Brightness 10 TV out NTSC Power Save OFF ...
... a scan (see page 20) or activate quad display (see page 18). Power Save Turn on each of the four camera channels On (enabled) or Off (disabled). System Setup Sub Menu Brightness Adjust the brightness of the audio from NTSC (North America) to Auto, the ... power save mode. Factory Reset Reset the receiver to the selected channel (see page 21). Choose a value from 1 (min) through 20 (maximum). Pair CAM Pair a camera to factory defaults. Choose a value from 0 (off if it's idle for the item ON ON ON 1 2 3 4 Brightness 10 TV out NTSC Power Save OFF ...
English Owners Manual
Page 16
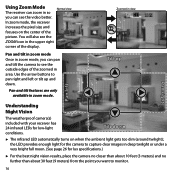
... with your receiver has 24 infrared LEDs for lux specifications.) ►► For the best night vision results, place the camera no closer than about 10 feet (3 meters) and no further than about 30 feet (9 meters) from the point you want to monitor. 16 Pan and ... light gets too dim (around twilight); Tilt down . Using Zoom Mode Normal view The receiver can zoom in so you can pan and tilt the camera to see the outside edges of the zoomed in area.
... with your receiver has 24 infrared LEDs for lux specifications.) ►► For the best night vision results, place the camera no closer than about 10 feet (3 meters) and no further than about 30 feet (9 meters) from the point you want to monitor. 16 Pan and ... light gets too dim (around twilight); Tilt down . Using Zoom Mode Normal view The receiver can zoom in so you can pan and tilt the camera to see the outside edges of the zoomed in area.
English Owners Manual
Page 18
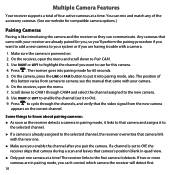
...Press . see the manual that came with your system or if you are having trouble with a camera. 1. The receiver links to put it to camera; Any cameras that came with the new one camera at a time. Use Right or Left to highlight the channel you want to Pair CAM. ...;► Make sure you enable the channel after you can communicate. Multiple Camera Features Your receiver supports a total of this camera. 4. Make sure the camera is like introducing the camera and the receiver so they can 't control which camera the receiver will detect first. 18 On the receiver, open the menu...
...Press . see the manual that came with your system or if you are having trouble with a camera. 1. The receiver links to put it to camera; Any cameras that came with the new one camera at a time. Use Right or Left to highlight the channel you want to Pair CAM. ...;► Make sure you enable the channel after you can communicate. Multiple Camera Features Your receiver supports a total of this camera. 4. Make sure the camera is like introducing the camera and the receiver so they can 't control which camera the receiver will detect first. 18 On the receiver, open the menu...
English Owners Manual
Page 19
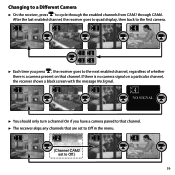
... from CAM1 through CAM4. After the last enabled channel, the receiver goes to quad display, then back to the first camera. 1 2 3 4 12 34 ►► Each time you have a camera paired to that channel. ►► The receiver skips any channels that channel. Changing to a Different... Camera ►► On the receiver, press to the next enabled channel, regardless of whether there is no camera signal on that are set to Off...
... from CAM1 through CAM4. After the last enabled channel, the receiver goes to quad display, then back to the first camera. 1 2 3 4 12 34 ►► Each time you have a camera paired to that channel. ►► The receiver skips any channels that channel. Changing to a Different... Camera ►► On the receiver, press to the next enabled channel, regardless of whether there is no camera signal on that are set to Off...
English Owners Manual
Page 20
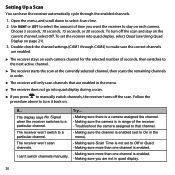
... can have the receiver automatically cycle through CAM4) to make sure the correct channels are enabled. ►► The receiver stays on each camera channel for the selected number of seconds, then switches to the next active channel. ►► The receiver starts the scan at the ... receiver will only scan channels that channel. --Making sure the channel is enabled (set to stay on each camera. Try... --Making sure there is a camera assigned the channel. --Making sure the camera is in range of time you press to a particular channel. Choose 5 seconds, 10 seconds, 15 seconds...
... can have the receiver automatically cycle through CAM4) to make sure the correct channels are enabled. ►► The receiver stays on each camera channel for the selected number of seconds, then switches to the next active channel. ►► The receiver starts the scan at the ... receiver will only scan channels that channel. --Making sure the channel is enabled (set to stay on each camera. Try... --Making sure there is a camera assigned the channel. --Making sure the camera is in range of time you press to a particular channel. Choose 5 seconds, 10 seconds, 15 seconds...
English Owners Manual
Page 21
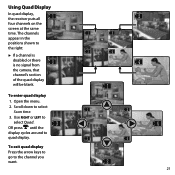
... the positions shown to select Scan time. 3. Scroll down to the right: ►► If a channel is disabled or there is no signal from 3 the camera, that channel's section of the quad display will be blank.
... the positions shown to select Scan time. 3. Scroll down to the right: ►► If a channel is disabled or there is no signal from 3 the camera, that channel's section of the quad display will be blank.


