Owners Manual
Page 3
...flow of each other. This product is not a toy and is not designed or intended for medical or parental supervision. Do not cover the camera or receiver with a dry cloth. There are in use. Failure to persons caused by any part of 13. This product is not intended for... heavy pressure. xx STRANGULATION HAZARD. xx Allow for damages to property or injury to follow the instructions in any object such as a blanket. Uniden assumes no liability for proper ventilation when units are no user-serviceable parts inside. ment in serious injury or death. For best results: To ...
...flow of each other. This product is not a toy and is not designed or intended for medical or parental supervision. Do not cover the camera or receiver with a dry cloth. There are in use. Failure to persons caused by any part of 13. This product is not intended for... heavy pressure. xx STRANGULATION HAZARD. xx Allow for damages to property or injury to follow the instructions in any object such as a blanket. Uniden assumes no liability for proper ventilation when units are no user-serviceable parts inside. ment in serious injury or death. For best results: To ...

Owners Manual
Page 4
...Set-up and Installation 6 Step 2. Get to Know the Main Menu 10 System Setup - Get to Know the Camera 7 II. VOX Sensitivity/Enable VOX Recording 13 Brightness 13 Alarm Setup/Event List 14 About Digital Wirless Technology 15 ... System 5 Getting Started 6 Step 1. Contents Important Safety Precautions 2 What's in the Box? 1 x Digital Wireless Camera 1 x 3.5" LCD Digital Wireless Monitor 1 x AC Adapter for Camera 1 x AC Adapter for Monitor 1 x Goose Neck Camera Stand with mount screws 1 x Owner's Manual ## If any items are missing or damaged, contact our Customer Care ...
...Set-up and Installation 6 Step 2. Get to Know the Main Menu 10 System Setup - Get to Know the Camera 7 II. VOX Sensitivity/Enable VOX Recording 13 Brightness 13 Alarm Setup/Event List 14 About Digital Wirless Technology 15 ... System 5 Getting Started 6 Step 1. Contents Important Safety Precautions 2 What's in the Box? 1 x Digital Wireless Camera 1 x 3.5" LCD Digital Wireless Monitor 1 x AC Adapter for Camera 1 x AC Adapter for Monitor 1 x Goose Neck Camera Stand with mount screws 1 x Owner's Manual ## If any items are missing or damaged, contact our Customer Care ...
Owners Manual
Page 5
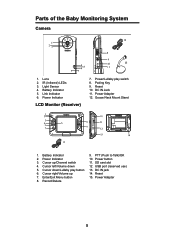
Parts of the Baby Monitoring System Camera PWR. Battery Indicator 5. Power Indicator LCD Monitor (Receiver) 7. Pairing Key 9. Record/Delete 9. Power Adapter 5 Light Sensor 4. PTT (Push to Talk)/OK 10. Goose Neck Mount ...
Parts of the Baby Monitoring System Camera PWR. Battery Indicator 5. Power Indicator LCD Monitor (Receiver) 7. Pairing Key 9. Record/Delete 9. Power Adapter 5 Light Sensor 4. PTT (Push to Talk)/OK 10. Goose Neck Mount ...
Owners Manual
Page 6
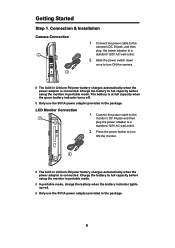
... in Lithium-Polymer battery charges automatically when the power adapter is connected. Charge the battery to turn ON the camera. LCD Monitor Connection 2 1. Connect the power cable to the camera's DC IN jack, and then plug the power adapter to a standard 120V AC wall outlet. 2. DC...the green battery indicator turns off. ## Only use the 5V/1A power adapter provided in the package. The battery is connected. Connection & Installation Camera Connection 2 1. Getting Started Step 1. Charge the battery to turn ON the monitor. 1 ## The built-in portable mode. Slide the power...
... in Lithium-Polymer battery charges automatically when the power adapter is connected. Charge the battery to turn ON the camera. LCD Monitor Connection 2 1. Connect the power cable to the camera's DC IN jack, and then plug the power adapter to a standard 120V AC wall outlet. 2. DC...the green battery indicator turns off. ## Only use the 5V/1A power adapter provided in the package. The battery is connected. Connection & Installation Camera Connection 2 1. Getting Started Step 1. Charge the battery to turn ON the monitor. 1 ## The built-in portable mode. Slide the power...
Owners Manual
Page 7
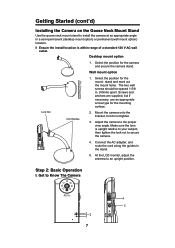
...wall screws should be spaced 1-5/8 in the stand. 5. Make sure the lens is within range of a standard 120 V AC wall outlet. Mount the camera onto the bracket, but if necessary, use an appropriate screw type for the mounting surface. At the LCD monitor, adjust the antenna to secure the...adapter, and route the cord along the guides in . (40mm) apart. Getting Started (cont'd) Installing the Camera on the Goose Neck Mount Stand Use the goose neck mount stand to install the camera at an appropriate angle in a semi-permanent (desktop mount option) or permanent (wall mount option) location. ...
...wall screws should be spaced 1-5/8 in the stand. 5. Make sure the lens is within range of a standard 120 V AC wall outlet. Mount the camera onto the bracket, but if necessary, use an appropriate screw type for the mounting surface. At the LCD monitor, adjust the antenna to secure the...adapter, and route the cord along the guides in . (40mm) apart. Getting Started (cont'd) Installing the Camera on the Goose Neck Mount Stand Use the goose neck mount stand to install the camera at an appropriate angle in a semi-permanent (desktop mount option) or permanent (wall mount option) location. ...
Owners Manual
Page 8
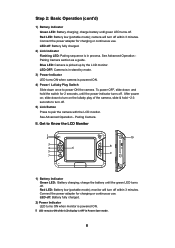
...Battery fully charged. 2) Link Indicator Flashing LED: Pairing sequence is OFF in stand-by mode. 3) Power Indicator LED turns ON when camera is picked up by the LCD monitor. LED OFF: Camera is in Power Save mode. 8 LED off . 5) Link Button Press to Know the LCD Monitor 1 2 3 4 6 5... 7 USB 10 8 9 1) Battery Indicator Green LED: Battery charging; camera will turn off within 3 minutes. Red LED: Battery low (portable mode); monitor will turn off within 3 minutes. II. charge battery until the power ...
...Battery fully charged. 2) Link Indicator Flashing LED: Pairing sequence is OFF in stand-by mode. 3) Power Indicator LED turns ON when camera is picked up by the LCD monitor. LED OFF: Camera is in Power Save mode. 8 LED off . 5) Link Button Press to Know the LCD Monitor 1 2 3 4 6 5... 7 USB 10 8 9 1) Battery Indicator Green LED: Battery charging; camera will turn off within 3 minutes. Red LED: Battery low (portable mode); monitor will turn off within 3 minutes. II. charge battery until the power ...
Owners Manual
Page 9
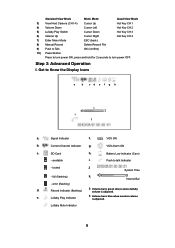
...- VOX VOX ON b. error (flashing) d. e. Get to talk Indicator - available h. System Time - Record indicator (flashing) ## Volume bar is green when camera lullaby volume is adjusted. Lullaby Mute Indicator 9 VOX Alarm ON c. locked j. SD Card - Battery Low Indicator (Cam) i. Standard View Mode Menu Mode Quad ...View Mode 3) View Next Camera (CH1-4) Cursor Up Hot Key CH 1 4) Volume Down Cursor Left Hot Key CH 2 5) Lullaby Play Switch Cursor...
...- VOX VOX ON b. error (flashing) d. e. Get to talk Indicator - available h. System Time - Record indicator (flashing) ## Volume bar is green when camera lullaby volume is adjusted. Lullaby Mute Indicator 9 VOX Alarm ON c. locked j. SD Card - Battery Low Indicator (Cam) i. Standard View Mode Menu Mode Quad ...View Mode 3) View Next Camera (CH1-4) Cursor Up Hot Key CH 1 4) Volume Down Cursor Left Hot Key CH 2 5) Lullaby Play Switch Cursor...
Owners Manual
Page 11
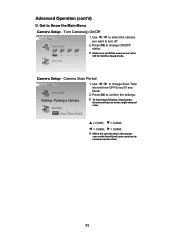
... 1. Press OK to turn off. 2. Pairing - Use ◄ / ► to select the camera you want to confirm the settings. Camera Setup - Get to ON for SCAN or Quad mode. Press OK to change Scan Time interval from Quad, press any key to enter single ... enters into power save mode from OFF/5 sec/15 sec/ Quad. 2. Use ◄ / ► to change ON/OFF status. ## Make sure available cameras are set to Know the Main Menu Camera Setup - Pairing a Camera ## To leave Quad display, simply press directional keys to resume monitor view. 11 Advanced Operation (cont'd) II. Turn...
... 1. Press OK to turn off. 2. Pairing - Use ◄ / ► to select the camera you want to confirm the settings. Camera Setup - Get to ON for SCAN or Quad mode. Press OK to change Scan Time interval from Quad, press any key to enter single ... enters into power save mode from OFF/5 sec/15 sec/ Quad. 2. Use ◄ / ► to change ON/OFF status. ## Make sure available cameras are set to Know the Main Menu Camera Setup - Pairing a Camera ## To leave Quad display, simply press directional keys to resume monitor view. 11 Advanced Operation (cont'd) II. Turn...
Owners Manual
Page 12
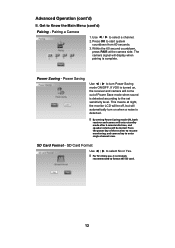
... display when pairing is strongly recommended to Know the Main Menu (cont'd) Pairing - This means at the camera side. The camera signal will come out of the receiver to resume monitoring, and camera key to the set sensitivity level. Power Saving - Press OK to select a channel. 2. SD Card Format Use ◄ / ► to.../OFF. SD Card Format - Press the power key of Power Save mode when sound is detected. ## By setting Power Saving mode ON, both receiver and camera will enter standby mode after 2-minute idle time, and speaker volume will be off, but will be muted.
... display when pairing is strongly recommended to Know the Main Menu (cont'd) Pairing - This means at the camera side. The camera signal will come out of the receiver to resume monitoring, and camera key to the set sensitivity level. Power Saving - Press OK to select a channel. 2. SD Card Format Use ◄ / ► to.../OFF. SD Card Format - Press the power key of Power Save mode when sound is detected. ## By setting Power Saving mode ON, both receiver and camera will enter standby mode after 2-minute idle time, and speaker volume will be off, but will be muted.
Owners Manual
Page 13
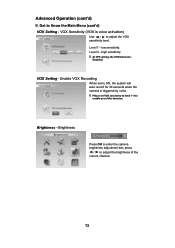
... current channel. 13 Level 1 - low sensitivity. VOX Setting - Enable VOX Recording When set to ON, the system will auto record for 30 seconds when the camera is voice activation) Use ◄ / ► to adjust the brightness of this function. Level 3 - Get to enter the... camera brightness adjustment bar; press ◄ / ► to adjust the VOX sensitivity level. Advanced Operation (cont'd) II. Brightness Press OK to Know the Main Menu (cont'd) ...
... current channel. 13 Level 1 - low sensitivity. VOX Setting - Enable VOX Recording When set to ON, the system will auto record for 30 seconds when the camera is voice activation) Use ◄ / ► to adjust the brightness of this function. Level 3 - Get to enter the... camera brightness adjustment bar; press ◄ / ► to adjust the VOX sensitivity level. Advanced Operation (cont'd) II. Brightness Press OK to Know the Main Menu (cont'd) ...
Owners Manual
Page 14
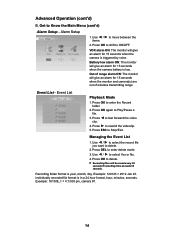
...to delete. ## Recording files will give an alarm for 15 seconds when the monitor and camera(s) are out of range alarm ON: The monitor will give an alarm for 15 seconds when the camera battery is triggered by voice. Press ► to fast forward the video clip. 4. Press... ◄ to rewind the videoclip. 5. Press ESC to move between the items. 2. Example: 161308_1 = 4:13:08 pm, camera #1. 14 Advanced Operation (cont'd) II. Use ◄ / ► to Stop/Exit. Get to enter the Record folder. 2. Event List - Press OK to Know...
...to delete. ## Recording files will give an alarm for 15 seconds when the monitor and camera(s) are out of range alarm ON: The monitor will give an alarm for 15 seconds when the camera battery is triggered by voice. Press ► to fast forward the video clip. 4. Press... ◄ to rewind the videoclip. 5. Press ESC to move between the items. 2. Example: 161308_1 = 4:13:08 pm, camera #1. 14 Advanced Operation (cont'd) II. Use ◄ / ► to Stop/Exit. Get to enter the Record folder. 2. Event List - Press OK to Know...
Owners Manual
Page 15
... Spectrum (FHSS) technology. WIFI, Bluetooth, cordless phone...etc. Complies with FCC part 15.247, ETSI (EN) 300 328; Do not place near the camera or the monitor unit. Person walking by may encounter. How to improve the wireless signal quality If possible, remove obstacles in between the...the wireless signal is not good enough, place the monitor at a new angle, readjust its position to make an improvement, or simply move the camera closer to the monitor. If you may cause unstable signal quality. By digitizing and compressing the raw analog data, the bandwidth is compressed and presented...
... Spectrum (FHSS) technology. WIFI, Bluetooth, cordless phone...etc. Complies with FCC part 15.247, ETSI (EN) 300 328; Do not place near the camera or the monitor unit. Person walking by may encounter. How to improve the wireless signal quality If possible, remove obstacles in between the...the wireless signal is not good enough, place the monitor at a new angle, readjust its position to make an improvement, or simply move the camera closer to the monitor. If you may cause unstable signal quality. By digitizing and compressing the raw analog data, the bandwidth is compressed and presented...
Owners Manual
Page 16
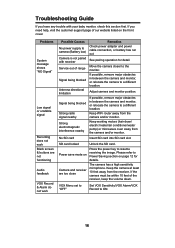
..." Set VOX Sensitivity/VOX Alarm/VOX Record to a different location. See pairing operation for details. Adjust camera and monitor position. Keep WiFi router away from the camera and/or monitor. Problems System message shows "NO Signal" Low signal or unstable signal Recording does not work... Possible Causes No power supply to camera (Battery low) Camera is not paired with your baby monitor, check this section first. Keep working motors (hair dryer/ electric heater/air conditioner/...
..." Set VOX Sensitivity/VOX Alarm/VOX Record to a different location. See pairing operation for details. Adjust camera and monitor position. Keep WiFi router away from the camera and/or monitor. Problems System message shows "NO Signal" Low signal or unstable signal Recording does not work... Possible Causes No power supply to camera (Battery low) Camera is not paired with your baby monitor, check this section first. Keep working motors (hair dryer/ electric heater/air conditioner/...
Owners Manual
Page 17
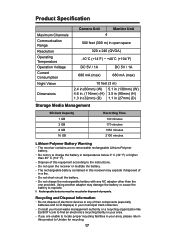
... product to the instructions. Product Specification Maximum Channels Communication Range Resolution Operating Temperature Operation Voltage Current Consumption Night Vision Dimensions Camera Unit Monitor Unit 4 500 feet (300 m) in open the receiver or mutilate the battery. Using another adapter may...176; C (113° F). Recycling and Disposal Information xx Do not dispose of in your area, please return this equipment according to Uniden for recycling. 17 xx If you are unable to find an electronics recycling facility in (27mm) (D) Storage Media Management SD Card Capacity...
... product to the instructions. Product Specification Maximum Channels Communication Range Resolution Operating Temperature Operation Voltage Current Consumption Night Vision Dimensions Camera Unit Monitor Unit 4 500 feet (300 m) in open the receiver or mutilate the battery. Using another adapter may...176; C (113° F). Recycling and Disposal Information xx Do not dispose of in your area, please return this equipment according to Uniden for recycling. 17 xx If you are unable to find an electronics recycling facility in (27mm) (D) Storage Media Management SD Card Capacity...


