Owners Manual
Page 1
Need Help? Get answers 24/7 at our website: www.uniden.com. Never use damaged products! UBW2101 3.5" LCD Portable Wireless Baby Monitoring System If any items are missing or damaged, contact our Customer Care Line immediately.
Need Help? Get answers 24/7 at our website: www.uniden.com. Never use damaged products! UBW2101 3.5" LCD Portable Wireless Baby Monitoring System If any items are missing or damaged, contact our Customer Care Line immediately.
Owners Manual
Page 2
xx DO NOT immerse any part of fire, electric shock and injury to reduce the risk of the product in a wet basement or near a bath tub, wash bowl, kitchen sink or laundry tub, in water. xx Use only the power cord and/or batteries indicated in this product's operation. Check with the end user. Important Safety Precautions This manual contains important information about this manual. Never dispose of electric shock from the wall outlet. xx Never tug or pull on any high traffic areas where people might trip over them. Do not use this manual or a copy with local codes for ...
xx DO NOT immerse any part of fire, electric shock and injury to reduce the risk of the product in a wet basement or near a bath tub, wash bowl, kitchen sink or laundry tub, in water. xx Use only the power cord and/or batteries indicated in this product's operation. Check with the end user. Important Safety Precautions This manual contains important information about this manual. Never dispose of electric shock from the wall outlet. xx Never tug or pull on any high traffic areas where people might trip over them. Do not use this manual or a copy with local codes for ...
Owners Manual
Page 3
... you are within range of each other. For best results: To avoid damage to your parent or guardian understand these terms, conditions, and safety warnings. Uniden assumes no user-serviceable parts inside. Important Safety Precautions (cont'd) Warnings to Parents and Other Users Failure to follow these warnings and the assembly instructions...
... you are within range of each other. For best results: To avoid damage to your parent or guardian understand these terms, conditions, and safety warnings. Uniden assumes no user-serviceable parts inside. Important Safety Precautions (cont'd) Warnings to Parents and Other Users Failure to follow these warnings and the assembly instructions...

Owners Manual
Page 4
Get to Know the Main Menu 10 System Setup - Get to Know the LCD Monitor 8 Step 3. Basic Operation 7 I . Get to Know the Display Icons 9 II. Advanced Operation 9 I . Turn Camera(s) ON/OFF/Camera Scan Period..11 Pairing a Camera/Power Save Mode/SD Card Format 12 VOX Setting - Time Setting/Factory Defaults 10 Camera Setup - Set-up and Installation 6 Step 2. Contents Important Safety Precautions 2 What's in the Box? 1 x Digital Wireless Camera 1 x 3.5" LCD Digital Wireless Monitor 1 x AC Adapter for Camera 1 x AC Adapter for Monitor 1 x Goose Neck Camera Stand with mount...
Get to Know the Main Menu 10 System Setup - Get to Know the LCD Monitor 8 Step 3. Basic Operation 7 I . Get to Know the Display Icons 9 II. Advanced Operation 9 I . Turn Camera(s) ON/OFF/Camera Scan Period..11 Pairing a Camera/Power Save Mode/SD Card Format 12 VOX Setting - Time Setting/Factory Defaults 10 Camera Setup - Set-up and Installation 6 Step 2. Contents Important Safety Precautions 2 What's in the Box? 1 x Digital Wireless Camera 1 x 3.5" LCD Digital Wireless Monitor 1 x AC Adapter for Camera 1 x AC Adapter for Monitor 1 x Goose Neck Camera Stand with mount...
Owners Manual
Page 5
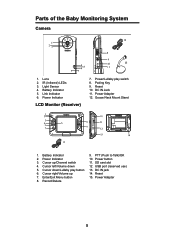
Light Sensor 4. Power Indicator LCD Monitor (Receiver) 7. DC IN Jack 11. Goose Neck Mount Stand USB 1. Enter/Exit Menu button 8. PTT (Push to Talk)/OK 10. Reset 15. Battery Indicator 5. Power/Lullaby play button 6. Pairing Key 9. Cursor left/Volume down /Lullaby play switch 8. DC IN jack 14. Power Adapter 5 IR (Infrared) LEDs 3. Reset 10. Cursor right/Volume up /Channel switch 4. Record/Delete 9. Power Adapter 12. Power Indicator 3. Power button 11. Parts of the Baby Monitoring System Camera PWR. DC IN 5V/1A 13 1. Lens 2. Cursor up 7....
Light Sensor 4. Power Indicator LCD Monitor (Receiver) 7. DC IN Jack 11. Goose Neck Mount Stand USB 1. Enter/Exit Menu button 8. PTT (Push to Talk)/OK 10. Reset 15. Battery Indicator 5. Power/Lullaby play button 6. Pairing Key 9. Cursor left/Volume down /Lullaby play switch 8. DC IN jack 14. Power Adapter 5 IR (Infrared) LEDs 3. Reset 10. Cursor right/Volume up /Channel switch 4. Record/Delete 9. Power Adapter 12. Power Indicator 3. Power button 11. Parts of the Baby Monitoring System Camera PWR. DC IN 5V/1A 13 1. Lens 2. Cursor up 7....
Owners Manual
Page 6
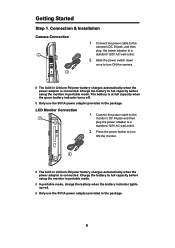
Connect the power cable to the monitor's DC IN jack and then plug the power adapter to a standard 120V AC wall outlet. 2. Connect the power cable to the camera's DC IN jack, and then plug the power adapter to a standard 120V AC wall outlet. 2. DC IN 5V/1A 1 ## The built-in the package. Getting Started Step 1. LCD Monitor Connection 2 1. Connection & Installation Camera Connection 2 1. Press the power button to turn ON the monitor. 1 ## The built-in Lithium-Polymer battery charges automatically when the power adapter is connected. Slide the power switch down once ...
Connect the power cable to the monitor's DC IN jack and then plug the power adapter to a standard 120V AC wall outlet. 2. Connect the power cable to the camera's DC IN jack, and then plug the power adapter to a standard 120V AC wall outlet. 2. DC IN 5V/1A 1 ## The built-in the package. Getting Started Step 1. LCD Monitor Connection 2 1. Connection & Installation Camera Connection 2 1. Press the power button to turn ON the monitor. 1 ## The built-in Lithium-Polymer battery charges automatically when the power adapter is connected. Slide the power switch down once ...
Owners Manual
Page 7
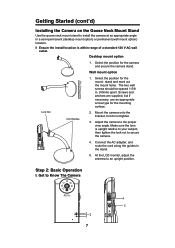
Mount the camera onto the bracket, but if necessary, use an appropriate screw type for the mount stand and mark out the mount holes. Step 2: Basic Operation I. Getting Started (cont'd) Installing the Camera on the Goose Neck Mount Stand Use the goose neck mount stand to install the camera at an appropriate angle in a semi-permanent (desktop mount option) or permanent (wall mount option) location. ## Ensure the install location is upright relative to your subject, then tighten the lock nut to secure the camera. 4. Wall mount option 1. Screws and anchors are supplied, but do ...
Mount the camera onto the bracket, but if necessary, use an appropriate screw type for the mount stand and mark out the mount holes. Step 2: Basic Operation I. Getting Started (cont'd) Installing the Camera on the Goose Neck Mount Stand Use the goose neck mount stand to install the camera at an appropriate angle in a semi-permanent (desktop mount option) or permanent (wall mount option) location. ## Ensure the install location is upright relative to your subject, then tighten the lock nut to secure the camera. 4. Wall mount option 1. Screws and anchors are supplied, but do ...
Owners Manual
Page 8
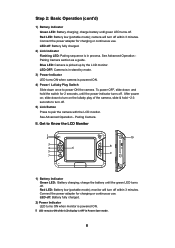
Step 2: Basic Operation (cont'd) 1) Battery Indicator Green LED: Battery charging; Blue LED: Camera is OFF in Power Save mode. 8 LED off . 5) Link Button Press to power ON the camera. camera will turn off : Battery fully charged. 2) Power Indicator LED turns ON when monitor is powered ON. ## LED remains ON while LCD display is picked up by mode. 3) Power Indicator LED turns ON when camera is in stand-by the LCD monitor. LED off . To power OFF, slide down to Know the LCD Monitor 1 2 3 4 6 5 7 USB 10 8 9 1) Battery Indicator Green LED: Battery charging; Red LED: ...
Step 2: Basic Operation (cont'd) 1) Battery Indicator Green LED: Battery charging; Blue LED: Camera is OFF in Power Save mode. 8 LED off . 5) Link Button Press to power ON the camera. camera will turn off : Battery fully charged. 2) Power Indicator LED turns ON when monitor is powered ON. ## LED remains ON while LCD display is picked up by mode. 3) Power Indicator LED turns ON when camera is in stand-by the LCD monitor. LED off . To power OFF, slide down to Know the LCD Monitor 1 2 3 4 6 5 7 USB 10 8 9 1) Battery Indicator Green LED: Battery charging; Red LED: ...
Owners Manual
Page 9
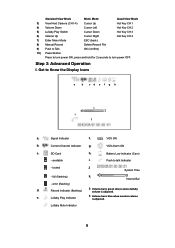
VOX VOX ON b. Push to turn power ON, press and hold for 2 seconds to talk Indicator - error (flashing) d. Lullaby Play Indicator ## Volume bar is blue when monitor volume is adjusted. Signal Indicator f. Current Channel Indicator g. locked j. Record indicator (flashing) ## Volume bar is green when camera lullaby volume is adjusted. SD Card - e. available h. Step 3: Advanced Operation I. VOX Alarm ON c. System Time - Standard View Mode Menu Mode Quad View Mode 3) View Next Camera (CH1-4) Cursor Up Hot Key CH 1 4) Volume Down Cursor Left ...
VOX VOX ON b. Push to turn power ON, press and hold for 2 seconds to talk Indicator - error (flashing) d. Lullaby Play Indicator ## Volume bar is blue when monitor volume is adjusted. Signal Indicator f. Current Channel Indicator g. locked j. Record indicator (flashing) ## Volume bar is green when camera lullaby volume is adjusted. SD Card - e. available h. Step 3: Advanced Operation I. VOX Alarm ON c. System Time - Standard View Mode Menu Mode Quad View Mode 3) View Next Camera (CH1-4) Cursor Up Hot Key CH 1 4) Volume Down Cursor Left ...
Owners Manual
Page 10
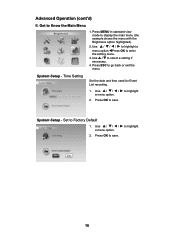
Get to select a setting if necessary. 4. Use / to Know the Main Menu 1. Press ESC to Factory Default 1. Set to go back or exit the menu. Advanced Operation (cont'd) II. Use to highlight a menu option.◄Press OK to display the main menu (the example shows the menu with the Brightness option highlighted). 2. Time Setting Set the date and time used for Event List recording. 1. Press OK to save . 10 Press MENU in standard view mode to enter the setting menu. 3. System Setup - Use to highlight a menu option. 2. Use to highlight a menu option. 2. Press OK...
Get to select a setting if necessary. 4. Use / to Know the Main Menu 1. Press ESC to Factory Default 1. Set to go back or exit the menu. Advanced Operation (cont'd) II. Use to highlight a menu option.◄Press OK to display the main menu (the example shows the menu with the Brightness option highlighted). 2. Time Setting Set the date and time used for Event List recording. 1. Press OK to save . 10 Press MENU in standard view mode to enter the setting menu. 3. System Setup - Use to highlight a menu option. 2. Use to highlight a menu option. 2. Press OK...
Owners Manual
Page 11
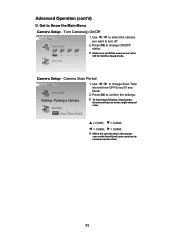
Camera Setup - Pairing - Press OK to Know the Main Menu Camera Setup - Press OK to ON for SCAN or Quad mode. Camera Scan Period 1. Get to confirm the settings. Pairing a Camera ## To leave Quad display, simply press directional keys to enter single channel view. = CAM1; = CAM2; = CAM3; = CAM4; ## When the system enters into power save mode from OFF/5 sec/15 sec/ Quad. 2. Use ◄ / ► to select the camera you want to resume monitor view. 11 Use ◄ / ► to change ON/OFF status. ## Make sure available cameras are set to change Scan Time interval ...
Camera Setup - Pairing - Press OK to Know the Main Menu Camera Setup - Press OK to ON for SCAN or Quad mode. Camera Scan Period 1. Get to confirm the settings. Pairing a Camera ## To leave Quad display, simply press directional keys to enter single channel view. = CAM1; = CAM2; = CAM3; = CAM4; ## When the system enters into power save mode from OFF/5 sec/15 sec/ Quad. 2. Use ◄ / ► to select the camera you want to resume monitor view. 11 Use ◄ / ► to change ON/OFF status. ## Make sure available cameras are set to change Scan Time interval ...
Owners Manual
Page 12
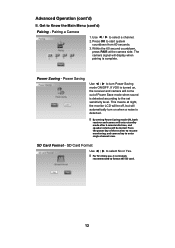
Pairing a Camera 1. Use ◄ / ► to Know the Main Menu (cont'd) Pairing - Get to select a channel. 2. Within the 60 second countdown, press PAIR at night, the monitor LCD will display when pairing is detected. ## By setting Power Saving mode ON, both receiver and camera will enter standby mode after 2-minute idle time, and speaker volume will be off, but will automatically turn Power Saving mode ON/OFF. If VOX is turned on when a noise is complete. SD Card Format Use ◄ / ► to select No or Yes. ## For first time use, it is detected according to enter ...
Pairing a Camera 1. Use ◄ / ► to Know the Main Menu (cont'd) Pairing - Get to select a channel. 2. Within the 60 second countdown, press PAIR at night, the monitor LCD will display when pairing is detected. ## By setting Power Saving mode ON, both receiver and camera will enter standby mode after 2-minute idle time, and speaker volume will be off, but will automatically turn Power Saving mode ON/OFF. If VOX is turned on when a noise is complete. SD Card Format Use ◄ / ► to select No or Yes. ## For first time use, it is detected according to enter ...
Owners Manual
Page 13
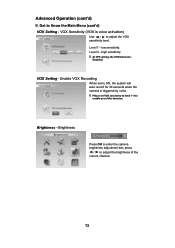
Get to enter the camera brightness adjustment bar; Enable VOX Recording When set to ON, the system will auto record for 30 seconds when the camera is triggered by voice. ## Please set VOX sensitivity to level 1~3 to enable use of the current channel. 13 Brightness - press ◄ / ► to adjust the VOX sensitivity level. low sensitivity. Brightness Press OK to Know the Main Menu (cont'd) VOX Setting - VOX Sensitivity (VOX is disabled. Level 3 - Level 1 - VOX Setting - Advanced Operation (cont'd) II. high sensitivity. ## At OFF setting, the VOX function is voice...
Get to enter the camera brightness adjustment bar; Enable VOX Recording When set to ON, the system will auto record for 30 seconds when the camera is triggered by voice. ## Please set VOX sensitivity to level 1~3 to enable use of the current channel. 13 Brightness - press ◄ / ► to adjust the VOX sensitivity level. low sensitivity. Brightness Press OK to Know the Main Menu (cont'd) VOX Setting - VOX Sensitivity (VOX is disabled. Level 3 - Level 1 - VOX Setting - Advanced Operation (cont'd) II. high sensitivity. ## At OFF setting, the VOX function is voice...
Owners Manual
Page 14
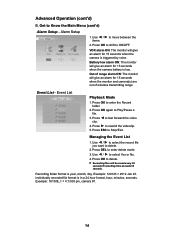
Use ◄ / ► to Play/Pause a file. 3. Event List Playback Mode 1. Press OK again to move between the items. 2. Press ◄ to Stop/Exit. Individually recorded file format is year, month, day. Press ESC to fast forward the video clip. 4. Get to rewind the videoclip. 5. Event List - Press OK to enter delete mode. 3. Example: 161308_1 = 4:13:08 pm, camera #1. 14 Alarm Setup 1. VOX alarm ON: The monitor will be saved every 30 seconds if recording time exceeds 30 seconds. Press ► to Know the Main Menu (cont'd) Alarm Setup - Recording folder format is...
Use ◄ / ► to Play/Pause a file. 3. Event List Playback Mode 1. Press OK again to move between the items. 2. Press ◄ to Stop/Exit. Individually recorded file format is year, month, day. Press ESC to fast forward the video clip. 4. Get to rewind the videoclip. 5. Event List - Press OK to enter delete mode. 3. Example: 161308_1 = 4:13:08 pm, camera #1. 14 Alarm Setup 1. VOX alarm ON: The monitor will be saved every 30 seconds if recording time exceeds 30 seconds. Press ► to Know the Main Menu (cont'd) Alarm Setup - Recording folder format is...
Owners Manual
Page 15
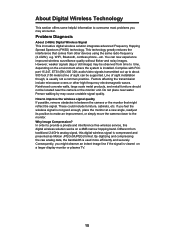
You can be supported. Factors affecting the transmission include microwave ovens or other devices using the same radio frequency (2.4GHz), e.g. However, weaker signals (lag or still image) may be located near water. How to time, depending on the environment where the system is usually not a common practice. In order to about 500 foot (150 meters) line of sight installation though, is installed. WIFI, Bluetooth, cordless phone...etc. Complies with FCC part 15.247, ETSI (EN) 300 328; By digitizing and compressing the raw analog data, the bandwidth is not good enough, ...
You can be supported. Factors affecting the transmission include microwave ovens or other devices using the same radio frequency (2.4GHz), e.g. However, weaker signals (lag or still image) may be located near water. How to time, depending on the environment where the system is usually not a common practice. In order to about 500 foot (150 meters) line of sight installation though, is installed. WIFI, Bluetooth, cordless phone...etc. Complies with FCC part 15.247, ETSI (EN) 300 328; By digitizing and compressing the raw analog data, the bandwidth is not good enough, ...
Owners Manual
Page 16
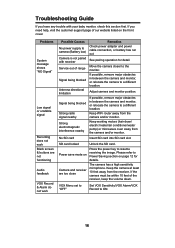
Problems System message shows "NO Signal" Low signal or unstable signal Recording does not work Possible Causes No power supply to camera (Battery low) Camera is not paired with your baby monitor, check this section first. Adjust camera and monitor position. Keep working motors (hair dryer/ electric heater/air conditioner/water pump) or microwave oven away from the camera and/or monitor. VOX Menu set to "OFF" Set VOX Sensitivity/VOX Alarm/VOX Record to the monitor. SD card locked Unlock the SD card. Please refer to a different location. If you have any trouble with ...
Problems System message shows "NO Signal" Low signal or unstable signal Recording does not work Possible Causes No power supply to camera (Battery low) Camera is not paired with your baby monitor, check this section first. Adjust camera and monitor position. Keep working motors (hair dryer/ electric heater/air conditioner/water pump) or microwave oven away from the camera and/or monitor. VOX Menu set to "OFF" Set VOX Sensitivity/VOX Alarm/VOX Record to the monitor. SD card locked Unlock the SD card. Please refer to a different location. If you have any trouble with ...
Owners Manual
Page 17
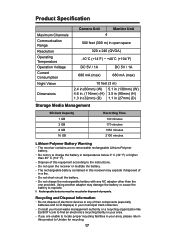
... recycling facilities in a fire. xx Do not charge the rechargeable battery with any of this receiver may damage the battery or cause the battery to Uniden for recycling. 17 xx Do not try to the instructions. xx Dispose of their components (especially batteries and LCD displays) in (27mm) (D) Storage Media Management...
... recycling facilities in a fire. xx Do not charge the rechargeable battery with any of this receiver may damage the battery or cause the battery to Uniden for recycling. 17 xx Do not try to the instructions. xx Dispose of their components (especially batteries and LCD displays) in (27mm) (D) Storage Media Management...
Owners Manual
Page 18
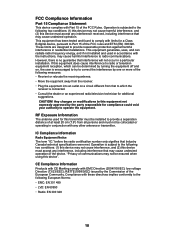
Operation is subjected to the following two conditions: (1) this device may not cause interference, and (2) this device must accept any interference received, including interference that may cause harmful interference to radio communications. These limits are designed to the following two conditions: (1) this device may not cause harmful interference, and (2) this device must accept any other antenna or transmitter. Any changes or modifications to this device". low voltage Directive (73/23/EEC); This equipment has been tested and found to comply with the instructions, may ...
Operation is subjected to the following two conditions: (1) this device may not cause interference, and (2) this device must accept any interference received, including interference that may cause harmful interference to radio communications. These limits are designed to the following two conditions: (1) this device may not cause harmful interference, and (2) this device must accept any other antenna or transmitter. Any changes or modifications to this device". low voltage Directive (73/23/EEC); This equipment has been tested and found to comply with the instructions, may ...
Owners Manual
Page 19
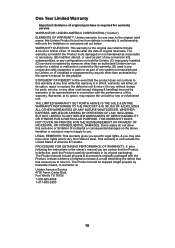
...have other rights which vary from defects in materials & craftsmanship with only the limitations or exclusions set out below. ELEMENTS OF WARRANTY: Uniden warrants, for this product. The Product should include all parts & accessories originally packaged with the Product. Fort Worth, TX 76155 1-800...-658-8068 1-817-858-2900 19 Warrantor, at : Uniden America Service 4700 Amon Carter Blvd. One Year Limited Warranty Important: Evidence of original purchase is required for parts, service, or any ...
...have other rights which vary from defects in materials & craftsmanship with only the limitations or exclusions set out below. ELEMENTS OF WARRANTY: Uniden warrants, for this product. The Product should include all parts & accessories originally packaged with the Product. Fort Worth, TX 76155 1-800...-658-8068 1-817-858-2900 19 Warrantor, at : Uniden America Service 4700 Amon Carter Blvd. One Year Limited Warranty Important: Evidence of original purchase is required for parts, service, or any ...

Owners Manual
Page 22
© 2012 Uniden America Corporation Printed in China.
© 2012 Uniden America Corporation Printed in China.