
English Owners Manual
Page 16
.... Press FREQ/CHAN until the red FREQ LED lights. 5. Use the Rotary Tuner to select the frequency you can also enter the frequency on your scanner. Enter the frequency. b. If you want to stop scanning. Press m to program Note: You can press . a. SCAN MANUAL 1 23 PRI TRUNK DATA a 4 ... and go back to unlock the Rotary Tuner. 2. Then press e. Programming using the Rotary Tuner 1. If the green LOCK LED is outside the scanner's frequency bands, a distinctive beep sounds. Use the Rotary Tuner to select the channel you enter a frequency which is on page 3 for a moment ...
.... Press FREQ/CHAN until the red FREQ LED lights. 5. Use the Rotary Tuner to select the frequency you can also enter the frequency on your scanner. Enter the frequency. b. If you want to stop scanning. Press m to program Note: You can press . a. SCAN MANUAL 1 23 PRI TRUNK DATA a 4 ... and go back to unlock the Rotary Tuner. 2. Then press e. Programming using the Rotary Tuner 1. If the green LOCK LED is outside the scanner's frequency bands, a distinctive beep sounds. Use the Rotary Tuner to select the channel you enter a frequency which is on page 3 for a moment ...
English Owners Manual
Page 17
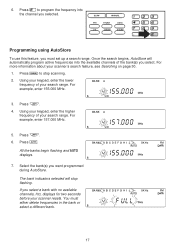
... active frequencies into the channel you want programmed during AutoStore. You must set up a search range. Using your keypad, enter the lower frequency of your scanner resets. For example, enter 155.000 MHz. 3. Press U. Press m to program the frequency into the available channels of the bank(s) you select. All the banks begin... the bank(s) you selected. 6. Press e to stop flashing. Once the search begins, AutoStore will stop scanning. 2. Using your keypad, enter the higher frequency of your scanner's search feature, see Searching on page 30. 1.
... active frequencies into the channel you want programmed during AutoStore. You must set up a search range. Using your keypad, enter the lower frequency of your scanner resets. For example, enter 155.000 MHz. 3. Press U. Press m to program the frequency into the available channels of the bank(s) you select. All the banks begin... the bank(s) you selected. 6. Press e to stop flashing. Once the search begins, AutoStore will stop scanning. 2. Using your keypad, enter the higher frequency of your scanner's search feature, see Searching on page 30. 1.
English Owners Manual
Page 18
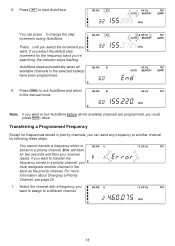
... you select the default step increment for frequencies stored in the bank as the priority channel. Error will flash for two seconds and then your scanner resets. You cannot transfer a frequency which is stored in the selected bank(s) have been programmed. 9. For more information about Changing a Priority Channel, see page 26. 1. You...
... you select the default step increment for frequencies stored in the bank as the priority channel. Error will flash for two seconds and then your scanner resets. You cannot transfer a frequency which is stored in the selected bank(s) have been programmed. 9. For more information about Changing a Priority Channel, see page 26. 1. You...
English Owners Manual
Page 20
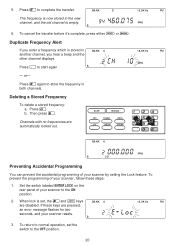
... disabled. Deleting a Stored Frequency To delete a stored frequency: a. Then press e. Set the switch labeled ENTER LOCK on the rear panel of your scanner resets. 3. If these steps: 1. To cancel the transfer before it's complete, press either N or m. Duplicate Frequency Alert If you hear a beep ... - to store the frequency in another channel, you enter a frequency which is stored in both channels. To prevent the programming of your scanner, follow these keys are automatically locked out. or- SCAN MANUAL PRI TRUNK DATA L/O DELAY CTCSS b a 1 23 4 56 7 89...
... disabled. Deleting a Stored Frequency To delete a stored frequency: a. Then press e. Set the switch labeled ENTER LOCK on the rear panel of your scanner resets. 3. If these steps: 1. To cancel the transfer before it's complete, press either N or m. Duplicate Frequency Alert If you hear a beep ... - to store the frequency in another channel, you enter a frequency which is stored in both channels. To prevent the programming of your scanner, follow these keys are automatically locked out. or- SCAN MANUAL PRI TRUNK DATA L/O DELAY CTCSS b a 1 23 4 56 7 89...
English Owners Manual
Page 40
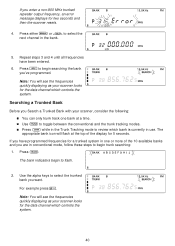
... mode, follow these steps to select the trunked bank you have been entered. 6. The appropriate bank icon will see the frequencies quickly displaying as your scanner looks for the data channel which controls the system. 40 If you want. For example press B. Use the alpha keys to begin trunk searching: 1.... the following: You can only trunk track one or more of the display for two seconds and then the scanner resets. 4. Searching a Trunked Bank Before you 've programmed. Press either m or h to select the next channel in the Trunk Tracking mode to begin to toggle ...
... mode, follow these steps to select the trunked bank you have been entered. 6. The appropriate bank icon will see the frequencies quickly displaying as your scanner looks for the data channel which controls the system. 40 If you want. For example press B. Use the alpha keys to begin trunk searching: 1.... the following: You can only trunk track one or more of the display for two seconds and then the scanner resets. 4. Searching a Trunked Bank Before you 've programmed. Press either m or h to select the next channel in the Trunk Tracking mode to begin to toggle ...

English Owners Manual
Page 51
...want a block to be Type II, select Size Code S-0. Press e. Select the Trunking Programming mode and the bank you programmed. Note: Your scanner saves the setting for the bank again, the last settings used will see both types of system IDs. That is set to choose E2. 4.... When you 'll change . 2. The scanner exits the Trunking Programming mode, acquires the data channel, and begins searching. To reset the Type II default for more information. 51 Restoring Default Tracking Your scanner is , Type II IDs usually appear as an even number without a ...
...want a block to be Type II, select Size Code S-0. Press e. Select the Trunking Programming mode and the bank you programmed. Note: Your scanner saves the setting for the bank again, the last settings used will see both types of system IDs. That is set to choose E2. 4.... When you 'll change . 2. The scanner exits the Trunking Programming mode, acquires the data channel, and begins searching. To reset the Type II default for more information. 51 Restoring Default Tracking Your scanner is , Type II IDs usually appear as an even number without a ...


