
User Guide
Page 3
... only the accessories supplied by the manufacturer. 10 Keep the camcorder out of the reach of infants. 11 Risk of explosion if battery is replaced by an incorrect type. 12 Dispose of the camcorder. 8 Remove the battery if it in direct sunlight. Contact Address: TOSHIBA America Information Systems, Inc. 9740 Irvine Boulevard Irvine, California 92618...
... only the accessories supplied by the manufacturer. 10 Keep the camcorder out of the reach of infants. 11 Risk of explosion if battery is replaced by an incorrect type. 12 Dispose of the camcorder. 8 Remove the battery if it in direct sunlight. Contact Address: TOSHIBA America Information Systems, Inc. 9740 Irvine Boulevard Irvine, California 92618...
User Guide
Page 4
... completely secured, discontinue use the supplied AC adaptor or USB cable, or an optional Toshiba battery charger to charge the battery. Keep all new and used button cell batteries out of reach of children. Dispose of ingestion. See http://www.dtsc.ca.gov/... The button cell battery can explode if not replaced, used , handled, or disposed of properly. Perchlorate Material - The battery is completely secure after replacing the battery. About the remote control battery Chemical burns and choking hazard due to charge the battery with this camcorder contains a button ...
... completely secured, discontinue use the supplied AC adaptor or USB cable, or an optional Toshiba battery charger to charge the battery. Keep all new and used button cell batteries out of reach of children. Dispose of ingestion. See http://www.dtsc.ca.gov/... The button cell battery can explode if not replaced, used , handled, or disposed of properly. Perchlorate Material - The battery is completely secure after replacing the battery. About the remote control battery Chemical burns and choking hazard due to charge the battery with this camcorder contains a button ...
User Guide
Page 7
Contents Chapter 1: Getting to Know Your Camcorder 10 Overview 10 Check the components 11 System requirements 11 Front view 12 Rear view 12 Side view 13 Underside view 13 Chapter 2: Getting Started 14 Loading the battery 14 Charge your battery 16 Inserting and removing an SD™ Card (optional).....20 Protecting data on an SD™ Card 21 Turning the camcorder on and getting started .......22 Turning off the camcorder 22 Chapter 3: Record Mode 23 Button functions 23 LCD touch screen information 24 Notification icons 24 7
Contents Chapter 1: Getting to Know Your Camcorder 10 Overview 10 Check the components 11 System requirements 11 Front view 12 Rear view 12 Side view 13 Underside view 13 Chapter 2: Getting Started 14 Loading the battery 14 Charge your battery 16 Inserting and removing an SD™ Card (optional).....20 Protecting data on an SD™ Card 21 Turning the camcorder on and getting started .......22 Turning off the camcorder 22 Chapter 3: Record Mode 23 Button functions 23 LCD touch screen information 24 Notification icons 24 7
User Guide
Page 11
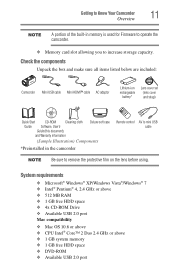
... to increase storage capacity. Check the components Unpack the box and make sure all items listed below are included: Camcorder Mini USB cable Mini HDMI™ cable AC adaptor Lithium-ion rechargeable battery* Lens cover set (lens cover and strap) Quick Start CD-ROM Cleaning cloth Guide Software, User's Guide (this document...
... to increase storage capacity. Check the components Unpack the box and make sure all items listed below are included: Camcorder Mini USB cable Mini HDMI™ cable AC adaptor Lithium-ion rechargeable battery* Lens cover set (lens cover and strap) Quick Start CD-ROM Cleaning cloth Guide Software, User's Guide (this document...
User Guide
Page 13
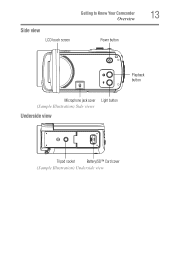
Side view LCD touch screen Getting to Know Your Camcorder Overview Power button 13 Playback button Microphone jack cover Light button (Sample Illustration) Side views Underside view Tripod socket Battery/SD™ Card cover (Sample Illustration) Underside view
Side view LCD touch screen Getting to Know Your Camcorder Overview Power button 13 Playback button Microphone jack cover Light button (Sample Illustration) Side views Underside view Tripod socket Battery/SD™ Card cover (Sample Illustration) Underside view
User Guide
Page 14
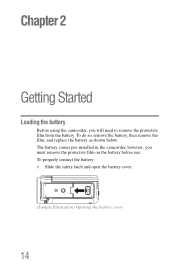
To do so, remove the battery, then remove the film, and replace the battery as shown below. The battery comes pre-installed in the camcorder, however, you will need to remove the protective film from the battery. To properly connect the battery: 1 Slide the safety latch and open the battery cover. (Sample Illustration) Opening the battery cover 14 Chapter 2 Getting Started Loading the battery Before using the camcorder, you must remove the protective film on the battery before use.
To do so, remove the battery, then remove the film, and replace the battery as shown below. The battery comes pre-installed in the camcorder, however, you will need to remove the protective film from the battery. To properly connect the battery: 1 Slide the safety latch and open the battery cover. (Sample Illustration) Opening the battery cover 14 Chapter 2 Getting Started Loading the battery Before using the camcorder, you must remove the protective film on the battery before use.
User Guide
Page 16
... injury. Turn off automatically after the battery is complete. The battery could also damage the battery and product. Always wrap the battery in plastic (or place it into a fire, and never allow exposure to charge your battery You must use . In AC charging mode, the light will turn off the camcorder. This could cause serious injury...
... injury. Turn off automatically after the battery is complete. The battery could also damage the battery and product. Always wrap the battery in plastic (or place it into a fire, and never allow exposure to charge your battery You must use . In AC charging mode, the light will turn off the camcorder. This could cause serious injury...
User Guide
Page 20
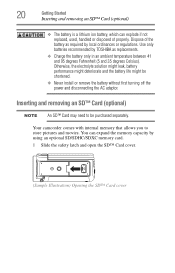
...an SD™ Card (optional) NOTE An SD™ Card may need to store pictures and movies. Dispose of properly. Use only batteries recommended by TOSHIBA as required by using an optional SD/SDHC/SDXC memory card. 1 Slide the safety latch and open the SD™ Card cover.... Card cover 20 Getting Started Inserting and removing an SD™ Card (optional) ❖ The battery is a lithium ion battery, which can expand the memory capacity by local ordinances or regulations. Your camcorder comes with internal memory that allows you to be shortened. ❖ Never install or remove the...
...an SD™ Card (optional) NOTE An SD™ Card may need to store pictures and movies. Dispose of properly. Use only batteries recommended by TOSHIBA as required by using an optional SD/SDHC/SDXC memory card. 1 Slide the safety latch and open the SD™ Card cover.... Card cover 20 Getting Started Inserting and removing an SD™ Card (optional) ❖ The battery is a lithium ion battery, which can expand the memory capacity by local ordinances or regulations. Your camcorder comes with internal memory that allows you to be shortened. ❖ Never install or remove the...
User Guide
Page 28
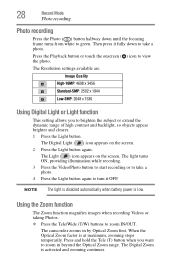
... Zoom is low. The Light ( ) icon appears on the screen. 2 Press the Light button again. NOTE The light is disabled automatically when battery power is activated and zooming continues. Then press it fully down until the focusing frame turns from white to green. The Digital Light ( ) icon...IN/OUT. The light turns ON, providing illumination while recording. 3 Press the Video/Photo button to start recording or to take a photo. The camcorder zooms in beyond the Optical Zoom range. Press the Playback button or touch the onscreen ( ) icon to zoom in by Optical Zoom first. ...
... Zoom is low. The Light ( ) icon appears on the screen. 2 Press the Light button again. NOTE The light is disabled automatically when battery power is activated and zooming continues. Then press it fully down until the focusing frame turns from white to green. The Digital Light ( ) icon...IN/OUT. The light turns ON, providing illumination while recording. 3 Press the Video/Photo button to start recording or to take a photo. The camcorder zooms in beyond the Optical Zoom range. Press the Playback button or touch the onscreen ( ) icon to zoom in by Optical Zoom first. ...
User Guide
Page 69
... indicates that charging has been completed. A blinking light confirms the camcorder is too low of my indoor pictures look blurry and dark? The camcorder extends picture exposure time under low-light/ indoor conditions. The camcorder must use the supplied AC adaptor or the USB cable. To ... speed card. 3 Why do some of a speed or contains corrupted files. Keep the camcorder (and the target subject) steady for several seconds when taking pictures. The light turns off automatically after battery is taken. 4 How do not display properly when the LCD touch screen shows the "!"...
... indicates that charging has been completed. A blinking light confirms the camcorder is too low of my indoor pictures look blurry and dark? The camcorder extends picture exposure time under low-light/ indoor conditions. The camcorder must use the supplied AC adaptor or the USB cable. To ... speed card. 3 Why do some of a speed or contains corrupted files. Keep the camcorder (and the target subject) steady for several seconds when taking pictures. The light turns off automatically after battery is taken. 4 How do not display properly when the LCD touch screen shows the "!"...


