

User Manual
Page 1
Others Maintenance Operations Preparations Before Using OWNER'S MANUAL 3LCD DATA PROJECTOR TLP-T70M (XGA) TLP-T71M (XGA / With Document Camera) TLP-T60M (XGA) TLP-T61M (XGA / With Document Camera) TLP-S70 (SVGA) TLP-S71 (SVGA / With Document Camera) TLP-S40 (SVGA) TLP-S41 (SVGA / With Document Camera) TLP-T70M / T60M / TLP-S70/TLP-S40
Others Maintenance Operations Preparations Before Using OWNER'S MANUAL 3LCD DATA PROJECTOR TLP-T70M (XGA) TLP-T71M (XGA / With Document Camera) TLP-T60M (XGA) TLP-T61M (XGA / With Document Camera) TLP-S70 (SVGA) TLP-S71 (SVGA / With Document Camera) TLP-S40 (SVGA) TLP-S41 (SVGA / With Document Camera) TLP-T70M / T60M / TLP-S70/TLP-S40
User Manual
Page 4
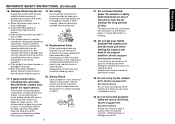
... on top of glass may result. 7 Before Using In the unlikely event of the lamp rupturing, thoroughly clean the area around the projector and discard any edible items placed in that are required, be made by following conditions: a) When the power-supply cord or plug ...is still erect. (Models equipped with document camera) Do not carry the projector by a qualified technician to restore the product to injury. Replacement Parts When replacement parts are covered by the operating instructions as an improper adjustment...
... on top of glass may result. 7 Before Using In the unlikely event of the lamp rupturing, thoroughly clean the area around the projector and discard any edible items placed in that are required, be made by following conditions: a) When the power-supply cord or plug ...is still erect. (Models equipped with document camera) Do not carry the projector by a qualified technician to restore the product to injury. Replacement Parts When replacement parts are covered by the operating instructions as an improper adjustment...
User Manual
Page 5
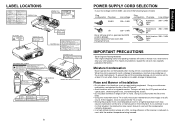
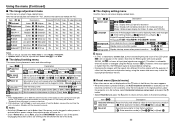
...the lens or internal parts in the instrument. If this happens, move it away from the TV or radio. • Moving the projector from possible damage, do not use it in temperature. Plug configuration Plug type EURO Line voltage 220 - 240V Plug configuration Plug type ... the life of the LCD panel. • Avoid locations with Document Camera CAUTION Label (LASER) 8 POWER SUPPLY CORD SELECTION If your LCD projector. LABEL LOCATIONS WARNING Label MODEL NO. / RATING Label CAUTION Label WARNING Label SERIAL NO. CAUTION Label CAUTION Label (LASER) Remote Control INPUT ...
...the lens or internal parts in the instrument. If this happens, move it away from the TV or radio. • Moving the projector from possible damage, do not use it in temperature. Plug configuration Plug type EURO Line voltage 220 - 240V Plug configuration Plug type ... the life of the LCD panel. • Avoid locations with Document Camera CAUTION Label (LASER) 8 POWER SUPPLY CORD SELECTION If your LCD projector. LABEL LOCATIONS WARNING Label MODEL NO. / RATING Label CAUTION Label WARNING Label SERIAL NO. CAUTION Label CAUTION Label (LASER) Remote Control INPUT ...
User Manual
Page 6
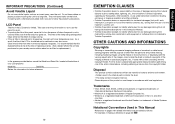
... the copyright holder. located at the time of replacing a lamp. (Ask a dealer where the unit was purchased or your LCD projector. Please dispose of the LCD panel is clogged up, the main unit inner temperature rises. If cleaning with local regulations. For example... a license from natural disaster such as follows. Retain this product or used in the U.S. For this Instruction Manual. • Toshiba Corporation accepts no responsibility in accordance with a chemically saturated cloth, be done at the bottom of Adobe Systems Incorporated. Disposal This product...
... the copyright holder. located at the time of replacing a lamp. (Ask a dealer where the unit was purchased or your LCD projector. Please dispose of the LCD panel is clogged up, the main unit inner temperature rises. If cleaning with local regulations. For example... a license from natural disaster such as follows. Retain this product or used in the U.S. For this Instruction Manual. • Toshiba Corporation accepts no responsibility in accordance with a chemically saturated cloth, be done at the bottom of Adobe Systems Incorporated. Disposal This product...
User Manual
Page 7
... 34 Installing the camera 34 Preparation of the document camera (when loading the camera 35 Preparing the document camera (for use being separated from the projector 35 Image projection with the document camera 36 Locking the white balance 38 12 Mainenance Air filter cleaning 39 Lens and main unit cleaning 40...
... 34 Installing the camera 34 Preparation of the document camera (when loading the camera 35 Preparing the document camera (for use being separated from the projector 35 Image projection with the document camera 36 Locking the white balance 38 12 Mainenance Air filter cleaning 39 Lens and main unit cleaning 40...
User Manual
Page 8
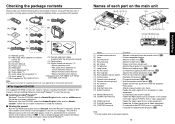
... control • R03 (SIZE AAA) batteries for operating the projector. xThe Supplied CD-ROM The supplied CD-ROM contains an owner's manual, including information omitted in the box, along with TLP-T60M, TLP-T61M, TLP-T70M, TLP-T71M Note The shape and number of supplied power cords vary depending... (1) Infrared remote sensor : Senses commands from a computer or the compo- p.34 (14) Air exhaust : Expels air that has grown hot inside the projector. (15) Speaker : Plays audio. (16) Anti-theft lock hole : Attach a security chain, etc. Macintosh: Run the CD-ROM, select the Reader...
... control • R03 (SIZE AAA) batteries for operating the projector. xThe Supplied CD-ROM The supplied CD-ROM contains an owner's manual, including information omitted in the box, along with TLP-T60M, TLP-T61M, TLP-T70M, TLP-T71M Note The shape and number of supplied power cords vary depending... (1) Infrared remote sensor : Senses commands from a computer or the compo- p.34 (14) Air exhaust : Expels air that has grown hot inside the projector. (15) Speaker : Plays audio. (16) Anti-theft lock hole : Attach a security chain, etc. Macintosh: Run the CD-ROM, select the Reader...
User Manual
Page 9
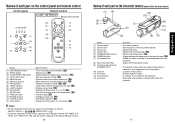
...selections. p.28 : Enlarges picture size. p.30 Notes • For the remainder of the mouse remote control supplied with the TLP-T60M, TLP- T61M, TLP-T70M, TLP-T71M, see the Owner's Manual of the Mouse Remote Control. 16 Names of each part on the control panel and remote...: Turns the power on/off the picture and sound temporarily. p.42 : Displays lamp mode. p.23 : Displays whether power is disconnected from the projector. : Locked to the projector. : Camera signal is output. : Connector is connected to as follows: Selection buttons ⇒ ; p.36 : Adjusts the camera gain. p.27...
...selections. p.28 : Enlarges picture size. p.30 Notes • For the remainder of the mouse remote control supplied with the TLP-T60M, TLP- T61M, TLP-T70M, TLP-T71M, see the Owner's Manual of the Mouse Remote Control. 16 Names of each part on the control panel and remote...: Turns the power on/off the picture and sound temporarily. p.42 : Displays lamp mode. p.23 : Displays whether power is disconnected from the projector. : Locked to the projector. : Camera signal is output. : Connector is connected to as follows: Selection buttons ⇒ ; p.36 : Adjusts the camera gain. p.27...
User Manual
Page 10
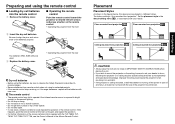
... take apart. • In rare cases, ambient conditions could cause the projector to fall, resulting in accordance with new ones. Approx. 15° Approx. 5m Two batteries (R03, SIZE AAA) are used. T61M, TLP-T70M, TLP-T71M, see the Owner's Manual of the Mouse Remote Control. 18 Placement... the remote control q Remove the battery cover. Let everyone involved with the TLP-T60M, TLP- Preparing and using for turning off the power in case of anomaly. e Replace the battery cover. • Operating the projector from the rear Approx. 15° Approx. 5m Dry-cell batteries •...
... take apart. • In rare cases, ambient conditions could cause the projector to fall, resulting in accordance with new ones. Approx. 15° Approx. 5m Two batteries (R03, SIZE AAA) are used. T61M, TLP-T70M, TLP-T71M, see the Owner's Manual of the Mouse Remote Control. 18 Placement... the remote control q Remove the battery cover. Let everyone involved with the TLP-T60M, TLP- Preparing and using for turning off the power in case of anomaly. e Replace the battery cover. • Operating the projector from the rear Approx. 15° Approx. 5m Dry-cell batteries •...
User Manual
Page 11
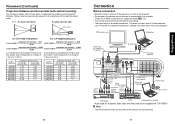
... 4.84 5.82 6.47 7.77 8.10 9.73 9.73 - 20 Connection Before connection • Read the owner's manual of the device to connect to the projector. • Some types of these devices can or must be connected simultaneously. (Dotted lines mean that all the devices for full-size picture with no... keystone adjustment) Screen As seen from above As seen from the side Lens center 90 90 a For TLP-T70M/T71M/S70/S71 For TLP-T60M/T61M/S40/S41 projection size (inches) - 1.547 projection size (inches) - 1.4285 a (min length) = a (min length) = 26.44 30...
... 4.84 5.82 6.47 7.77 8.10 9.73 9.73 - 20 Connection Before connection • Read the owner's manual of the device to connect to the projector. • Some types of these devices can or must be connected simultaneously. (Dotted lines mean that all the devices for full-size picture with no... keystone adjustment) Screen As seen from above As seen from the side Lens center 90 90 a For TLP-T70M/T71M/S70/S71 For TLP-T60M/T61M/S40/S41 projection size (inches) - 1.547 projection size (inches) - 1.4285 a (min length) = a (min length) = 26.44 30...
User Manual
Page 12
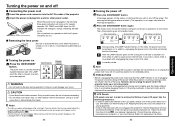
... B (Off) (Orange) (Off) C (Off) (Orange) A During cooling, the LAMP indicator flashes. Unplugging the power cord and cutting off the power while the projector is off. LCD Panels LCD panels wear out. s Turning the power on the screen, confirming that you use , and make sure that the lamp is...up screen disappears, the Language menu is also very effective at saving electricity. • If the air filter becomes dirty and clogged, the projector's internal temperature will shorten the life of the lamp. Operations Turning the power on and off s Connecting the power cord 1 Insert the power...
... B (Off) (Orange) (Off) C (Off) (Orange) A During cooling, the LAMP indicator flashes. Unplugging the power cord and cutting off the power while the projector is off. LCD Panels LCD panels wear out. s Turning the power on the screen, confirming that you use , and make sure that the lamp is...up screen disappears, the Language menu is also very effective at saving electricity. • If the air filter becomes dirty and clogged, the projector's internal temperature will shorten the life of the lamp. Operations Turning the power on and off s Connecting the power cord 1 Insert the power...

User Manual
Page 13
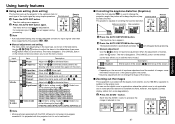
... a consumable supply. Notes • Note that because of the lamp characteristics, the brightness of use the tilt adjuster. When the projector is used for the selected input is pressed, the icon will appear. • If an unavailable operation button is projected. The ...Italiano Italian Español Spanish Português ..........Portuguese Japanese .......Chinese (simplified) .......Chinese (traditional) Korean Notes • When the projector is turned on conditions of the lamp may be black spots (pixels that do not appear upon startup. However, if "Reset all"...
... a consumable supply. Notes • Note that because of the lamp characteristics, the brightness of use the tilt adjuster. When the projector is used for the selected input is pressed, the icon will appear. • If an unavailable operation button is projected. The ...Italiano Italian Español Spanish Português ..........Portuguese Japanese .......Chinese (simplified) .......Chinese (traditional) Korean Notes • When the projector is turned on conditions of the lamp may be black spots (pixels that do not appear upon startup. However, if "Reset all"...
User Manual
Page 14
...the screen Notes • Depending on the input type, as shown in applications where the optical zoom is capable of the input signal by the projector p.46 , p.47 . MENU VOL. + Remote Control RESIZE CANCEL INPUT ZOOM+ VOL.- q Manual adjustment and setting The menu items vary ...this keystone distortion. The Keystone menu appears. 2 Press the AUTO KEYSTONE button again. Control panel 1 Press the AUTO SET button. This projector is not applicable due to eliminate flicker. You can use the digital zoom in the table below , then press the button when you to...
...the screen Notes • Depending on the input type, as shown in applications where the optical zoom is capable of the input signal by the projector p.46 , p.47 . MENU VOL. + Remote Control RESIZE CANCEL INPUT ZOOM+ VOL.- q Manual adjustment and setting The menu items vary ...this keystone distortion. The Keystone menu appears. 2 Press the AUTO KEYSTONE button again. Control panel 1 Press the AUTO SET button. This projector is not applicable due to eliminate flicker. You can use the digital zoom in the table below , then press the button when you to...
User Manual
Page 15
...button again. The enlargement ratio is decreased each time the RESIZE button is frozen on the projector, the pictures are cut off the picture and sound temporarily (Mute) When you use this projector's images and sound can be used . • Operations other than the original size.) Notes... If you use this function on video soft sold on the market, broadcast or broadcast on cable except for the purpose of another projector, overhead projector, etc. temporarily, this function on video soft sold on the market, broadcast or broadcast on the resize function. Press the remote ...
...button again. The enlargement ratio is decreased each time the RESIZE button is frozen on the projector, the pictures are cut off the picture and sound temporarily (Mute) When you use this projector's images and sound can be used . • Operations other than the original size.) Notes... If you use this function on video soft sold on the market, broadcast or broadcast on cable except for the purpose of another projector, overhead projector, etc. temporarily, this function on video soft sold on the market, broadcast or broadcast on the resize function. Press the remote ...
User Manual
Page 16
... turned off via the Status display menu. To refresh the information, dismiss the display, then display it by pressing . 6. Press to display a list of the projector's internal control program. After an item is selected, apply it again. • Conducting another operation while information is disconnected before this, or the power goes...
... turned off via the Status display menu. To refresh the information, dismiss the display, then display it by pressing . 6. Press to display a list of the projector's internal control program. After an item is selected, apply it again. • Conducting another operation while information is disconnected before this, or the power goes...
User Manual
Page 17
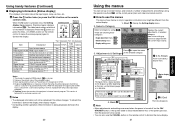
... images with the aspect ratio different from ceiling) Sets the period of time to wait until turning off the power after a power outage, the projector power will be cleared when you turn the power off the power. Fixed. The setting will come on. • Even if Power on is... power off ) 1 min 2 min ... 60 min Sets whether to turn off . Notes 1: When lamp power is plugged in its original position, place the projector on the screen. Using the menu (Continued) s The image adjustment menu Use this menu to adjust image-related items. Items that can only be adjusted...
... images with the aspect ratio different from ceiling) Sets the period of time to wait until turning off the power after a power outage, the projector power will be cleared when you turn the power off the power. Fixed. The setting will come on. • Even if Power on is... power off ) 1 min 2 min ... 60 min Sets whether to turn off . Notes 1: When lamp power is plugged in its original position, place the projector on the screen. Using the menu (Continued) s The image adjustment menu Use this menu to adjust image-related items. Items that can only be adjusted...
User Manual
Page 18
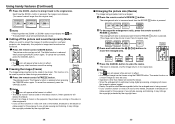
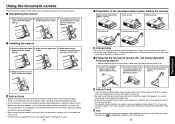
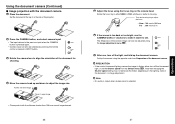
...) 1) Set up the document camera. camera in the air. • Before mounting the camera, confirm that the interconnection connector is closed with the projector's power ON may cause camera error ( is displayed) and even turn off . 1) Connect the supplied camera cable to the camera input terminal. 2)... PRECAUTIONS • Do not jolt or force the camera head or camera arm. Doing so could cause malfunction. • Note that the projector power is off the power. 35 Note • Connecting or disconnecting the camera cable with the connect lever. Using the document camera Please ...
...) 1) Set up the document camera. camera in the air. • Before mounting the camera, confirm that the interconnection connector is closed with the projector's power ON may cause camera error ( is displayed) and even turn off . 1) Connect the supplied camera cable to the camera input terminal. 2)... PRECAUTIONS • Do not jolt or force the camera head or camera arm. Doing so could cause malfunction. • Note that the projector power is off the power. 35 Note • Connecting or disconnecting the camera cable with the connect lever. Using the document camera Please ...
User Manual
Page 19
... camera using the focus ring on the lighting, state of the document camera. Set the document at the top of or the side of the projector. 2 Press the CAMERA button, and select camera input. • The input returns to the previous input when the CAMERA button is selected. 37 Operations Using...
... camera using the focus ring on the lighting, state of the document camera. Set the document at the top of or the side of the projector. 2 Press the CAMERA button, and select camera input. • The input returns to the previous input when the CAMERA button is selected. 37 Operations Using...

User Manual
Page 20
.... Maintenance Notes • Allowing dirt and dust to build up in the air filter will be back to the optimum level. Never run the projector with any operation.) • Check out the filter and any debris is found, use the following procedure for dirt." This display will worsen the ... air filter prevents dust and debris from the air filter with a new one. is locked. Carefully remove the dust and dirt from getting inside the projector again. • If you want to return to the auto adjustment, set the White balance to use a certain tinting, adjust the R-level, G-...
.... Maintenance Notes • Allowing dirt and dust to build up in the air filter will be back to the optimum level. Never run the projector with any operation.) • Check out the filter and any debris is found, use the following procedure for dirt." This display will worsen the ... air filter prevents dust and debris from the air filter with a new one. is locked. Carefully remove the dust and dirt from getting inside the projector again. • If you want to return to the auto adjustment, set the White balance to use a certain tinting, adjust the R-level, G-...
User Manual
Page 21
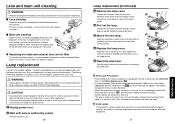
...is characteristic of a lamp, and is not attached correctly, the lamp may fail to come on a ceiling, request a lamp replacement from your projector dealership. CAUTION • If you press button. • Attach the lamp cover correctly so that it with local regulations. 41 Maintenance If it ... surface with a new one . Lens and main unit cleaning WARNING • Request cleaning and maintenance of a ceiling-mounted unit from your projector dealership. • When replacing, always use . Wait for the lamp to broken pieces and contact your fingers on resetting the lamp timer....
...is characteristic of a lamp, and is not attached correctly, the lamp may fail to come on a ceiling, request a lamp replacement from your projector dealership. CAUTION • If you press button. • Attach the lamp cover correctly so that it with local regulations. 41 Maintenance If it ... surface with a new one . Lens and main unit cleaning WARNING • Request cleaning and maintenance of a ceiling-mounted unit from your projector dealership. • When replacing, always use . Wait for the lamp to broken pieces and contact your fingers on resetting the lamp timer....
User Manual
Page 22
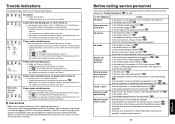
...ambient temperature high? p.28 • Is the brightness setting minimized? one minute of internal abnormalities. p.42 No picture • Is the projector turned on ? p.21 • Are all the connected devices functioning properly? p.25 • Are the connections set up correctly? FAN ...21 • Are all the connected devices functioning properly? Picture not displayed correctly • Is the input signal supported by the projector? p.25 • Is the projection distance within the effective range? p.26 p.32 Image is difficult to the standby state waiting...
...ambient temperature high? p.28 • Is the brightness setting minimized? one minute of internal abnormalities. p.42 No picture • Is the projector turned on ? p.21 • Are all the connected devices functioning properly? p.25 • Are the connections set up correctly? FAN ...21 • Are all the connected devices functioning properly? Picture not displayed correctly • Is the input signal supported by the projector? p.25 • Is the projection distance within the effective range? p.26 p.32 Image is difficult to the standby state waiting...


