User Manual
Page 2
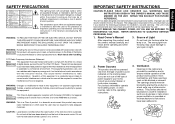
... the remote control. This set has been designed and manufactured to operate the equipment. This unit is on this product or cords associated with accessories sold with USA only this equipment, not expressly approved by USA only Toshiba, or parties authorized by Toshiba, could void the user's authority to assure personal safety. Power Sources 4. Before Using SAFETY PRECAUTIONS The lightning flash with...
... the remote control. This set has been designed and manufactured to operate the equipment. This unit is on this product or cords associated with accessories sold with USA only this equipment, not expressly approved by USA only Toshiba, or parties authorized by Toshiba, could void the user's authority to assure personal safety. Power Sources 4. Before Using SAFETY PRECAUTIONS The lightning flash with...
User Manual
Page 4
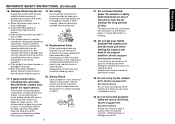
.... If glass components, including lens and lamp, should be sure the service technician has used replacement parts specified by the manufacturer or have fallen into the product. The broken pieces of the lamp only should break, please handle with document camera) To avoid injury, be made by the operating instructions as the original part. Replacement Parts When replacement parts are covered by users.) 20. Do not...
.... If glass components, including lens and lamp, should be sure the service technician has used replacement parts specified by the manufacturer or have fallen into the product. The broken pieces of the lamp only should break, please handle with document camera) To avoid injury, be made by the operating instructions as the original part. Replacement Parts When replacement parts are covered by users.) 20. Do not...
User Manual
Page 5
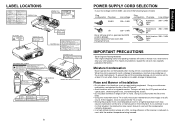
...) Remote Control INPUT PLAY CAUTION Label LASER WARNING Models with Document Camera CAUTION Label (LASER) 8 POWER SUPPLY CORD SELECTION If your LCD projector. Plug configuration Plug type EURO Line voltage 220 - 240V Plug configuration Plug type Australian 240V 10A Line voltage 200 - 240V UK 220 - 240V Use a 5A fuse which is 220 to 240V, use one of the following types of Installation •...
...) Remote Control INPUT PLAY CAUTION Label LASER WARNING Models with Document Camera CAUTION Label (LASER) 8 POWER SUPPLY CORD SELECTION If your LCD projector. Plug configuration Plug type EURO Line voltage 220 - 240V Plug configuration Plug type Australian 240V 10A Line voltage 200 - 240V UK 220 - 240V Use a 5A fuse which is 220 to 240V, use one of the following types of Installation •...
User Manual
Page 6
... improper operation and other problems. • Toshiba Corporation bears no responsibility for incidental damages (lost profit, work interruption, corruption or loss of your nearby service station about an air filter for a long time. LCD Panel The life of the LCD is shortened and a malfunction may also occur. Clean the air filter from the copyright holder. OTHER CAUTIONS AND INFORMATIONS Copyrights Showing or transmitting commercial imaging software or...
... improper operation and other problems. • Toshiba Corporation bears no responsibility for incidental damages (lost profit, work interruption, corruption or loss of your nearby service station about an air filter for a long time. LCD Panel The life of the LCD is shortened and a malfunction may also occur. Clean the air filter from the copyright holder. OTHER CAUTIONS AND INFORMATIONS Copyrights Showing or transmitting commercial imaging software or...
User Manual
Page 7
... remote control 18 Placement ...19 Connection ...21 Operations Turning the power on and off 22 Basic operations 24 Using handy features 26 Using auto setting (Auto setting 26 Correcting the keystone distortion (Keystone 27 Zooming out the images 27 Cutting off the picture and sound temporarily (Mute 28 Freezing the image (Freeze 28 Enlarging the picture size (Resize 29 Displaying Information [Status display 30 Using the menus 31 How to use the menus 31 The image adjustment menu 32 The default setting menu...
... remote control 18 Placement ...19 Connection ...21 Operations Turning the power on and off 22 Basic operations 24 Using handy features 26 Using auto setting (Auto setting 26 Correcting the keystone distortion (Keystone 27 Zooming out the images 27 Cutting off the picture and sound temporarily (Mute 28 Freezing the image (Freeze 28 Enlarging the picture size (Resize 29 Displaying Information [Status display 30 Using the menus 31 How to use the menus 31 The image adjustment menu 32 The default setting menu...
User Manual
Page 8
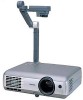
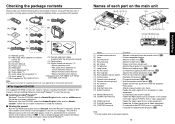
...™ to replace lamp. p.18 (2) Lens : Projects expanded image. (3) Zooming lever : Adjusts screen size. p.41 (8) AC IN socket : Connect the supplied power cord here. If any item is missing, please contact the store immediately where you purchased the product. (1) (6) (11) (2) (7) (*1) (12) (3) (8) (4) (9) (13) (*2) (5) (10) LASER PLAY MER-NUC/LIECNKTER INPUT STOP VOL.PJ MODE s (1) Remote control s (2) R03 (SIZE AAA) batteries for remote control (2) s (3) CD-ROM s (4) Owner's Manual s (5) Power cord (See note) s (6) RGB cable s (7) Quick Reference...
...™ to replace lamp. p.18 (2) Lens : Projects expanded image. (3) Zooming lever : Adjusts screen size. p.41 (8) AC IN socket : Connect the supplied power cord here. If any item is missing, please contact the store immediately where you purchased the product. (1) (6) (11) (2) (7) (*1) (12) (3) (8) (4) (9) (13) (*2) (5) (10) LASER PLAY MER-NUC/LIECNKTER INPUT STOP VOL.PJ MODE s (1) Remote control s (2) R03 (SIZE AAA) batteries for remote control (2) s (3) CD-ROM s (4) Owner's Manual s (5) Power cord (See note) s (6) RGB cable s (7) Quick Reference...
User Manual
Page 9
...: Adjusts the camera gain. MENU (6) VOL. + (3) AUTO KEYSTONE AUTO SET ZOOM - (5) (4) (15) (3) (11) (13) (14) CALL ON/ STANDBY KEYSTONE AUTO SET MUTE FREEZE RESIZE CANCEL INPUT ZOOM + VOL.- p.27 : Sets up image and mode. p.31 : Displays cooling fan mode. T61M, TLP-T70M, TLP-T71M, see the Owner's Manual of the Mouse Remote Control. 16 Names of each part on the control panel and remote control Control panel Remote Control CLASS 1 LED PRODUCT Remote control transmitter (7) (8) (9) (10) FAN TEMP LAMP ON (2) INPUT ON / STANDBY ZOOM + (1) VOL. - MENU VOL.+ ZOOM...
...: Adjusts the camera gain. MENU (6) VOL. + (3) AUTO KEYSTONE AUTO SET ZOOM - (5) (4) (15) (3) (11) (13) (14) CALL ON/ STANDBY KEYSTONE AUTO SET MUTE FREEZE RESIZE CANCEL INPUT ZOOM + VOL.- p.27 : Sets up image and mode. p.31 : Displays cooling fan mode. T61M, TLP-T70M, TLP-T71M, see the Owner's Manual of the Mouse Remote Control. 16 Names of each part on the control panel and remote control Control panel Remote Control CLASS 1 LED PRODUCT Remote control transmitter (7) (8) (9) (10) FAN TEMP LAMP ON (2) INPUT ON / STANDBY ZOOM + (1) VOL. - MENU VOL.+ ZOOM...
User Manual
Page 10
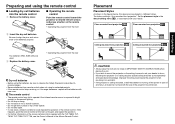
... into the remote control q Remove the battery cover. The factory setting is ceiling-mounted, install the breaker for extended periods. • If the remote control stops working, or if its range decreases, replace all the batteries with the use of the projector know that.fact. 19 Preparations Set the placement style in the default setting menu p.32 , in accordance with the TLP-T60M, TLP- Preparing and using for turning off the power in case...
... into the remote control q Remove the battery cover. The factory setting is ceiling-mounted, install the breaker for extended periods. • If the remote control stops working, or if its range decreases, replace all the batteries with the use of the projector know that.fact. 19 Preparations Set the placement style in the default setting menu p.32 , in accordance with the TLP-T60M, TLP- Preparing and using for turning off the power in case...
User Manual
Page 11
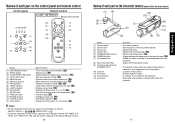
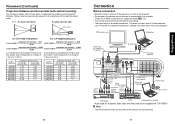
... computer) (*supplied) AUDIO MONITOR To audio output COMPUTER( Y/PB/PR ) VIDEO VIDEO S-VIDEO CONTROL To RGB output RGB cable (supplied) Monitor cable Mini D-sub 15P-BNC (not supplied) To audio output White (L) Red (R) Audio cable (*supplied) To Y/CB/CR output Green (Y) Blue (CB), Red (CR) Yellow (to 9.73 m. Computer Audio cable (for full-size picture with all of both devices before connecting. • The figure below to determine the screen size and projection distance. (Screen sizes are not supplied with TLP-S70/S71. screen size (cm...
... computer) (*supplied) AUDIO MONITOR To audio output COMPUTER( Y/PB/PR ) VIDEO VIDEO S-VIDEO CONTROL To RGB output RGB cable (supplied) Monitor cable Mini D-sub 15P-BNC (not supplied) To audio output White (L) Red (R) Audio cable (*supplied) To Y/CB/CR output Green (Y) Blue (CB), Red (CR) Yellow (to 9.73 m. Computer Audio cable (for full-size picture with all of both devices before connecting. • The figure below to determine the screen size and projection distance. (Screen sizes are not supplied with TLP-S70/S71. screen size (cm...
User Manual
Page 12
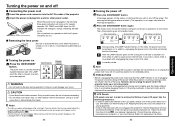
... start-up screen not to operate for replacement air filters. 23 Operations A message appears on the screen, confirming that the lamp is displayed p.24 . 22 s Turning the power off 1 Press the ON/STANDBY button. PRECAUTIONS • Before unplugging the power cord, make sure that you purchased your projector, or your vision. B After the LAMP indicator goes off, the cooling fan continues to appear via the Display setting menu p.33 . • The first time you use the projector...
... start-up screen not to operate for replacement air filters. 23 Operations A message appears on the screen, confirming that the lamp is displayed p.24 . 22 s Turning the power off 1 Press the ON/STANDBY button. PRECAUTIONS • Before unplugging the power cord, make sure that you purchased your projector, or your vision. B After the LAMP indicator goes off, the cooling fan continues to appear via the Display setting menu p.33 . • The first time you use the projector...

User Manual
Page 13
... adjuster release button, then slowly lower the projector. 6 Adjusting the picture size and focus 1 q Use the zooming lever to adjust the screen size. 2 w Use the focusing ring to select the desired input, and press the button. This is characteristic of your computer. • If a signal not supported by the model (XGA or SVGA, depending on the projector and the monitor's display may be set via the Display setting menu p.33 and Lamp power via the Default setting menu p.32 . • This owner's manual...
... adjuster release button, then slowly lower the projector. 6 Adjusting the picture size and focus 1 q Use the zooming lever to adjust the screen size. 2 w Use the focusing ring to select the desired input, and press the button. This is characteristic of your computer. • If a signal not supported by the model (XGA or SVGA, depending on the projector and the monitor's display may be set via the Display setting menu p.33 and Lamp power via the Default setting menu p.32 . • This owner's manual...
User Manual
Page 14
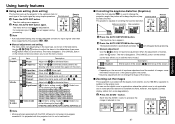
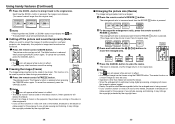
.... button is pressed, the image is automatically adjusted/set. ZOOM- 27 Operations Signal format [ : Enter to setting mode] [ : Select one of the input signal by the projector p.46 , p.47 . q Manual adjustment Use the buttons for input signals other than those supported by using simple operations. FAN TEMP LAMP ON INPUT ON / STANDBY The Auto setting menu appears. 2 Press the AUTO SET button again. Remote Control CALL ON/ STANDBY KEYSTONE AUTO SET MUTE FREEZE RESIZE RESIZE OFF INPUT Note • Auto adjustment/setting may not be lost, or the picture...
.... button is pressed, the image is automatically adjusted/set. ZOOM- 27 Operations Signal format [ : Enter to setting mode] [ : Select one of the input signal by the projector p.46 , p.47 . q Manual adjustment Use the buttons for input signals other than those supported by using simple operations. FAN TEMP LAMP ON INPUT ON / STANDBY The Auto setting menu appears. 2 Press the AUTO SET button again. Remote Control CALL ON/ STANDBY KEYSTONE AUTO SET MUTE FREEZE RESIZE RESIZE OFF INPUT Note • Auto adjustment/setting may not be lost, or the picture...
User Manual
Page 15
... ZOOM + button is released, and the image returns to Remote Control RESIZE 2 1 CANCEL 4 INPUT ZOOM + VOL.- The enlargement ratio is increased each time the RESIZE button is in effect. • Operating any other equipment. • If you use this projector's images and sound can be turned off the picture and sound temporarily (Mute) When you use this function on video soft sold on the market, broadcast or broadcast on cable...
... ZOOM + button is released, and the image returns to Remote Control RESIZE 2 1 CANCEL 4 INPUT ZOOM + VOL.- The enlargement ratio is increased each time the RESIZE button is in effect. • Operating any other equipment. • If you use this projector's images and sound can be turned off the picture and sound temporarily (Mute) When you use this function on video soft sold on the market, broadcast or broadcast on cable...
User Manual
Page 16
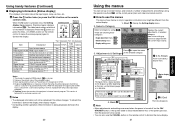
... computer signal. 3: Sync signal polarity shown as P (positive) or N (negative) for customer service, etc. Using handy features (Continued) s Displaying Information [Status display] This displays information about getting a TLPLV2 replacement lamp (sold separately) prepared. 5: [Version] shows the version of the projector's internal control program. Press the button twice (or press the CALL button on the remote INPUT ON / STANDBY ZOOM + VOL. - Note • Menu adjustments and settings are options. Pressing it again displays FAN TEMP LAMP ON...
... computer signal. 3: Sync signal polarity shown as P (positive) or N (negative) for customer service, etc. Using handy features (Continued) s Displaying Information [Status display] This displays information about getting a TLPLV2 replacement lamp (sold separately) prepared. 5: [Version] shows the version of the projector's internal control program. Press the button twice (or press the CALL button on the remote INPUT ON / STANDBY ZOOM + VOL. - Note • Menu adjustments and settings are options. Pressing it again displays FAN TEMP LAMP ON...
User Manual
Page 17
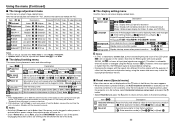
... adjusted when Video mode is set Wide. s The default setting menu This menu shows placement status and other menus are not displayed and the button is held down, the menu appears. • When the screen is placed vertically, and Auto keystone correction is executed, but the cooling fan noise gets quieter. Fixed. Unplugging the power cord to cut off the power. Notes 1: When lamp power is selected for RGB signals with "No". Using the menu...
... adjusted when Video mode is set Wide. s The default setting menu This menu shows placement status and other menus are not displayed and the button is held down, the menu appears. • When the screen is placed vertically, and Auto keystone correction is executed, but the cooling fan noise gets quieter. Fixed. Unplugging the power cord to cut off the power. Notes 1: When lamp power is selected for RGB signals with "No". Using the menu...

User Manual
Page 20
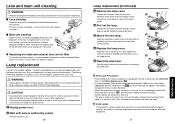
... a ceiling-mounted unit from the air filter with the filter removed. WARNING • Request cleaning and maintenance of white paper, and adjust so it fills the screen. In this message is displayed for 30 seconds when the image is displayed for the first time after power is torn, consult with your projector dealership. 1 Unplug power cord. 2 Remove the air filter. This display will be dismissed with a new one. Notes • White balance setting to Fixed, if power is turned off...
... a ceiling-mounted unit from the air filter with the filter removed. WARNING • Request cleaning and maintenance of white paper, and adjust so it fills the screen. In this message is displayed for 30 seconds when the image is displayed for the first time after power is torn, consult with your projector dealership. 1 Unplug power cord. 2 Remove the air filter. This display will be dismissed with a new one. Notes • White balance setting to Fixed, if power is turned off...
User Manual
Page 21
... blower and/or lens cleaner. • The lens is no longer loose. 5 1 7 Reset the lamp timer. s Lens cleaning • Clean the lens with a dry cloth. Lamp replacement A lamp is severe, dip the cloth in a neutral detergent diluted in accordance with a new one . WARNING • If the projector is sufficiently cooled. This display disappears when you have been using the two lamp locking screws. 6 Replace the lamp cover. Wait for repair service. 1 Unplug power cord. 2 Wait until the...
... blower and/or lens cleaner. • The lens is no longer loose. 5 1 7 Reset the lamp timer. s Lens cleaning • Clean the lens with a dry cloth. Lamp replacement A lamp is severe, dip the cloth in a neutral detergent diluted in accordance with a new one . WARNING • If the projector is sufficiently cooled. This display disappears when you have been using the two lamp locking screws. 6 Replace the lamp cover. Wait for repair service. 1 Unplug power cord. 2 Wait until the...
User Manual
Page 22
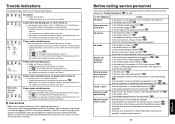
... remote control being used within the projector's supported range? one minute of the lamp has ended or the projector is wrong, check the followings before the power goes out. ❈ After approx. FAN TEMP LAMP ON (Orange (Red lit) flashing) Power went out during use, or power won 't come on ⇒ Lamp temperature is high so that the air intake and exhaust are not concerned about lamp lifetime, the light may fail to the standby...
... remote control being used within the projector's supported range? one minute of the lamp has ended or the projector is wrong, check the followings before the power goes out. ❈ After approx. FAN TEMP LAMP ON (Orange (Red lit) flashing) Power went out during use, or power won 't come on ⇒ Lamp temperature is high so that the air intake and exhaust are not concerned about lamp lifetime, the light may fail to the standby...
User Manual
Page 23
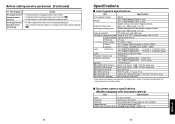
... imaging camera out of general specifications Item Specification Consumption Power 265 W Weight TLP-T70M/T60M/S70/S40: 2.2 kg TLP-T71M/T61M/S71/S41: 2.7kg Models without document imaging camera: External Dimensions 303 × 84 × 206 mm (W × H × D) (including protruding parts) Models equipped with document camera) Item Specification Lens Focusing Zooming Image element Effective pixels for usage environment Temp: 0°C to 70% Display method 3-panel transmission Panel size 0.7 type LCD Panel...
... imaging camera out of general specifications Item Specification Consumption Power 265 W Weight TLP-T70M/T60M/S70/S40: 2.2 kg TLP-T71M/T61M/S71/S41: 2.7kg Models without document imaging camera: External Dimensions 303 × 84 × 206 mm (W × H × D) (including protruding parts) Models equipped with document camera) Item Specification Lens Focusing Zooming Image element Effective pixels for usage environment Temp: 0°C to 70% Display method 3-panel transmission Panel size 0.7 type LCD Panel...
User Manual
Page 25
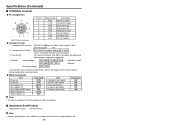
...) Data ... s Separately Sold Product Replacement Lamp Model TLPLV2 Note • Design, specifications, etc. Stop Bit Length: 1 bit STX (02h) Command (3Byte) ETX (03h) Only 1 command valid per communication. q Main Commands Item Power on Power off Icon display on Icon display off Auto setting (RGB input) Status display on Status display off Command PON POF MO0 MO1 PAT DON DOF Item Computer input select Y/PB/PR input select Video input select S-video input select Camera input select Command IN1...
...) Data ... s Separately Sold Product Replacement Lamp Model TLPLV2 Note • Design, specifications, etc. Stop Bit Length: 1 bit STX (02h) Command (3Byte) ETX (03h) Only 1 command valid per communication. q Main Commands Item Power on Power off Icon display on Icon display off Auto setting (RGB input) Status display on Status display off Command PON POF MO0 MO1 PAT DON DOF Item Computer input select Y/PB/PR input select Video input select S-video input select Camera input select Command IN1...


