

Owners Manual
Page 7
The broken pieces of glass may expose you to dangerous voltage or other hazards. (Replacement of the lamp rupturing, thoroughly clean the area around the projector and discard any edible items placed in that are required, be made by the manufacturer or have fallen into the product. In ...the unlikely event of the lamp only should be sure the service technician has used replacement parts specified by users.)...
The broken pieces of glass may expose you to dangerous voltage or other hazards. (Replacement of the lamp rupturing, thoroughly clean the area around the projector and discard any edible items placed in that are required, be made by the manufacturer or have fallen into the product. In ...the unlikely event of the lamp only should be sure the service technician has used replacement parts specified by users.)...

Owners Manual
Page 10
...balance 59 Correcting illuminated defects 60 Maintenance Trouble indications 61 Air filter cleaning 62 Lens and main unit cleaning 64 Lamp replacement 65 Others Before calling service personal 67 Pin assignment of each part on the remote control 14 Loading batteries...control operation 16 Installation and connections Floor-mounted projector placement 17 Lens shift function 20 Projector placement angle adjustment (Foot adjuster) .. 21 Ceiling-mounted projector placement 22 Connecting a computer 23 Connecting video equipment 24 Projector operation control by using RS-232C 72 ...
...balance 59 Correcting illuminated defects 60 Maintenance Trouble indications 61 Air filter cleaning 62 Lens and main unit cleaning 64 Lamp replacement 65 Others Before calling service personal 67 Pin assignment of each part on the remote control 14 Loading batteries...control operation 16 Installation and connections Floor-mounted projector placement 17 Lens shift function 20 Projector placement angle adjustment (Foot adjuster) .. 21 Ceiling-mounted projector placement 22 Connecting a computer 23 Connecting video equipment 24 Projector operation control by using RS-232C 72 ...

Owners Manual
Page 12
...correct the keystone distortion of the projector. Top side Control panel Continued To adjust the volume when the menu is not displayed. INPUT MENU ENTER VOL / ADJ EXIT AUTO SET AUTO SET button 34 To adjust the computer input image automatically. ON indicator 28 33 61 LAMP indicator 28 33 61 TEMP...selection buttons and the EXIT button to enlarge the image. 38 EXIT button Selection buttons ENTER button MENU button ON LAMP ON / STANDBY ON/STANDBY button 28 33 To turn the projector on the menu. INPUT button 30 To select the input source. TEMP FAN VOL/ADJ buttons 43 32 To set...
...correct the keystone distortion of the projector. Top side Control panel Continued To adjust the volume when the menu is not displayed. INPUT MENU ENTER VOL / ADJ EXIT AUTO SET AUTO SET button 34 To adjust the computer input image automatically. ON indicator 28 33 61 LAMP indicator 28 33 61 TEMP...selection buttons and the EXIT button to enlarge the image. 38 EXIT button Selection buttons ENTER button MENU button ON LAMP ON / STANDBY ON/STANDBY button 28 33 To turn the projector on the menu. INPUT button 30 To select the input source. TEMP FAN VOL/ADJ buttons 43 32 To set...

Owners Manual
Page 16
... with excessively high temperature or humidity. • Do not get water on the remote control or place wet objects on the projector's remote sensor. • Operate the remote control from a position where the remote sensor is sunlight or other strong light such as a fluorescent... lamp shining on it. • Do not disassemble the remote control. • Under unusual circumstances the remote control may not operate well due to the projector and retry the operation. Remote control operation Point the remote control at...
... with excessively high temperature or humidity. • Do not get water on the remote control or place wet objects on the projector's remote sensor. • Operate the remote control from a position where the remote sensor is sunlight or other strong light such as a fluorescent... lamp shining on it. • Do not disassemble the remote control. • Under unusual circumstances the remote control may not operate well due to the projector and retry the operation. Remote control operation Point the remote control at...

Owners Manual
Page 18
... screen. Note You can adjust the vertical projection position with the lens shift dial. 20 Continued To obtain proper screen projection, place the projector so that the projecting light hits the screen squarely. 2 Determine the screen size projected on the screen. Adjust the projection size by changing... size depends on a steady, level surface such as a table. Top view Side view Screen Screen 90° KEYSTONE ON / STANDBY ON LAMP TEMP FAN ENTER EXIT AUTO SET VOL / ADJ 90° CONTENTS 18 Installation and connections MENU INPUT Point the lens straight at the center of...
... screen. Note You can adjust the vertical projection position with the lens shift dial. 20 Continued To obtain proper screen projection, place the projector so that the projecting light hits the screen squarely. 2 Determine the screen size projected on the screen. Adjust the projection size by changing... size depends on a steady, level surface such as a table. Top view Side view Screen Screen 90° KEYSTONE ON / STANDBY ON LAMP TEMP FAN ENTER EXIT AUTO SET VOL / ADJ 90° CONTENTS 18 Installation and connections MENU INPUT Point the lens straight at the center of...

Owners Manual
Page 19
... out the light with curtains or by other end into the AC IN socket on the projector. • Insert the other means. • If the screen and the projector are lit green. The three indicators, TEMP, LAMP, and ON, light in green for an adequate time (1 to 2 hours, depending on the ...lens or the internal optical section to the standby mode. Notes • When the projector is moved from a cold location to a warm...
... out the light with curtains or by other end into the AC IN socket on the projector. • Insert the other means. • If the screen and the projector are lit green. The three indicators, TEMP, LAMP, and ON, light in green for an adequate time (1 to 2 hours, depending on the ...lens or the internal optical section to the standby mode. Notes • When the projector is moved from a cold location to a warm...

Owners Manual
Page 21
...make fine adjustment to "Projection on your fingers. • Do not tilt the projector at an angle exceeding the range adjustable by the lens shift dial 20 is obtained...picture. 1 Lift the front of the projector until the desired tilt angle is insufficient. Notes • To put the foot adjuster back, hold the projector when putting the foot adjuster back so as... to lower. Refer to the height. Installation and connections Projector placement angle adjustment (Foot adjuster) CONTENTS 21 The tilt of the projector can be shortened. Foot adjuster release button Foot adjuster ...
...make fine adjustment to "Projection on your fingers. • Do not tilt the projector at an angle exceeding the range adjustable by the lens shift dial 20 is obtained...picture. 1 Lift the front of the projector until the desired tilt angle is insufficient. Notes • To put the foot adjuster back, hold the projector when putting the foot adjuster back so as... to lower. Refer to the height. Installation and connections Projector placement angle adjustment (Foot adjuster) CONTENTS 21 The tilt of the projector can be shortened. Foot adjuster release button Foot adjuster ...

Owners Manual
Page 28
... AUTO SET FREEZE MUTE PIP CALL RESIZE 1 ON LAMP ON / STANDBY TEMP FAN ON LAMP ON / STANDBY (Green) (Green Flashing) (Green) (Green) (Green) The lamp lights and the start up with procedures 2 and 3 on the menu screen. 51 • When a projector is used for a while. You can also set... the startup screen not to be displayed on the next page. Preparation 1 Install and connect the projector properly. 2 Take off the...
... AUTO SET FREEZE MUTE PIP CALL RESIZE 1 ON LAMP ON / STANDBY TEMP FAN ON LAMP ON / STANDBY (Green) (Green Flashing) (Green) (Green) (Green) The lamp lights and the start up with procedures 2 and 3 on the menu screen. 51 • When a projector is used for a while. You can also set... the startup screen not to be displayed on the next page. Preparation 1 Install and connect the projector properly. 2 Take off the...
Owners Manual
Page 29
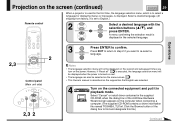
.../ ADJ 2 3 ENTER Press ENTER to re-select a ENTER language. 2,3 ENTER CT-90106 EXIT / P.MODE Control panel (Main unit side) ON LAMP ON / STANDBY TEMP FAN MENU ENTER VOL / ADJ EXIT AUTO SET 2,3 2 INPUT Notes • The language selection menu will be displayed when the...power. Select a desired language. (At shipping from factory, it in the selected language. Projection on the screen (continued) CONTENTS 29 When a projector is used for the first time, the language selection menu, which is to English.) Remote control INPUT KEYSTONE ON / STANDBY AUTO SET 2 Select...
.../ ADJ 2 3 ENTER Press ENTER to re-select a ENTER language. 2,3 ENTER CT-90106 EXIT / P.MODE Control panel (Main unit side) ON LAMP ON / STANDBY TEMP FAN MENU ENTER VOL / ADJ EXIT AUTO SET 2,3 2 INPUT Notes • The language selection menu will be displayed when the...power. Select a desired language. (At shipping from factory, it in the selected language. Projection on the screen (continued) CONTENTS 29 When a projector is used for the first time, the language selection menu, which is to English.) Remote control INPUT KEYSTONE ON / STANDBY AUTO SET 2 Select...
Owners Manual
Page 32
...the input source, the icon appears. • The projector may also occur. Operations KEYSTONE INPUT KEYSTONE ON / STANDBY AUTO SET FREEZE MUTE PIP CALL RESIZE MENU VOL / ADJ 8 ENTER CT-90106 EXIT / P.MODE Control panel (Main unit side) ON LAMP ON / STANDBY TEMP FAN MENU ENTER VOL / ADJ...nearby service station about an air filter for years. • To prolong the life of the unit. • The lamp may rarely burst with a loud sound. • The projector's liquid crystal panel is not available, the icon appears. • When supplying the signal not compatible with dust. 61...
...the input source, the icon appears. • The projector may also occur. Operations KEYSTONE INPUT KEYSTONE ON / STANDBY AUTO SET FREEZE MUTE PIP CALL RESIZE MENU VOL / ADJ 8 ENTER CT-90106 EXIT / P.MODE Control panel (Main unit side) ON LAMP ON / STANDBY TEMP FAN MENU ENTER VOL / ADJ...nearby service station about an air filter for years. • To prolong the life of the unit. • The lamp may rarely burst with a loud sound. • The projector's liquid crystal panel is not available, the icon appears. • When supplying the signal not compatible with dust. 61...

Owners Manual
Page 33
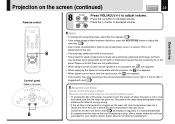
... 2 ON/STANDBY ON/STANDBY Press ON/STANDBY again. If you unplug the power cord when not using the projector for long periods of cooling is completed, the LAMP and FAN indicators turn off appears on during this unit, unplug the power cord. • When reinserting the... power cord while the projector is operating or the light source lamp is set . (The ON indicator turns in orange.) ON LAMP (Green) (Orange) Flashing FAN A (Green) ON LAMP (Off) (Orange) FAN B (Green) ON LAMP (Off) (Orange) C FAN (Off) A To protect the light source lamp, the LAMP indicator blinks as long ...
... 2 ON/STANDBY ON/STANDBY Press ON/STANDBY again. If you unplug the power cord when not using the projector for long periods of cooling is completed, the LAMP and FAN indicators turn off appears on during this unit, unplug the power cord. • When reinserting the... power cord while the projector is operating or the light source lamp is set . (The ON indicator turns in orange.) ON LAMP (Green) (Orange) Flashing FAN A (Green) ON LAMP (Off) (Orange) FAN B (Green) ON LAMP (Off) (Orange) C FAN (Off) A To protect the light source lamp, the LAMP indicator blinks as long ...

Owners Manual
Page 34
... into digital signals. The horizontal position, vertical position, sampling phase and sampling frequency are converted into digital signals inside the projector. In order to match the computer's dot clock frequency. Remote control INPUT KEYSTONE ON / STANDBY AUTO SET FREEZE MUTE PIP...Input full screen video signals from the computer are sampled. Operations KEYSTONE ENTER CT-90106 EXIT / P.MODE Control panel (Main unit side) ON LAMP ON / STANDBY TEMP FAN MENU ENTER VOL / ADJ EXIT AUTO SET 2 Notes • Automatic adjustment may change. If this adjustment is...
... into digital signals. The horizontal position, vertical position, sampling phase and sampling frequency are converted into digital signals inside the projector. In order to match the computer's dot clock frequency. Remote control INPUT KEYSTONE ON / STANDBY AUTO SET FREEZE MUTE PIP...Input full screen video signals from the computer are sampled. Operations KEYSTONE ENTER CT-90106 EXIT / P.MODE Control panel (Main unit side) ON LAMP ON / STANDBY TEMP FAN MENU ENTER VOL / ADJ EXIT AUTO SET 2 Notes • Automatic adjustment may change. If this adjustment is...

Owners Manual
Page 35
... 1 INPUT KEYSTONE ON / STANDBY AUTO SET FREEZE MUTE PIP CALL RESIZE MENU VOL / ADJ ENTER CT-90106 EXIT / P.MODE 2 3 Control panel (Main unit side) ON LAMP ON / STANDBY TEMP FAN MENU ENTER VOL / ADJ EXIT AUTO SET 2 31 1 KEYSTONE Press KEYSTONE. INPUT The keystone adjustment menu appears. EXIT Notes • Turn.... KEYSTONE (This menu is the same as the sub-menu which is displayed when "Correct the keystone distortion of the screen" is selected from the projector lifted up by the foot adjuster. The...
... 1 INPUT KEYSTONE ON / STANDBY AUTO SET FREEZE MUTE PIP CALL RESIZE MENU VOL / ADJ ENTER CT-90106 EXIT / P.MODE 2 3 Control panel (Main unit side) ON LAMP ON / STANDBY TEMP FAN MENU ENTER VOL / ADJ EXIT AUTO SET 2 31 1 KEYSTONE Press KEYSTONE. INPUT The keystone adjustment menu appears. EXIT Notes • Turn.... KEYSTONE (This menu is the same as the sub-menu which is displayed when "Correct the keystone distortion of the screen" is selected from the projector lifted up by the foot adjuster. The...

Owners Manual
Page 40
...the input signal source, etc., can be reset when the lamp is replaced. • The "Version" is the version of the control program used in the projector and is used for lamp replacement. (It should not be used as a lamp warranty time counter.) If the time indicated here nears 1500H,... contact your store of purchase about obtaining a replacement lamp (TLPL55, sold separately). • The "Lamp time" can be displayed. the ...
...the input signal source, etc., can be reset when the lamp is replaced. • The "Version" is the version of the control program used in the projector and is used for lamp replacement. (It should not be used as a lamp warranty time counter.) If the time indicated here nears 1500H,... contact your store of purchase about obtaining a replacement lamp (TLPL55, sold separately). • The "Lamp time" can be displayed. the ...

Owners Manual
Page 42
...the selection buttons continuously. (The function is different from the , keys of the computer.) 7 P.MODE When the presentation is finished; The projector returns to 3. INPUT Operations KEYSTONE 3 INPUT KEYSTONE ON / STANDBY AUTO SET FREEZE MUTE PIP CALL RESIZE MENU VOL / ADJ ENTER CT-90106...6 5,7 P.MODE Control panel (Main unit side) ON LAMP ON / STANDBY TEMP FAN MENU ENTER VOL / ADJ EXIT AUTO SET 3 4 Adjust the projector before presentation if necessary. In the presentation mode after step 5, the projector cannot be switched even if you press and hold for two...
...the selection buttons continuously. (The function is different from the , keys of the computer.) 7 P.MODE When the presentation is finished; The projector returns to 3. INPUT Operations KEYSTONE 3 INPUT KEYSTONE ON / STANDBY AUTO SET FREEZE MUTE PIP CALL RESIZE MENU VOL / ADJ ENTER CT-90106...6 5,7 P.MODE Control panel (Main unit side) ON LAMP ON / STANDBY TEMP FAN MENU ENTER VOL / ADJ EXIT AUTO SET 3 4 Adjust the projector before presentation if necessary. In the presentation mode after step 5, the projector cannot be switched even if you press and hold for two...

Owners Manual
Page 60
... control panel and EXIT on the document camera image, use the remote control buttons. Correcting illuminated defects CONTENTS 60 Control panel (Main unit side) ON LAMP ON / STANDBY TEMP FAN For the CCD image sensor used in the camera unit, in parts ot the image that are properly displayed being corrected... due to appear on the picture. This disturbance may be careful if the camera input mode is not covered. If white spots appear on the projector's control panel simultaneously.
... control panel and EXIT on the document camera image, use the remote control buttons. Correcting illuminated defects CONTENTS 60 Control panel (Main unit side) ON LAMP ON / STANDBY TEMP FAN For the CCD image sensor used in the camera unit, in parts ot the image that are properly displayed being corrected... due to appear on the picture. This disturbance may be careful if the camera input mode is not covered. If white spots appear on the projector's control panel simultaneously.
Owners Manual
Page 61
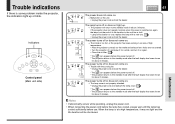
... not come on . → Trouble with a new one. 65 • Unplug the power cord and call the dealer. ON LAMP (Lit in red) TEMP FAN The power turns off . * The projector returns to the standby mode after the fault display has been shown for a while, and turn it on again, the... exhaust fan's holes are not covered. • Turn the projector off . * The projector returns to the standby mode in about 2 minutes. ON LAMP (Lit in red) (Lit in red) TEMP FAN The lamp turns off ) * The icon appears before use. If the projector does not operate normally when the power is switched on again...
... not come on . → Trouble with a new one. 65 • Unplug the power cord and call the dealer. ON LAMP (Lit in red) TEMP FAN The power turns off . * The projector returns to the standby mode after the fault display has been shown for a while, and turn it on again, the... exhaust fan's holes are not covered. • Turn the projector off . * The projector returns to the standby mode in about 2 minutes. ON LAMP (Lit in red) (Lit in red) TEMP FAN The lamp turns off ) * The icon appears before use. If the projector does not operate normally when the power is switched on again...

Owners Manual
Page 65
...service. 1 Unplug the power cord. Lamp cover 4 1 Pull out the lamp. CAUTION • If you have been using the projector, the lamp will not light up the handle to pull out the lamp. 3 2 Maintenance Continued Loosen the two fixing screws, and lift up . (Lamp's life depends on operating conditions.) In.... CONTENTS 65 2 Wait until the lamp gets cool enough. 3 1 Take off the lamp cover on the ceiling, ask the dealer to carry out the maintenance such as cleaning or replacement of the lamp. • When replacing, always use the projector mounted on the bottom panel. 2 ...
...service. 1 Unplug the power cord. Lamp cover 4 1 Pull out the lamp. CAUTION • If you have been using the projector, the lamp will not light up the handle to pull out the lamp. 3 2 Maintenance Continued Loosen the two fixing screws, and lift up . (Lamp's life depends on operating conditions.) In.... CONTENTS 65 2 Wait until the lamp gets cool enough. 3 1 Take off the lamp cover on the ceiling, ask the dealer to carry out the maintenance such as cleaning or replacement of the lamp. • When replacing, always use the projector mounted on the bottom panel. 2 ...
Owners Manual
Page 67
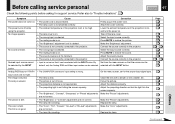
...Picture" adjustments. Make the "Color" adjustments. No image appears. The picture is faint. Select the input source correctly. Press MUTE to the projector. Make the "Brightness" adjustment. Set from the menu screen so that the source can be selected. • The COMPUTER connector's input ...lens cleaner, etc. Select the input source correctly. Make the "Picture" adjustments. Take off while using the projector. Replace the lamp. The tint is blurred. Connect the source correctly to the projector. • The wrong input is selected. • The muting mode is on . • The "...
...Picture" adjustments. Make the "Color" adjustments. No image appears. The picture is faint. Select the input source correctly. Press MUTE to the projector. Make the "Brightness" adjustment. Set from the menu screen so that the source can be selected. • The COMPUTER connector's input ...lens cleaner, etc. Select the input source correctly. Make the "Picture" adjustments. Take off while using the projector. Replace the lamp. The tint is blurred. Connect the source correctly to the projector. • The wrong input is selected. • The muting mode is on . • The "...


