User Guide
Page 30
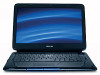
Contents Introduction 37 This guide 39 Safety icons 40 Other icons used 40 Your computer's features and specifications ....41 Other documentation 41 Service options 41 Chapter 1: Getting Started 42 Selecting a place to work 42 Setting up a work environment 42 Keeping yourself comfortable 43 Precautions 43 Important information on your computer's cooling fan 45 Setting up your computer 45 Connecting to a power source 46 Charging the main battery 48 Using the computer for the first time 49 Opening the display panel 49 30
Contents Introduction 37 This guide 39 Safety icons 40 Other icons used 40 Your computer's features and specifications ....41 Other documentation 41 Service options 41 Chapter 1: Getting Started 42 Selecting a place to work 42 Setting up a work environment 42 Keeping yourself comfortable 43 Precautions 43 Important information on your computer's cooling fan 45 Setting up your computer 45 Connecting to a power source 46 Charging the main battery 48 Using the computer for the first time 49 Opening the display panel 49 30
User Guide
Page 49
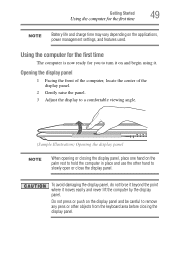
... the display panel, place one hand on the palm rest to hold the computer in place and use the other hand to slowly open or close the display panel. Opening the display panel 1 Facing the front of the computer, locate the center of the display panel. 2 Gently raise the panel. 3... Adjust the display to a comfortable viewing angle. (Sample Illustration) Opening the display panel NOTE When opening or closing the display panel. Using the computer for the first time The computer is now ready for the first time 49 NOTE...
... the display panel, place one hand on the palm rest to hold the computer in place and use the other hand to slowly open or close the display panel. Opening the display panel 1 Facing the front of the computer, locate the center of the display panel. 2 Gently raise the panel. 3... Adjust the display to a comfortable viewing angle. (Sample Illustration) Opening the display panel NOTE When opening or closing the display panel. Using the computer for the first time The computer is now ready for the first time 49 NOTE...

User Guide
Page 55
Select Recover to out-of-box state. (Sample Image) Recovery of Factory Default Software screen appears. Getting Started Recovering the Internal Storage Drive 55 4 When the Toshiba Recovery Wizard opens and the Selecting a process screen displays, select Recovery of Factory Default Software and then click Next. (Sample Image) Selecting a Process screen 5 The Recovery of Factory Default Software screen
Select Recover to out-of-box state. (Sample Image) Recovery of Factory Default Software screen appears. Getting Started Recovering the Internal Storage Drive 55 4 When the Toshiba Recovery Wizard opens and the Selecting a process screen displays, select Recovery of Factory Default Software and then click Next. (Sample Image) Selecting a Process screen 5 The Recovery of Factory Default Software screen

User Guide
Page 57
Click Yes to continue. (Sample Image) Warning screen 5 When the Toshiba Recovery Wizard opens and the Selecting a process screen displays, select Recovery of Factory Default Software and then click Next. (Sample Image) Selecting a Process screen Getting Started Recovering the Internal Storage Drive 57 4 A warning screen appears, stating that when the recovery is executed all data will be deleted and rewritten.
Click Yes to continue. (Sample Image) Warning screen 5 When the Toshiba Recovery Wizard opens and the Selecting a process screen displays, select Recovery of Factory Default Software and then click Next. (Sample Image) Selecting a Process screen Getting Started Recovering the Internal Storage Drive 57 4 A warning screen appears, stating that when the recovery is executed all data will be deleted and rewritten.

User Guide
Page 60
60 Getting Started Recovering the Internal Storage Drive 4 A warning screen appears stating that when the recovery is executed all data will be deleted and rewritten. Click Yes to continue. (Sample Image) Warning screen 5 When the Toshiba Recovery Wizard opens and the Selecting a process screen displays, select Recovery of Factory Default Software and then click Next. (Sample Image) Selecting a Process screen
60 Getting Started Recovering the Internal Storage Drive 4 A warning screen appears stating that when the recovery is executed all data will be deleted and rewritten. Click Yes to continue. (Sample Image) Warning screen 5 When the Toshiba Recovery Wizard opens and the Selecting a process screen displays, select Recovery of Factory Default Software and then click Next. (Sample Image) Selecting a Process screen
User Guide
Page 65
..., leaving other partitions from the drive. 8 Follow the on your internal storage drive will be deleted and rewritten. Click Yes to continue. 6 When the Toshiba Recovery Wizard opens and the Selecting a Process screen displays, select Recovery of Factory Default Software and then click Next. 7 Select one of the following options: ❖ Recover...
..., leaving other partitions from the drive. 8 Follow the on your internal storage drive will be deleted and rewritten. Click Yes to continue. 6 When the Toshiba Recovery Wizard opens and the Selecting a Process screen displays, select Recovery of Factory Default Software and then click Next. 7 Select one of the following options: ❖ Recover...
User Guide
Page 68
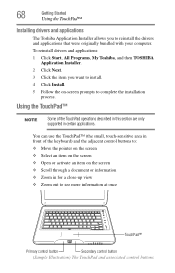
... reinstall the drivers and applications that were originally bundled with your computer. 68 Getting Started Using the TouchPad™ Installing drivers and applications The Toshiba Application Installer allows you want to install. 4 Click Install. 5 Follow the on the screen ❖ Scroll through a document or information ...up view ❖ Zoom out to : ❖ Move the pointer on the screen ❖ Select an item on the screen ❖ Open or activate an item on -screen prompts to complete the installation process. Using the TouchPad™ NOTE Some of the keyboard) and the ...
... reinstall the drivers and applications that were originally bundled with your computer. 68 Getting Started Using the TouchPad™ Installing drivers and applications The Toshiba Application Installer allows you want to install. 4 Click Install. 5 Follow the on the screen ❖ Scroll through a document or information ...up view ❖ Zoom out to : ❖ Move the pointer on the screen ❖ Select an item on the screen ❖ Open or activate an item on -screen prompts to complete the installation process. Using the TouchPad™ NOTE Some of the keyboard) and the ...
User Guide
Page 69
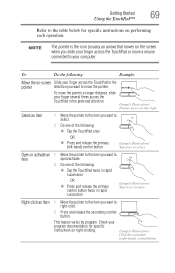
...OR ❖ Press and release the primary (left-hand) control button (Sample Illustration) Tap once to select Open or activate an 1 Move the pointer to the item you want to item open Right-click an item 1 Move the pointer to the item you slide your finger across the TouchPad in rapid... succession (Sample Illustration) Tap twice to open /activate. 2 Do one of the following : Example: Move the on the screen when you want to move a mouse connected to your program documentation for...
...OR ❖ Press and release the primary (left-hand) control button (Sample Illustration) Tap once to select Open or activate an 1 Move the pointer to the item you want to item open Right-click an item 1 Move the pointer to the item you slide your finger across the TouchPad in rapid... succession (Sample Illustration) Tap twice to open /activate. 2 Do one of the following : Example: Move the on the screen when you want to move a mouse connected to your program documentation for...
User Guide
Page 78
... restarting after all, wait a few seconds before turning the computer on again. ❖ Use the Sleep command to save your files and make sure all open programs and files you left it first saves the current state of the system is stored to the internal storage drive, no data is lost...
... restarting after all, wait a few seconds before turning the computer on again. ❖ Use the Sleep command to save your files and make sure all open programs and files you left it first saves the current state of the system is stored to the internal storage drive, no data is lost...
User Guide
Page 79
.... For information on using the Sleep command and the main battery discharges fully, your unsaved information will be lost. This command closes all open documents and programs to your computer sleeps for an extended period of the system is stored in Sleep mode, the computer uses some main ... data if the main battery discharges completely while the computer is in Sleep mode. ❖ Restarting from where you left it, including all open programs, shuts down the operating system, and then turns off your work or the current state of the computer to enter Hibernation mode. Sleep...
.... For information on using the Sleep command and the main battery discharges fully, your unsaved information will be lost. This command closes all open documents and programs to your computer sleeps for an extended period of the system is stored in Sleep mode, the computer uses some main ... data if the main battery discharges completely while the computer is in Sleep mode. ❖ Restarting from where you left it, including all open programs, shuts down the operating system, and then turns off your work or the current state of the computer to enter Hibernation mode. Sleep...

User Guide
Page 80
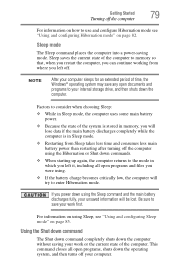
... the Power Options feature. To use this method, you first need to activate it using the Shut down command: 1 Click Start. The computer closes all open programs, shuts down button in the lower-right corner of the Start menu. Start button Shut down button (Sample Image) Shut down button 2 Click the...
... the Power Options feature. To use this method, you first need to activate it using the Shut down command: 1 Click Start. The computer closes all open programs, shuts down button in the lower-right corner of the Start menu. Start button Shut down button (Sample Image) Shut down button 2 Click the...
User Guide
Page 82
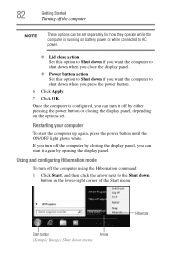
... start the computer up again, press the power button until the ON/OFF light glows white. Using and configuring Hibernation mode To turn off by opening the display panel. Restarting your computer To start it off the computer by closing the display panel, depending on battery power or while connected to...
... start the computer up again, press the power button until the ON/OFF light glows white. Using and configuring Hibernation mode To turn off by opening the display panel. Restarting your computer To start it off the computer by closing the display panel, depending on battery power or while connected to...

User Guide
Page 83
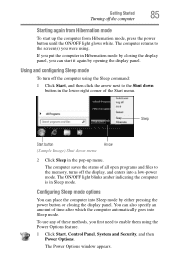
.... The Advanced settings tab of these methods, you first need to be customized. Configuring Hibernation mode options You can also specify an amount of all open programs and files, turns off the display, and then turns off the computer 83 2 Click Hibernate in the pop-up menu. The Power Options window...
.... The Advanced settings tab of these methods, you first need to be customized. Configuring Hibernation mode options You can also specify an amount of all open programs and files, turns off the display, and then turns off the computer 83 2 Click Hibernate in the pop-up menu. The Power Options window...
User Guide
Page 85
... Options window appears. The computer returns to the screen(s) you can also specify an amount of all open programs and files to the memory, turns off the display, and enters into Sleep mode by opening the display panel. You can start up menu. The ON/OFF light blinks amber indicating the computer...
... Options window appears. The computer returns to the screen(s) you can also specify an amount of all open programs and files to the memory, turns off the display, and enters into Sleep mode by opening the display panel. You can start up menu. The ON/OFF light blinks amber indicating the computer...
User Guide
Page 88
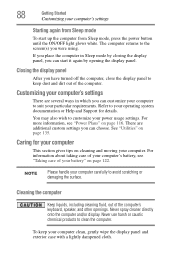
... fluid, out of the computer. Refer to your battery" on cleaning and moving your power usage settings. There are several ways in Sleep mode by opening the display panel. For information about taking care of your computer's battery, see "Power Plans" on page 135. For more information, see "Taking care of..., gently wipe the display panel and exterior case with a lightly dampened cloth. To keep dust and dirt out of the computer's keyboard, speaker, and other openings. 88 Getting Started Customizing your particular requirements.
... fluid, out of the computer. Refer to your battery" on cleaning and moving your power usage settings. There are several ways in Sleep mode by opening the display panel. For information about taking care of your computer's battery, see "Power Plans" on page 135. For more information, see "Taking care of..., gently wipe the display panel and exterior case with a lightly dampened cloth. To keep dust and dirt out of the computer's keyboard, speaker, and other openings. 88 Getting Started Customizing your particular requirements.

User Guide
Page 94
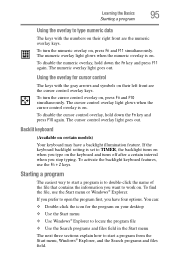
... Illustration) Special Windows® keys Your computer's keyboard has one key and one button that have special functions in Windows®: ❖ Windows® button-Opens the Start menu ❖ Application key-Has a similar function as you enter numeric data or control the cursor as the secondary mouse button Overlay keys...
... Illustration) Special Windows® keys Your computer's keyboard has one key and one button that have special functions in Windows®: ❖ Windows® button-Opens the Start menu ❖ Application key-Has a similar function as you enter numeric data or control the cursor as the secondary mouse button Overlay keys...
User Guide
Page 95
... overlay light goes out. If the keyboard backlight setting is to double-click the name of the file that contains the information you want to open the program first, you have a backlight illumination feature. Using the overlay for the program on your desktop ❖ Use the Start menu ❖ Use Windows...
... overlay light goes out. If the keyboard backlight setting is to double-click the name of the file that contains the information you want to open the program first, you have a backlight illumination feature. Using the overlay for the program on your desktop ❖ Use the Start menu ❖ Use Windows...
User Guide
Page 96
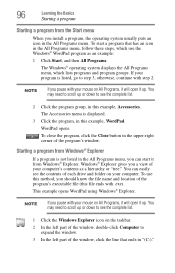
...If your program is listed, go to scroll up . You may need to step 3, otherwise, continue with your mouse on All Programs, it will open it from Windows® Explorer. Starting a program from Windows® Explorer If a program is displayed. 3 Click the program, in the All Programs..., and then All Programs. The Windows® operating system displays the All Programs menu, which lists programs and program groups. WordPad opens. This example opens WordPad using Windows® Explorer. You can start a program that ends in the upper-right corner of your computer. You may ...
...If your program is listed, go to scroll up . You may need to step 3, otherwise, continue with your mouse on All Programs, it will open it from Windows® Explorer. Starting a program from Windows® Explorer If a program is displayed. 3 Click the program, in the All Programs..., and then All Programs. The Windows® operating system displays the All Programs menu, which lists programs and program groups. WordPad opens. This example opens WordPad using Windows® Explorer. You can start a program that ends in the upper-right corner of your computer. You may ...
User Guide
Page 97
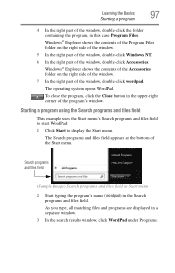
The operating system opens WordPad. Starting a program using the Search programs and files field This example uses the Start menu's Search programs and files field to start WordPad: 1 Click ...
The operating system opens WordPad. Starting a program using the Search programs and files field This example uses the Start menu's Search programs and files field to start WordPad: 1 Click ...
User Guide
Page 104
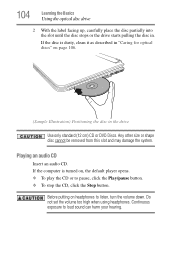
... starts pulling the disc in the drive Use only standard (12 cm) CD or DVD Discs. If the disc is turned on, the default player opens. ❖ To play the CD or to pause, click the Play/pause button. ❖ To stop the CD, click the Stop button. Playing an audio...
... starts pulling the disc in the drive Use only standard (12 cm) CD or DVD Discs. If the disc is turned on, the default player opens. ❖ To play the CD or to pause, click the Play/pause button. ❖ To stop the CD, click the Stop button. Playing an audio...


