
User Guide
Page 29
... display devices 53 Directing the display output when you turn on the computer 54 Adjusting the quality of the external display......55 Using an external keyboard 55 Using a mouse 55 Connecting a printer 56 Setting up a printer 57 Connecting an optional external diskette drive........57 Turning off the computer 58 Options for... your computer 68 Cleaning the computer 68 Moving the computer 69 Using a computer lock 69 Chapter 2: Learning the Basics 70 Computing tips 70 Using the keyboard 72 Character keys 72 Making your...
... display devices 53 Directing the display output when you turn on the computer 54 Adjusting the quality of the external display......55 Using an external keyboard 55 Using a mouse 55 Connecting a printer 56 Setting up a printer 57 Connecting an optional external diskette drive........57 Turning off the computer 58 Options for... your computer 68 Cleaning the computer 68 Moving the computer 69 Using a computer lock 69 Chapter 2: Learning the Basics 70 Computing tips 70 Using the keyboard 72 Character keys 72 Making your...

User Guide
Page 33
...Resolving a hardware conflict 154 A plan of action 154 Fixing a problem with Device Manager ...........155 Power and the batteries 156 Keyboard problems 157 Display problems 158 Disk or internal storage drive problems ..........160 Optical drive problems 162 Sound system problems 163 Printer problems ...174; operating system 168 If you need further assistance 173 Before you contact Toshiba 173 Contacting Toshiba 173 Other Toshiba Internet Web sites 174 Toshiba's worldwide offices 174 Appendix A: Hot Keys/TOSHIBA Cards 176 Hot Key Cards 176 Using the Hot Key Cards 177 Application ...
...Resolving a hardware conflict 154 A plan of action 154 Fixing a problem with Device Manager ...........155 Power and the batteries 156 Keyboard problems 157 Display problems 158 Disk or internal storage drive problems ..........160 Optical drive problems 162 Sound system problems 163 Printer problems ...174; operating system 168 If you need further assistance 173 Before you contact Toshiba 173 Contacting Toshiba 173 Other Toshiba Internet Web sites 174 Toshiba's worldwide offices 174 Appendix A: Hot Keys/TOSHIBA Cards 176 Hot Key Cards 176 Using the Hot Key Cards 177 Application ...

User Guide
Page 34
34 Contents Hot key functions 180 Volume Mute 181 Lock (Instant security 182 Power plan 183 Sleep mode 184 Hibernation mode 185 Output (Display switch 186 Display brightness 187 Disabling or enabling wireless devices............188 Disabling or enabling the TouchPad 189 Zoom (Display resolution 190 Keyboard hot key functions 191 Appendix B: Power Cord/Cable Connectors 192 Glossary 193 Index 207
34 Contents Hot key functions 180 Volume Mute 181 Lock (Instant security 182 Power plan 183 Sleep mode 184 Hibernation mode 185 Output (Display switch 186 Display brightness 187 Disabling or enabling wireless devices............188 Disabling or enabling the TouchPad 189 Zoom (Display resolution 190 Keyboard hot key functions 191 Appendix B: Power Cord/Cable Connectors 192 Glossary 193 Index 207

User Guide
Page 43
... block the vents located at the base of the computer. Your computer contains a rechargeable main battery that is in Sleep mode). See "Connecting to , a mouse, keyboard, printer, and memory. In this condition, observe the following: ❖ Never cover your computer or AC adaptor with your computer. Overheating your computer or AC...
... block the vents located at the base of the computer. Your computer contains a rechargeable main battery that is in Sleep mode). See "Connecting to , a mouse, keyboard, printer, and memory. In this condition, observe the following: ❖ Never cover your computer or AC adaptor with your computer. Overheating your computer or AC...

User Guide
Page 45
...not diminish Customer rights under the Toshiba standard limited Warranty. Getting Started 45 Registering your computer with Toshiba Registering your computer with Toshiba Product registration is strongly recommended, and allows Toshiba to send you periodic updates, ...announcements, and special offers applicable to : ❖ Connect a mouse (see "Using a mouse" on page 55) ❖ Connect a full-size keyboard (see "Using an external keyboard...
...not diminish Customer rights under the Toshiba standard limited Warranty. Getting Started 45 Registering your computer with Toshiba Registering your computer with Toshiba Product registration is strongly recommended, and allows Toshiba to send you periodic updates, ...announcements, and special offers applicable to : ❖ Connect a mouse (see "Using a mouse" on page 55) ❖ Connect a full-size keyboard (see "Using an external keyboard...

User Guide
Page 49
... display panel and be careful to turn it on the palm rest to hold the computer in place and use the other objects from the keyboard area before closing the display panel, place one hand on and begin using it moves easily and never lift the computer by the display panel...
... display panel and be careful to turn it on the palm rest to hold the computer in place and use the other objects from the keyboard area before closing the display panel, place one hand on and begin using it moves easily and never lift the computer by the display panel...
User Guide
Page 51
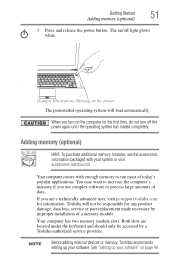
... Getting Started 51 Adding memory (optional) 3 Press and release the power button. NOTE Before adding external devices or memory, Toshiba recommends setting up your software" on the power The preinstalled operating system will not be accessed by improper installation of data. If... you are located under the keyboard and should only be responsible for information. Toshiba will load automatically. See "Setting up your system or visit accessories.toshiba.com. Your computer has two memory module slots. When you use...
... Getting Started 51 Adding memory (optional) 3 Press and release the power button. NOTE Before adding external devices or memory, Toshiba recommends setting up your software" on the power The preinstalled operating system will not be accessed by improper installation of data. If... you are located under the keyboard and should only be responsible for information. Toshiba will load automatically. See "Setting up your system or visit accessories.toshiba.com. Your computer has two memory module slots. When you use...
User Guide
Page 52
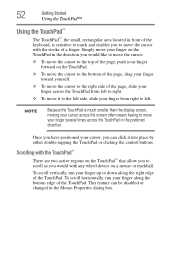
... or trackball. 52 Getting Started Using the TouchPad™ Using the TouchPad™ The TouchPad™, the small, rectangular area located in front of the keyboard, is much smaller than the display screen, moving your cursor across the TouchPad from left to right. ❖ To move it into place by either...
... or trackball. 52 Getting Started Using the TouchPad™ Using the TouchPad™ The TouchPad™, the small, rectangular area located in front of the keyboard, is much smaller than the display screen, moving your cursor across the TouchPad from left to right. ❖ To move it into place by either...
User Guide
Page 55
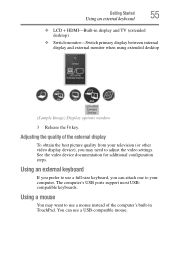
... you prefer to use a full-size keyboard, you may want to adjust the video settings. You can attach one to your television (or other video display device), you can use a mouse instead ...of the external display To obtain the best picture quality from your computer. The computer's USB ports support most USBcompatible keyboards. Getting Started 55 Using an external keyboard ❖ LCD + HDMI-Built-in TouchPad. See the video device documentation for additional configuration steps. Using a mouse You may need to use...
... you prefer to use a full-size keyboard, you may want to adjust the video settings. You can attach one to your television (or other video display device), you can use a mouse instead ...of the external display To obtain the best picture quality from your computer. The computer's USB ports support most USBcompatible keyboards. Getting Started 55 Using an external keyboard ❖ LCD + HDMI-Built-in TouchPad. See the video device documentation for additional configuration steps. Using a mouse You may need to use...

User Guide
Page 68
.... For information about taking care of your battery" on cleaning and moving your power usage settings. To keep dust and dirt out of the computer's keyboard, speaker, and other openings. Never use harsh or caustic chemical products to clean the computer. Never spray cleaner directly onto the computer and/or display...
.... For information about taking care of your battery" on cleaning and moving your power usage settings. To keep dust and dirt out of the computer's keyboard, speaker, and other openings. Never use harsh or caustic chemical products to clean the computer. Never spray cleaner directly onto the computer and/or display...

User Guide
Page 72
...: Press Fn and Enter simultaneously to simulate the Enter key on the numeric pad of the enhanced keyboard. Making your keyboard emulate a full-size keyboard Although your computer's keyboard layout is very much like typing on a typewriter, except that: ❖ The space bar creates... uppercase letter O and the number 0 are not interchangeable. A standard full-size keyboard includes two Enter, Ctrl, and Alt keys; 72 Learning the Basics Using the keyboard Using the keyboard Your computer's keyboard contains character keys, control keys, function keys, and special Windows® keys, ...
...: Press Fn and Enter simultaneously to simulate the Enter key on the numeric pad of the enhanced keyboard. Making your keyboard emulate a full-size keyboard Although your computer's keyboard layout is very much like typing on a typewriter, except that: ❖ The space bar creates... uppercase letter O and the number 0 are not interchangeable. A standard full-size keyboard includes two Enter, Ctrl, and Alt keys; 72 Learning the Basics Using the keyboard Using the keyboard Your computer's keyboard contains character keys, control keys, function keys, and special Windows® keys, ...

User Guide
Page 73
...keys because they execute programmed functions when pressed. Special Windows® keys Windows® button Application key (Sample Illustration) Special Windows® keys Your computer's keyboard has one key and one button that have special functions in combination with the Fn key, function keys marked with the Fn key) are the... 12 keys at the top of the keyboard. (Sample Illustration) Function keys F1 through F12 are using. Ctrl, Fn, and Alt keys Learning the Basics 73 Using the...
...keys because they execute programmed functions when pressed. Special Windows® keys Windows® button Application key (Sample Illustration) Special Windows® keys Your computer's keyboard has one key and one button that have special functions in combination with the Fn key, function keys marked with the Fn key) are the... 12 keys at the top of the keyboard. (Sample Illustration) Function keys F1 through F12 are using. Ctrl, Fn, and Alt keys Learning the Basics 73 Using the...
User Guide
Page 74
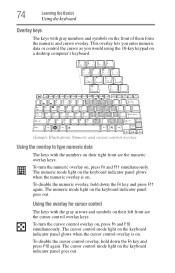
...are the cursor control overlay keys. To turn the numeric overlay on, press Fn and F11 simultaneously. The cursor control mode light on the keyboard indicator panel glows when the cursor control overlay is on. To turn the cursor control overlay on, press Fn and F10 simultaneously. This overlay... lets you enter numeric data or control the cursor as you would using the 10-key keypad on a desktop computer's keyboard. (Sample Illustration) Numeric and cursor control overlay Using the overlay to type numeric data The keys with gray numbers and symbols on the front...
...are the cursor control overlay keys. To turn the numeric overlay on, press Fn and F11 simultaneously. The cursor control mode light on the keyboard indicator panel glows when the cursor control overlay is on. To turn the cursor control overlay on, press Fn and F10 simultaneously. This overlay... lets you enter numeric data or control the cursor as you would using the 10-key keypad on a desktop computer's keyboard. (Sample Illustration) Numeric and cursor control overlay Using the overlay to type numeric data The keys with gray numbers and symbols on the front...

User Guide
Page 79
... printer(s). For information on showing or hiding file extensions, see your file correctly. If you use all the letters, numbers, and other characters on the keyboard, except for your printer as being created in "Setting up a printer" on page 57. Learning the Basics 79 Printing your work Ensure the operating system...
... printer(s). For information on showing or hiding file extensions, see your file correctly. If you use all the letters, numbers, and other characters on the keyboard, except for your printer as being created in "Setting up a printer" on page 57. Learning the Basics 79 Printing your work Ensure the operating system...

User Guide
Page 83
... The Play/Pause button starts playing the disc or makes it pause if currently playing. The Previous track button returns to the side of the keyboard let you to increase the volume of the sound coming from the computer. The Volume decrease button allows you mute the sound and play audio...
... The Play/Pause button starts playing the disc or makes it pause if currently playing. The Previous track button returns to the side of the keyboard let you to increase the volume of the sound coming from the computer. The Volume decrease button allows you mute the sound and play audio...

User Guide
Page 93
... battery power NOTE Wait at least 16 seconds after turning on /off light ( ), and the power button light (near the upper-right corner of the keyboard). Power button System Indicator Lights Wireless indicator light AC power light On/off light or power button light flashes amber, it indicates that the system...
... battery power NOTE Wait at least 16 seconds after turning on /off light ( ), and the power button light (near the upper-right corner of the keyboard). Power button System Indicator Lights Wireless indicator light AC power light On/off light or power button light flashes amber, it indicates that the system...

User Guide
Page 133
...version or change various default settings for slower processing. If data does not appear on keyboard function Switching the CPU to low allows you to change certain settings back to their default values ❖ Keyboard-Allows you to access the wake-on the display you to enable or disable CPU ... is connected to the AC adaptor, the CPU frequency mode is set to low for the built-in Sleep Mode, press Fn + F5. Utilities TOSHIBA Hardware Setup 133 ❖ CPU-Allows you are using either the battery or the AC adaptor ❖ Device Config-Shows the Device configuration options ...
...version or change various default settings for slower processing. If data does not appear on keyboard function Switching the CPU to low allows you to change certain settings back to their default values ❖ Keyboard-Allows you to access the wake-on the display you to enable or disable CPU ... is connected to the AC adaptor, the CPU frequency mode is set to low for the built-in Sleep Mode, press Fn + F5. Utilities TOSHIBA Hardware Setup 133 ❖ CPU-Allows you are using either the battery or the AC adaptor ❖ Device Config-Shows the Device configuration options ...

User Guide
Page 136
... port available. The Wakeup setting (function to allow the Wakeup) check box will be able to use the "USB Wakeup function," attach the mouse or keyboard to a USB port that does not have the "USB Sleep and Charge function"-compatible icon ( ), if you restart your system. Enables the function Enabled...be supplied if the computer is in the dialog boxes and clicking Apply, you want to Disabled. When "USB Sleep and Charge function" is in TOSHIBA Hardware Setup, the "USB Wakeup function" does not work . If all USB ports, including compatible ports, even when the computer is Enabled in ...
... port available. The Wakeup setting (function to allow the Wakeup) check box will be able to use the "USB Wakeup function," attach the mouse or keyboard to a USB port that does not have the "USB Sleep and Charge function"-compatible icon ( ), if you restart your system. Enables the function Enabled...be supplied if the computer is in the dialog boxes and clicking Apply, you want to Disabled. When "USB Sleep and Charge function" is in TOSHIBA Hardware Setup, the "USB Wakeup function" does not work . If all USB ports, including compatible ports, even when the computer is Enabled in ...

User Guide
Page 138
...located on the system control panel directly above the keyboard. To access TOSHIBA Button Support: 1 Click the TOSHIBA Button Support icon in the Notification Area and then click Help. The TOSHIBA Button Support window appears. (Sample Image) TOSHIBA Button Support screen 2 Under Button Name, select ...to customize the Mute and Media buttons. 138 Utilities TOSHIBA Button Support For more information about how to use the TOSHIBA Zooming Utility, right-click the icon in the Optimize tab of TOSHIBA Assist. TOSHIBA Button Support TOSHIBA Button Support allows you to be customized. 3 Make...
...located on the system control panel directly above the keyboard. To access TOSHIBA Button Support: 1 Click the TOSHIBA Button Support icon in the Notification Area and then click Help. The TOSHIBA Button Support window appears. (Sample Image) TOSHIBA Button Support screen 2 Under Button Name, select ...to customize the Mute and Media buttons. 138 Utilities TOSHIBA Button Support For more information about how to use the TOSHIBA Zooming Utility, right-click the icon in the Optimize tab of TOSHIBA Assist. TOSHIBA Button Support TOSHIBA Button Support allows you to be customized. 3 Make...
User Guide
Page 141
... on the internal storage drive may be viewed by a third party. Toshiba is recommended that you delete your fingerprint template data before starting fingerprint enrollment. Fingerprint utility limitations Toshiba does not guarantee that might arise out of the use this utility it... your online help file. For information on your Online help file. The Fingerprint practice tutorial shows how to replace the keyboard-based user password authentication system when booting up. Using the Fingerprint Authentication Utility To access the Fingerprint Authentication Utility, click...
... on the internal storage drive may be viewed by a third party. Toshiba is recommended that you delete your fingerprint template data before starting fingerprint enrollment. Fingerprint utility limitations Toshiba does not guarantee that might arise out of the use this utility it... your online help file. For information on your Online help file. The Fingerprint practice tutorial shows how to replace the keyboard-based user password authentication system when booting up. Using the Fingerprint Authentication Utility To access the Fingerprint Authentication Utility, click...

