
User Guide
Page 18
... environment....... 39 Keeping yourself comfortable 40 Precautions 43 Setting up your computer 45 Setting up your software 45 Registering your computer with Toshiba ......... 47 Adding external devices 47 Connecting the AC adapter 48 Charging the main battery 50 Using the computer for the first time... 51 Turning on the power 51 Using the TouchPad 52 Control buttons 53 Disabling or enabling the TouchPad 53 Installing additional memory (optional 54 Removing a memory module 60 Connecting a mouse 60 Connecting a printer 61 Setting up a printer 62 Turning off the computer 65 Caring ...
... environment....... 39 Keeping yourself comfortable 40 Precautions 43 Setting up your computer 45 Setting up your software 45 Registering your computer with Toshiba ......... 47 Adding external devices 47 Connecting the AC adapter 48 Charging the main battery 50 Using the computer for the first time... 51 Turning on the power 51 Using the TouchPad 52 Control buttons 53 Disabling or enabling the TouchPad 53 Installing additional memory (optional 54 Removing a memory module 60 Connecting a mouse 60 Connecting a printer 61 Setting up a printer 62 Turning off the computer 65 Caring ...
User Guide
Page 23
... can help you 185 Resolving a hardware conflict 185 A plan of action 186 Resolving hardware conflicts on your own .... 186 Fixing a problem with Device Manager .......... 188 Memory card problems 190 Power and the batteries 190 Keyboard problems 192 Display problems 192 Disk drive problems 194 DVD-ROM or multifunction drive problems ... 196... Card problems 204 Printer problems 207 Modem problems 208 Develop good computing habits 209 If you need further assistance 210 Before you call 210 Contacting Toshiba 211 Other Toshiba Internet Web sites 212
... can help you 185 Resolving a hardware conflict 185 A plan of action 186 Resolving hardware conflicts on your own .... 186 Fixing a problem with Device Manager .......... 188 Memory card problems 190 Power and the batteries 190 Keyboard problems 192 Display problems 192 Disk drive problems 194 DVD-ROM or multifunction drive problems ... 196... Card problems 204 Printer problems 207 Modem problems 208 Develop good computing habits 209 If you need further assistance 210 Before you call 210 Contacting Toshiba 211 Other Toshiba Internet Web sites 212
User Guide
Page 32
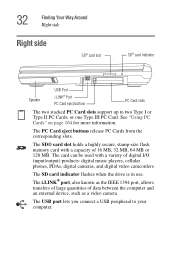
... PC Card slots The two stacked PC Card slots support up to your computer. The SD® card slot holds a highly secure, stamp-size flash memory card with a variety of 16 MB, 32 MB, 64 MB or 128 MB. The card can be used with a capacity of digital I or Type II...
... PC Card slots The two stacked PC Card slots support up to your computer. The SD® card slot holds a highly secure, stamp-size flash memory card with a variety of 16 MB, 32 MB, 64 MB or 128 MB. The card can be used with a capacity of digital I or Type II...
User Guide
Page 37
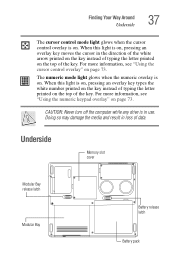
... the key. When this light is on, pressing an overlay key moves the cursor in loss of typing the letter printed on page 73. Underside Memory slot cover Modular Bay release latch Modular Bay Battery release latch Battery pack For more information, see "Using the cursor control overlay" on the top...
... the key. When this light is on, pressing an overlay key moves the cursor in loss of typing the letter printed on page 73. Underside Memory slot cover Modular Bay release latch Modular Bay Battery release latch Battery pack For more information, see "Using the cursor control overlay" on the top...
User Guide
Page 38
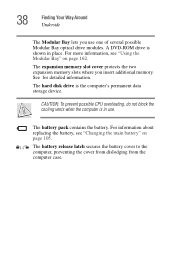
...battery release latch secures the battery cover to the computer, preventing the cover from dislodging from the computer case. The expansion memory slot cover protects the two expansion memory slots where you use . The battery pack contains the battery. For information about replacing the battery, see "Using the... Modular Bay" on page 105. 38 Finding Your Way Around Underside The Modular Bay lets you insert additional memory. See for detailed information. For more information, see "Changing the main battery" on page 162. A DVD-ROM drive is shown in ...
...battery release latch secures the battery cover to the computer, preventing the cover from dislodging from the computer case. The expansion memory slot cover protects the two expansion memory slots where you use . The battery pack contains the battery. For information about replacing the battery, see "Using the... Modular Bay" on page 105. 38 Finding Your Way Around Underside The Modular Bay lets you insert additional memory. See for detailed information. For more information, see "Changing the main battery" on page 162. A DVD-ROM drive is shown in ...
User Guide
Page 45
... the message: "How will pause for a moment while checking for more information. Your computer contains a rechargeable high-capacity battery that needs to , a mouse, keyboard, printer, memory, and PC cards. These components include, but are not limited to be charged before adding external or internal components to the internet?"
... the message: "How will pause for a moment while checking for more information. Your computer contains a rechargeable high-capacity battery that needs to , a mouse, keyboard, printer, memory, and PC cards. These components include, but are not limited to be charged before adding external or internal components to the internet?"
User Guide
Page 47
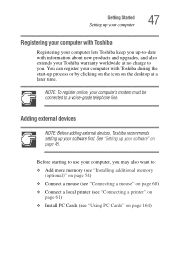
... you up-to-date with Toshiba during the start-up process or by clicking on the icon on the desktop at no charge to you may also want to: ❖ Add more memory (see "Installing additional memory (optional)" on page 54) ❖ Connect a mouse (see "Connecting a mouse" on page 60) ❖ Connect a local...
... you up-to-date with Toshiba during the start-up process or by clicking on the icon on the desktop at no charge to you may also want to: ❖ Add more memory (see "Installing additional memory (optional)" on page 54) ❖ Connect a mouse (see "Connecting a mouse" on page 60) ❖ Connect a local...
User Guide
Page 54
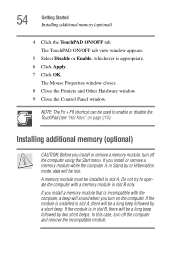
...installed in Stand by or Hibernation mode, data will be a long beep followed by two short beeps. Installing additional memory (optional) CAUTION: Before you install a memory module that is incompatible with a memory module in slot A. The Mouse Properties window closes. 8 Close the Printers and Other Hardware window. 9 Close ...: The Fn + F9 shortcut can be used to operate the computer with the computer, a beep will sound when you install or remove a memory module while the computer is in slot B, there will be lost. If you turn off the computer using the Start menu. If the module is...
...installed in Stand by or Hibernation mode, data will be a long beep followed by two short beeps. Installing additional memory (optional) CAUTION: Before you install a memory module that is incompatible with a memory module in slot A. The Mouse Properties window closes. 8 Close the Printers and Other Hardware window. 9 Close ...: The Fn + F9 shortcut can be used to operate the computer with the computer, a beep will sound when you install or remove a memory module while the computer is in slot B, there will be lost. If you turn off the computer using the Start menu. If the module is...
User Guide
Page 55
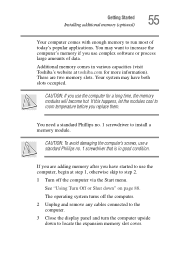
...you replace them. You need a standard Phillips no . 1 screwdriver that is in various capacities (visit Toshiba's website at step 1, otherwise skip to locate the expansion memory slot cover. CAUTION: If you use complex software or process large amounts of today's popular applications. ... to run most of data. Getting Started Installing additional memory (optional) 55 Your computer comes with enough memory to use the computer, begin at toshiba.com for a long time, the memory modules will become hot. Additional memory comes in good condition. See "Using Turn Off or...
...you replace them. You need a standard Phillips no . 1 screwdriver that is in various capacities (visit Toshiba's website at step 1, otherwise skip to locate the expansion memory slot cover. CAUTION: If you use complex software or process large amounts of today's popular applications. ... to run most of data. Getting Started Installing additional memory (optional) 55 Your computer comes with enough memory to use the computer, begin at toshiba.com for a long time, the memory modules will become hot. Additional memory comes in good condition. See "Using Turn Off or...
User Guide
Page 56
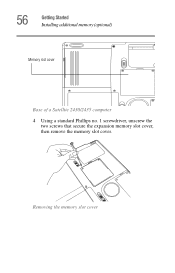
56 Getting Started Installing additional memory (optional) Memory slot cover Base of a Satellite 2430/2435 computer 4 Using a standard Phillips no. 1 screwdriver, unscrew the two screws that secure the expansion memory slot cover, then remove the memory slot cover. Removing the memory slot cover
56 Getting Started Installing additional memory (optional) Memory slot cover Base of a Satellite 2430/2435 computer 4 Using a standard Phillips no. 1 screwdriver, unscrew the two screws that secure the expansion memory slot cover, then remove the memory slot cover. Removing the memory slot cover
User Guide
Page 57
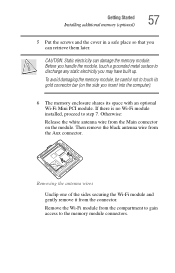
...careful not to discharge any static electricity you insert into the computer). 6 The memory enclosure shares its gold connector bar (on the module. Removing the antenna wires... the compartment to gain access to step 7. If there is no Wi-Fi module installed, proceed to the memory module connectors. Remove the Wi-Fi module from the Aux connector. Before you handle the module, touch a grounded... CAUTION: Static electricity can retrieve them later. Getting Started Installing additional memory (optional) 57 5 Put the screws and the cover in a safe place so that you can damage the...
...careful not to discharge any static electricity you insert into the computer). 6 The memory enclosure shares its gold connector bar (on the module. Removing the antenna wires... the compartment to gain access to step 7. If there is no Wi-Fi module installed, proceed to the memory module connectors. Remove the Wi-Fi module from the Aux connector. Before you handle the module, touch a grounded... CAUTION: Static electricity can retrieve them later. Getting Started Installing additional memory (optional) 57 5 Put the screws and the cover in a safe place so that you can damage the...
User Guide
Page 58
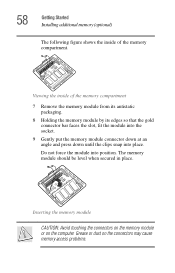
58 Getting Started Installing additional memory (optional) The following figure shows the inside of the memory compartment. Inserting the memory module CAUTION: Avoid touching the connectors on the memory module or on the connectors may cause memory access problems. Grease or dust on the computer. The memory module should be level when secured in place. Viewing the...
58 Getting Started Installing additional memory (optional) The following figure shows the inside of the memory compartment. Inserting the memory module CAUTION: Avoid touching the connectors on the memory module or on the connectors may cause memory access problems. Grease or dust on the computer. The memory module should be level when secured in place. Viewing the...
User Guide
Page 59
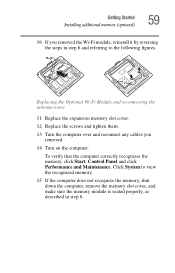
Click System to the following figures. Replacing the Optional Wi-Fi Module and reconnecting the antenna wires 11 Replace the expansion memory slot cover. 12 Replace the screws and tighten them. 13 Turn the computer over and reconnect any cables you removed the Wi-Fi module, ...reinstall it by reversing the steps in step 6 and referring to view the recognized memory. 15 If the computer does not recognize the memory, shut down the computer, remove the memory slot cover, and make sure the memory module is seated properly, as described in step 8. To verify that the computer correctly ...
Click System to the following figures. Replacing the Optional Wi-Fi Module and reconnecting the antenna wires 11 Replace the expansion memory slot cover. 12 Replace the screws and tighten them. 13 Turn the computer over and reconnect any cables you removed the Wi-Fi module, ...reinstall it by reversing the steps in step 6 and referring to view the recognized memory. 15 If the computer does not recognize the memory, shut down the computer, remove the memory slot cover, and make sure the memory module is seated properly, as described in step 8. To verify that the computer correctly ...
User Guide
Page 60
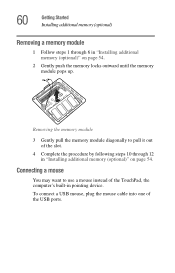
60 Getting Started Installing additional memory (optional) Removing a memory module 1 Follow steps 1 through 12 in "Installing additional memory (optional)" on page 54. 2 Gently push the memory locks outward until the memory module pops up. Connecting a mouse You may want to pull it out of the slot. 4 Complete the ...To connect a USB mouse, plug the mouse cable into one of the TouchPad, the computer's built-in "Installing additional memory (optional)" on page 54. Removing the memory module 3 Gently pull the memory module diagonally to use a mouse instead of the USB ports.
60 Getting Started Installing additional memory (optional) Removing a memory module 1 Follow steps 1 through 12 in "Installing additional memory (optional)" on page 54. 2 Gently push the memory locks outward until the memory module pops up. Connecting a mouse You may want to pull it out of the slot. 4 Complete the ...To connect a USB mouse, plug the mouse cable into one of the TouchPad, the computer's built-in "Installing additional memory (optional)" on page 54. Removing the memory module 3 Gently pull the memory module diagonally to use a mouse instead of the USB ports.
User Guide
Page 61
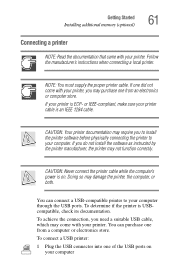
... through the USB ports. You can purchase one from a computer or electronics store. If one did not come with your printer. Getting Started Installing additional memory (optional) 61 Connecting a printer NOTE: Read the documentation that came with your printer. NOTE: You must supply the proper printer cable. To connect a USB printer...
... through the USB ports. You can purchase one from a computer or electronics store. If one did not come with your printer. Getting Started Installing additional memory (optional) 61 Connecting a printer NOTE: Read the documentation that came with your printer. NOTE: You must supply the proper printer cable. To connect a USB printer...

User Guide
Page 62
... started your printer documentation for the model of a parallel printer cable 2 Plug the printer's power cable into a live AC outlet. 62 Getting Started Installing additional memory (optional) 2 Plug the printer's power cable into a live AC outlet. To the computer To the printer Identifying the ends of printer that is on , it...
... started your printer documentation for the model of a parallel printer cable 2 Plug the printer's power cable into a live AC outlet. 62 Getting Started Installing additional memory (optional) 2 Plug the printer's power cable into a live AC outlet. To the computer To the printer Identifying the ends of printer that is on , it...
User Guide
Page 63
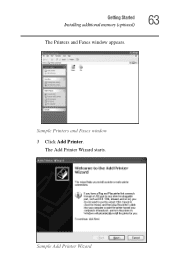
Sample Printers and Faxes window 3 Click Add Printer. Sample Add Printer Wizard Getting Started Installing additional memory (optional) 63 The Printers and Faxes window appears. The Add Printer Wizard starts.
Sample Printers and Faxes window 3 Click Add Printer. Sample Add Printer Wizard Getting Started Installing additional memory (optional) 63 The Printers and Faxes window appears. The Add Printer Wizard starts.
User Guide
Page 64
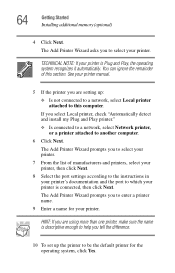
The Add Printer Wizard prompts you to which your printer is connected, then click Next. 64 Getting Started Installing additional memory (optional) 4 Click Next. The Add Printer Wizard asks you to select your printer is descriptive enough to help you to this section. TECHNICAL NOTE: If ...
The Add Printer Wizard prompts you to which your printer is connected, then click Next. 64 Getting Started Installing additional memory (optional) 4 Click Next. The Add Printer Wizard asks you to select your printer is descriptive enough to help you to this section. TECHNICAL NOTE: If ...

User Guide
Page 65
You are using it may see various messages indicating the status of your printer is a good idea to turn off your system settings to memory so that, when you left off , it for the first time, leave the computer plugged into a power source (even though the computer is off the ...
You are using it may see various messages indicating the status of your printer is a good idea to turn off your system settings to memory so that, when you left off , it for the first time, leave the computer plugged into a power source (even though the computer is off the ...
User Guide
Page 69
... preset intervals. This feature saves your work frequently. Your work , if, for details. 69 You will lose all unsaved work temporarily stays in the computer's memory until you when the battery is running low. Chapter 3 Learning the Basics This chapter lists some computing tips and provides important information about basic features.
... preset intervals. This feature saves your work frequently. Your work , if, for details. 69 You will lose all unsaved work temporarily stays in the computer's memory until you when the battery is running low. Chapter 3 Learning the Basics This chapter lists some computing tips and provides important information about basic features.


