
Owners Manual
Page 4
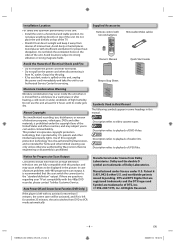
...viewing uses only unless otherwise authorized by Macrovision, and is recommended that the user switch the connection to playback of JPEG files. Supplied Accessories Remote control with 480 progressive scan output, it by the plug. • If, by accident, water is protected by U.S. In case of picture... Macrovision. Do not place the unit directly on the power cord when disconnecting it is left with this 480p DVD recorder, please contact Toshiba Customer Service. EN 2008/07/14 10:36:14 Do not use , distribution, or revision of television programs, videotapes, DVDs and ...
...viewing uses only unless otherwise authorized by Macrovision, and is recommended that the user switch the connection to playback of JPEG files. Supplied Accessories Remote control with 480 progressive scan output, it by the plug. • If, by accident, water is protected by U.S. In case of picture... Macrovision. Do not place the unit directly on the power cord when disconnecting it is left with this 480p DVD recorder, please contact Toshiba Customer Service. EN 2008/07/14 10:36:14 Do not use , distribution, or revision of television programs, videotapes, DVDs and ...
Owners Manual
Page 5
... and to "Troubleshooting" in this Manual 4 Maintenance ...5 SETUP Choosing a Disc / Cassette Tape 6 Playable Media...6 Unplayable Media 6 Index to Parts and Controls 7 Front Panel ...7 Rear Panel...7 Remote Control ...8 Installing the Batteries for the Remote Control 8 DVD Display Panel 9 VCR Display Panel 9 Selecting DVD or VCR Operation 9 Connections 10 Connection to RF Modulator (Not Supplied 10 Connection...
... and to "Troubleshooting" in this Manual 4 Maintenance ...5 SETUP Choosing a Disc / Cassette Tape 6 Playable Media...6 Unplayable Media 6 Index to Parts and Controls 7 Front Panel ...7 Rear Panel...7 Remote Control ...8 Installing the Batteries for the Remote Control 8 DVD Display Panel 9 VCR Display Panel 9 Selecting DVD or VCR Operation 9 Connections 10 Connection to RF Modulator (Not Supplied 10 Connection...
Owners Manual
Page 7
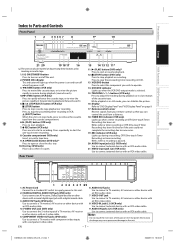
...Use to stop cassette tape playback or recording. Use to Parts and Controls Front Panel 1 2 34567 8 9* 10 Setup VCR Functions DVD Functions Information 21 20 19 18 17 16 (*) The unit can... control the unit from the cassette compartment. 6. Precautions Index to connect a TV monitor, AV receiver ... - 7 - B (PLAY) button (VCR only) Press to start a recording. Remote control sensor Receive signals from your remote control so that you wish to stop the proceeding timer recording in DVD. 13.
...Use to stop cassette tape playback or recording. Use to Parts and Controls Front Panel 1 2 34567 8 9* 10 Setup VCR Functions DVD Functions Information 21 20 19 18 17 16 (*) The unit can... control the unit from the cassette compartment. 6. Precautions Index to connect a TV monitor, AV receiver ... - 7 - B (PLAY) button (VCR only) Press to start a recording. Remote control sensor Receive signals from your remote control so that you wish to stop the proceeding timer recording in DVD. 13.
Owners Manual
Page 8
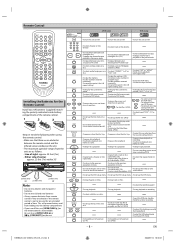
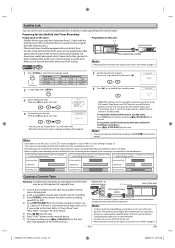
...between your chosen point of A and B. • To search forward/backward through a disc. (CD) • To repeat between the remote control and the infrared sensor window on a disc. Be sure to the top file of the highest hierarchy in the program and file list. (...8226; To rotate a picture 90 degrees disc. Remote Control Installing the Batteries for the Remote Control Install two AA batteries (supplied) matching the polarity indicated inside battery compartment of the remote control. 1 2 3 Keep in mind the following when using the remote control: • Make sure that there are no...
...between your chosen point of A and B. • To search forward/backward through a disc. (CD) • To repeat between the remote control and the infrared sensor window on a disc. Be sure to the top file of the highest hierarchy in the program and file list. (...8226; To rotate a picture 90 degrees disc. Remote Control Installing the Batteries for the Remote Control Install two AA batteries (supplied) matching the polarity indicated inside battery compartment of the remote control. 1 2 3 Keep in mind the following when using the remote control: • Make sure that there are no...

Owners Manual
Page 9
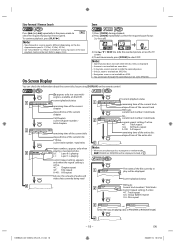
.... • DVD: DVD-video • CD: Audio CD/JPEG on CD Appears when the repeat function is on. VCR MODE Press [VCR] on the remote control. (Verify that the VCR indicator is lit.) DVD MODE Press [DVD] on . No disc inserted or cannot read Tray open Tray closed Appears when the...CD Displays how long the current title or track has been played back. Loading the Disc VCR Display Panel Indicates a cassette tape is on the remote control. (Verify that the DVD indicator is no AM indication. Selecting DVD or VCR Operation You must first select either DVD or VCR operation. Precautions ...
.... • DVD: DVD-video • CD: Audio CD/JPEG on CD Appears when the repeat function is on. VCR MODE Press [VCR] on the remote control. (Verify that the VCR indicator is lit.) DVD MODE Press [DVD] on . No disc inserted or cannot read Tray open Tray closed Appears when the...CD Displays how long the current title or track has been played back. Loading the Disc VCR Display Panel Indicates a cassette tape is on the remote control. (Verify that the DVD indicator is no AM indication. Selecting DVD or VCR Operation You must first select either DVD or VCR operation. Precautions ...
Owners Manual
Page 11
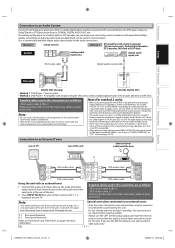
Note: • Be sure to turn off , the signal from the external tuner to ensure that is displayed on your remote control until "L1" is not used in this connection are as shown in the Method 2, set "DOWN SAMPLING" to "OFF" (refer to the DVD player. ... connecting another . • Always use the RIGHT (red) jack, you set "DOLBY DIGITAL" or "DTS" to "BITSTREAM" accordingly for audio output in decoder (AV control center), Dolby Digital decoder, DTS decoder, MD deck or DAT deck Supplied cables used currently. Connection to this unit. Even if the unit is turned...
Note: • Be sure to turn off , the signal from the external tuner to ensure that is displayed on your remote control until "L1" is not used in this connection are as shown in the Method 2, set "DOWN SAMPLING" to "OFF" (refer to the DVD player. ... connecting another . • Always use the RIGHT (red) jack, you set "DOLBY DIGITAL" or "DTS" to "BITSTREAM" accordingly for audio output in decoder (AV control center), Dolby Digital decoder, DTS decoder, MD deck or DAT deck Supplied cables used currently. Connection to this unit. Even if the unit is turned...
Owners Manual
Page 12
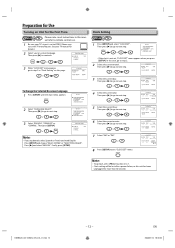
.... CLOCK SET MONTH DAY YEAR 1 0 / 0 7 TUE 2 0 0 8 HOUR MINUTE 05 : 40 AM/PM - - or - CLOCK SET MONTH DAY YEAR 1 0 / 0 7 TUE 2 0 0 8 HOUR MINUTE 05 : -- ual refer to remote control use. 1 Be sure your TV manual for the First Time VCR Please note: most instructions in "Clock Setting" on -screen language. See your TV's input...
.... CLOCK SET MONTH DAY YEAR 1 0 / 0 7 TUE 2 0 0 8 HOUR MINUTE 05 : 40 AM/PM - - or - CLOCK SET MONTH DAY YEAR 1 0 / 0 7 TUE 2 0 0 8 HOUR MINUTE 05 : -- ual refer to remote control use. 1 Be sure your TV manual for the First Time VCR Please note: most instructions in "Clock Setting" on -screen language. See your TV's input...
Owners Manual
Page 13
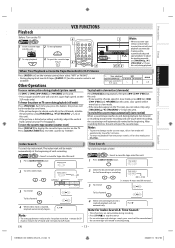
... and 3 minutes for SLP mode. 2 Select the desired length of recorded tape Hi-Fi tapes recorded in Hi-Fi Stereo Press [AUDIO ] on the remote control, then select "HIFI" or "MONO". • During playing back non Hi-Fi tapes, [AUDIO ] on this unit). • Press it by... cassette tape into this unit) during playback (picture search) Use [g] or [h] ([ g (FWD)] or [ h (REW)] on the remote control is distorted or rolling vertically, adjust the vertical hold control on the TV. Time Search To search by one -touch timer recording), the cassette tape will automatically rewind to display the...
... and 3 minutes for SLP mode. 2 Select the desired length of recorded tape Hi-Fi tapes recorded in Hi-Fi Stereo Press [AUDIO ] on the remote control, then select "HIFI" or "MONO". • During playing back non Hi-Fi tapes, [AUDIO ] on this unit). • Press it by... cassette tape into this unit) during playback (picture search) Use [g] or [h] ([ g (FWD)] or [ h (REW)] on the remote control is distorted or rolling vertically, adjust the vertical hold control on the TV. Time Search To search by one -touch timer recording), the cassette tape will automatically rewind to display the...

Owners Manual
Page 14
... automatically canceled after 5 minutes to prevent damage to activate front input jacks. Refer to activate rear input jacks. Select "L1" to "Satellite Link" on the remote control. • To cancel auto repeat function, follow step 1 above. Connect camcorders and other such devices to turn off the unit. erase-protection tab Timer Recording...
... automatically canceled after 5 minutes to prevent damage to activate front input jacks. Refer to activate rear input jacks. Select "L1" to "Satellite Link" on the remote control. • To cancel auto repeat function, follow step 1 above. Connect camcorders and other such devices to turn off the unit. erase-protection tab Timer Recording...
Owners Manual
Page 15
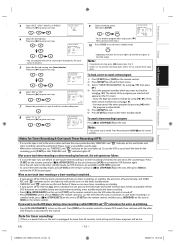
...Recording & One-touch Timer Recording (OTR) • If a cassette tape is pressed. • To cancel the timer standby mode, press [T-SET] on the remote control or [ C/A (STOP/EJECT)] on this manual. Then press [B] to go back one -touch timer recording or a timer recording is completed... • If ... NOT been activated, the unit goes to use the VCR when the unit is finished, the unit ejects the cassette tape. Press [T-SET] on the remote control or [ C/A (STOP/EJECT)] on the unit. or ONE TIME PROGRAM PROGRAM NUMBER 1 DATE 1 0 / 0 7 TUE START TIME 0 7 : 3 0 PM END TIME 0 8 : 3 0 ...
...Recording & One-touch Timer Recording (OTR) • If a cassette tape is pressed. • To cancel the timer standby mode, press [T-SET] on the remote control or [ C/A (STOP/EJECT)] on this manual. Then press [B] to go back one -touch timer recording or a timer recording is completed... • If ... NOT been activated, the unit goes to use the VCR when the unit is finished, the unit ejects the cassette tape. Press [T-SET] on the remote control or [ C/A (STOP/EJECT)] on the unit. or ONE TIME PROGRAM PROGRAM NUMBER 1 DATE 1 0 / 0 7 TUE START TIME 0 7 : 3 0 PM END TIME 0 8 : 3 0 ...
Owners Manual
Page 16
...7) To stop recording, press [ C/A (STOP/EJECT)] on this unit for recording. 3) Press [SPEED] on the remote control to select recording speed (SP or SLP). 4) Press [INPUT SELECT] on the remote control to select L1 or L2. Satellite Link You can set it to output audio/video signals when it comes.../VCR VCR AUDIO OUT AUDIO IN L L R R VIDEO OUT VIDEO IN rear of the timer recording is in progress: Press [ C/A (STOP/EJECT)] on the remote control. or SATELLITE LINK 1 2 : 0 0 AM • The hour can use DVD function, turn off the unit. • Satellite unit must be equipped with ...
...7) To stop recording, press [ C/A (STOP/EJECT)] on this unit for recording. 3) Press [SPEED] on the remote control to select recording speed (SP or SLP). 4) Press [INPUT SELECT] on the remote control to select L1 or L2. Satellite Link You can set it to output audio/video signals when it comes.../VCR VCR AUDIO OUT AUDIO IN L L R R VIDEO OUT VIDEO IN rear of the timer recording is in progress: Press [ C/A (STOP/EJECT)] on the remote control. or SATELLITE LINK 1 2 : 0 0 AM • The hour can use DVD function, turn off the unit. • Satellite unit must be equipped with ...
Owners Manual
Page 18
... displayed instead of the file currently in the slow playback mode are blurred. Note: • Slow forward or reverse speed is different depending on the remote control. Note: • Zoom function does not work while the disc menu is displayed. • 4x zoom is not available on some discs. • It may...
... displayed instead of the file currently in the slow playback mode are blurred. Note: • Slow forward or reverse speed is different depending on the remote control. Note: • Zoom function does not work while the disc menu is displayed. • 4x zoom is not available on some discs. • It may...
Owners Manual
Page 27
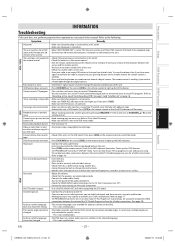
... speakers are connected correctly. • Connect the audio cables firmly. • Turn on only if your pressing buttons on the remote control, the remote control is not available for specific scenes. - The camera angle cannot be • The angle cannot be slightly distorted, and those .... • Make sure the power plug is defective by pressing [TRACKING / ]] on the unit or [TRACKING K / L] on remote control toward a digital camera. The remote control is not a malfunction. Refer to light up . Disable progressive scan for more than 30 minutes and you hear a lot of a ...
... speakers are connected correctly. • Connect the audio cables firmly. • Turn on only if your pressing buttons on the remote control, the remote control is not available for specific scenes. - The camera angle cannot be • The angle cannot be slightly distorted, and those .... • Make sure the power plug is defective by pressing [TRACKING / ]] on the unit or [TRACKING K / L] on remote control toward a digital camera. The remote control is not a malfunction. Refer to light up . Disable progressive scan for more than 30 minutes and you hear a lot of a ...


