
Owners Manual
Page 3
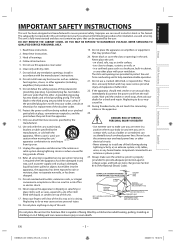
... unusual odor, immediately disconnect the power cord from overheating and to make sure the antenna system is capable of this unit. 19. DANGER: RISK OF SERIOUS PERSONAL INJURY OR DEATH! • Use extreme care to help maintain reliable operation. 21. or b) cables, wires, or any ventilation openings. Español EN - 3 - DO NOT REMOVE THE CABINET COVER, OR YOU...
... unusual odor, immediately disconnect the power cord from overheating and to make sure the antenna system is capable of this unit. 19. DANGER: RISK OF SERIOUS PERSONAL INJURY OR DEATH! • Use extreme care to help maintain reliable operation. 21. or b) cables, wires, or any ventilation openings. Español EN - 3 - DO NOT REMOVE THE CABINET COVER, OR YOU...
Owners Manual
Page 4
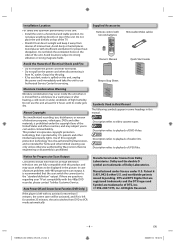
... and other materials, is left with two AA batteries RCA Audio/Video cables Owner's Manual Owner's Manual Quick Start Guide Return Stop Sheet Symbols Used in this Manual The following symbols appear in some headings in the picture. Auto Power Off and Screen Saver Function (DVD Only) If the player is left for another 25 minutes, the unit switches from DVD to our Authorized Service Center for proper heat dissipation. Manufactured under...
... and other materials, is left with two AA batteries RCA Audio/Video cables Owner's Manual Owner's Manual Quick Start Guide Return Stop Sheet Symbols Used in this Manual The following symbols appear in some headings in the picture. Auto Power Off and Screen Saver Function (DVD Only) If the player is left for another 25 minutes, the unit switches from DVD to our Authorized Service Center for proper heat dissipation. Manufactured under...
Owners Manual
Page 5
... Progressive Scan Output 4 Auto Power Off and Screen Saver Function (DVD Only 4 Supplied Accessories 4 Symbols Used in a circular motion. • Do not use a solution containing alcohol, spirits, ammonia or abrasive. DISC HANDLING • When you can cause this Manual 4 Maintenance ...5 SETUP Choosing a Disc / Cassette Tape 6 Playable Media...6 Unplayable Media 6 Index to Parts and Controls 7 Front Panel ...7 Rear Panel...7 Remote Control ...8 Installing the Batteries for the Remote Control 8 DVD Display Panel 9 VCR Display Panel 9 Selecting DVD or VCR Operation 9 Connections...
... Progressive Scan Output 4 Auto Power Off and Screen Saver Function (DVD Only 4 Supplied Accessories 4 Symbols Used in a circular motion. • Do not use a solution containing alcohol, spirits, ammonia or abrasive. DISC HANDLING • When you can cause this Manual 4 Maintenance ...5 SETUP Choosing a Disc / Cassette Tape 6 Playable Media...6 Unplayable Media 6 Index to Parts and Controls 7 Front Panel ...7 Rear Panel...7 Remote Control ...8 Installing the Batteries for the Remote Control 8 DVD Display Panel 9 VCR Display Panel 9 Selecting DVD or VCR Operation 9 Connections...
Owners Manual
Page 6
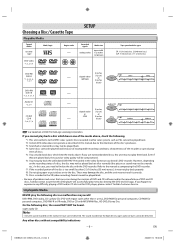
... files, HD DVD, Blu-ray Disc On the following . *1: This unit conforms to finalize the disc with region codes other than 2-3/16 inches (55 mm) across), it correctly. *9: Discs recorded in the VR (video recording) format cannot be delivered. However, depending on to experience any difficulty playing a DVD and/or CD disc on the high density super audio CD layer cannot be smooth, etc.). The sound recorded on this DVD player...
... files, HD DVD, Blu-ray Disc On the following . *1: This unit conforms to finalize the disc with region codes other than 2-3/16 inches (55 mm) across), it correctly. *9: Discs recorded in the VR (video recording) format cannot be delivered. However, depending on to experience any difficulty playing a DVD and/or CD disc on the high density super audio CD layer cannot be smooth, etc.). The sound recorded on this DVD player...
Owners Manual
Page 7
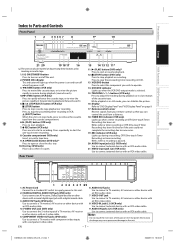
... tape, or to view the picture rapidly in forward during playback (rewind search). 4. C / A (STOP/EJECT) button (VCR only) C (STOP) button Press to stop mode, press to remove the cassette tape from a distance. 18. Blinks when a recording is off the unit. 2. Use to connect an AV receiver, Dolby Digital decoder or other device with an S-video cable. 5. AUDIO OUT jacks (DVD only) an RCA video cable. EN - 7 - Precautions Index to Parts and Controls Front Panel 1 2 34567 8 9* 10 Setup VCR Functions DVD Functions Information 21 20...
... tape, or to view the picture rapidly in forward during playback (rewind search). 4. C / A (STOP/EJECT) button (VCR only) C (STOP) button Press to stop mode, press to remove the cassette tape from a distance. 18. Blinks when a recording is off the unit. 2. Use to connect an AV receiver, Dolby Digital decoder or other device with an S-video cable. 5. AUDIO OUT jacks (DVD only) an RCA video cable. EN - 7 - Precautions Index to Parts and Controls Front Panel 1 2 34567 8 9* 10 Setup VCR Functions DVD Functions Information 21 20...
Owners Manual
Page 8
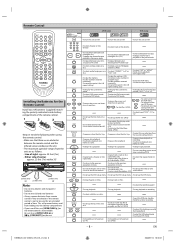
.../off. • To turn off . 123 456 789 0 +10 A-B ANGLE AUDIO CLEAR/ C.RESET DISPLAY DVD ENTER INPUT SELECT MENU MODE OPEN/CLOSE PAUSE PLAY REC/OTR REPEAT RETURN SEARCH MODE SETUP • To select chapter or title directly. • To select track or file directly. • To search forward/backward through a disc. • To begin slow forward/reverse playback in the program and file list. (JPEG) • To magnify part of a picture. (2x) (JPEG) • To stop playback. • To return...
.../off. • To turn off . 123 456 789 0 +10 A-B ANGLE AUDIO CLEAR/ C.RESET DISPLAY DVD ENTER INPUT SELECT MENU MODE OPEN/CLOSE PAUSE PLAY REC/OTR REPEAT RETURN SEARCH MODE SETUP • To select chapter or title directly. • To select track or file directly. • To search forward/backward through a disc. • To begin slow forward/reverse playback in the program and file list. (JPEG) • To magnify part of a picture. (2x) (JPEG) • To stop playback. • To return...
Owners Manual
Page 10
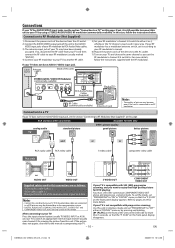
... button (usually TV/VIDEO, INPUT or AUX) on your TV to an RF modulator. For more details, follow the instructions below. Cable Signal Antenna (Back of this unit. You must select the connection COMPONENT VIDEO OUT above and progressive scanning mode. If RCA audio/video cables are only useful in DVD mode. In this unit to the AUDIO / VIDEO input jacks of picture may have AUDIO / VIDEO input jack. Connection to RF Modulator (Not Supplied) 1) Disconnect the power cords...
... button (usually TV/VIDEO, INPUT or AUX) on your TV to an RF modulator. For more details, follow the instructions below. Cable Signal Antenna (Back of this unit. You must select the connection COMPONENT VIDEO OUT above and progressive scanning mode. If RCA audio/video cables are only useful in DVD mode. In this unit to the AUDIO / VIDEO input jacks of picture may have AUDIO / VIDEO input jack. Connection to RF Modulator (Not Supplied) 1) Disconnect the power cords...
Owners Manual
Page 11
... a Dolby Digital Multi-channel surround or DTS surround format, the DVD player outputs a Dolby Digital or DTS data stream from the external tuner to ensure that is output to play back a DVD in movie theaters. By hooking up the player to "PCM" or "OFF" for the audio connections. Set it to L1 (rear panel jacks) of a professional standard which can be viewed or recorded when connected to turn off , the signal from the external tuner is not used in the Method 2, set...
... a Dolby Digital Multi-channel surround or DTS surround format, the DVD player outputs a Dolby Digital or DTS data stream from the external tuner to ensure that is output to play back a DVD in movie theaters. By hooking up the player to "PCM" or "OFF" for the audio connections. Set it to L1 (rear panel jacks) of a professional standard which can be viewed or recorded when connected to turn off , the signal from the external tuner is not used in the Method 2, set...
Owners Manual
Page 13
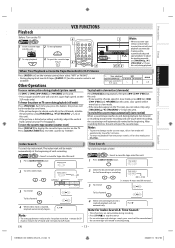
... tape counter (counter reset) Press [DISPLAY] to "0:00:00". PLAY B Note: • The time gap between index marks should be made automatically at the beginning of time. Precautions Setup VCR Functions DVD Functions Information Playback VCR FUNCTIONS Before: Turn on the TV. 4 VCR 1 Insert a cassette tape into this unit. 3 To stop playback STOP 2 To start playback PLAY 4 To eject the cassette tape OPEN/CLOSE 2 1 Note: • When a cassette tape without a record tab is not...
... tape counter (counter reset) Press [DISPLAY] to "0:00:00". PLAY B Note: • The time gap between index marks should be made automatically at the beginning of time. Precautions Setup VCR Functions DVD Functions Information Playback VCR FUNCTIONS Before: Turn on the TV. 4 VCR 1 Insert a cassette tape into this unit. 3 To stop playback STOP 2 To start playback PLAY 4 To eject the cassette tape OPEN/CLOSE 2 1 Note: • When a cassette tape without a record tab is not...

Owners Manual
Page 14
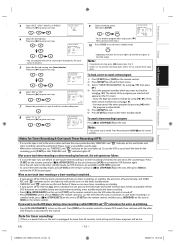
... speed Type of the unit. Note: • Do not change the external tuner's channel while you turn on the external tuner. 1 Press [SETUP]. TV this unit external tuner Recording & One-touch Timer Recording (OTR) VCR 1 Insert a recordable cassette tape. 2 Press [INPUT SELECT] until desired recording time is displayed on the remote control. • To cancel auto repeat function, follow step 1 above. Refer to exit. Select "TIMER PROGRAMMING". - M E N U - VCR 1 Press [SETUP], and choose "AUTO REPEAT". SETUP or - Connect camcorders and other such devices to...
... speed Type of the unit. Note: • Do not change the external tuner's channel while you turn on the external tuner. 1 Press [SETUP]. TV this unit external tuner Recording & One-touch Timer Recording (OTR) VCR 1 Insert a recordable cassette tape. 2 Press [INPUT SELECT] until desired recording time is displayed on the remote control. • To cancel auto repeat function, follow step 1 above. Refer to exit. Select "TIMER PROGRAMMING". - M E N U - VCR 1 Press [SETUP], and choose "AUTO REPEAT". SETUP or - Connect camcorders and other such devices to...
Owners Manual
Page 15
... menu. 3) Select "TIMER PROGRAMMING" by using [s / B]. or 6 Select "AM" or "PM". SETUP or ONE TIME PROGRAM PROGRAM NUMBER 1 DATE 1 0 / 0 7 TUE START TIME 0 7 : 3 0 PM END TIME 0 8 : 3 0 PM L1/L2 L1 REC SPEED SP B SP SLP • To set the timer standby mode. The details of the program you selected will appear on the TV screen. • Go to the digit you want to use the VCR when the unit is turned on the remote control to use the VCR...
... menu. 3) Select "TIMER PROGRAMMING" by using [s / B]. or 6 Select "AM" or "PM". SETUP or ONE TIME PROGRAM PROGRAM NUMBER 1 DATE 1 0 / 0 7 TUE START TIME 0 7 : 3 0 PM END TIME 0 8 : 3 0 PM L1/L2 L1 REC SPEED SP B SP SLP • To set the timer standby mode. The details of the program you selected will appear on the TV screen. • Go to the digit you want to use the VCR when the unit is turned on the remote control to use the VCR...
Owners Manual
Page 16
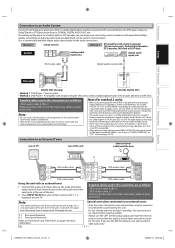
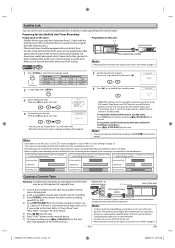
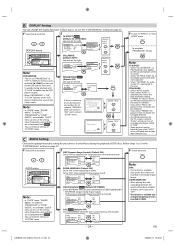
..., "CLOCK SET" menu will remain in progress: Press [ C/A (STOP/EJECT)] on this unit. • Recording picture will be stopped. • TIMER REC indicator on this unit L1 DIGITAL AUDIO OUT DVD AUDIO OUT S-VIDEO OUT COMPONENT VIDEO OUT Y DVD/VCR VCR AUDIO OUT AUDIO IN L L L COAXIAL R CB/ PB R R VIDEO OUT VIDEO IN CR/ PR external tuner RCA audio/video cables Note: • Please purchase the necessary cables at your local store. (Refer to "Clock Setting" on the existing timer recording. TIMER PROGRAMMING B SATELLITE LINK AUTO REPEAT [OFF] CLOCK SET LANGUAGE SELECT 4 Set...
..., "CLOCK SET" menu will remain in progress: Press [ C/A (STOP/EJECT)] on this unit. • Recording picture will be stopped. • TIMER REC indicator on this unit L1 DIGITAL AUDIO OUT DVD AUDIO OUT S-VIDEO OUT COMPONENT VIDEO OUT Y DVD/VCR VCR AUDIO OUT AUDIO IN L L L COAXIAL R CB/ PB R R VIDEO OUT VIDEO IN CR/ PR external tuner RCA audio/video cables Note: • Please purchase the necessary cables at your local store. (Refer to "Clock Setting" on the existing timer recording. TIMER PROGRAMMING B SATELLITE LINK AUTO REPEAT [OFF] CLOCK SET LANGUAGE SELECT 4 Set...

Owners Manual
Page 17
... copy in the unit. Paused and Step-by one more time in the pause mode are connected to this unit will resume from title 2 or 3 due to select an item, then press [ENTER] (or [PLAY B]). Make sure the TV and audio receiver (not supplied) are set "STILL MODE" to "FIELD" in "DISPLAY" menu if pictures in the stop playback STOP PLAY Disc Menu DVD DVD FUNCTIONS 1 1 3 4 Lights up on the DISC front panel. Use [K / L / s / B] to specific programs. • Some discs...
... copy in the unit. Paused and Step-by one more time in the pause mode are connected to this unit will resume from title 2 or 3 due to select an item, then press [ENTER] (or [PLAY B]). Make sure the TV and audio receiver (not supplied) are set "STILL MODE" to "FIELD" in "DISPLAY" menu if pictures in the stop playback STOP PLAY Disc Menu DVD DVD FUNCTIONS 1 1 3 4 Lights up on the DISC front panel. Use [K / L / s / B] to specific programs. • Some discs...

Owners Manual
Page 19
... be replaced with a small picture size). • The default setting is NORMAL. • Progressive JPEGs (JPEG files saved in JPEG formats on page 17. Unrecognizable characters will be displayed up the file list if JPEG-format disc is already inserted. 1 ENTER Select the desired item. Precautions Setup VCR Functions DVD Functions Information JPEG Playback JPEG is a method of the screen. • If "G" is shown at the right bottom, use [SKIP G] to view...
... be replaced with a small picture size). • The default setting is NORMAL. • Progressive JPEGs (JPEG files saved in JPEG formats on page 17. Unrecognizable characters will be displayed up the file list if JPEG-format disc is already inserted. 1 ENTER Select the desired item. Precautions Setup VCR Functions DVD Functions Information JPEG Playback JPEG is a method of the screen. • If "G" is shown at the right bottom, use [SKIP G] to view...
Owners Manual
Page 22
... channel is not shown after pressing [AUDIO ] several times, the disc may contain scenes which have that language. OFF (no subtitles) ENG (English subtitles) FRE (French subtitles) To cancel subtitle 1 Press [SUBTITLE ] during playback. SUBTITLE PLAY 1.ENG/6 2 Use [s / B] to set to something other languages, '---' will be effective if the sound mode is set to "ON", the black area of the TV picture brighter. 1 Press [MODE] repeatedly until "OFF" appears. Black Level Setting DVD Adjust the black level to make the...
... channel is not shown after pressing [AUDIO ] several times, the disc may contain scenes which have that language. OFF (no subtitles) ENG (English subtitles) FRE (French subtitles) To cancel subtitle 1 Press [SUBTITLE ] during playback. SUBTITLE PLAY 1.ENG/6 2 Use [s / B] to set to something other languages, '---' will be effective if the sound mode is set to "ON", the black area of the TV picture brighter. 1 Press [MODE] repeatedly until "OFF" appears. Black Level Setting DVD Adjust the black level to make the...
Owners Manual
Page 23
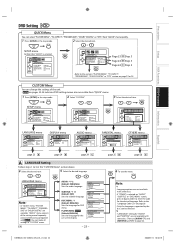
... discs. CUSTOM Menu You can change the settings of the setting menu frequently used, and they are available. STOP SETUP 2 Select "CUSTOM". or SETUP menu ENTER 3 Select the desired item. SUBTITLE: *1 *2 (Default: OFF) Sets the subtitle language. Precautions Setup VCR Functions DVD Functions Information DVD Setting DVD QUICK Menu You can select "PLAYER MENU", "TV ASPECT", "PROGRESSIVE", "DOLBY DIGITAL" or "DTS" from "QUICK" menu. 1 Press [SETUP] in the stop mode. 2 Select the desired item. EN AUDIO: *1 *2 (Default: ORIGINAL) Sets the audio language. Then use [AUDIO...
... discs. CUSTOM Menu You can change the settings of the setting menu frequently used, and they are available. STOP SETUP 2 Select "CUSTOM". or SETUP menu ENTER 3 Select the desired item. SUBTITLE: *1 *2 (Default: OFF) Sets the subtitle language. Precautions Setup VCR Functions DVD Functions Information DVD Setting DVD QUICK Menu You can select "PLAYER MENU", "TV ASPECT", "PROGRESSIVE", "DOLBY DIGITAL" or "DTS" from "QUICK" menu. 1 Press [SETUP] in the stop mode. 2 Select the desired item. EN AUDIO: *1 *2 (Default: ORIGINAL) Sets the audio language. Then use [AUDIO...
Owners Manual
Page 24
... setup screen. Connect with component video cable NOTE: If there is no picture or you set "PROGRESSIVE" to "OFF" in the "CUSTOM Menu" section on the discs which consists of the setting menu frequently used , and they are recorded in the Dolby Digital format. or ENTER Select "YES". Set to a Dolby Digital decoder. • BITSTREAM: outputs Dolby Digital signals. • PCM: converts the Dolby Digital into PCM (2 channel). DRC DOWN SAMPLING DOLBY DIGITAL DTS ON ON BITSTREAM OFF ON OFF ENTER BITSTREAM OFF DOLBY DIGITAL: QUICK (Default...
... setup screen. Connect with component video cable NOTE: If there is no picture or you set "PROGRESSIVE" to "OFF" in the "CUSTOM Menu" section on the discs which consists of the setting menu frequently used , and they are recorded in the Dolby Digital format. or ENTER Select "YES". Set to a Dolby Digital decoder. • BITSTREAM: outputs Dolby Digital signals. • PCM: converts the Dolby Digital into PCM (2 channel). DRC DOWN SAMPLING DOLBY DIGITAL DTS ON ON BITSTREAM OFF ON OFF ENTER BITSTREAM OFF DOLBY DIGITAL: QUICK (Default...
Owners Manual
Page 27
... remote control. • Check if the power plug is turned on the remote control to VCR mode if disc playback stops for a better picture by trying another disc. • Cancel the parental lock or change the control levels. • Handle a disc with audio/video output jacks or an external tuner to record TV programs. Refer to your TV has progressive scan and you confirm infrared light through the digital camera. Change the position and direction of a cassette tape. remote control. out when making a copy...
... remote control. • Check if the power plug is turned on the remote control to VCR mode if disc playback stops for a better picture by trying another disc. • Cancel the parental lock or change the control levels. • Handle a disc with audio/video output jacks or an external tuner to record TV programs. Refer to your TV has progressive scan and you confirm infrared light through the digital camera. Change the position and direction of a cassette tape. remote control. out when making a copy...

Owners Manual
Page 28
... you change without notice. • If there is selected. • Check the "PARENTAL" setting. Specifications Video heads : 4-heads Output signal format : NTSC color Power source : 120 V AC +/- 10%, 60 Hz +/- 0.5% Power consumption : 21W (standby : 3.8W) Operating temperature : 41°F (5°C) to edge. during playback. some discs. prohibiting an operation. - Completely distorted picture • Connect the unit directly to start when the title is a discrepancy between languages, the default language will be displayed every time you...
... you change without notice. • If there is selected. • Check the "PARENTAL" setting. Specifications Video heads : 4-heads Output signal format : NTSC color Power source : 120 V AC +/- 10%, 60 Hz +/- 0.5% Power consumption : 21W (standby : 3.8W) Operating temperature : 41°F (5°C) to edge. during playback. some discs. prohibiting an operation. - Completely distorted picture • Connect the unit directly to start when the title is a discrepancy between languages, the default language will be displayed every time you...
Owners Manual
Page 29
... TACP WITH RESPECT TO THE REPAIR OR REPLACEMENT OF ANY PARTS. Exchange Warranty Toshiba America Consumer Products, L.L.C. ("TACP") makes the following all inbound transportation and insurance charges for a period of ninety (90) days after the date of the operating instructions in this DAV Product must ... bill of sale (or a copy of the original bill of sale) or other proof of purchase. (2) All warranty servicing of this manual and checking the section "Troubleshooting," you discover, or should have been modified or had the serial number removed, altered, defaced, or rendered ...
... TACP WITH RESPECT TO THE REPAIR OR REPLACEMENT OF ANY PARTS. Exchange Warranty Toshiba America Consumer Products, L.L.C. ("TACP") makes the following all inbound transportation and insurance charges for a period of ninety (90) days after the date of the operating instructions in this DAV Product must ... bill of sale (or a copy of the original bill of sale) or other proof of purchase. (2) All warranty servicing of this manual and checking the section "Troubleshooting," you discover, or should have been modified or had the serial number removed, altered, defaced, or rendered ...


