User Manual
Page 19
Contents 19 Registering your computer with Toshiba 38 Adding optional external devices 38 Adding memory (optional 39 Installing a memory module 39 Removing a memory module 45 Checking total memory 47 Recovering the Internal Storage Drive 47 Recovering to out-of-box state (recommended recovery method 49 Recovering to a custom size partition 51 Recovering without ...
Contents 19 Registering your computer with Toshiba 38 Adding optional external devices 38 Adding memory (optional 39 Installing a memory module 39 Removing a memory module 45 Checking total memory 47 Recovering the Internal Storage Drive 47 Recovering to out-of-box state (recommended recovery method 49 Recovering to a custom size partition 51 Recovering without ...
User Manual
Page 21
... audio features 115 Recording sounds 115 Using external speakers or headphones..........116 Using the Web Camera 117 Using the Memory card reader 117 Inserting memory media 118 Removing memory media 118 Chapter 5: Utilities 120 TOSHIBA Assist 121 Secure 122 Protect & Fix 123 Optimize 124 TOSHIBA Recovery Media Creator 125 TOSHIBA Application Installer 125 Setting passwords 126
... audio features 115 Recording sounds 115 Using external speakers or headphones..........116 Using the Web Camera 117 Using the Memory card reader 117 Inserting memory media 118 Removing memory media 118 Chapter 5: Utilities 120 TOSHIBA Assist 121 Secure 122 Protect & Fix 123 Optimize 124 TOSHIBA Recovery Media Creator 125 TOSHIBA Application Installer 125 Setting passwords 126
User Manual
Page 22
... a supervisor password 127 Using a user password 128 Deleting a user password 129 TOSHIBA PC Diagnostic Tool Utility 130 Mouse Utility 131 TOSHIBA Hardware Setup 132 TOSHIBA Zooming Utility 134 TOSHIBA Accessibility 135 TOSHIBA Service Station 136 Chapter 6: If Something Goes Wrong 137 Problems that are easy ...142 The Windows® operating system can help you 142 Fixing a problem with Device Manager 143 Checking device properties 143 Memory problems 144 Power and the batteries 144 Keyboard problems 146 Display problems 146 Disk or storage drive problems 148 Error-checking...
... a supervisor password 127 Using a user password 128 Deleting a user password 129 TOSHIBA PC Diagnostic Tool Utility 130 Mouse Utility 131 TOSHIBA Hardware Setup 132 TOSHIBA Zooming Utility 134 TOSHIBA Accessibility 135 TOSHIBA Service Station 136 Chapter 6: If Something Goes Wrong 137 Problems that are easy ...142 The Windows® operating system can help you 142 Fixing a problem with Device Manager 143 Checking device properties 143 Memory problems 144 Power and the batteries 144 Keyboard problems 146 Display problems 146 Disk or storage drive problems 148 Error-checking...
User Manual
Page 32
... up to and including "Setting up your computer's cooling fan Your computer may have adequate ventilation and are not limited to, a mouse, keyboard, printer, and memory. Using your computer. To use external power or to charge the battery you can block the vents located at the base of the computer. ❖...
... up to and including "Setting up your computer's cooling fan Your computer may have adequate ventilation and are not limited to, a mouse, keyboard, printer, and memory. Using your computer. To use external power or to charge the battery you can block the vents located at the base of the computer. ❖...
User Manual
Page 38
...and the order in which windows appear, may want to complete Product Registration will not diminish Customer rights under the Toshiba standard limited Warranty. Failure to : ❖ Add more memory (see "Adding memory (optional)" on page 39) ❖ Connect a mouse (see "Using a mouse" on page 69) &#...Connect a local printer (see "Connecting a printer" on page 69) Adding optional external devices NOTE Before adding external devices or memory, Toshiba recommends setting up your software. The first time you turn off the power again until the operating system has loaded completely.
...and the order in which windows appear, may want to complete Product Registration will not diminish Customer rights under the Toshiba standard limited Warranty. Failure to : ❖ Add more memory (see "Adding memory (optional)" on page 39) ❖ Connect a mouse (see "Using a mouse" on page 69) &#...Connect a local printer (see "Connecting a printer" on page 69) Adding optional external devices NOTE Before adding external devices or memory, Toshiba recommends setting up your software. The first time you turn off the power again until the operating system has loaded completely.
User Manual
Page 39
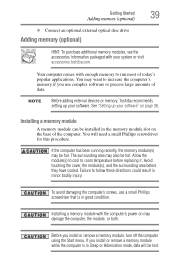
NOTE Before adding external devices or memory, Toshiba recommends setting up your software. If the computer has been running recently, the memory module(s) may be hot. See "Setting up your software" on page 38. You will be installed in Sleep or Hibernation ... to follow these directions could result in good condition. Installing a memory module A memory module can be lost. Allow the module(s) to cool to run most of data. Installing a memory module with your system or visit accessories.toshiba.com. To avoid damaging the computer's screws, use complex software or...
NOTE Before adding external devices or memory, Toshiba recommends setting up your software. If the computer has been running recently, the memory module(s) may be hot. See "Setting up your software" on page 38. You will be installed in Sleep or Hibernation ... to follow these directions could result in good condition. Installing a memory module A memory module can be lost. Allow the module(s) to cool to run most of data. Installing a memory module with your system or visit accessories.toshiba.com. To avoid damaging the computer's screws, use complex software or...
User Manual
Page 40
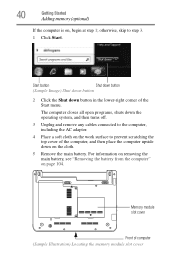
40 Getting Started Adding memory (optional) If the computer is on page 104. For information on removing the main battery, see "Removing the battery from ... 1; Start button Shut down button (Sample Image) Shut down button 2 Click the Shut down on the cloth. 5 Remove the main battery. Memory module slot cover Front of the Start menu. The computer closes all open programs, shuts down the operating system, and then turns off. 3 Unplug... and then place the computer upside down button in the lower-right corner of computer (Sample Illustration) Locating the memory module slot cover
40 Getting Started Adding memory (optional) If the computer is on page 104. For information on removing the main battery, see "Removing the battery from ... 1; Start button Shut down button (Sample Image) Shut down button 2 Click the Shut down on the cloth. 5 Remove the main battery. Memory module slot cover Front of the Start menu. The computer closes all open programs, shuts down the operating system, and then turns off. 3 Unplug... and then place the computer upside down button in the lower-right corner of computer (Sample Illustration) Locating the memory module slot cover
User Manual
Page 41
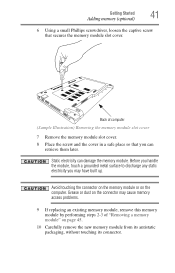
... dust on the connector may have built up. Back of computer (Sample Illustration) Removing the memory module slot cover 7 Remove the memory module slot cover. 8 Place the screw and the cover in a safe place so that secures the memory module slot cover. Before you handle the module, touch a grounded metal surface to discharge...
... dust on the connector may have built up. Back of computer (Sample Illustration) Removing the memory module slot cover 7 Remove the memory module slot cover. 8 Place the screw and the cover in a safe place so that secures the memory module slot cover. Before you handle the module, touch a grounded metal surface to discharge...
User Manual
Page 42
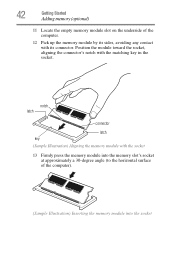
...socket, aligning the connector's notch with the socket 13 Firmly press the memory module into the memory slot's socket at approximately a 30-degree angle (to the horizontal surface of the computer. 12 Pick up the memory module by its sides, avoiding any contact with its connector. notch latch... connector latch key (Sample Illustration) Aligning the memory module with the matching key in the socket. 42 Getting Started Adding memory (optional) 11 Locate the empty memory module slot on the ...
...socket, aligning the connector's notch with the socket 13 Firmly press the memory module into the memory slot's socket at approximately a 30-degree angle (to the horizontal surface of the computer. 12 Pick up the memory module by its sides, avoiding any contact with its connector. notch latch... connector latch key (Sample Illustration) Aligning the memory module with the matching key in the socket. 42 Getting Started Adding memory (optional) 11 Locate the empty memory module slot on the ...
User Manual
Page 43
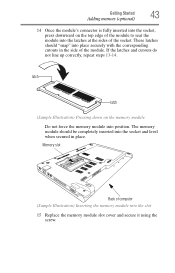
... socket and level when secured in the side of computer (Sample Illustration) Inserting the memory module into the slot 15 Replace the memory module slot cover and secure it using the screw. Memory slot Back of the module. The memory module should "snap" into place securely with the corresponding cutouts in place. latch latch... down on the top edge of the module to seat the module into the latches at the sides of the socket. Getting Started 43 Adding memory (optional) 14 Once the module's connector is fully inserted into the socket, press downward on the...
... socket and level when secured in the side of computer (Sample Illustration) Inserting the memory module into the slot 15 Replace the memory module slot cover and secure it using the screw. Memory slot Back of the module. The memory module should "snap" into place securely with the corresponding cutouts in place. latch latch... down on the top edge of the module to seat the module into the latches at the sides of the socket. Getting Started 43 Adding memory (optional) 14 Once the module's connector is fully inserted into the socket, press downward on the...
User Manual
Page 44
...on inserting the main battery, see "Inserting a charged battery" on a carpet or other soft material can block the vents located at least one memory module installed for the computer to a power outlet (even if your computer and AC adaptor have at the base of the computer. ❖ ... ❖ Never place your computer on or when an AC adaptor is connected to work surface before restarting the computer. 44 Getting Started Adding memory (optional) 16 Re-insert the main battery. You can verify that the computer has recognized it correctly as an electric blanket or heater. &#...
...on inserting the main battery, see "Inserting a charged battery" on a carpet or other soft material can block the vents located at least one memory module installed for the computer to a power outlet (even if your computer and AC adaptor have at the base of the computer. ❖ ... ❖ Never place your computer on or when an AC adaptor is connected to work surface before restarting the computer. 44 Getting Started Adding memory (optional) 16 Re-insert the main battery. You can verify that the computer has recognized it correctly as an electric blanket or heater. &#...
User Manual
Page 45
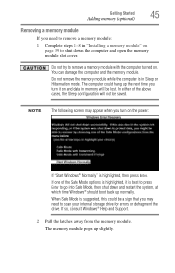
..." is best to press Enter to go into Safe Mode, then shut down the computer and open the memory module slot cover. NOTE The following screen may need to remove a memory module: 1 Complete steps 1-8 in memory will not be lost. If so, consult Windows® Help and Support. 2 Pull the latches away from... the memory module. Do not try to remove a memory module with the computer turned on page 39 to shut down and restart the system, at which time Windows® should boot back up normally. ...
..." is best to press Enter to go into Safe Mode, then shut down the computer and open the memory module slot cover. NOTE The following screen may need to remove a memory module: 1 Complete steps 1-8 in memory will not be lost. If so, consult Windows® Help and Support. 2 Pull the latches away from... the memory module. Do not try to remove a memory module with the computer turned on page 39 to shut down and restart the system, at which time Windows® should boot back up normally. ...
User Manual
Page 46
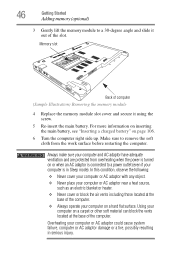
... of computer (Sample Illustration) Removing the memory module 4 Replace the memory module slot cover and secure it out of the slot. Always make sure your computer and AC adaptor have adequate ventilation and are protected from ..." on or when an AC adaptor is connected to a power outlet (even if your computer on a hard flat surface. 46 Getting Started Adding memory (optional) 3 Gently lift the memory module to remove the soft cloth from overheating when the power is turned on page 106. 6 Turn the computer right side up. Make...
... of computer (Sample Illustration) Removing the memory module 4 Replace the memory module slot cover and secure it out of the slot. Always make sure your computer and AC adaptor have adequate ventilation and are protected from ..." on or when an AC adaptor is connected to a power outlet (even if your computer on a hard flat surface. 46 Getting Started Adding memory (optional) 3 Gently lift the memory module to remove the soft cloth from overheating when the power is turned on page 106. 6 Turn the computer right side up. Make...
User Manual
Page 47
.... Recovering the Internal Storage Drive NOTE To purchase an optional external writable optical disc drive or a USB Flash drive, visit the Toshiba Web site at least one memory module installed for the computer to prevent programs or people from doing things on page 39), and then check that the module is displayed...
.... Recovering the Internal Storage Drive NOTE To purchase an optional external writable optical disc drive or a USB Flash drive, visit the Toshiba Web site at least one memory module installed for the computer to prevent programs or people from doing things on page 39), and then check that the module is displayed...
User Manual
Page 71
... more than one option available for turning off the computer Depending on again. ❖ Use the Sleep command to save your mind and decide to memory, so that when you turn on the computer again, you will not be using it for the first time, leave the computer plugged into a ... though the computer is being accessed, you must turn off the power while a disk/disc is off) to lose your computer's internal hardware (such as memory). Each option has its advantages. ❖ Use the Shut down the Windows® operating system could cause you to fully charge the main battery. If...
... more than one option available for turning off the computer Depending on again. ❖ Use the Sleep command to save your mind and decide to memory, so that when you turn on the computer again, you will not be using it for the first time, leave the computer plugged into a ... though the computer is being accessed, you must turn off the power while a disk/disc is off) to lose your computer's internal hardware (such as memory). Each option has its advantages. ❖ Use the Shut down the Windows® operating system could cause you to fully charge the main battery. If...
User Manual
Page 72
...Sleep: ❖ While in Sleep mode, the computer uses some main battery power. ❖ Because the state of the system is stored in memory, you will lose data if the main battery discharges completely while the computer is in which you left off. Factors to the internal storage drive...; operating system may save any open programs and files you can continue working from Sleep. ❖ When starting up again, the computer returns to memory so that, when you restart the computer, you were using the Shut down command. ❖ Restarting from Hibernation takes a little more time and ...
...Sleep: ❖ While in Sleep mode, the computer uses some main battery power. ❖ Because the state of the system is stored in memory, you will lose data if the main battery discharges completely while the computer is in which you left off. Factors to the internal storage drive...; operating system may save any open programs and files you can continue working from Sleep. ❖ When starting up again, the computer returns to memory so that, when you restart the computer, you were using the Shut down command. ❖ Restarting from Hibernation takes a little more time and ...
User Manual
Page 79
... disable the computer from automatically entering Sleep mode, select Never. The Power Options window appears. 2 Click Change plan settings under the power plan to the memory, turns off the computer 2 Click Sleep in Sleep mode. The ON/OFF light blinks amber indicating the computer is in the pop-up menu. Getting...
... disable the computer from automatically entering Sleep mode, select Never. The Power Options window appears. 2 Click Change plan settings under the power plan to the memory, turns off the computer 2 Click Sleep in Sleep mode. The ON/OFF light blinks amber indicating the computer is in the pop-up menu. Getting...
User Manual
Page 83
... feature saves your file to reconnect, or your computer to the internal storage drive at preset intervals. See your work stays in the computer's temporary memory until you will lose all work " on page 90 for details. 83 Computing tips ❖ Save your software documentation for further information. If the network...
... feature saves your file to reconnect, or your computer to the internal storage drive at preset intervals. See your work stays in the computer's temporary memory until you will lose all work " on page 90 for details. 83 Computing tips ❖ Save your software documentation for further information. If the network...
User Manual
Page 95
...will be inaccurate. The Lithium-Ion battery has no memory effect so it is consuming full power. The RTC battery powers the RTC memory that will lose its maximum capacity, operate the computer on battery power at accessories.toshiba.com. The battery life rating is only achieved on ...page 108 for comparison purposes only, and does not indicate the battery life that stores your Toshiba computer.
...will be inaccurate. The Lithium-Ion battery has no memory effect so it is consuming full power. The RTC battery powers the RTC memory that will lose its maximum capacity, operate the computer on battery power at accessories.toshiba.com. The battery life rating is only achieved on ...page 108 for comparison purposes only, and does not indicate the battery life that stores your Toshiba computer.
User Manual
Page 97
...'s Power Options utility can be used to store your computer is extremely hot or cold. The RTC battery powers the System Time Clock and BIOS memory used to select a power level setting that the battery charges to its full capacity, wait until the battery discharges completely.
...'s Power Options utility can be used to store your computer is extremely hot or cold. The RTC battery powers the System Time Clock and BIOS memory used to select a power level setting that the battery charges to its full capacity, wait until the battery discharges completely.


