

User Guide 1
Page 7
Although the initial emphasis is in Europe, Toshiba is intended to protect the quality of the environment and human health through the responsible use of natural resources and the adoption of electrical and electronic products put on the market in the Battery Directive (2006/66/EC), then the chemical symbols ...of -life strategies for lead (Pb), mercury (Hg) and/or cadmium (Cd) will appear below the crossed out wheeled bin symbol on the battery. For information on how to trade-in or recycle your local government for recovery and recycling. Please contact your product, visit www.reuse...
Although the initial emphasis is in Europe, Toshiba is intended to protect the quality of the environment and human health through the responsible use of natural resources and the adoption of electrical and electronic products put on the market in the Battery Directive (2006/66/EC), then the chemical symbols ...of -life strategies for lead (Pb), mercury (Hg) and/or cadmium (Cd) will appear below the crossed out wheeled bin symbol on the battery. For information on how to trade-in or recycle your local government for recovery and recycling. Please contact your product, visit www.reuse...

User Guide 1
Page 18
Contents Introduction 24 This guide 26 Safety icons 27 Other icons used 27 Your computer's features and specifications ....28 Other documentation 28 Service options 28 Chapter 1: Getting Started 29 Getting comfortable with your computer 29 Keeping yourself comfortable 30 Precautions 30 Important information on your computer's cooling fan 32 Setting up your computer 32 Connecting to a power source 33 Charging the main battery 35 Using the computer for the first time 36 Opening the display panel 36 Turning on the power 37 18
Contents Introduction 24 This guide 26 Safety icons 27 Other icons used 27 Your computer's features and specifications ....28 Other documentation 28 Service options 28 Chapter 1: Getting Started 29 Getting comfortable with your computer 29 Keeping yourself comfortable 30 Precautions 30 Important information on your computer's cooling fan 32 Setting up your computer 32 Connecting to a power source 33 Charging the main battery 35 Using the computer for the first time 36 Opening the display panel 36 Turning on the power 37 18
User Guide 1
Page 20
... 82 Restoring your work 83 Toshiba's online resources 83 Chapter 3: Mobile Computing 84 Toshiba's energy-saver design 84 Running the computer on battery power 84 Battery Notice 85 Power management 86 Using additional batteries 86 Charging batteries 86 Charging the main battery 87 Charging the RTC battery 87 Monitoring main battery power 88 Determining remaining battery power 90 What to...
... 82 Restoring your work 83 Toshiba's online resources 83 Chapter 3: Mobile Computing 84 Toshiba's energy-saver design 84 Running the computer on battery power 84 Battery Notice 85 Power management 86 Using additional batteries 86 Charging batteries 86 Charging the main battery 87 Charging the RTC battery 87 Monitoring main battery power 88 Determining remaining battery power 90 What to...
User Guide 1
Page 21
Contents 21 Changing the main battery 93 Removing the battery from the computer .........94 Inserting a charged battery 95 Taking care of your battery 96 Safety precautions 96 Maintaining your battery 97 Disposing of used batteries 98 Traveling tips 99 Chapter 4: Exploring Your Computer's Features 100 Exploring the desktop 100 Finding ... Using the Bridge Media Adapter Slot 109 Inserting memory media 110 Removing memory media 110 Chapter 5: Utilities 112 TOSHIBA Recovery Disc Creator 113 TOSHIBA Application Installer 113 TOSHIBA Password Utility 114 Deleting a user password 115
Contents 21 Changing the main battery 93 Removing the battery from the computer .........94 Inserting a charged battery 95 Taking care of your battery 96 Safety precautions 96 Maintaining your battery 97 Disposing of used batteries 98 Traveling tips 99 Chapter 4: Exploring Your Computer's Features 100 Exploring the desktop 100 Finding ... Using the Bridge Media Adapter Slot 109 Inserting memory media 110 Removing memory media 110 Chapter 5: Utilities 112 TOSHIBA Recovery Disc Creator 113 TOSHIBA Application Installer 113 TOSHIBA Password Utility 114 Deleting a user password 115
User Guide 1
Page 22
...Preset Power Profiles 121 Quickly creating a new power profile 121 Customizing a power profile 121 Mouse Utility 122 TOSHIBA Hardware Setup 123 TOSHIBA Zooming Utility 127 TOSHIBA Accessibility 128 Chapter 6: If Something Goes Wrong 129 Problems that are easy to fix 129 Problems when ... 136 Resolving hardware conflicts on your own .....136 Fixing a problem with Device Manager ...........137 Memory problems 139 Power and the batteries 139 Keyboard problems 141 Display problems 141 Disk, diskette, or storage drive problems........143 Sound system problems 145 Printer problems 146 ...
...Preset Power Profiles 121 Quickly creating a new power profile 121 Customizing a power profile 121 Mouse Utility 122 TOSHIBA Hardware Setup 123 TOSHIBA Zooming Utility 127 TOSHIBA Accessibility 128 Chapter 6: If Something Goes Wrong 129 Problems that are easy to fix 129 Problems when ... 136 Resolving hardware conflicts on your own .....136 Fixing a problem with Device Manager ...........137 Memory problems 139 Power and the batteries 139 Keyboard problems 141 Display problems 141 Disk, diskette, or storage drive problems........143 Sound system problems 145 Printer problems 146 ...

User Guide 1
Page 24
...174; compliant. If the model you leave this computer to meet the latest ENERGY STAR® guidelines for both AC power and battery modes. You can accompany you wherever you can check email, enjoy streaming music or video, make calls with the power management options... Welcome to a configuration that your computer will provide the most stable operating environment and optimum system performance for energy efficiency. With your Toshiba computer, your entertainment can wake the computer from Standby mode by pressing the power button. Your computer ships with VOIP (Voice Over IP...
...174; compliant. If the model you leave this computer to meet the latest ENERGY STAR® guidelines for both AC power and battery modes. You can accompany you wherever you can check email, enjoy streaming music or video, make calls with the power management options... Welcome to a configuration that your computer will provide the most stable operating environment and optimum system performance for energy efficiency. With your Toshiba computer, your entertainment can wake the computer from Standby mode by pressing the power button. Your computer ships with VOIP (Voice Over IP...
User Guide 1
Page 30
...such as air conditioner vents or heaters. ❖ Extreme heat, cold, or humidity. ❖ Liquids and corrosive chemicals. Keeping yourself comfortable The Toshiba Instruction Manual for Safety and Comfort, that are connected to the computer) or speakerphones. ❖ Rapid changes in damage or serious injury. If ...any part of the computer. Remove the battery pack. Do not turn on the power again until you have taken the computer to rain, water, seawater or moisture. Disconnect the AC...
...such as air conditioner vents or heaters. ❖ Extreme heat, cold, or humidity. ❖ Liquids and corrosive chemicals. Keeping yourself comfortable The Toshiba Instruction Manual for Safety and Comfort, that are connected to the computer) or speakerphones. ❖ Rapid changes in damage or serious injury. If ...any part of the computer. Remove the battery pack. Do not turn on the power again until you have taken the computer to rain, water, seawater or moisture. Disconnect the AC...
User Guide 1
Page 32
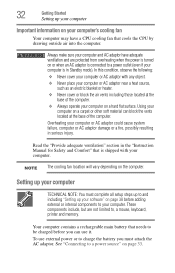
..., printer and memory. NOTE The cooling fan location will vary depending on a carpet or other soft material can use external power or to charge the battery you can block the vents located at the base of the computer. To use it. Using your computer on the computer. Overheating your computer Important... CPU by drawing outside air into the computer. Setting up your computer TECHNICAL NOTE: You must attach the AC adaptor. Your computer contains a rechargeable main battery that is turned on page 33.
..., printer and memory. NOTE The cooling fan location will vary depending on a carpet or other soft material can use external power or to charge the battery you can block the vents located at the base of the computer. To use it. Using your computer on the computer. Overheating your computer Important... CPU by drawing outside air into the computer. Setting up your computer TECHNICAL NOTE: You must attach the AC adaptor. Your computer contains a rechargeable main battery that is turned on page 33.

User Guide 1
Page 33
...resulting in serious injury. Getting Started Connecting to a power source 33 NOTE Please handle your computer), or use AC adaptors and battery chargers specified by TOSHIBA to avoid any damage caused by use of an incompatible adaptor or charger. Always confirm that may have been provided with your ...computer and the TOSHIBA Battery Charger (that the power plug (and extension cable plug if used) has been fully inserted into the socket, to the computer possibly...
...resulting in serious injury. Getting Started Connecting to a power source 33 NOTE Please handle your computer), or use AC adaptors and battery chargers specified by TOSHIBA to avoid any damage caused by use of an incompatible adaptor or charger. Always confirm that may have been provided with your ...computer and the TOSHIBA Battery Charger (that the power plug (and extension cable plug if used) has been fully inserted into the socket, to the computer possibly...

User Guide 1
Page 35
...you an indication of the power provided by the AC adaptor to recharge. To charge the battery, leave the computer plugged into the computer or AC outlet ❖ Flashes amber when the main battery charge is low and it is not plugged into an AC power source with the computer ... run applications, features, and devices. Disconnect the AC power cord/cable and remove the main battery pack. See "Changing the main battery" on replacing the main battery. Once the battery is charged for the first time, avoid leaving the computer plugged in the AC adaptor NOTE If the AC power light ...
...you an indication of the power provided by the AC adaptor to recharge. To charge the battery, leave the computer plugged into the computer or AC outlet ❖ Flashes amber when the main battery charge is low and it is not plugged into an AC power source with the computer ... run applications, features, and devices. Disconnect the AC power cord/cable and remove the main battery pack. See "Changing the main battery" on replacing the main battery. Once the battery is charged for the first time, avoid leaving the computer plugged in the AC adaptor NOTE If the AC power light ...
User Guide 1
Page 36
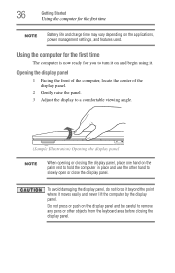
... the applications, power management settings, and features used. Using the computer for the first time The computer is now ready for the first time NOTE Battery life and charge time may vary depending on and begin using it moves easily and never lift the computer by the display panel. 36 Getting...
... the applications, power management settings, and features used. Using the computer for the first time The computer is now ready for the first time NOTE Battery life and charge time may vary depending on and begin using it moves easily and never lift the computer by the display panel. 36 Getting...

User Guide 1
Page 37
... The preinstalled operating system will load automatically. NOTE The power button is disabled when the display panel is operated on battery power, the screen will deteriorate. When you plan to use AC power rather than battery power) are properly connected and ready. 2 Check to increase the brightness of the screen while on... battery power. Turning on the power To turn on the computer: 1 Make sure any external devices (such as the AC adaptor, if you turn on the ...
... The preinstalled operating system will load automatically. NOTE The power button is disabled when the display panel is operated on battery power, the screen will deteriorate. When you plan to use AC power rather than battery power) are properly connected and ready. 2 Check to increase the brightness of the screen while on... battery power. Turning on the power To turn on the computer: 1 Make sure any external devices (such as the AC adaptor, if you turn on the ...

User Guide 1
Page 41
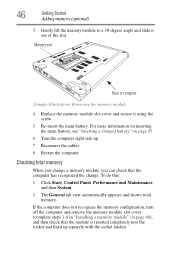
... (Sample Illustration) Locating the memory module slot cover For information on removing the main battery, see "Removing the battery from the computer" on , begin at step 1; otherwise, skip to locate the memory module slot cover. 5 Remove the main battery. The Turn off the computer. 3 Unplug and remove any cables connected to the computer...
... (Sample Illustration) Locating the memory module slot cover For information on removing the main battery, see "Removing the battery from the computer" on , begin at step 1; otherwise, skip to locate the memory module slot cover. 5 Remove the main battery. The Turn off the computer. 3 Unplug and remove any cables connected to the computer...

User Guide 1
Page 45
... slot cover. The computer could hang up when you turn it on page 46. Getting Started Adding memory (optional) 45 15 Re-insert the main battery. For more information on inserting the main...
... slot cover. The computer could hang up when you turn it on page 46. Getting Started Adding memory (optional) 45 15 Re-insert the main battery. For more information on inserting the main...
User Guide 1
Page 46
...Started Adding memory (optional) 3 Gently lift the memory module to a 30-degree angle and slide it using the screw. 5 Re-insert the main battery. If the computer does not recognize the memory configuration, turn off the computer and remove the memory module slot cover (complete steps 1-8 in "Installing ... module 4 Replace the memory module slot cover and secure it out of the slot. For more information on inserting the main battery, see "Inserting a charged battery" on page 40), and then check that the computer has recognized the change a memory module, you can check that the module...
...Started Adding memory (optional) 3 Gently lift the memory module to a 30-degree angle and slide it using the screw. 5 Re-insert the main battery. If the computer does not recognize the memory configuration, turn off the computer and remove the memory module slot cover (complete steps 1-8 in "Installing ... module 4 Replace the memory module slot cover and secure it out of the slot. For more information on inserting the main battery, see "Inserting a charged battery" on page 40), and then check that the computer has recognized the change a memory module, you can check that the module...

User Guide 1
Page 62
... could cause you to a domain server. ❖ If you left off . If you may be lost. It is a good idea to fully charge the main battery. Options for turning off the computer: Turn Off, Hibernate, and Standby. Make sure the system indicator panel's storage drive light and the drive-in progress...
... could cause you to a domain server. ❖ If you left off . If you may be lost. It is a good idea to fully charge the main battery. Options for turning off the computer: Turn Off, Hibernate, and Standby. Make sure the system indicator panel's storage drive light and the drive-in progress...

User Guide 1
Page 63
... being retrieved from the internal storage drive rather than from memory, restarting from Hibernation takes a little more time and consumes more main battery power than when restarting from where you left off. Factors to use and configure Hibernation mode see "Using and configuring Hibernation mode" ...on Standby. ❖ Restarting from Standby takes less time and may consume more main battery power to start up than restarting from turning off the computer or using Hibernation mode. ❖ When starting up again, the computer...
... being retrieved from the internal storage drive rather than from memory, restarting from Hibernation takes a little more time and consumes more main battery power than when restarting from where you left off. Factors to use and configure Hibernation mode see "Using and configuring Hibernation mode" ...on Standby. ❖ Restarting from Standby takes less time and may consume more main battery power to start up than restarting from turning off the computer or using Hibernation mode. ❖ When starting up again, the computer...

User Guide 1
Page 64
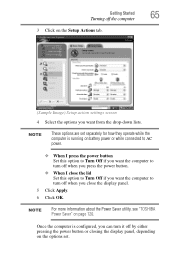
... Windows® dialog box 2 Click Turn Off. For information on page 68. The computer shuts down using the Standby command and the main battery discharges fully, your unsaved information will be lost. To use this method, you first need to save your work first. Be sure to activate... it using Standby, see "Using and configuring Standby mode" on using Toshiba's Power Saver utility. 1 Click Start, Control Panel, and then Performance and Maintenance. 2 Click the TOSHIBA Power Saver icon. Turn Off Follow these steps to turn off the computer when you power down...
... Windows® dialog box 2 Click Turn Off. For information on page 68. The computer shuts down using the Standby command and the main battery discharges fully, your unsaved information will be lost. To use this method, you first need to save your work first. Be sure to activate... it using Standby, see "Using and configuring Standby mode" on using Toshiba's Power Saver utility. 1 Click Start, Control Panel, and then Performance and Maintenance. 2 Click the TOSHIBA Power Saver icon. Turn Off Follow these steps to turn off the computer when you power down...
User Guide 1
Page 65
... pressing the power button or closing the display panel, depending on the options set separately for how they operate while the computer is running on battery power or while connected to AC power. ❖ When I press the power button Set this option to Turn Off if you want the computer to... turn off when you want from the drop-down lists. NOTE These options are set . NOTE For more information about the Power Saver utility, see "TOSHIBA Power Saver" on page 120.
... pressing the power button or closing the display panel, depending on the options set separately for how they operate while the computer is running on battery power or while connected to AC power. ❖ When I press the power button Set this option to Turn Off if you want the computer to... turn off when you want from the drop-down lists. NOTE These options are set . NOTE For more information about the Power Saver utility, see "TOSHIBA Power Saver" on page 120.

User Guide 1
Page 67
... Saver utility, see "TOSHIBA Power Saver" on the Hibernation options set separately for the options you want. The computer returns to go into Hibernation mode when you press the power button. ❖ When I close the display panel. 5 Click Apply. 6 Click OK. Once the computer is running on battery power or while connected...
... Saver utility, see "TOSHIBA Power Saver" on the Hibernation options set separately for the options you want. The computer returns to go into Hibernation mode when you press the power button. ❖ When I close the display panel. 5 Click Apply. 6 Click OK. Once the computer is running on battery power or while connected...


