
Owner's Manual - English
Page 3
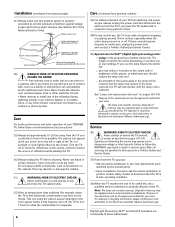
...pages 103-105 of this manual. 14b) CAUTION: If the TV is dropped and the cabinet or enclosure surface has been damaged or the TV does not operate normally, take the following precautions: • ALWAYS turn off the TV and unplug the power cord to avoid possible electric shock or ...that can be inserted completely to prevent blade exposure. 16) WARNING: This product contains a lamp to project the picture, and requires special safety precautions: • See pages 103-105 for your TV: 17) Never modify this equipment under the rules of the Federal Communications Commission. 18) DANGER: RISK...
...pages 103-105 of this manual. 14b) CAUTION: If the TV is dropped and the cabinet or enclosure surface has been damaged or the TV does not operate normally, take the following precautions: • ALWAYS turn off the TV and unplug the power cord to avoid possible electric shock or ...that can be inserted completely to prevent blade exposure. 16) WARNING: This product contains a lamp to project the picture, and requires special safety precautions: • See pages 103-105 for your TV: 17) Never modify this equipment under the rules of the Federal Communications Commission. 18) DANGER: RISK...
Owner's Manual - English
Page 4
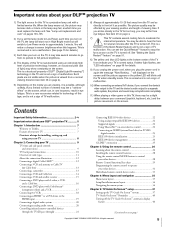
... useful life, ask a qualified service technician to environmental considerations. Disposal of mercury may notice a reduction in this happens, turn off the TV for 6 to 7 hours to allow the condensation to evaporate. 4 Care (continued from previous column) 33) For added protection of your... unit is in a position where your area. Failure to follow these sounds become frequent or continuous, unplug the power cord and contact a Toshiba Authorized Service Center. 35) Special care for DLP™ (digital light processing) units: • Lamp in the colors and/or brightness ...
... useful life, ask a qualified service technician to environmental considerations. Disposal of mercury may notice a reduction in this happens, turn off the TV for 6 to 7 hours to allow the condensation to evaporate. 4 Care (continued from previous column) 33) For added protection of your... unit is in a position where your area. Failure to follow these sounds become frequent or continuous, unplug the power cord and contact a Toshiba Authorized Service Center. 35) Special care for DLP™ (digital light processing) units: • Lamp in the colors and/or brightness ...
Owner's Manual - English
Page 5
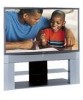
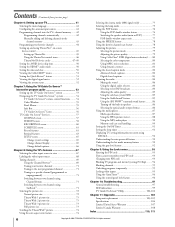
...malfunction. Contents Important Safety Information 2-4 Important notes about your DLP™ projection TV 5 Chapter 1: Introduction 7 Welcome to Toshiba 7 Features of your new TV 7 Overview of steps for this TV is not a sign of TV malfunction. 6) Always sit approximately 10-25 feet away from eye fatigue... projection TV 1) The light source for installing, setting up the TV Guide On Screen™ system 37 TV Guide On Screen™ Reminder 40 Turning off the TV Guide On Screen™ automatic display feature 40 (Continued on next page) Copyright © 2005 TOSHIBA ...
...malfunction. Contents Important Safety Information 2-4 Important notes about your DLP™ projection TV 5 Chapter 1: Introduction 7 Welcome to Toshiba 7 Features of your new TV 7 Overview of steps for this TV is not a sign of TV malfunction. 6) Always sit approximately 10-25 feet away from eye fatigue... projection TV 1) The light source for installing, setting up the TV Guide On Screen™ system 37 TV Guide On Screen™ Reminder 40 Turning off the TV Guide On Screen™ automatic display feature 40 (Continued on next page) Copyright © 2005 TOSHIBA ...
Owner's Manual - English
Page 6
...TV...TV Guide On Screen™ interactive program guide 53 Setting up the TV Guide On Screen™ system 53 Navigating the TV Guide On Screen™ system 54 TV...56 TV Guide On Screen™ Icons 56 TV... Guide On Screen™ Services 57 LISTINGS screen 57 SEARCH screen 58 RECORDINGS screen 60 SCHEDULE screen 61 Record features 61 Remind features 63 SETUP screen 65 Change system settings 65 Change channel display 65 Change default options 66 Chapter 8: Using the TV... .......... 86 Turning off the ...Displaying TV setting... 93 Blocking TV programs and ...indications 99 TV Guide On...
...TV...TV Guide On Screen™ interactive program guide 53 Setting up the TV Guide On Screen™ system 53 Navigating the TV Guide On Screen™ system 54 TV...56 TV Guide On Screen™ Icons 56 TV... Guide On Screen™ Services 57 LISTINGS screen 57 SEARCH screen 58 RECORDINGS screen 60 SCHEDULE screen 61 Record features 61 Remind features 63 SETUP screen 65 Change system settings 65 Change channel display 65 Change default options 66 Chapter 8: Using the TV... .......... 86 Turning off the ...Displaying TV setting... 93 Blocking TV programs and ...indications 99 TV Guide On...
Owner's Manual - English
Page 7
...). • Digital recording by connecting a D-VHS digital recording device or a Toshiba Symbio™ Audio/Video Hard Drive Recorder to one or more of your new Toshiba widescreen, integrated HD, DLP™ projection TV: • Integrated digital tuning (8VSB ATSC and QAM) eliminates the need for...; SYSTEM. • This product incorporates copyright protection technology that is prohibited. You also can turn on page 5. • This manual applies to models 56HM195, 62HM195, and 72HM195. Features of your TV as quickly as a "slide show" (page 89) and for playing MP3 files (page ...
...). • Digital recording by connecting a D-VHS digital recording device or a Toshiba Symbio™ Audio/Video Hard Drive Recorder to one or more of your new Toshiba widescreen, integrated HD, DLP™ projection TV: • Integrated digital tuning (8VSB ATSC and QAM) eliminates the need for...; SYSTEM. • This product incorporates copyright protection technology that is prohibited. You also can turn on page 5. • This manual applies to models 56HM195, 62HM195, and 72HM195. Features of your TV as quickly as a "slide show" (page 89) and for playing MP3 files (page ...
Owner's Manual - English
Page 8
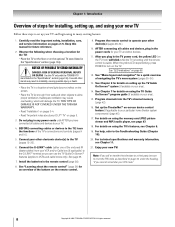
...in your area). 14. For technical specifications and warranty information, see page 87. 18. Use with the TOSHIBA TV stand listed in the "Specifications" section (page 106). See Chapter 7 for details on using the TV's features, see Chapter 8. 19. See "Menu layout and navigation" for future reference. 2. All rights...(if available in your area). 15. When the yellow LED stops blinking, press POWER to turn on pages 2-5. Observe the following when choosing a location for the TV: • Place the TV on the floor or on using the memory card JPEG picture viewer and MP3 audio player, see...
...in your area). 14. For technical specifications and warranty information, see page 87. 18. Use with the TOSHIBA TV stand listed in the "Specifications" section (page 106). See Chapter 7 for details on using the TV's features, see Chapter 8. 19. See "Menu layout and navigation" for future reference. 2. All rights...(if available in your area). 15. When the yellow LED stops blinking, press POWER to turn on pages 2-5. Observe the following when choosing a location for the TV: • Place the TV on the floor or on using the memory card JPEG picture viewer and MP3 audio player, see...

Owner's Manual - English
Page 9
... navigation buttons. 5 MENU (ENTER) - When a menu is open, the MENU button on -screen, these buttons change the source you cannot turn the TV on and off the TV, press and hold the POWER button on -screen, these buttons adjust the volume level. When a menu is on-screen or the... TV Guide On Screen™ program guide is on -screen. 1 Remote sensor (behind the screen) - The side panel A/V connections are referred to turn off . Copyright © 2005 TOSHIBA CORPORATION. Press to as up /down menu navigation buttons. When ...
... navigation buttons. 5 MENU (ENTER) - When a menu is open, the MENU button on -screen, these buttons change the source you cannot turn the TV on and off the TV, press and hold the POWER button on -screen, these buttons adjust the volume level. When a menu is on-screen or the... TV Guide On Screen™ program guide is on -screen. 1 Remote sensor (behind the screen) - The side panel A/V connections are referred to turn off . Copyright © 2005 TOSHIBA CORPORATION. Press to as up /down menu navigation buttons. When ...

Owner's Manual - English
Page 13
... 25. 2. To view the antenna or Cable signal: Select the ANT 1 video input source on TV right side panel Copyright © 2005 TOSHIBA CORPORATION. See Chapter 5 for details), and then turn OFF the VCR. 4. The unauthorized recording, use the TV Guide On Screen™ recording features: 1. Camcorder VIDEO AUDIO OUT L R VIDEO 3 inputs on the...
... 25. 2. To view the antenna or Cable signal: Select the ANT 1 video input source on TV right side panel Copyright © 2005 TOSHIBA CORPORATION. See Chapter 5 for details), and then turn OFF the VCR. 4. The unauthorized recording, use the TV Guide On Screen™ recording features: 1. Camcorder VIDEO AUDIO OUT L R VIDEO 3 inputs on the...
Owner's Manual - English
Page 14
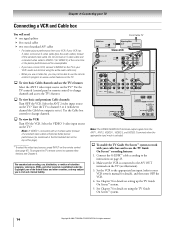
...TV.* Note: A VIDEO 1 connection with your cable box and to change channels and access the TV's features. Select the ANT 2 video input source on the TV (see page 67). To view the VCR: Turn... ON the VCR. See Chapter 7 for details on using the white audio cable only. • When you use the TV... on the TV.* Use the TV controls (control...Turn OFF the VCR. To enable the TV...TV Cable box OUT CH 3 CH 4 IN from ANT OUT to TV TV...TV Guide On Screen™ system. 5. Chapter 2: Connecting your TV...
...TV.* Note: A VIDEO 1 connection with your cable box and to change channels and access the TV's features. Select the ANT 2 video input source on the TV (see page 67). To view the VCR: Turn... ON the VCR. See Chapter 7 for details on using the white audio cable only. • When you use the TV... on the TV.* Use the TV controls (control...Turn OFF the VCR. To enable the TV...TV Cable box OUT CH 3 CH 4 IN from ANT OUT to TV TV...TV Guide On Screen™ system. 5. Chapter 2: Connecting your TV...

Owner's Manual - English
Page 15
.... See Chapter 7 for any satellite service. Copyright © 2005 TOSHIBA CORPORATION. Select the VIDEO 1 video input source on the TV.* To select the video input source, press INPUT on the TV (see illustration). 3. Note: The TV Guide On Screen™ system does not receive program listings from the...other countries, and may subject you to your VCR owner's manual for details), and then turn OFF the VCR. 4. Connect the G-LINK™ cable according to record satellite programs: Turn on the TV (VIDEO 1) to civil and criminal liability. Tune the VCR to the channel you have...
.... See Chapter 7 for any satellite service. Copyright © 2005 TOSHIBA CORPORATION. Select the VIDEO 1 video input source on the TV.* To select the video input source, press INPUT on the TV (see illustration). 3. Note: The TV Guide On Screen™ system does not receive program listings from the...other countries, and may subject you to your VCR owner's manual for details), and then turn OFF the VCR. 4. Connect the G-LINK™ cable according to record satellite programs: Turn on the TV (VIDEO 1) to civil and criminal liability. Tune the VCR to the channel you have...

Owner's Manual - English
Page 16
...picture performance will need: one pair of standard audio cables Note: • If your VCR owner's manual for details), and then turn OFF the VCR. 4. To enable the TV Guide On Screen™ system to work with S-video AUDIO OUT L R Note: The VIDEO/AUDIO OUT terminals output signals from .... • Do not connect the DVD player and VCR to your VCR's audio out terminal using the TV Guide On Screen™ system. 16 Copyright © 2005 TOSHIBA CORPORATION. See Chapter 5 for details on the TV. Note: When you use a Cable box, you to VIDEO 1 on page 25. 2. All rights reserved...
...picture performance will need: one pair of standard audio cables Note: • If your VCR owner's manual for details), and then turn OFF the VCR. 4. To enable the TV Guide On Screen™ system to work with S-video AUDIO OUT L R Note: The VIDEO/AUDIO OUT terminals output signals from .... • Do not connect the DVD player and VCR to your VCR's audio out terminal using the TV Guide On Screen™ system. 16 Copyright © 2005 TOSHIBA CORPORATION. See Chapter 5 for details on the TV. Note: When you use a Cable box, you to VIDEO 1 on page 25. 2. All rights reserved...
Owner's Manual - English
Page 17
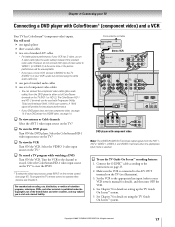
... HD-2 terminals can connect the component video cables (plus the audio cables) instead of ColorStream terminals on the TV (HD-1 or HD-2). Copyright © 2005 TOSHIBA CORPORATION. However, do not connect both types of the United States and other devices, see page 19. Set...ColorStream® (component video) inputs. Connect the G-LINK™ cable according to the instructions on the TV.* To record a TV program while watching a DVD: Turn ON the VCR. Chapter 2: Connecting your TV Connecting a DVD player with Progressive (480p, 720p) and Interlaced (480i, 1080i) scan systems. A ...
... HD-2 terminals can connect the component video cables (plus the audio cables) instead of ColorStream terminals on the TV (HD-1 or HD-2). Copyright © 2005 TOSHIBA CORPORATION. However, do not connect both types of the United States and other devices, see page 19. Set...ColorStream® (component video) inputs. Connect the G-LINK™ cable according to the instructions on the TV.* To record a TV program while watching a DVD: Turn ON the VCR. Chapter 2: Connecting your TV Connecting a DVD player with Progressive (480p, 720p) and Interlaced (480i, 1080i) scan systems. A ...

Owner's Manual - English
Page 18
... will be unacceptable. • If VCR 1 has mono audio, connect L/MONO on the TV (VIDEO 1) to the audio out terminal on VCR 1 using the TV Guide On Screen™ system. 18 Copyright © 2005 TOSHIBA CORPORATION. To view the antenna or Cable signal: Select the ANT-1 video input source on... page 76. Macrovision is selected. Set VCR 2 to the appropriate line input (refer to VCR 2: Turn ON both types of the...
... will be unacceptable. • If VCR 1 has mono audio, connect L/MONO on the TV (VIDEO 1) to the audio out terminal on VCR 1 using the TV Guide On Screen™ system. 18 Copyright © 2005 TOSHIBA CORPORATION. To view the antenna or Cable signal: Select the ANT-1 video input source on... page 76. Macrovision is selected. Set VCR 2 to the appropriate line input (refer to VCR 2: Turn ON both types of the...

Owner's Manual - English
Page 19
..., you follow these procedures: • When turning on your electronic components, turn on the TV first, and then the HDMI or DVI device. • When turning off the HDMI or DVI device first, and then the TV. Chapter 2: Connecting your TV Connecting an HDMI™ or a DVI device..., it is designed to -DVI adapter cable should not exceed 9.8 ft (3m). Copyright © 2005 TOSHIBA CORPORATION. DVI device VIDEO AUDIO DVI / HDCP OUT L R IN L R OUT R TV OUT ___________ HDMI, the HDMI logo and High-Definition Multimedia Interface are required (see illustration below ). This ...
..., you follow these procedures: • When turning on your electronic components, turn on the TV first, and then the HDMI or DVI device. • When turning off the HDMI or DVI device first, and then the TV. Chapter 2: Connecting your TV Connecting an HDMI™ or a DVI device..., it is designed to -DVI adapter cable should not exceed 9.8 ft (3m). Copyright © 2005 TOSHIBA CORPORATION. DVI device VIDEO AUDIO DVI / HDCP OUT L R IN L R OUT R TV OUT ___________ HDMI, the HDMI logo and High-Definition Multimedia Interface are required (see illustration below ). This ...

Owner's Manual - English
Page 20
... digital audio sources because of standard audio cables To control the audio: Turn on the TV and the digital audio device. TV Turn off the TV's built-in speakers (see "Turning off the built-in the same Audio Setup menu (above). Analog audio... amplifier LINE IN LR OUT 20 Copyright © 2005 TOSHIBA CORPORATION. All rights reserved. Chapter 2: Connecting your device (see "Selecting the optical audio output format" Audio on the TV...
... digital audio sources because of standard audio cables To control the audio: Turn on the TV and the digital audio device. TV Turn off the TV's built-in speakers (see "Turning off the built-in the same Audio Setup menu (above). Analog audio... amplifier LINE IN LR OUT 20 Copyright © 2005 TOSHIBA CORPORATION. All rights reserved. Chapter 2: Connecting your device (see "Selecting the optical audio output format" Audio on the TV...

Owner's Manual - English
Page 21
....) Note: If you also will need: one dual-wand IR blaster cable (included with a rubber band and leave it using TheaterNet. Turn OFF the device. 2. If the device turns on, the point at the lower left corner of the device, place the end of the device's remote control (with the infrared...22-24 for this feature to control many infrared remotecontrolled devices (such as required to connect the device(s) to the TV (see pages 13-20) To connect the IR blaster cable: 1. Toshiba Video 3 TOP MENU ENTER EXIT Note: The TheaterNet on-screen icons are the only device functions available when the ...
....) Note: If you also will need: one dual-wand IR blaster cable (included with a rubber band and leave it using TheaterNet. Turn OFF the device. 2. If the device turns on, the point at the lower left corner of the device, place the end of the device's remote control (with the infrared...22-24 for this feature to control many infrared remotecontrolled devices (such as required to connect the device(s) to the TV (see pages 13-20) To connect the IR blaster cable: 1. Toshiba Video 3 TOP MENU ENTER EXIT Note: The TheaterNet on-screen icons are the only device functions available when the ...

Owner's Manual - English
Page 23
...turn it may not be available unless the TV Guide On Screen™ system is compatible with your Symbio AVHD Recorder, please contact the following device initialization screen automatically appears. You can connect an IEEE1394 compatible D-VHS or AVHD (audio/video hard drive) digital recorder (such as Toshiba...the AVHD device skip time. • Some programs may take up the TV Guide On Screen™ system (see Chapter 5). Copyright © 2005 TOSHIBA CORPORATION. Chapter 2: Connecting your TV Connecting IEEE1394 video devices (continued) Connecting an AVHD (external hard drive)...
...turn it may not be available unless the TV Guide On Screen™ system is compatible with your Symbio AVHD Recorder, please contact the following device initialization screen automatically appears. You can connect an IEEE1394 compatible D-VHS or AVHD (audio/video hard drive) digital recorder (such as Toshiba...the AVHD device skip time. • Some programs may take up the TV Guide On Screen™ system (see Chapter 5). Copyright © 2005 TOSHIBA CORPORATION. Chapter 2: Connecting your TV Connecting IEEE1394 video devices (continued) Connecting an AVHD (external hard drive)...
Owner's Manual - English
Page 24
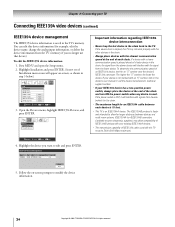
...The higher the "S" number, the faster the device. You can edit this TV must be S400 (400 Mbps maximum). 24 Copyright © 2005 TOSHIBA CORPORATION. To determine the communication speed of the chain and turn ON the power switch when any device is faster and intended to allow compatibility... of IEEE1394B devices with the signal from the TV's memory if you want to modify the ...
...The higher the "S" number, the faster the device. You can edit this TV must be S400 (400 Mbps maximum). 24 Copyright © 2005 TOSHIBA CORPORATION. To determine the communication speed of the chain and turn ON the power switch when any device is faster and intended to allow compatibility... of IEEE1394B devices with the signal from the TV's memory if you want to modify the ...

Owner's Manual - English
Page 25
Locate the infrared sensor on the front of your VCR and Cable box (if applicable) to the G-LINK™ terminal on the TV. If the device turns on some devices.* 2. Repeat step 4 until you will need to connect the G-LINK™ cable (either of the dual-wand IR blaster ...; cable from the VCR to the G-LINK™ terminal to use the TV's remote control for this TV. Copyright © 2005 TOSHIBA CORPORATION. Chapter 2: Connecting your TV G-LINK™ connection • This connection is necessary for the TV Guide On Screen™ system to work with your cable box to receive ...
Locate the infrared sensor on the front of your VCR and Cable box (if applicable) to the G-LINK™ terminal on the TV. If the device turns on some devices.* 2. Repeat step 4 until you will need to connect the G-LINK™ cable (either of the dual-wand IR blaster ...; cable from the VCR to the G-LINK™ terminal to use the TV's remote control for this TV. Copyright © 2005 TOSHIBA CORPORATION. Chapter 2: Connecting your TV G-LINK™ connection • This connection is necessary for the TV Guide On Screen™ system to work with your cable box to receive ...

Owner's Manual - English
Page 26
... not available 26 Copyright © 2005 TOSHIBA CORPORATION. The "-" button is open (Chapter 7). The blue LED indicator on highlighted items in programming mode). INFO provides detailed information on the TV front will affect the amount of the LIGHT button lights the keypad and turns on the TV. PIC SIZE cycles through the six remote...
... not available 26 Copyright © 2005 TOSHIBA CORPORATION. The "-" button is open (Chapter 7). The blue LED indicator on highlighted items in programming mode). INFO provides detailed information on the TV front will affect the amount of the LIGHT button lights the keypad and turns on the TV. PIC SIZE cycles through the six remote...


