
User Manual
Page 1
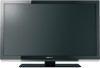
...with your TV. Note: To display a High Definition picture, the TV must be receiving a High Definition signal (...Definition LCD Television HIGH-DEFINITION TELEVISION 40SL412U 46SL412U 55SL412U 55S41U Foran overview of your Toshiba dealer about this TV. Model number: Serial number: For... details, please contact your TV antenna installer, cable provider, or satellite provider. © 2011 TOSHIBA CORPORATION All Rights Reserved Owner's Record The model number and serial number are on the back of steps for setting...
...with your TV. Note: To display a High Definition picture, the TV must be receiving a High Definition signal (...Definition LCD Television HIGH-DEFINITION TELEVISION 40SL412U 46SL412U 55SL412U 55S41U Foran overview of your Toshiba dealer about this TV. Model number: Serial number: For... details, please contact your TV antenna installer, cable provider, or satellite provider. © 2011 TOSHIBA CORPORATION All Rights Reserved Owner's Record The model number and serial number are on the back of steps for setting...

User Manual
Page 7
...This device may cause undesired operation. To return to [Home] mode settings, select [Standard] picture mode. [Standard] mode is displayed for a long period of time. therefore, Toshiba is not responsible for perceived issues resulting from these rules is viewed ... ENERGY STAR qualification. ENERGY STAR® qualified TV. Changing Picture Settings may cause harmful interference to radio communications. FCC Declaration of Conformity Compliance Statement (Part 15): Toshiba 40SL412U, 46SL412U, 55SL412U, and 55S41U Television models comply with the limits for a...
...This device may cause undesired operation. To return to [Home] mode settings, select [Standard] picture mode. [Standard] mode is displayed for a long period of time. therefore, Toshiba is not responsible for perceived issues resulting from these rules is viewed ... ENERGY STAR qualification. ENERGY STAR® qualified TV. Changing Picture Settings may cause harmful interference to radio communications. FCC Declaration of Conformity Compliance Statement (Part 15): Toshiba 40SL412U, 46SL412U, 55SL412U, and 55S41U Television models comply with the limits for a...
User Manual
Page 9
... the TV's advanced features 51 Using the advanced picture settings features 51 Using Dynamic Contrast 51 Using the static gamma feature 51 Selecting the color temperature 51 Using the ClearFrame™ feature (For 46SL412U, 55SL412U, and 55S41U 52 Using the Film Stabilization feature (For 46SL412U, 55SL412U, and 55S41U 52 Using CableClear® digital noise... 56 Specifications 56 Acceptable signal formats for PC IN and HDMI terminals......57 Limited United States Warranty for LCD Televisions 58 Limited Canadian Warranty for Toshiba Brand Flat Panel Televisions 59 9
... the TV's advanced features 51 Using the advanced picture settings features 51 Using Dynamic Contrast 51 Using the static gamma feature 51 Selecting the color temperature 51 Using the ClearFrame™ feature (For 46SL412U, 55SL412U, and 55S41U 52 Using the Film Stabilization feature (For 46SL412U, 55SL412U, and 55S41U 52 Using CableClear® digital noise... 56 Specifications 56 Acceptable signal formats for PC IN and HDMI terminals......57 Limited United States Warranty for LCD Televisions 58 Limited Canadian Warranty for Toshiba Brand Flat Panel Televisions 59 9
User Manual
Page 10
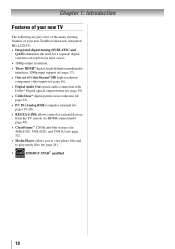
...exciting features of your new Toshiba widescreen, integrated HD, LCD TV: • Integrated digital tuning (8VSB ATSC and QAM) eliminates the need for a separate digital converter set-top box (in most cases...connection with Dolby® Digital optical output format ( page 39). • CableClear® digital picture noise reduction ( page 52). • PC IN (Analog RGB) computer terminal ( pages...( page 48). • ClearFrame™ 120 Hz anti-blur feature (for 46SL412U, 55SL412U, and 55S41U) ( page 52). • Media Player allows you to view photo files...
...exciting features of your new Toshiba widescreen, integrated HD, LCD TV: • Integrated digital tuning (8VSB ATSC and QAM) eliminates the need for a separate digital converter set-top box (in most cases...connection with Dolby® Digital optical output format ( page 39). • CableClear® digital picture noise reduction ( page 52). • PC IN (Analog RGB) computer terminal ( pages...( page 48). • ClearFrame™ 120 Hz anti-blur feature (for 46SL412U, 55SL412U, and 55S41U) ( page 52). • Media Player allows you to view photo files...
User Manual
Page 14
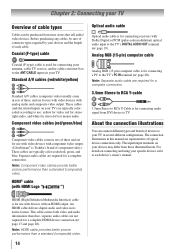
...is used for stereo left (or mono) audio. The connection illustrations in sets of three, and are not required for a complete connection. This cable carries both video and audio information; Note: HDMI cable provides better picture performance than a standard (composite) video. These cables (and the related... for stereo right audio, and white for connecting your antenna, cable TV service, and/or cable converter box to RCA Y-Cable is Toshiba's brand of component video.) These cables are representative of three and are required for a complete HDMI device connection ( page 17 ...
...is used for stereo left (or mono) audio. The connection illustrations in sets of three, and are not required for a complete connection. This cable carries both video and audio information; Note: HDMI cable provides better picture performance than a standard (composite) video. These cables (and the related... for stereo right audio, and white for connecting your antenna, cable TV service, and/or cable converter box to RCA Y-Cable is Toshiba's brand of component video.) These cables are representative of three and are required for a complete HDMI device connection ( page 17 ...
User Manual
Page 20
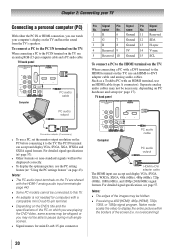
Such as a Toshiba PC with an HDMI terminal, use an HDMI-to this TV. •• An ...cable. name Pin Signal No. TV back panel Conversion adapter (if necessary) • To use the PC setting feature ( "Using the PC settings feature" on PC hardware and setup ( page 17). For detailed signal specifications, see page 57. TV ...). • Other formats or non-standard signals will not be displayed correctly. • To display the optimum picture, use a PC, set the monitor output resolution on the PC before connecting it to the PC IN terminal on which you are playing ...
Such as a Toshiba PC with an HDMI terminal, use an HDMI-to this TV. •• An ...cable. name Pin Signal No. TV back panel Conversion adapter (if necessary) • To use the PC setting feature ( "Using the PC settings feature" on PC hardware and setup ( page 17). For detailed signal specifications, see page 57. TV ...). • Other formats or non-standard signals will not be displayed correctly. • To display the optimum picture, use a PC, set the monitor output resolution on the PC before connecting it to the PC IN terminal on which you are playing ...
User Manual
Page 23
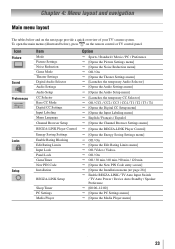
...of your TV's menu system. Icon Picture Sound Preferences Locks Setup Item Mode Picture Settings Noise Reduction Game Mode Theater Settings Digital Audio Selector Audio Settings Audio Setup CC Selector Base CC Mode Digital CC Settings Input Labeling Menu Language Channel Browser Setup... / Movie / PC / Preference [Opens the Picture Settings menu] [Opens the Noise Reduction menu] Off / On [Opens the Theater Settings menu] [Launches the temporary Audio Selector] [Opens the Audio Settings menu] [Opens the Audio Setup menu] ...
...of your TV's menu system. Icon Picture Sound Preferences Locks Setup Item Mode Picture Settings Noise Reduction Game Mode Theater Settings Digital Audio Selector Audio Settings Audio Setup CC Selector Base CC Mode Digital CC Settings Input Labeling Menu Language Channel Browser Setup... / Movie / PC / Preference [Opens the Picture Settings menu] [Opens the Noise Reduction menu] Off / On [Opens the Theater Settings menu] [Launches the temporary Audio Selector] [Opens the Audio Settings menu] [Opens the Audio Setup menu] ...

User Manual
Page 33
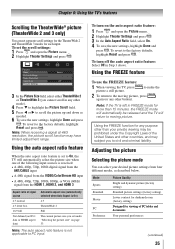
... looks best to the button. 3無 You can do one of picture sizes - Using these functions to select the desired picture size setting. 3無 Highlight Done and press . To view the hidden edges, either scroll the picture (TheaterWide 2 and 3 only) or try viewing the program in the... Theater Settings menu. 2無 Press or to change the picture size (i.e., changing the height/ width ratio) for each input on the receiving...
... looks best to the button. 3無 You can do one of picture sizes - Using these functions to select the desired picture size setting. 3無 Highlight Done and press . To view the hidden edges, either scroll the picture (TheaterWide 2 and 3 only) or try viewing the program in the... Theater Settings menu. 2無 Press or to change the picture size (i.e., changing the height/ width ratio) for each input on the receiving...
User Manual
Page 35
... again (or any other countries, and may have limited adjustment range. Using the FREEZE function for more than your desired picture settings from the HDMI 1, HDMI 2, and HDMI 3 Aspect ratio of signal source 4:3 normal 4:3 letter box 16:9 full Not... liability. to make the 2無 To return to the moving picture. Mode Sports Standard Movie PC Preference Picture Quality Bright and dynamic picture (factory setting) Standard picture settings (factory setting) Lower contrast for darkened room (factory setting) Designed for each input. Using the auto aspect ratio feature When...
... again (or any other countries, and may have limited adjustment range. Using the FREEZE function for more than your desired picture settings from the HDMI 1, HDMI 2, and HDMI 3 Aspect ratio of signal source 4:3 normal 4:3 letter box 16:9 full Not... liability. to make the 2無 To return to the moving picture. Mode Sports Standard Movie PC Preference Picture Quality Bright and dynamic picture (factory setting) Standard picture settings (factory setting) Lower contrast for darkened room (factory setting) Designed for each input. Using the auto aspect ratio feature When...

User Manual
Page 36
... videos that you began adjusting the picture settings from, highlight Reset and press . Adjusting the picture quality You can use any of darkness. To select the picture mode using the menu system: 1無 Press and open the Picture menu. 2無 Highlight Picture Settings and press . 3無 Press... or to select the picture quality you prefer and press . ** DynaLight This...
... videos that you began adjusting the picture settings from, highlight Reset and press . Adjusting the picture quality You can use any of darkness. To select the picture mode using the menu system: 1無 Press and open the Picture menu. 2無 Highlight Picture Settings and press . 3無 Press... or to select the picture quality you prefer and press . ** DynaLight This...
User Manual
Page 42
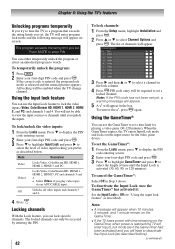
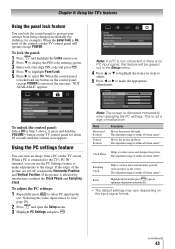
...1 minute remain on the GameTimer. ••If the TV loses power with time remaining on the GameTimer, when power is released and the normal picture appears. Push 'MUTE' to deactivate the Input Lock (as described). Off Unlocks all video inputs and channels 3 and 4. 4無 Press . Using... the GameTimer® You can either temporarily unlock the program or select an unlocked program to watch. To set the GameTimer®: 1無 From the Locks menu, press to display the PIN code entering screen. 2無 Enter your four-digit PIN...
...1 minute remain on the GameTimer. ••If the TV loses power with time remaining on the GameTimer, when power is released and the normal picture appears. Push 'MUTE' to deactivate the Input Lock (as described). Off Unlocks all video inputs and channels 3 and 4. 4無 Press . Using... the GameTimer® You can either temporarily unlock the program or select an unlocked program to watch. To set the GameTimer®: 1無 From the Locks menu, press to display the PIN code entering screen. 2無 Enter your four-digit PIN...
User Manual
Page 43
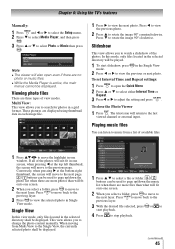
... Press and highlight the Locks menu icon. 2無 Press to display the PIN code entering screen. 3無 Enter your settings from center.* Sampling Clock Reset Helps to reduce noise and sharpen the picture. button on the input signal format. (continued) 43 The adjustment range is On, none of malfunction. If the... The adjustment range is no PC input signal, this item then press to select On. When a PC is disrupted momentarily when adjusting the PC settings. If the edges of the picture are cut off, readjust the Horizontal Position and Vertical Position.
... Press and highlight the Locks menu icon. 2無 Press to display the PIN code entering screen. 3無 Enter your settings from center.* Sampling Clock Reset Helps to reduce noise and sharpen the picture. button on the input signal format. (continued) 43 The adjustment range is On, none of malfunction. If the... The adjustment range is no PC input signal, this item then press to select On. When a PC is disrupted momentarily when adjusting the PC settings. If the edges of the picture are cut off, readjust the Horizontal Position and Vertical Position.
User Manual
Page 45
... move to the next layer. Single View In this mode, only files located in the selected directory will not fit in a grid format. These pictures are three types of the photos. If all of available files. Press to move back to the previous layer. 3無 Press to search for...the screen will move to the next page. / buttons can be displayed. Press to rotate the image 90° counterclockwise. To set Interval Time and Repeat settings: 1無 Press to open even if there are more photos than what will fit onto one screen. 2無 When you to page up...
... move to the next layer. Single View In this mode, only files located in the selected directory will not fit in a grid format. These pictures are three types of the photos. If all of available files. Press to move back to the previous layer. 3無 Press to search for...the screen will move to the next page. / buttons can be displayed. Press to rotate the image 90° counterclockwise. To set Interval Time and Repeat settings: 1無 Press to open even if there are more photos than what will fit onto one screen. 2無 When you to page up...
User Manual
Page 46
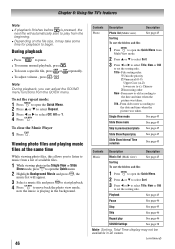
...the Quick Menu. 2無 Press or to select Sort. 3無 Press or to select Title, New or Old to set the repeat mode: 1無 Press to open the Quick Menu. 2無 Press or to select Repeat. 3無 Press or &#...61553; to select Sort. 3無 Press or to select Title, New or Old to set the sorting rule. Old--From old to new according to the date and time when the picture was taken. Title--File sorting rules: 1 Unicode priority 2 Numerical (0-9) Upper Case (A-Z) lowercase (a-z), Chinese 3 Increasing...
...the Quick Menu. 2無 Press or to select Sort. 3無 Press or to select Title, New or Old to set the repeat mode: 1無 Press to open the Quick Menu. 2無 Press or to select Repeat. 3無 Press or &#...61553; to select Sort. 3無 Press or to select Title, New or Old to set the sorting rule. Old--From old to new according to the date and time when the picture was taken. Title--File sorting rules: 1 Unicode priority 2 Numerical (0-9) Upper Case (A-Z) lowercase (a-z), Chinese 3 Increasing...
User Manual
Page 48
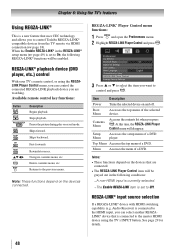
...page 49) is a new feature that uses CEC technology and allows you to control Toshiba REGZA-LINK® compatible devices from the TV remote via HDMI connection ( page ...• The REGZA-LINK Player Control item will disappear. Stops playback. Pauses the picture during play or record mode. Contents Menu Accesses the contents list when you want ...a DVD. Available remote control key functions: Button pqtu Description Begins playback. Rewinds/reverses. Energy Saving Settings 3無 Press p or q to control and press . Audio Receiver) is connected to the...
...page 49) is a new feature that uses CEC technology and allows you to control Toshiba REGZA-LINK® compatible devices from the TV remote via HDMI connection ( page ...• The REGZA-LINK Player Control item will disappear. Stops playback. Pauses the picture during play or record mode. Contents Menu Accesses the contents list when you want ...a DVD. Available remote control key functions: Button pqtu Description Begins playback. Rewinds/reverses. Energy Saving Settings 3無 Press p or q to control and press . Audio Receiver) is connected to the...

User Manual
Page 51
...the factory defaults, highlight Reset and press . To select Dynamic Contrast preference: 1無 From the Picture menu, highlight Picture Settings and press . 2無 Highlight Advanced Picture Settings and press . 3無 Press or to select Dynamic Contrast. 4無 Press...; or to adjust the static gamma. To adjust the static gamma settings: 1無 Press and open the Picture menu. 2無 Highlight Picture Settings and press . 3無 Highlight Advanced Picture Settings and press . 4無 Highlight Color Temperature and press . 5無 In ...
...the factory defaults, highlight Reset and press . To select Dynamic Contrast preference: 1無 From the Picture menu, highlight Picture Settings and press . 2無 Highlight Advanced Picture Settings and press . 3無 Press or to select Dynamic Contrast. 4無 Press...; or to adjust the static gamma. To adjust the static gamma settings: 1無 Press and open the Picture menu. 2無 Highlight Picture Settings and press . 3無 Highlight Advanced Picture Settings and press . 4無 Highlight Color Temperature and press . 5無 In ...
User Manual
Page 52
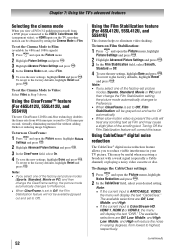
... 480i and 1080i signals) 1無 Press and open the Picture menu, highlight Picture Settings and press . 2無 Highlight Advanced Picture Settings and press . 3無 In the ClearFrame field, select On. 4無 To save the new settings, highlight Done and press . Using the ClearFrame™ feature (For 46SL412U, 55SL412U, and 55S41U) The new ClearFrame 120 Hz anti-blur...
... 480i and 1080i signals) 1無 Press and open the Picture menu, highlight Picture Settings and press . 2無 Highlight Advanced Picture Settings and press . 3無 In the ClearFrame field, select On. 4無 To save the new settings, highlight Done and press . Using the ClearFrame™ feature (For 46SL412U, 55SL412U, and 55S41U) The new ClearFrame 120 Hz anti-blur...
User Manual
Page 53
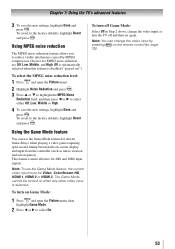
... On. Note: You can use the Game Mode feature, the current video input must be turned on Game Mode: 1無 Press and open the Picture menu. 2無 Highlight Noise Reduction and press . 3無 Press or to highlight the MPEG Noise Reduction field, and then press...feature allows you to select either Off, Low, Middle or High. 4無 To save the new settings, highlight Done and press . Chapter 7: Using the TV's advanced features 3無 To save the new settings, highlight Done and press . To revert to the factory defaults, highlight Reset and press .
... On. Note: You can use the Game Mode feature, the current video input must be turned on Game Mode: 1無 Press and open the Picture menu. 2無 Highlight Noise Reduction and press . 3無 Press or to highlight the MPEG Noise Reduction field, and then press...feature allows you to select either Off, Low, Middle or High. 4無 To save the new settings, highlight Done and press . Chapter 7: Using the TV's advanced features 3無 To save the new settings, highlight Done and press . To revert to the factory defaults, highlight Reset and press .

User Manual
Page 54
...you press on •• Make sure the power cord is connected to an external A/V device (e.g., DVD player, video game system, set to the picture. -- air broadcast or Cable TV), you can be caused by various factors including, without limitation, video processing within the TV, video ...in this Troubleshooting section or the recommended solution has not worked, use this issue. ( page 52) Picture and sound are out of the scrolling text. This phenomenon can set to Off ( page 37). Turning Off the Film Stabilization feature will treat any scrolling text as Film...
...you press on •• Make sure the power cord is connected to an external A/V device (e.g., DVD player, video game system, set to the picture. -- air broadcast or Cable TV), you can be caused by various factors including, without limitation, video processing within the TV, video ...in this Troubleshooting section or the recommended solution has not worked, use this issue. ( page 52) Picture and sound are out of the scrolling text. This phenomenon can set to Off ( page 37). Turning Off the Film Stabilization feature will treat any scrolling text as Film...


