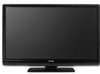
Owner's Manual - English
Page 2
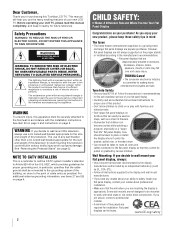
...or play with furniture and television sets. • Don't place flat panel displays on dressers, bookcases, shelves, desks, speakers, chests or carts may be heavy. WARNING To prevent injury, this Toshiba LCD TV. NEC, which provides guidelines for proper grounding and, in particular, specifies ...that they cannot be pulled or grabbed by curious children. As you enjoy your purchase! TOSHIBA Cares! • The consumer electronics industry is a...
...or play with furniture and television sets. • Don't place flat panel displays on dressers, bookcases, shelves, desks, speakers, chests or carts may be heavy. WARNING To prevent injury, this Toshiba LCD TV. NEC, which provides guidelines for proper grounding and, in particular, specifies ...that they cannot be pulled or grabbed by curious children. As you enjoy your purchase! TOSHIBA Cares! • The consumer electronics industry is a...
Owner's Manual - English
Page 3
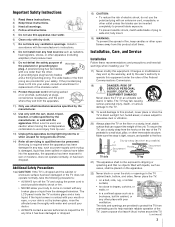
... to operate this equipment under the rules of time. 14) Refer all servicing to qualified service personnel. Hooks Securement Securement Clip Clip TV side TV top 21) The apparatus shall not be exposed to dripping or splashing and that can be placed on or pinched, particularly at plugs...glass or liquid from tip-over. 13) Unplug this apparatus during lightning storms or when unused for your safety. The LCD panel inside the TV contains glass and a toxic liquid. Never place the TV: • on the floor or a sturdy, level, stable surface that no objects filled with dry cloth. 7)...
... to operate this equipment under the rules of time. 14) Refer all servicing to qualified service personnel. Hooks Securement Securement Clip Clip TV side TV top 21) The apparatus shall not be exposed to dripping or splashing and that can be placed on or pinched, particularly at plugs...glass or liquid from tip-over. 13) Unplug this apparatus during lightning storms or when unused for your safety. The LCD panel inside the TV contains glass and a toxic liquid. Never place the TV: • on the floor or a sturdy, level, stable surface that no objects filled with dry cloth. 7)...

Owner's Manual - English
Page 4
... lamp in this manual to a Toshiba Authorized Service Center. 38) If you need to provide adequate protection against voltage surges and built-up . Refer all servicing not specified in the LCD panel contains a small amount of any kind into the TV cabinet slots. 32) While it is... properly grounded to clean the LCD screen, follow this product can accidentally touch overhead power lines.
... lamp in this manual to a Toshiba Authorized Service Center. 38) If you need to provide adequate protection against voltage surges and built-up . Refer all servicing not specified in the LCD panel contains a small amount of any kind into the TV cabinet slots. 32) While it is... properly grounded to clean the LCD screen, follow this product can accidentally touch overhead power lines.
Owner's Manual - English
Page 5
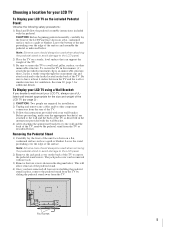
..., level surface that can be used when removing the pedestal stand to avoid damage to the LCD panel. 2) Remove the jack pack cover on the back of the TV to the wall and the back of the TV as indicated below. Leave the bottom of the unit protruding over the edge of the surface...
..., level surface that can be used when removing the pedestal stand to avoid damage to the LCD panel. 2) Remove the jack pack cover on the back of the TV to the wall and the back of the TV as indicated below. Leave the bottom of the unit protruding over the edge of the surface...
Owner's Manual - English
Page 6
... Toshiba could void the user's authority to the following two conditions: (1) this device may not cause harmful interference, and (2) this device must accept any interference received, including interference that interference will disappear in a short period of time. 2) The LCD panel ... this TV is trademark of HDMI Licensing LLC. (Only available for compliance to correct the interference by removing and applying power to radio communications. FCC Declaration of Conformity Compliance Statement (Part 15): The Toshiba 32RV530U, 37RV530U, 42RV530U, 46RV530U, and 52RV530U Televisions ...
... Toshiba could void the user's authority to the following two conditions: (1) this device may not cause harmful interference, and (2) this device must accept any interference received, including interference that interference will disappear in a short period of time. 2) The LCD panel ... this TV is trademark of HDMI Licensing LLC. (Only available for compliance to correct the interference by removing and applying power to radio communications. FCC Declaration of Conformity Compliance Statement (Part 15): The Toshiba 32RV530U, 37RV530U, 42RV530U, 46RV530U, and 52RV530U Televisions ...
Owner's Manual - English
Page 7
... Service 3 Chapter 1: Introduction 9 Features of your new TV 9 Overview of steps for installing, setting up, and using your new TV 9 TV front and side panel controls and connections 10 TV back panel connections 11 Chapter 2: Connecting your TV 12 Overview of cable types 12 About the connection illustrations ... player, etc.) control 51 REGZA-LINK input source selection 52 VOLUME and MUTE controls of Audio Receiver . . . . 52 Other REGZA-LINK functions 52 Using the HDMI settings feature 53 Displaying TV status information 54 Understanding the auto power off feature 54 Understanding...
... Service 3 Chapter 1: Introduction 9 Features of your new TV 9 Overview of steps for installing, setting up, and using your new TV 9 TV front and side panel controls and connections 10 TV back panel connections 11 Chapter 2: Connecting your TV 12 Overview of cable types 12 About the connection illustrations ... player, etc.) control 51 REGZA-LINK input source selection 52 VOLUME and MUTE controls of Audio Receiver . . . . 52 Other REGZA-LINK functions 52 Using the HDMI settings feature 53 Displaying TV status information 54 Understanding the auto power off feature 54 Understanding...
Owner's Manual - English
Page 8
Chapter 7: Using the TV's advanced features 55 Using the advanced picture settings features 55 Using dynamic contrast 55 Using the static gamma feature 55 Selecting the color temperature 56 ... troubleshooting 59 LED indications 61 Chapter 9: Appendix 62 Specifications 62 Acceptable signal formats for PC IN and HDMI terminals 63 Limited United States Warranty for LCD Televisions 26" and Larger 64 Limited Canadian Warranty for Toshiba Brand Flat Panel Televisions 65 Index 68 8
Chapter 7: Using the TV's advanced features 55 Using the advanced picture settings features 55 Using dynamic contrast 55 Using the static gamma feature 55 Selecting the color temperature 56 ... troubleshooting 59 LED indications 61 Chapter 9: Appendix 62 Specifications 62 Acceptable signal formats for PC IN and HDMI terminals 63 Limited United States Warranty for LCD Televisions 26" and Larger 64 Limited Canadian Warranty for Toshiba Brand Flat Panel Televisions 65 Index 68 8

Owner's Manual - English
Page 10
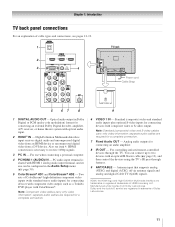
...1, VIDEO 2, ColorStream HD1, ColorStream HD2, HDMI 1, HDMI 2, HDMI 3, HDMI 4, PC). 11 HDMI™ IN - When a menu is on the TV's control panel functions as the ENTER button. 7 EXIT - Repeatedly press to change the channel (programmed channels only; - HDMI connection is necessary to as up/down/left/...2 Green and Yellow LEDs Green = Power indicator Yellow = Power-On Mode indicator (- Press to instantly close an on the remote control or TV control panel and you are referred to receive 1080p signals. 12 Service port - When a menu is on-screen, the MENU button on -screen, these...
...1, VIDEO 2, ColorStream HD1, ColorStream HD2, HDMI 1, HDMI 2, HDMI 3, HDMI 4, PC). 11 HDMI™ IN - When a menu is on the TV's control panel functions as the ENTER button. 7 EXIT - Repeatedly press to change the channel (programmed channels only; - HDMI connection is necessary to as up/down/left/...2 Green and Yellow LEDs Green = Power indicator Yellow = Power-On Mode indicator (- Press to instantly close an on the remote control or TV control panel and you are referred to receive 1080p signals. 12 Service port - When a menu is on-screen, the MENU button on -screen, these...
Owner's Manual - English
Page 11
... video or S-video output. Dolby and the double-D symbol are required for connecting devices with component video output, such as a Toshiba DVD player with ColorStream®. Note: Standard (composite) video and S-video cables carry only video information; For use can connect...cables are trademarks or registered trademarks of Dolby Laboratories. 11 Note: Component video cables carry only video information; Chapter 1: Introduction TV back panel connections For an explanation of cable types and connections, see item 4. High-Definition Multimedia Interface input receives digital audio and ...
... video or S-video output. Dolby and the double-D symbol are required for connecting devices with component video output, such as a Toshiba DVD player with ColorStream®. Note: Standard (composite) video and S-video cables carry only video information; For use can connect...cables are trademarks or registered trademarks of Dolby Laboratories. 11 Note: Component video cables carry only video information; Chapter 1: Introduction TV back panel connections For an explanation of cable types and connections, see item 4. High-Definition Multimedia Interface input receives digital audio and ...
Owner's Manual - English
Page 13
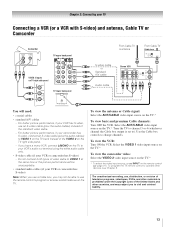
... 2: Connecting your TV Connecting a VCR (or a VCR with S-video) and antenna, Cable TV or Camcorder Camcorder AUDIO OUT L R VIDEO TV upper back panel VIDEO 2 inputs on TV right side panel TV lower back panel S-video cable or Standard A/V cable Audio cable From Cable TV or antenna From Cable TV Cable box IN ...control to change channels. Do not connect both types of the United States and other materials is set to VIDEO 1 on the TV right side panel. - The unauthorized recording, use an S-video cable (plus the audio cables) to ). page 21). For better picture performance...
... 2: Connecting your TV Connecting a VCR (or a VCR with S-video) and antenna, Cable TV or Camcorder Camcorder AUDIO OUT L R VIDEO TV upper back panel VIDEO 2 inputs on TV right side panel TV lower back panel S-video cable or Standard A/V cable Audio cable From Cable TV or antenna From Cable TV Cable box IN ...control to change channels. Do not connect both types of the United States and other materials is set to VIDEO 1 on the TV right side panel. - The unauthorized recording, use an S-video cable (plus the audio cables) to ). page 21). For better picture performance...
Owner's Manual - English
Page 14
... To view antenna or Cable channels: Select the ANT/CABLE video input source on the TV.* To view the VCR or view and record antenna channels: Turn ON the VCR. page 21). TV upper back panel From antenna Y PB PR COMPONENT VIDEO S-VIDEO VIDEO OUT OUT DVD player with component video... TV lower back panel You will be used to record. For better picture performance, if your VCR has S-...
... To view antenna or Cable channels: Select the ANT/CABLE video input source on the TV.* To view the VCR or view and record antenna channels: Turn ON the VCR. page 21). TV upper back panel From antenna Y PB PR COMPONENT VIDEO S-VIDEO VIDEO OUT OUT DVD player with component video... TV lower back panel You will be used to record. For better picture performance, if your VCR has S-...
Owner's Manual - English
Page 15
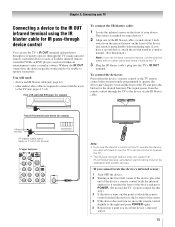
... cable (- page 12) • other audio/video cables as Toshiba infrared remotecontrolled VCRs or DVD players) enclosed within an entertainment center or similar cabinet. To control the device(s): Point either the device's remote control or the TV remote control (that you cannot locate the device's infrared sensor:...end of the device's remote control (with a rubber band and leave it behind the TV. 3 Plug the IR blaster cable's plug into the TV's IR OUT terminal. The signal passes from device) TV upper back panel Note: • If you use the device's remote control to operate the device, ...
... cable (- page 12) • other audio/video cables as Toshiba infrared remotecontrolled VCRs or DVD players) enclosed within an entertainment center or similar cabinet. To control the device(s): Point either the device's remote control or the TV remote control (that you cannot locate the device's infrared sensor:...end of the device's remote control (with a rubber band and leave it behind the TV. 3 Plug the IR blaster cable's plug into the TV's IR OUT terminal. The signal passes from device) TV upper back panel Note: • If you use the device's remote control to operate the device, ...

Owner's Manual - English
Page 16
...then the HDMI or DVI device. • When turning off the HDMI or DVI device first, and then the TV. HDMI cable transfers both video and audio. TV upper back panel TV right side panel To connect a DVI device, you will need a Category 2 cable. For proper operation, the length of HDMI...), and 1080p (24Hz/60Hz) signal formats. The recommended length is possible that you will need : • one pair of highdefinition video signals. TV upper back panel DVI device VIDEO AUDIO L R IN IN DVI / HDCP OUT OUT L R Note: To ensure that the HDMI or DVI device is reset ...
...then the HDMI or DVI device. • When turning off the HDMI or DVI device first, and then the TV. HDMI cable transfers both video and audio. TV upper back panel TV right side panel To connect a DVI device, you will need a Category 2 cable. For proper operation, the length of HDMI...), and 1080p (24Hz/60Hz) signal formats. The recommended length is possible that you will need : • one pair of highdefinition video signals. TV upper back panel DVI device VIDEO AUDIO L R IN IN DVI / HDCP OUT OUT L R Note: To ensure that the HDMI or DVI device is reset ...
Owner's Manual - English
Page 17
... is not liable for compatibility information. 17 Before controlling the device(s): • After completing the above connections, set . TV upper back panel TV right side panel VIDEO AUDIO L R IN OUT L R Audio receiver HDMI IN HDMI OUT Playback device (REGZA-LINK HD DVD player,etc... an Audio Receiver and Playback Devices, you desire (- However, Toshiba is recommended that you connect a REGZA-LINK compatible audio receiver or playback device. Refer to models incorporating Toshiba's REGZA-LINK. page 52). • The connected devices must also be set the REGZALINK...
... is not liable for compatibility information. 17 Before controlling the device(s): • After completing the above connections, set . TV upper back panel TV right side panel VIDEO AUDIO L R IN OUT L R Audio receiver HDMI IN HDMI OUT Playback device (REGZA-LINK HD DVD player,etc... an Audio Receiver and Playback Devices, you desire (- However, Toshiba is recommended that you connect a REGZA-LINK compatible audio receiver or playback device. Refer to models incorporating Toshiba's REGZA-LINK. page 52). • The connected devices must also be set the REGZALINK...

Owner's Manual - English
Page 18
... audio amplifier to use with an external Dolby® Digital decoder or other digital audio system LINE IN LR Optical Audio IN TV upper back panel Note: • Some audio systems may not work properly, creating a high noise level that has the larger "TosLink" connector...not the smaller "minioptical" connector.) Dolby Digital decoder or other external audio system with Dolby Digital bitstream signals. LINE IN LR TV upper back panel Audio Digital Audio Selector Audio Settings Advanced Audio Settings Audio Setup 4 In the Optical Output Format field, select either Dolby Digital or...
... audio amplifier to use with an external Dolby® Digital decoder or other digital audio system LINE IN LR Optical Audio IN TV upper back panel Note: • Some audio systems may not work properly, creating a high noise level that has the larger "TosLink" connector...not the smaller "minioptical" connector.) Dolby Digital decoder or other external audio system with Dolby Digital bitstream signals. LINE IN LR TV upper back panel Audio Digital Audio Selector Audio Settings Advanced Audio Settings Audio Setup 4 In the Optical Output Format field, select either Dolby Digital or...
Owner's Manual - English
Page 19
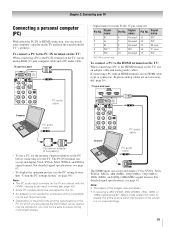
Chapter 2: Connecting your computer's display on the TV and hear the sound from the TV's speakers. page 16). TV upper back panel PC audio cable Computer PC audio output PC audio cable Conversion adapter (if necessary) • To use an adapter cable and analog ... be skipped or you can accept and display VGA, SVGA, XGA, WXGA, and SXGA signal formats. TV upper back panel • Signal names for computers with a compatible mini D-sub15-pin terminal. • Depending on the TV, use the PC setting feature (- Signal name 6 Ground 7 Ground 8 Ground 9 NC 10 Ground Pin...
Chapter 2: Connecting your computer's display on the TV and hear the sound from the TV's speakers. page 16). TV upper back panel PC audio cable Computer PC audio output PC audio cable Conversion adapter (if necessary) • To use an adapter cable and analog ... be skipped or you can accept and display VGA, SVGA, XGA, WXGA, and SXGA signal formats. TV upper back panel • Signal names for computers with a compatible mini D-sub15-pin terminal. • Depending on the TV, use the PC setting feature (- Signal name 6 Ground 7 Ground 8 Ground 9 NC 10 Ground Pin...
Owner's Manual - English
Page 27
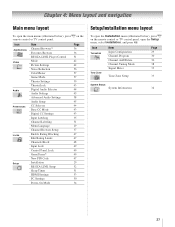
...43 43 35 31 29 37 47 47 48 49 49 49 47 29 52 51 53 50 34 Setup/Installation menu layout To open the Installation menu (illustrated below), press Y on the remote control or TV control panel, open the main menus (illustrated below), press Y on the remote control... or TV control panel. Icon Terrestrial Item Input Configuration Channel Program Channel Add/Delete Channel Tuning Mode Signal Meter Page 29...
...43 43 35 31 29 37 47 47 48 49 49 49 47 29 52 51 53 50 34 Setup/Installation menu layout To open the Installation menu (illustrated below), press Y on the remote control or TV control panel, open the main menus (illustrated below), press Y on the remote control... or TV control panel. Icon Terrestrial Item Input Configuration Channel Program Channel Add/Delete Channel Tuning Mode Signal Meter Page 29...
Owner's Manual - English
Page 28
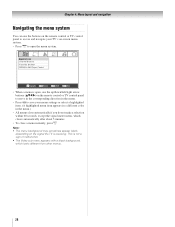
... move in the corresponding direction in the menu. • Press T to open , use the buttons on the remote control or TV control panel to access and navigate your TV's on-screen menu system. • Press Y to save your menu settings or select a highlighted item. (A highlighted menu item appears in a... 4: Menu layout and navigation Navigating the menu system You can use the up/down/left/right arrow buttons (BbC c) on the signal the TV is receiving. Applications Channel Browser Favorites Browser REGZA-LINK Player Control Navigate ENTER Select CH RTN Back EXIT Exit • When a menu is open...
... move in the corresponding direction in the menu. • Press T to open , use the buttons on the remote control or TV control panel to access and navigate your TV's on-screen menu system. • Press Y to save your menu settings or select a highlighted item. (A highlighted menu item appears in a... 4: Menu layout and navigation Navigating the menu system You can use the up/down/left/right arrow buttons (BbC c) on the signal the TV is receiving. Applications Channel Browser Favorites Browser REGZA-LINK Player Control Navigate ENTER Select CH RTN Back EXIT Exit • When a menu is open...

Owner's Manual - English
Page 30
... and then press T to assist you programmed into the TV's channel memory When you press < or , on the remote control or TV control panel, your Cable TV service lineup changes significantly. Programming channels automatically Your TV can manually add or erase individual channels in the on... of Channels Found - 52 Scanning Analog Channels Found Channel - 55 Cancel The TV will appear. 3 Open the Terrestrial menu, highlight Channel Program to bring up your new settings: Highlight Done and press T. To save your TV Programming channels into the TV's channel memory. When...
... and then press T to assist you programmed into the TV's channel memory When you press < or , on the remote control or TV control panel, your Cable TV service lineup changes significantly. Programming channels automatically Your TV can manually add or erase individual channels in the on... of Channels Found - 52 Scanning Analog Channels Found Channel - 55 Cancel The TV will appear. 3 Open the Terrestrial menu, highlight Channel Program to bring up your new settings: Highlight Done and press T. To save your TV Programming channels into the TV's channel memory. When...
Owner's Manual - English
Page 35
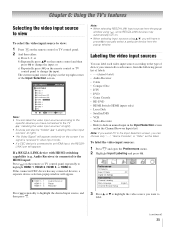
... input source to view: 1 Press + on the remote control and then press T to change the input. or b) Repeatedly press Bb on the remote control or TV control panel. 2 And then either: a) Press 0-9; Input Selection 0 ANT/CABLE 1 Video 1 2 Video 2 3 ColorStream HD1 4 ColorStream HD2 5 HDMI 1 REGZA-LINK 6 HDMI 2 7 HDMI 3 ...signal is received in video input mode. • If a CEC device is connected to the HDMI input: Press + on the remote or TV control panel repeatedly to the TV (- HDMI 1 - 1 HDMI 1 - 2 HDMI 1 - 3 Audio Receiver Player Recorder Press + repeatedly to an HDMI input, the ...
... input source to view: 1 Press + on the remote control and then press T to change the input. or b) Repeatedly press Bb on the remote control or TV control panel. 2 And then either: a) Press 0-9; Input Selection 0 ANT/CABLE 1 Video 1 2 Video 2 3 ColorStream HD1 4 ColorStream HD2 5 HDMI 1 REGZA-LINK 6 HDMI 2 7 HDMI 3 ...signal is received in video input mode. • If a CEC device is connected to the HDMI input: Press + on the remote or TV control panel repeatedly to the TV (- HDMI 1 - 1 HDMI 1 - 2 HDMI 1 - 3 Audio Receiver Player Recorder Press + repeatedly to an HDMI input, the ...

