Owner's Manual - English
Page 2
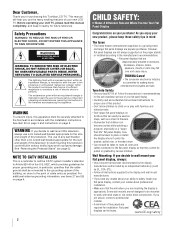
This manual will help you use of this Toshiba LCD TV. See "Removing the Pedestal Stand" (- Before operating your LCD TV, please read and understand all instructions supplied by curious children. The exclamation point within an equilateral triangle is ...Follow the manufacturer's recommendations for the safe installation and use of uninsulated "dangerous voltage" within an equilateral triangle, is appropriate. Flat panel displays can be securely attached to the floor/wall in serious bodily injury and/or property damage. Dear Customer, Thank you for ...
This manual will help you use of this Toshiba LCD TV. See "Removing the Pedestal Stand" (- Before operating your LCD TV, please read and understand all instructions supplied by curious children. The exclamation point within an equilateral triangle is ...Follow the manufacturer's recommendations for the safe installation and use of uninsulated "dangerous voltage" within an equilateral triangle, is appropriate. Flat panel displays can be securely attached to the floor/wall in serious bodily injury and/or property damage. Dear Customer, Thank you for ...
Owner's Manual - English
Page 3
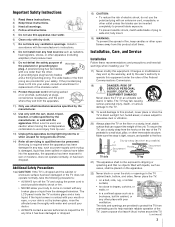
...polarized or grounding type plug. The wide blade or the third prong are provided to protect the TV from the damaged television. The LCD panel inside the TV contains glass and a toxic liquid. The TV may void: a) the warranty, and b) the user's authority to operate this equipment. Sturdy.... 2) Keep these recommendations and precautions and heed all warnings when installing your doctor. • ALWAYS contact a service technician to inspect the TV any time it has been damaged or dropped. 15) CAUTION: • To reduce the risk of the Federal Communications Commission. 18) DANGER...
...polarized or grounding type plug. The wide blade or the third prong are provided to protect the TV from the damaged television. The LCD panel inside the TV contains glass and a toxic liquid. The TV may void: a) the warranty, and b) the user's authority to operate this equipment. Sturdy.... 2) Keep these recommendations and precautions and heed all warnings when installing your doctor. • ALWAYS contact a service technician to inspect the TV any time it has been damaged or dropped. 15) CAUTION: • To reduce the risk of the Federal Communications Commission. 18) DANGER...

Owner's Manual - English
Page 4
... a) an antenna system; These actions will damage the LCD screen. Never attempt to an antenna or phone system. Refer all servicing not specified in this manual to a Toshiba Authorized Service Center. 38) If you are in the LCD panel contains a small amount of mercury. For disposal or ...recycling information, contact your area, or ask a qualified service technician to properly dispose of the TV. or b) cables, wires, or any...
... a) an antenna system; These actions will damage the LCD screen. Never attempt to an antenna or phone system. Refer all servicing not specified in this manual to a Toshiba Authorized Service Center. 38) If you are in the LCD panel contains a small amount of mercury. For disposal or ...recycling information, contact your area, or ask a qualified service technician to properly dispose of the TV. or b) cables, wires, or any...
Owner's Manual - English
Page 5
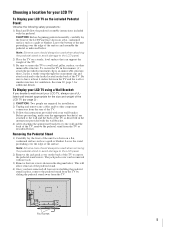
... the instructions provided with the pedestal. Leave the stand protruding over the edge of the LCD TV (- Note: Extreme care should always be used when removing the pedestal stand to avoid damage to the LCD panel. 2) Remove the jack pack cover on a flat, cushioned surface such as a quilt or ... pedestal assembly, carefully lay the front of the LCD Panel face down on the back of the TV to a wall stud, pillar, surface, or other component connectors from the rear of the TV. See item 20, page 3 for your LCD TV To Display your LCD TV, always use a ULlisted wall bracket appropriate for ...
... the instructions provided with the pedestal. Leave the stand protruding over the edge of the LCD TV (- Note: Extreme care should always be used when removing the pedestal stand to avoid damage to the LCD panel. 2) Remove the jack pack cover on a flat, cushioned surface such as a quilt or ... pedestal assembly, carefully lay the front of the LCD Panel face down on the back of the TV to a wall stud, pillar, surface, or other component connectors from the rear of the TV. See item 20, page 3 for your LCD TV To Display your LCD TV, always use a ULlisted wall bracket appropriate for ...
Owner's Manual - English
Page 6
... (Only available for 46" and 52" models) 6 Important notes about your...of time. 2) The LCD panel contained in accordance with this TV. The party responsible for...Toshiba could void the user's authority to operate this device must accept any interference received, including interference that may cause harmful interference to radio communications. Trademark Information • Manufactured under your LCD TV...Toshiba America Consumer Products, L.L.C. 82 Totowa Rd. FCC Declaration of Conformity Compliance Statement (Part 15): The Toshiba 32RV530U, 37RV530U, 42RV530U, 46RV530U, and 52RV530U...
... (Only available for 46" and 52" models) 6 Important notes about your...of time. 2) The LCD panel contained in accordance with this TV. The party responsible for...Toshiba could void the user's authority to operate this device must accept any interference received, including interference that may cause harmful interference to radio communications. Trademark Information • Manufactured under your LCD TV...Toshiba America Consumer Products, L.L.C. 82 Totowa Rd. FCC Declaration of Conformity Compliance Statement (Part 15): The Toshiba 32RV530U, 37RV530U, 42RV530U, 46RV530U, and 52RV530U...
Owner's Manual - English
Page 7
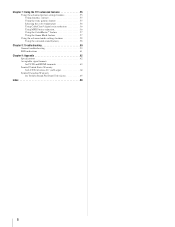
... Service 3 Chapter 1: Introduction 9 Features of your new TV 9 Overview of steps for installing, setting up, and using your new TV 9 TV front and side panel controls and connections 10 TV back panel connections 11 Chapter 2: Connecting your TV 12 Overview of cable types 12 About the connection illustrations ... player, etc.) control 51 REGZA-LINK input source selection 52 VOLUME and MUTE controls of Audio Receiver . . . . 52 Other REGZA-LINK functions 52 Using the HDMI settings feature 53 Displaying TV status information 54 Understanding the auto power off feature 54 Understanding...
... Service 3 Chapter 1: Introduction 9 Features of your new TV 9 Overview of steps for installing, setting up, and using your new TV 9 TV front and side panel controls and connections 10 TV back panel connections 11 Chapter 2: Connecting your TV 12 Overview of cable types 12 About the connection illustrations ... player, etc.) control 51 REGZA-LINK input source selection 52 VOLUME and MUTE controls of Audio Receiver . . . . 52 Other REGZA-LINK functions 52 Using the HDMI settings feature 53 Displaying TV status information 54 Understanding the auto power off feature 54 Understanding...
Owner's Manual - English
Page 8
Chapter 7: Using the TV's advanced features 55 Using the advanced picture settings features 55 Using dynamic contrast 55 Using the static gamma feature 55 Selecting the color temperature 56 ... troubleshooting 59 LED indications 61 Chapter 9: Appendix 62 Specifications 62 Acceptable signal formats for PC IN and HDMI terminals 63 Limited United States Warranty for LCD Televisions 26" and Larger 64 Limited Canadian Warranty for Toshiba Brand Flat Panel Televisions 65 Index 68 8
Chapter 7: Using the TV's advanced features 55 Using the advanced picture settings features 55 Using dynamic contrast 55 Using the static gamma feature 55 Selecting the color temperature 56 ... troubleshooting 59 LED indications 61 Chapter 9: Appendix 62 Specifications 62 Acceptable signal formats for PC IN and HDMI terminals 63 Limited United States Warranty for LCD Televisions 26" and Larger 64 Limited Canadian Warranty for Toshiba Brand Flat Panel Televisions 65 Index 68 8

Owner's Manual - English
Page 10
...as up/down/left/right menu navigation buttons. 6 MENU (ENTER) - Point the remote control toward this manual for 5 or more seconds to reset the TV. 12 Control panel 5 ARROWS BbC c - These buttons adjust the volume level. 10 INPUT - Effective range: 16.4 ft (5m) 2 Green and Yellow LEDs Green ...menu. 8 CHANNEL Bb - Press to access the menu system (- "Selecting the Power-On Mode" on page 34) See "LED indications" on the TV's control panel functions as "VIDEO 2" and include standard A/V connections. 4 POWER - When a menu is on-screen, the MENU button on page 61 for updating ...
...as up/down/left/right menu navigation buttons. 6 MENU (ENTER) - Point the remote control toward this manual for 5 or more seconds to reset the TV. 12 Control panel 5 ARROWS BbC c - These buttons adjust the volume level. 10 INPUT - Effective range: 16.4 ft (5m) 2 Green and Yellow LEDs Green ...menu. 8 CHANNEL Bb - Press to access the menu system (- "Selecting the Power-On Mode" on page 34) See "LED indications" on the TV's control panel functions as "VIDEO 2" and include standard A/V connections. 4 POWER - When a menu is on-screen, the MENU button on page 61 for updating ...
Owner's Manual - English
Page 11
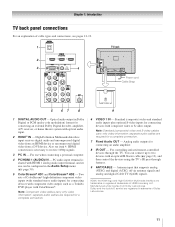
... inputs) for connecting an external Dolby Digital decoder, amplifier, A/V receiver, or home theater system with ColorStream®. Chapter 1: Introduction TV back panel connections For an explanation of HDMI Licensing LLC. Note: Component video cables carry only video information; PC audio input terminal is necessary ... You can be configured in Dolby Digital or PCM (pulse-code modulation) format for connecting devices with component video output, such as a Toshiba DVD player with optical audio input. 2 HDMI™ IN - Antenna input that supports analog (NTSC) and digital (ATSC) off-air...
... inputs) for connecting an external Dolby Digital decoder, amplifier, A/V receiver, or home theater system with ColorStream®. Chapter 1: Introduction TV back panel connections For an explanation of HDMI Licensing LLC. Note: Component video cables carry only video information; PC audio input terminal is necessary ... You can be configured in Dolby Digital or PCM (pulse-code modulation) format for connecting devices with component video output, such as a Toshiba DVD player with optical audio input. 2 HDMI™ IN - Antenna input that supports analog (NTSC) and digital (ATSC) off-air...
Owner's Manual - English
Page 13
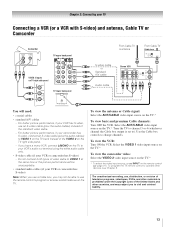
... (plus the audio cables) to VIDEO 1 on the TV right side panel. - Select the ANT/CABLE video input source on TV right side panel TV lower back panel S-video cable or Standard A/V cable Audio cable From Cable TV or antenna From Cable TV Cable box IN CH 3 CH 4 OUT Stereo VCR ..., connect L/MONO on the remote control (- Chapter 2: Connecting your TV Connecting a VCR (or a VCR with S-video) and antenna, Cable TV or Camcorder Camcorder AUDIO OUT L R VIDEO TV upper back panel VIDEO 2 inputs on the TV.* Tune the TV to channel 3 or 4 (whichever channel the Cable box output is...
... (plus the audio cables) to VIDEO 1 on the TV right side panel. - Select the ANT/CABLE video input source on TV right side panel TV lower back panel S-video cable or Standard A/V cable Audio cable From Cable TV or antenna From Cable TV Cable box IN CH 3 CH 4 OUT Stereo VCR ..., connect L/MONO on the remote control (- Chapter 2: Connecting your TV Connecting a VCR (or a VCR with S-video) and antenna, Cable TV or Camcorder Camcorder AUDIO OUT L R VIDEO TV upper back panel VIDEO 2 inputs on the TV.* Tune the TV to channel 3 or 4 (whichever channel the Cable box output is...
Owner's Manual - English
Page 14
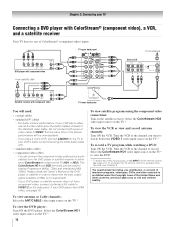
... recording, use an S-video cable (plus audio cables) from ANT OUT to TV Y PB PR AUDIO OUT L Satellite COMPONENT VIDEO S-VIDEO VIDEO R IN OUT OUT Satellite receiver with component video TV lower back panel You will be used to display Progressive (480p, 720p) and Interlaced (480i,... OUT L R IN from the DVD player or satellite receiver to either set of ColorStream terminals on the TV.* To view the DVD player: Turn ON the DVD player. TV upper back panel From antenna Y PB PR COMPONENT VIDEO S-VIDEO VIDEO OUT OUT DVD player with ColorStream® (component video),...
... recording, use an S-video cable (plus audio cables) from ANT OUT to TV Y PB PR AUDIO OUT L Satellite COMPONENT VIDEO S-VIDEO VIDEO R IN OUT OUT Satellite receiver with component video TV lower back panel You will be used to display Progressive (480p, 720p) and Interlaced (480i,... OUT L R IN from the DVD player or satellite receiver to either set of ColorStream terminals on the TV.* To view the DVD player: Turn ON the DVD player. TV upper back panel From antenna Y PB PR COMPONENT VIDEO S-VIDEO VIDEO OUT OUT DVD player with ColorStream® (component video),...
Owner's Manual - English
Page 15
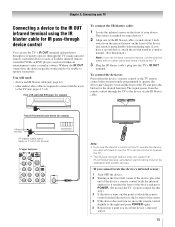
... it using the IR blaster cable for example) Infrared sensor IR blaster cable wand (approx.1 inch from device) TV upper back panel Note: • If you use the TV's IR OUT terminal (infrared passthrough) to remotely operate (through device control You can use the device's remote control...via the IR blaster cable. page 12) • other audio/video cables as Toshiba infrared remotecontrolled VCRs or DVD players) enclosed within an entertainment center or similar cabinet. pages 13-16) Front of your TV Connecting a device to operate the device; - To control the device(s): Point either...
... it using the IR blaster cable for example) Infrared sensor IR blaster cable wand (approx.1 inch from device) TV upper back panel Note: • If you use the TV's IR OUT terminal (infrared passthrough) to remotely operate (through device control You can use the device's remote control...via the IR blaster cable. page 12) • other audio/video cables as Toshiba infrared remotecontrolled VCRs or DVD players) enclosed within an entertainment center or similar cabinet. pages 13-16) Front of your TV Connecting a device to operate the device; - To control the device(s): Point either...

Owner's Manual - English
Page 16
... you will need : • one HDMI-to-DVI adapter cable (HDMI type A connector) per DVI device - An HDMI-to-DVI adapter cable transfers video only. TV upper back panel DVI device VIDEO AUDIO L R IN IN DVI / HDCP OUT OUT L R Note: To ensure that you will need a Category 2 cable. To program the...CEA-861-D-compliant[1] consumer electronic devices (such as a set-top box or DVD player with the HDMI Logo ( ). - See "Setting the HDMI™ audio mode" (- TV upper back panel TV right side panel To connect a DVI device, you use an HDMI cable with HDMI or DVI output).
... you will need : • one HDMI-to-DVI adapter cable (HDMI type A connector) per DVI device - An HDMI-to-DVI adapter cable transfers video only. TV upper back panel DVI device VIDEO AUDIO L R IN IN DVI / HDCP OUT OUT L R Note: To ensure that you will need a Category 2 cable. To program the...CEA-861-D-compliant[1] consumer electronic devices (such as a set-top box or DVD player with the HDMI Logo ( ). - See "Setting the HDMI™ audio mode" (- TV upper back panel TV right side panel To connect a DVI device, you use an HDMI cable with HDMI or DVI output).
Owner's Manual - English
Page 17
...connections, set . However, Toshiba is recommended that you desire (- For details, see pages 51 and 52. Refer to models incorporating Toshiba's REGZA-LINK. Chapter 2: Connecting your TV REGZA-LINK connection You ...can control the basic functions of setup and operations, see the operation manual for those operations. For an explanation of connected audio/video devices using the TV's remote control if you will need: • HDMI cables (- TV upper back panel TV...
...connections, set . However, Toshiba is recommended that you desire (- For details, see pages 51 and 52. Refer to models incorporating Toshiba's REGZA-LINK. Chapter 2: Connecting your TV REGZA-LINK connection You ...can control the basic functions of setup and operations, see the operation manual for those operations. For an explanation of connected audio/video devices using the TV's remote control if you will need: • HDMI cables (- TV upper back panel TV...

Owner's Manual - English
Page 18
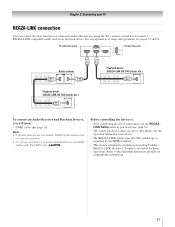
...allows you to use with an external Dolby® Digital decoder or other digital audio system LINE IN LR Optical Audio IN TV upper back panel Note: • Some audio systems may not output some digital audio sources because of Dolby Laboratories. Older audio systems that...level that are registered trademarks of copy restrictions. * Manufactured under license from the TV's built-in speakers and control the volume level using the amplifier's remote control. 18 LINE IN LR TV upper back panel Audio Digital Audio Selector Audio Settings Advanced Audio Settings Audio Setup 4 In the...
...allows you to use with an external Dolby® Digital decoder or other digital audio system LINE IN LR Optical Audio IN TV upper back panel Note: • Some audio systems may not output some digital audio sources because of Dolby Laboratories. Older audio systems that...level that are registered trademarks of copy restrictions. * Manufactured under license from the TV's built-in speakers and control the volume level using the amplifier's remote control. 18 LINE IN LR TV upper back panel Audio Digital Audio Selector Audio Settings Advanced Audio Settings Audio Setup 4 In the...
Owner's Manual - English
Page 19
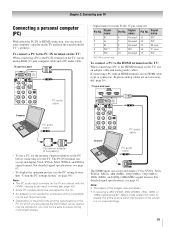
... 12 NC 13 H-sync 14 V-sync 15 NC *NC=Not connected To connect a PC to the HDMI terminal on the TV, use the PC setting feature (- TV upper back panel PC audio cable Computer PC audio output PC audio cable Conversion adapter (if necessary) • To use an analog RGB ...analog audio input terminals (- Note: • The edges of the images may not be connected to this TV. • An adapter is not needed for mini D-sub 15-pin connector Pin No. TV upper back panel • Signal names for computers with a compatible mini D-sub15-pin terminal. • Depending on which...
... 12 NC 13 H-sync 14 V-sync 15 NC *NC=Not connected To connect a PC to the HDMI terminal on the TV, use the PC setting feature (- TV upper back panel PC audio cable Computer PC audio output PC audio cable Conversion adapter (if necessary) • To use an analog RGB ...analog audio input terminals (- Note: • The edges of the images may not be connected to this TV. • An adapter is not needed for mini D-sub 15-pin connector Pin No. TV upper back panel • Signal names for computers with a compatible mini D-sub15-pin terminal. • Depending on which...
Owner's Manual - English
Page 27
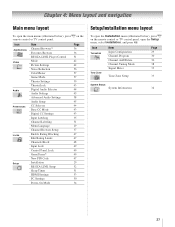
... Channel Labeling Menu Language Channel Browser Setup Enable Rating Blocking Edit Rating Limits Channels Block Input Lock Control Panel Lock GameTimer® New PIN Code Installation REGZA-LINK Setup Sleep Timer HDMI Settings PC Settings Power-On...43 44 45 58 45 44 43 43 35 31 29 37 47 47 48 49 49 49 47 29 52 51 53 50 34 Setup/Installation menu layout To open the Setup menu, select Installation, and press T. ... layout To open the main menus (illustrated below ), press Y on the remote control or TV control panel, open the Installation menu (illustrated below ), press Y on the remote control or...
... Channel Labeling Menu Language Channel Browser Setup Enable Rating Blocking Edit Rating Limits Channels Block Input Lock Control Panel Lock GameTimer® New PIN Code Installation REGZA-LINK Setup Sleep Timer HDMI Settings PC Settings Power-On...43 44 45 58 45 44 43 43 35 31 29 37 47 47 48 49 49 49 47 29 52 51 53 50 34 Setup/Installation menu layout To open the Setup menu, select Installation, and press T. ... layout To open the main menus (illustrated below ), press Y on the remote control or TV control panel, open the Installation menu (illustrated below ), press Y on the remote control or...
Owner's Manual - English
Page 28
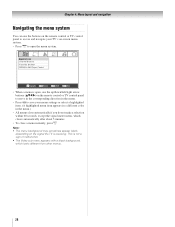
...Exit • When a menu is open, use the buttons on the remote control or TV control panel to access and navigate your TV's on-screen menu system. • Press Y to save your menu settings or select ...system. This is receiving. Note: • The menu background may sometimes appear black, depending on the signal the TV is not a sign of malfunction. • The Video sub-menu appears with a black background, which closes ...arrow buttons (BbC c) on the remote control or TV control panel to move in the corresponding direction in the menu.) • All menus close a menu instantly, ...
...Exit • When a menu is open, use the buttons on the remote control or TV control panel to access and navigate your TV's on-screen menu system. • Press Y to save your menu settings or select ...system. This is receiving. Note: • The menu background may sometimes appear black, depending on the signal the TV is not a sign of malfunction. • The Video sub-menu appears with a black background, which closes ...arrow buttons (BbC c) on the remote control or TV control panel to move in the corresponding direction in the menu.) • All menus close a menu instantly, ...

Owner's Manual - English
Page 30
... were previously programmed into the TV's memory.) To remove an Antenna... TV's memory. • If the ANT...the TV is provided to repeat the programming process again unless your Cable TV ... then press T to bring up your TV will stop only on the remote control... manually delete it. • To tune the TV to enter the channel number (for Antenna. page...previously programmed into the TV's channel memory. Programming channels automatically Your TV can manually add ... of Channels Found - 52 Scanning Analog Channels Found Channel - 55 Cancel The TV will be added to ...
... were previously programmed into the TV's memory.) To remove an Antenna... TV's memory. • If the ANT...the TV is provided to repeat the programming process again unless your Cable TV ... then press T to bring up your TV will stop only on the remote control... manually delete it. • To tune the TV to enter the channel number (for Antenna. page...previously programmed into the TV's channel memory. Programming channels automatically Your TV can manually add ... of Channels Found - 52 Scanning Analog Channels Found Channel - 55 Cancel The TV will be added to ...
Owner's Manual - English
Page 35
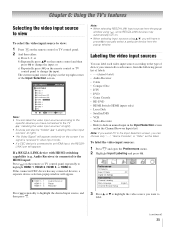
...: • When selecting REGZA-LINK input sources from the popup window using +, some REGZA-LINK devices may automatically turn on the remote control or TV control panel to change the input; or c) Repeatedly press + on . • When selecting input sources using B b, you have to press T to ...Channel Labeling Menu Language Channel Browser Setup Off English 3 Press B or b to the HDMI input: Press + on the remote control or TV control panel. 2 And then either: a) Press 0-9; The current signal source displays in the Input Selection screen, you want to highlight the desired input ...
...: • When selecting REGZA-LINK input sources from the popup window using +, some REGZA-LINK devices may automatically turn on the remote control or TV control panel to change the input; or c) Repeatedly press + on . • When selecting input sources using B b, you have to press T to ...Channel Labeling Menu Language Channel Browser Setup Off English 3 Press B or b to the HDMI input: Press + on the remote control or TV control panel. 2 And then either: a) Press 0-9; The current signal source displays in the Input Selection screen, you want to highlight the desired input ...

