
User's Guide for L1350U and L2300U Series TV's
Page 4
... damaged television. Additional Safety Precautions 14a) CAUTION: If the TV is dropped and the cabinet or enclosure surface has been damaged or the TV does not operate normally, take the following precautions: • ALWAYS turn off the TV and unplug the power cord to avoid possible electric shock or... fire. • NEVER allow your body to come into contact with water and contact your doctor immediately. • ALWAYS contact a service technician to inspect the TV any way, such as...
... damaged television. Additional Safety Precautions 14a) CAUTION: If the TV is dropped and the cabinet or enclosure surface has been damaged or the TV does not operate normally, take the following precautions: • ALWAYS turn off the TV and unplug the power cord to avoid possible electric shock or... fire. • NEVER allow your body to come into contact with water and contact your doctor immediately. • ALWAYS contact a service technician to inspect the TV any way, such as...
User's Guide for L1350U and L2300U Series TV's
Page 6
...condition. Never spray volatile compounds such as insecticide on or off switch, it is not completely disconnected from mains power. When the TV is turned off using the on/ off . These actions will damage internal parts. 38) WARNING: RISK OF ELECTRIC SHOCK! If you decide...appropriate bracket(s) to direct sunlight, such as described in death or serious injury. These actions will damage the LCD screen. Never attempt to a Toshiba Authorized Service Provider. To Display your wall bracket. CAUTION: Before beginning pedestal assembly, carefully lay the front of a window. • Never...
...condition. Never spray volatile compounds such as insecticide on or off switch, it is not completely disconnected from mains power. When the TV is turned off using the on/ off . These actions will damage internal parts. 38) WARNING: RISK OF ELECTRIC SHOCK! If you decide...appropriate bracket(s) to direct sunlight, such as described in death or serious injury. These actions will damage the LCD screen. Never attempt to a Toshiba Authorized Service Provider. To Display your wall bracket. CAUTION: Before beginning pedestal assembly, carefully lay the front of a window. • Never...
User's Guide for L1350U and L2300U Series TV's
Page 18
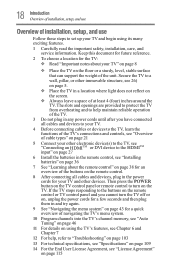
...exciting features. 1 Carefully read the important safety, installation, care, and service information. Then press the POWER button on the TV control panel or remote control to turn the TV off or on page 115 18 Introduction Overview of installation, setup, and use Overview of installation, setup, and use Follow ...these steps to set up your TV and begin using the TV's features, see Chapter 6 and Chapter 7 12 For help maintain reliable operation of the TV. 3 Do not plug in any power cords until after you cannot turn on the floor or a sturdy, level, stable surface that...
...exciting features. 1 Carefully read the important safety, installation, care, and service information. Then press the POWER button on the TV control panel or remote control to turn the TV off or on page 115 18 Introduction Overview of installation, setup, and use Overview of installation, setup, and use Follow ...these steps to set up your TV and begin using the TV's features, see Chapter 6 and Chapter 7 12 For help maintain reliable operation of the TV. 3 Do not plug in any power cords until after you cannot turn on the floor or a sturdy, level, stable surface that...
User's Guide for L1350U and L2300U Series TV's
Page 19
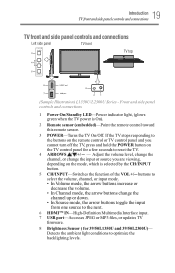
... side panel controls and connections 1 Power On/Standby LED-Power indicator light, (glows green when the TV power is selected by the CH/INPUT button. 5 CH/INPUT-Switches the function of the VOL +/&#...TV stops responding to the buttons on the remote control or TV control panel and you cannot turn off the TV, press and hold the POWER button on the TV control panel for a few seconds to reset the TV...On). 2 Remote sensor (embedded)-Point the remote control toward this remote sensor. 3 POWER-Turns the TV On/Off. Detects the ambient light conditions to the next. 6 HDMITM IN-High-Definition ...
... side panel controls and connections 1 Power On/Standby LED-Power indicator light, (glows green when the TV power is selected by the CH/INPUT button. 5 CH/INPUT-Switches the function of the VOL +/&#...TV stops responding to the buttons on the remote control or TV control panel and you cannot turn off the TV, press and hold the POWER button on the TV control panel for a few seconds to reset the TV...On). 2 Remote sensor (embedded)-Point the remote control toward this remote sensor. 3 POWER-Turns the TV On/Off. Detects the ambient light conditions to the next. 6 HDMITM IN-High-Definition ...
User's Guide for L1350U and L2300U Series TV's
Page 24
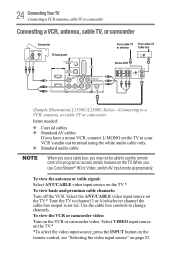
...AV input mode appropriately. Select the ANT/CABLE video input source on the VCR or camcorder video. To view the VCR or camcorder video: Turn on the TV.* Tune the TV to channel 3 or 4 (whichever channel the cable box output is set to). 24 ConnectingYourTV Connecting a VCR, antenna, cable... Illustration) L1350U/L2300U Series-Connecting to a VCR, antenna, or cable TV or camcorder Items needed: v Coaxial cables v Standard AV cables If you have a mono VCR, connect L/MONO on the TV.* To view basic and premium cable channels: Turn off the VCR. To view the antenna or cable signal: Select ANT/...
...AV input mode appropriately. Select the ANT/CABLE video input source on the VCR or camcorder video. To view the VCR or camcorder video: Turn on the TV.* Tune the TV to channel 3 or 4 (whichever channel the cable box output is set to). 24 ConnectingYourTV Connecting a VCR, antenna, cable... Illustration) L1350U/L2300U Series-Connecting to a VCR, antenna, or cable TV or camcorder Items needed: v Coaxial cables v Standard AV cables If you have a mono VCR, connect L/MONO on the TV.* To view basic and premium cable channels: Turn off the VCR. To view the antenna or cable signal: Select ANT/...
User's Guide for L1350U and L2300U Series TV's
Page 26
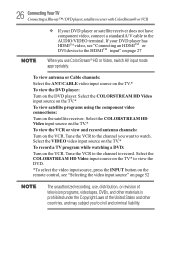
...the HDDMMIITTMM input" on page 27 When you want to record. Select the COLORSTREAM HD Video input source on the TV.* To view satellite programs using the component video connections: Turn on the VCR. Tune the VCR to the channel to watch. Select the VIDEO video input source on the... TV.* To record a TV program while watching a DVD: Turn on the satellite receiver. If your DVD player or satellite receiver does not have component video, connect a standard A/V cable to the AUDIO/VIDEO ...
...the HDDMMIITTMM input" on page 27 When you want to record. Select the COLORSTREAM HD Video input source on the TV.* To view satellite programs using the component video connections: Turn on the VCR. Tune the VCR to the channel to watch. Select the VIDEO video input source on the... TV.* To record a TV program while watching a DVD: Turn on the satellite receiver. If your DVD player or satellite receiver does not have component video, connect a standard A/V cable to the AUDIO/VIDEO ...
User's Guide for L1350U and L2300U Series TV's
Page 28
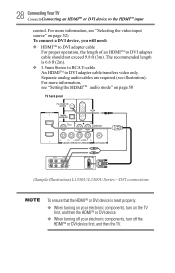
... 6.6 ft (2m). For more information, see illustration). For more information, see "Selecting the video input source" on the TV first, and then the HDMITM or DVI device. 28 ConnectingYourTV ConnectinCgoannnHeDctMinIgTManorHDDVMI dIeTvMicoertoDthVeIHdDeMviIcTeMtointphuet HDMITM input control. v 3.5mm Stereo to RCA ...cable should not exceed 9.8 ft (3m). v When turning off your electronic components, turn off the HDMITM or DVI device first, and then the TV. The recommended length is reset properly: v When turning on your electronic components, turn on page 52) To connect a DVI device, ...
... 6.6 ft (2m). For more information, see illustration). For more information, see "Selecting the video input source" on the TV first, and then the HDMITM or DVI device. 28 ConnectingYourTV ConnectinCgoannnHeDctMinIgTManorHDDVMI dIeTvMicoertoDthVeIHdDeMviIcTeMtointphuet HDMITM input control. v 3.5mm Stereo to RCA ...cable should not exceed 9.8 ft (3m). v When turning off your electronic components, turn off the HDMITM or DVI device first, and then the TV. The recommended length is reset properly: v When turning on your electronic components, turn on page 52) To connect a DVI device, ...
User's Guide for L1350U and L2300U Series TV's
Page 30
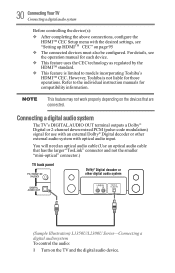
... see "Setting up HDMMIITTMM CEC" on the TV and the digital audio device. Refer to models incorporating Toshiba's HDMITM CEC. You will need an optical audio cable (Use an optical audio cable that are connected. However, Toshiba is limited to the individual instruction manuals for ...174; Digital decoder or other digital audio system (Sample Illustration) L1350U/L2300U Series-Connecting a digital audiosystem To control the audio: 1 Turn on page 95 v The connected devices must also be configured. 30 ConnectingYourTV Connecting a digital audio system Before controlling the device(s): v...
... see "Setting up HDMMIITTMM CEC" on the TV and the digital audio device. Refer to models incorporating Toshiba's HDMITM CEC. You will need an optical audio cable (Use an optical audio cable that are connected. However, Toshiba is limited to the individual instruction manuals for ...174; Digital decoder or other digital audio system (Sample Illustration) L1350U/L2300U Series-Connecting a digital audiosystem To control the audio: 1 Turn on page 95 v The connected devices must also be configured. 30 ConnectingYourTV Connecting a digital audio system Before controlling the device(s): v...
User's Guide for L1350U and L2300U Series TV's
Page 39
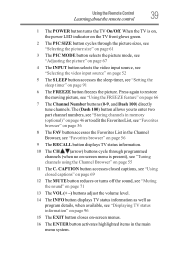
... 5 The SLEEP button accesses the sleep timer, see "Using the FREEZE feature" on page 91 6 The FREEZE button freezes the picture. When the TV is present), see "Displaying TV status information" on page 96 15 The EXIT button closes on page 55 11 The C. Using the Remote Control Learning about the remote... control 39 1 The POWER button turns the TV On/Off. Press again to edit the Favorites List, see "Favorites browser" on page 56 8 The FAV button accesses the Favorites List in the...
... 5 The SLEEP button accesses the sleep timer, see "Using the FREEZE feature" on page 91 6 The FREEZE button freezes the picture. When the TV is present), see "Displaying TV status information" on page 96 15 The EXIT button closes on page 55 11 The C. Using the Remote Control Learning about the remote... control 39 1 The POWER button turns the TV On/Off. Press again to edit the Favorites List, see "Favorites browser" on page 56 8 The FAV button accesses the Favorites List in the...
User's Guide for L1350U and L2300U Series TV's
Page 44
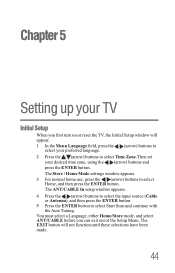
You must select a Language, either Home/Store mode, and select ANT/CABLE before you first turn on or reset the TV, the Initial Setup window will not function until these selections have been made. 44 The Store / Home Mode settings window appears. 3 For normal home use, .... 1 In the Menu Language field, press the / (arrow) buttons to select your preferred language. 2 Press the / (arrow) buttons to select Time Zone.Then set your TV Initial Setup When you can exit out of the Setup Menu. The ANT/CABLE In setup window appears. 4 Press the / (arrow) buttons to select the...
You must select a Language, either Home/Store mode, and select ANT/CABLE before you first turn on or reset the TV, the Initial Setup window will not function until these selections have been made. 44 The Store / Home Mode settings window appears. 3 For normal home use, .... 1 In the Menu Language field, press the / (arrow) buttons to select your preferred language. 2 Press the / (arrow) buttons to select Time Zone.Then set your TV Initial Setup When you can exit out of the Setup Menu. The ANT/CABLE In setup window appears. 4 Press the / (arrow) buttons to select the...
User's Guide for L1350U and L2300U Series TV's
Page 51
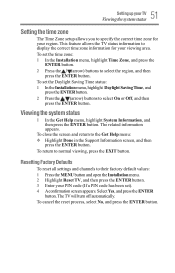
... menu, highlight Time Zone, and press the ENTER button. 2 Press the / (arrow) buttons to select the region, and then press the ENTER button. The TV will turn off automatically. To set the Daylight Saving Time status: 1 In the Installation menu, highlight Daylight Saving Time, and press the ENTER button. 2 Press the / (arrow...
... menu, highlight Time Zone, and press the ENTER button. 2 Press the / (arrow) buttons to select the region, and then press the ENTER button. The TV will turn off automatically. To set the Daylight Saving Time status: 1 In the Installation menu, highlight Daylight Saving Time, and press the ENTER button. 2 Press the / (arrow...

User's Guide for L1350U and L2300U Series TV's
Page 53
...to the specific devices you select HDMITM CEC input sources from the pop-up window using the INPUT button, some HDMITM CEC devices may automatically turn on the remote control repeatedly to highlight HDMI 1, HDMI 2 or HDMI 3. If the connected CEC device has any connected devices, a ...separate device selection pop-up window appears: Audio Receiver Player Recorder (Sample Illustration) HDMITM setting pop-up your TV Selecting the video input source (Sample Image) L1350/L2300U Series - 53 Setting up window Press the INPUT button repeatedly to highlight the desired...
...to the specific devices you select HDMITM CEC input sources from the pop-up window using the INPUT button, some HDMITM CEC devices may automatically turn on the remote control repeatedly to highlight HDMI 1, HDMI 2 or HDMI 3. If the connected CEC device has any connected devices, a ...separate device selection pop-up window appears: Audio Receiver Player Recorder (Sample Illustration) HDMITM setting pop-up your TV Selecting the video input source (Sample Image) L1350/L2300U Series - 53 Setting up window Press the INPUT button repeatedly to highlight the desired...
User's Guide for L1350U and L2300U Series TV's
Page 58
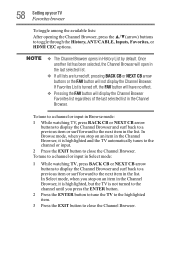
...next item in the list. To tune to a channel or input in Browse mode: 1 While watching TV, press BACK CB or NEXT CB arrow buttons to display the Channel Browser and surf back to a previous... v Pressing the FAV button will open in the Channel Browser, it is highlighted, but the TV is highlighted and the TV automatically tunes to the channel or input. 2 Press the EXIT button to close the Channel Browser....list. In Select mode, when you stop on an item in the Channel Browser, it is not turned to the channel until you stop on an item in the last selected list. Once another list has...
...next item in the list. To tune to a channel or input in Browse mode: 1 While watching TV, press BACK CB or NEXT CB arrow buttons to display the Channel Browser and surf back to a previous... v Pressing the FAV button will open in the Channel Browser, it is highlighted, but the TV is highlighted and the TV automatically tunes to the channel or input. 2 Press the EXIT button to close the Channel Browser....list. In Select mode, when you stop on an item in the Channel Browser, it is not turned to the channel until you stop on an item in the last selected list. Once another list has...
User's Guide for L1350U and L2300U Series TV's
Page 59
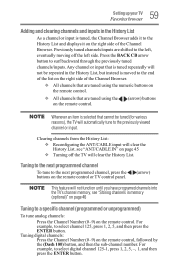
...previously viewed channel or input. This feature will not function until you have programed channels into the TV's channel memory, see "ANT/CABLE IN" on page 45 v Turning off the left , eventually moving off the TV will clear the History List. For example, to select digital channel 125-1, press 1, 2, 5,...remote control. Tuning digital channels: Press the Channel Number (0-9) on the right side of the Channel Browser. 59 Setting up your TV Favorites browser Adding and clearing channels and inputs in the History List As a channel or input is selected that cannot be repeated in...
...previously viewed channel or input. This feature will not function until you have programed channels into the TV's channel memory, see "ANT/CABLE IN" on page 45 v Turning off the left , eventually moving off the TV will clear the History List. For example, to select digital channel 125-1, press 1, 2, 5,...remote control. Tuning digital channels: Press the Channel Number (0-9) on the right side of the Channel Browser. 59 Setting up your TV Favorites browser Adding and clearing channels and inputs in the History List As a channel or input is selected that cannot be repeated in...
User's Guide for L1350U and L2300U Series TV's
Page 66
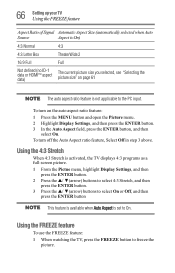
... the Auto Aspect ratio feature, Select Off in step 3 above. To turn on page 61 The auto aspect ratio feature is set to On. Using the FREEZE feature To use the FREEZE feature: 1 When watching the TV, press the FREEZE button to the PC input. 66 SettingupyourTV Using the ...press the ENTER button. 3 In the Auto Aspect field, press the ENTER button, and then select On. Using the 4:3 Stretch When 4:3 Stretch is activated, the TV displays 4:3 programs as a full-screen picture. 1 From the Pictue menu, highlight Display Settings, and then press the ENTER button. 2 Press the / ▼(...
... the Auto Aspect ratio feature, Select Off in step 3 above. To turn on page 61 The auto aspect ratio feature is set to On. Using the FREEZE feature To use the FREEZE feature: 1 When watching the TV, press the FREEZE button to the PC input. 66 SettingupyourTV Using the ...press the ENTER button. 3 In the Auto Aspect field, press the ENTER button, and then select On. Using the 4:3 Stretch When 4:3 Stretch is activated, the TV displays 4:3 programs as a full-screen picture. 1 From the Pictue menu, highlight Display Settings, and then press the ENTER button. 2 Press the / ▼(...
User's Guide for L1350U and L2300U Series TV's
Page 71
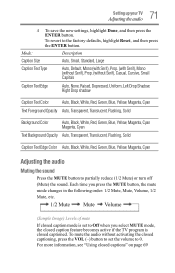
For more information, see "Using closed caption mode is closed captioned. To revert to partially reduce (1/2 Mute) or turn off (Mute) the sound. Mode: Description Caption Size Auto, Small, Standard, Large Caption Text Type Auto, Default, Mono (with Serif), Prop. (with Serif), Mono ... the factory defaults, highlight Reset, and then press the ENTER button. Each time you select MUTE mode, the closed caption feature becomes active if the TV program is set the volume to Off when you press the MUTE button, the mute mode changes in the following order: 1/2 Mute, Mute, Volume, 1/2...
For more information, see "Using closed caption mode is closed captioned. To revert to partially reduce (1/2 Mute) or turn off (Mute) the sound. Mode: Description Caption Size Auto, Small, Standard, Large Caption Text Type Auto, Default, Mono (with Serif), Prop. (with Serif), Mono ... the factory defaults, highlight Reset, and then press the ENTER button. Each time you select MUTE mode, the closed caption feature becomes active if the TV program is set the volume to Off when you press the MUTE button, the mute mode changes in the following order: 1/2 Mute, Mute, Volume, 1/2...
User's Guide for L1350U and L2300U Series TV's
Page 91
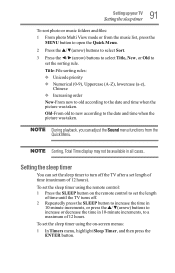
...date and time when the picture was taken. To set length of time (maximum of time until the TV turns off the TV after a set the sleep timer using the remote control: 1 Press the SLEEP button on -screen menus... then press the ENTER button. During playback, you can set the sorting rule. 91 Setting up your TV Setting the sleep timer To sort photo or music folders and files: 1 From photo Multi View mode ...or from the Quick Menu. Old-From old to new according to set the sleep timer to turn off . 2 Repeatedly press the SLEEP button to increase the time in 10-minute increments, or press ...
...date and time when the picture was taken. To set length of time (maximum of time until the TV turns off the TV after a set the sleep timer using the remote control: 1 Press the SLEEP button on -screen menus... then press the ENTER button. During playback, you can set the sorting rule. 91 Setting up your TV Setting the sleep timer To sort photo or music folders and files: 1 From photo Multi View mode ...or from the Quick Menu. Old-From old to new according to set the sleep timer to turn off . 2 Repeatedly press the SLEEP button to increase the time in 10-minute increments, or press ...
User's Guide for L1350U and L2300U Series TV's
Page 92
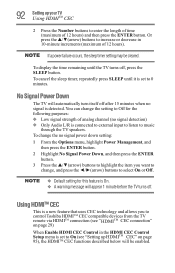
... minutes when no signal detection) v Only Audio L/R is set to control Toshiba HDMITM CEC compatible devices from the TV remote via HDMITM connection (see "HHDDMMIITTMM CEC connection" on page 95), the HDMITM CEC functions described below will appear 1 minute before the TV turns off , press the SLEEP button. v A warning message will be cleared. Or... is connected to external input to listen to select On or Off. To change , and press the ◄/►(arrow) buttons to music through the TV speakers. To cancel the sleep timer, repeatedly press SLEEP until the TV turns off .
... minutes when no signal detection) v Only Audio L/R is set to control Toshiba HDMITM CEC compatible devices from the TV remote via HDMITM connection (see "HHDDMMIITTMM CEC connection" on page 95), the HDMITM CEC functions described below will appear 1 minute before the TV turns off , press the SLEEP button. v A warning message will be cleared. Or... is connected to external input to listen to select On or Off. To change , and press the ◄/►(arrow) buttons to music through the TV speakers. To cancel the sleep timer, repeatedly press SLEEP until the TV turns off .
User's Guide for L1350U and L2300U Series TV's
Page 94
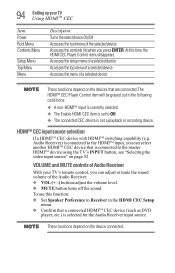
94 SettingupyourTV UsinggHHDDMMITITMM CECC Item: Power Root Menu Contents Menu Setup Menu Top Menu Menu Description: Turns the select device On/Off Accesses the root menu of the Audio Receiver. v The connected CEC device is... to Receiver in the following conditions: v A non-HDMITM input is set to the master HDMITM device using the TV's INPUT button, see "Selecting the video input source" on page 52 VOLUME and MUTE controls of Audio Receiver With your...a selected device Accesses the menu of a selected device These functions depend on the device connected. v MUTE button turns off the sound.
94 SettingupyourTV UsinggHHDDMMITITMM CECC Item: Power Root Menu Contents Menu Setup Menu Top Menu Menu Description: Turns the select device On/Off Accesses the root menu of the Audio Receiver. v The connected CEC device is... to Receiver in the following conditions: v A non-HDMITM input is set to the master HDMITM device using the TV's INPUT button, see "Selecting the video input source" on page 52 VOLUME and MUTE controls of Audio Receiver With your...a selected device Accesses the menu of a selected device These functions depend on the device connected. v MUTE button turns off the sound.
User's Guide for L1350U and L2300U Series TV's
Page 95
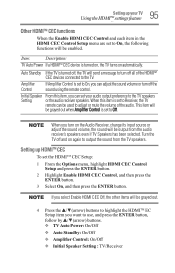
...When this item, you select Enable HDMI CEC Off, the other items will send a message to turn on automatically. v TV Auto Power: On/Off v Auto Standby: On/Off v Amplifier Control: On/Off v Initial Speaker Setting : TV/Receiver When you want to use, and press the ENTER button, follow by /▼(arrow) ... and press the ENTER button. 2 Highlight Enable HDMI CEC Control, and then press the ENTER button. 3 Select On, and then press the ENTER button. Turn the TV off , the TV will be grayed out. 4 Press the /▼(arrow) buttons to highlight the HDMITM EC Setup item you...
...When this item, you select Enable HDMI CEC Off, the other items will send a message to turn on automatically. v TV Auto Power: On/Off v Auto Standby: On/Off v Amplifier Control: On/Off v Initial Speaker Setting : TV/Receiver When you want to use, and press the ENTER button, follow by /▼(arrow) ... and press the ENTER button. 2 Highlight Enable HDMI CEC Control, and then press the ENTER button. 3 Select On, and then press the ENTER button. Turn the TV off , the TV will be grayed out. 4 Press the /▼(arrow) buttons to highlight the HDMITM EC Setup item you...


