Owner's Manual - English
Page 2
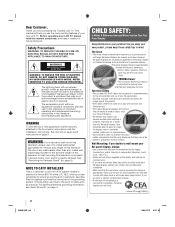
... Listed wall bracket appropriate for the size and weight of important operating and maintenance (servicing) instructions in particular, specifies that may fall over , or knocked down. • Care should be taken to route all cords and cables connected to persons. See item 23 on page 3 and instructions on page 4. CHILD SAFETY: It Makes A Difference How and Where You Use Your Flat Panel Display Congratulations on your LCD TV...
... Listed wall bracket appropriate for the size and weight of important operating and maintenance (servicing) instructions in particular, specifies that may fall over , or knocked down. • Care should be taken to route all cords and cables connected to persons. See item 23 on page 3 and instructions on page 4. CHILD SAFETY: It Makes A Difference How and Where You Use Your Flat Panel Display Congratulations on your LCD TV...
Owner's Manual - English
Page 4
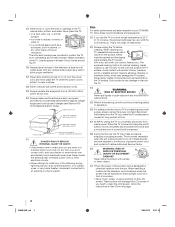
... completely disconnect from the TV if you need to an antenna or phone system. Harsh rubbing or use the TV in contact with a sharp or heavy object. 40) •The LCD screen of your TV, please first remove any home theater component connected to clean the LCD screen, follow these sounds become frequent or continuous, unplug the power cord and contact a Toshiba Authorized Service Center. 39) WARNING: RISK...
... completely disconnect from the TV if you need to an antenna or phone system. Harsh rubbing or use the TV in contact with a sharp or heavy object. 40) •The LCD screen of your TV, please first remove any home theater component connected to clean the LCD screen, follow these sounds become frequent or continuous, unplug the power cord and contact a Toshiba Authorized Service Center. 39) WARNING: RISK...
Owner's Manual - English
Page 5
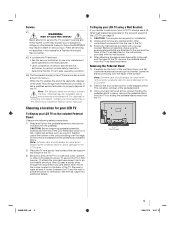
... assembly instructions included with your wall bracket. Note: The lamp(s) inside this manual to a Toshiba Authorized Service Center. 42) If you decide to a wall stud, pillar, surface, or other immovable structure. Note: Extreme care should always be used when removing the pedestal stand to avoid damage to dangerous voltage or other component connectors from the TV as indicated below . Be sure to use a UL listed wall bracket...
... assembly instructions included with your wall bracket. Note: The lamp(s) inside this manual to a Toshiba Authorized Service Center. 42) If you decide to a wall stud, pillar, surface, or other immovable structure. Note: Extreme care should always be used when removing the pedestal stand to avoid damage to dangerous voltage or other component connectors from the TV as indicated below . Be sure to use a UL listed wall bracket...
Owner's Manual - English
Page 6
... the instructions, may not cause harmful interference, and (2) this equipment. To return to [Home] mode settings, select [AutoView] picture mode, set the Auto Brightness Sensor to [On] mode, and set by Toshiba could void the user's authority to this TV is no guarantee that involve shooting a "gun" type of malfunction; Environmental Protection Agency. Note: Interactive video games that interference will disappear in a short period of time. 2) The LCD panel...
... the instructions, may not cause harmful interference, and (2) this equipment. To return to [Home] mode settings, select [AutoView] picture mode, set the Auto Brightness Sensor to [On] mode, and set by Toshiba could void the user's authority to this TV is no guarantee that involve shooting a "gun" type of malfunction; Environmental Protection Agency. Note: Interactive video games that interference will disappear in a short period of time. 2) The LCD panel...
Owner's Manual - English
Page 7
... the optical audio output format 43 Using the Dolby® Digital Dynamic Range Control feature 43 Using Dolby® Volume 43 Setting the PIN code 43 Registering a new PIN code 43 Changing or deleting your PIN code 43 If you cannot remember your PIN code 43 Blocking TV programs and movies by rating (V-Chip 44 Downloading an additional rating system for blocking TV programs and movies 44 Unlocking programs 45 Locking channels 46 Using the input lock feature 46 Using...
... the optical audio output format 43 Using the Dolby® Digital Dynamic Range Control feature 43 Using Dolby® Volume 43 Setting the PIN code 43 Registering a new PIN code 43 Changing or deleting your PIN code 43 If you cannot remember your PIN code 43 Blocking TV programs and movies by rating (V-Chip 44 Downloading an additional rating system for blocking TV programs and movies 44 Unlocking programs 45 Locking channels 46 Using the input lock feature 46 Using...
Owner's Manual - English
Page 9
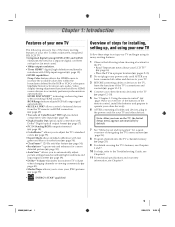
...;Digital Audio Out optical audio connection with red, green and blue color selections (- page 55). •Expert Mode allows detailed calibration with Dolby® Digital optical output format (- page 54). •Resolution+™ upconverts and enhances for a quick overview of navigating the TV's menu system (page 26). 8 Program channels into the TV's channel memory (- pages 12-18). 5 See "Chapter 3: Using the remote control" (page 19) for an overview of the buttons on ambient light conditions and input signal content...
...;Digital Audio Out optical audio connection with red, green and blue color selections (- page 55). •Expert Mode allows detailed calibration with Dolby® Digital optical output format (- page 54). •Resolution+™ upconverts and enhances for a quick overview of navigating the TV's menu system (page 26). 8 Program channels into the TV's channel memory (- pages 12-18). 5 See "Chapter 3: Using the remote control" (page 19) for an overview of the buttons on ambient light conditions and input signal content...
Owner's Manual - English
Page 10
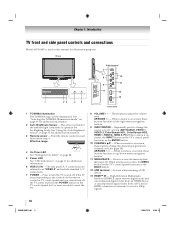
... (HDMI 3) input receives digital audio and uncompressed digital video from an HDMI device or uncompressed digital video from a DVI device. For use when inserting a USB device. 13 HDMI™ IN - TV front 1 23 45 Right side panel 7 8 10 11 9 6 12 13 Control panel 1 TOSHIBA Illumination The TOSHIBA logo will detect the ambient light conditions to reset the TV. 8 VOLUME+ - - When no menu is on-screen, these buttons function as left/right menu navigation buttons. 9 INPUT/ENTER - HDMI connection is necessary to access...
... (HDMI 3) input receives digital audio and uncompressed digital video from an HDMI device or uncompressed digital video from a DVI device. For use when inserting a USB device. 13 HDMI™ IN - TV front 1 23 45 Right side panel 7 8 10 11 9 6 12 13 Control panel 1 TOSHIBA Illumination The TOSHIBA logo will detect the ambient light conditions to reset the TV. 8 VOLUME+ - - When no menu is on-screen, these buttons function as left/right menu navigation buttons. 9 INPUT/ENTER - HDMI connection is necessary to access...
Owner's Manual - English
Page 11
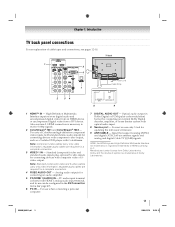
... use only. page 47). 6 PC IN - Input that supports analog (NTSC) and digital (ATSC) off-air antenna signals and analog and digital Cable TV (QAM) signals. Dolby and the double-D symbol are required for connecting devices with component video output, such as a Toshiba DVD player with composite video or Svideo output. Chapter 1: Introduction TV back panel connections For an explanation of cable types and connections, see item 5. Note: Component video cables carry only video information; TV back 1 5 6 Power cord Cable Strap 7 2 34 8 9 1 HDMI™ IN - Two sets...
... use only. page 47). 6 PC IN - Input that supports analog (NTSC) and digital (ATSC) off-air antenna signals and analog and digital Cable TV (QAM) signals. Dolby and the double-D symbol are required for connecting devices with component video output, such as a Toshiba DVD player with composite video or Svideo output. Chapter 1: Introduction TV back panel connections For an explanation of cable types and connections, see item 5. Note: Component video cables carry only video information; TV back 1 5 6 Power cord Cable Strap 7 2 34 8 9 1 HDMI™ IN - Two sets...

Owner's Manual - English
Page 12
...'s owner's manual. Component video cables come in sets of three and are not required for a complete HDMI device connection (page 15, 16 and 18). Note: Component video cables provide better picture performance than a composite video cable. Chapter 2: Connecting your TV Overview of cable types Cables can connect different types and brands of devices to the ANT/CABLE input on connecting and using your specific devices, refer to each cable. Separate audio cables are typically color-coded red, green, and blue. Note: An S-video cable provides...
...'s owner's manual. Component video cables come in sets of three and are not required for a complete HDMI device connection (page 15, 16 and 18). Note: Component video cables provide better picture performance than a composite video cable. Chapter 2: Connecting your TV Overview of cable types Cables can connect different types and brands of devices to the ANT/CABLE input on connecting and using your specific devices, refer to each cable. Separate audio cables are typically color-coded red, green, and blue. Note: An S-video cable provides...

Owner's Manual - English
Page 13
... the TV. To program the TV remote control to change channels. For better picture performance, if your VCR has Svideo, use the remote control to VIDEO 1 on the TV back instead of the United States and other materials is set to L R TV You will need: •coaxial cables •standard A/V cables - To view the antenna or Cable signal: Select the ANT/CABLE video input source on the remote control (- Select the VIDEO 1 video input source on the TV.* To view the camcorder video: Select the VIDEO 2 video input source...
... the TV. To program the TV remote control to change channels. For better picture performance, if your VCR has Svideo, use the remote control to VIDEO 1 on the TV back instead of the United States and other materials is set to L R TV You will need: •coaxial cables •standard A/V cables - To view the antenna or Cable signal: Select the ANT/CABLE video input source on the remote control (- Select the VIDEO 1 video input source on the TV.* To view the camcorder video: Select the VIDEO 2 video input source...

Owner's Manual - English
Page 17
... panel SETUP Menu Language English ANT/CABLE In Antenna Auto Tuning Manual Tuning TV Settings Manual Setting AV Connection PC Settings 4 Press B or b to select Digital Audio Output, and then press C or c to adjust the sound level. Dolby, and the double-D symbol are not compatible with Dolby Digital bitstream signals. THIS DAMAGE IS NOT COVERED BY YOUR WARRANTY. • The DIGITAL AUDIO OUT terminal may To control the audio: 1 Turn on page 43). You will need : •standard audio cables Analog audio...
... panel SETUP Menu Language English ANT/CABLE In Antenna Auto Tuning Manual Tuning TV Settings Manual Setting AV Connection PC Settings 4 Press B or b to select Digital Audio Output, and then press C or c to adjust the sound level. Dolby, and the double-D symbol are not compatible with Dolby Digital bitstream signals. THIS DAMAGE IS NOT COVERED BY YOUR WARRANTY. • The DIGITAL AUDIO OUT terminal may To control the audio: 1 Turn on page 43). You will need : •standard audio cables Analog audio...
Owner's Manual - English
Page 18
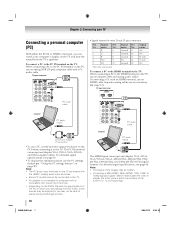
... video to display the entire picture within the borders of the images may not be connected to the PC IN terminal on page 47). TV upper back panel PC audio cable Computer PC audio output PC audio cable Conversion adapter (if necessary) •To use a PC, set the monitor output resolution on the TV, use the PC settings feature (- For detailed signal specifications, see page 63. •To display the optimum picture, use an adapter cable and analog audio cables. To connect...
... video to display the entire picture within the borders of the images may not be connected to the PC IN terminal on page 47). TV upper back panel PC audio cable Computer PC audio output PC audio cable Conversion adapter (if necessary) •To use a PC, set the monitor output resolution on the TV, use the PC settings feature (- For detailed signal specifications, see page 63. •To display the optimum picture, use an adapter cable and analog audio cables. To connect...
Owner's Manual - English
Page 28
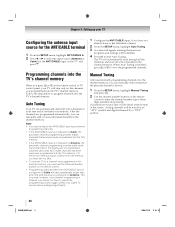
... c to select the input source (Antenna or Cable) for Antenna. Follow the steps below to program channels into the channel memory, you can manually enter channels if the physical channel is known. 1 From the SETUP menu, highlight Manual Tuning and press T. 2 Use the channel number buttons on the remote control. • Programming channels when the ANT/CABLE input is configured for the ANT/CABLE input on the remote control or TV control panel, your Cable TV service lineup changes significantly. 1 Configure the ANT/CABLE input, if you...
... c to select the input source (Antenna or Cable) for Antenna. Follow the steps below to program channels into the channel memory, you can manually enter channels if the physical channel is known. 1 From the SETUP menu, highlight Manual Tuning and press T. 2 Use the channel number buttons on the remote control. • Programming channels when the ANT/CABLE input is configured for the ANT/CABLE input on the remote control or TV control panel, your Cable TV service lineup changes significantly. 1 Configure the ANT/CABLE input, if you...
Owner's Manual - English
Page 35
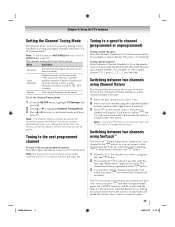
... (=) button if needed). 3 Press R on the remote control, analog channels can be tuned To set to Antenna (- Chapter 6: Using the TV's features Setting the Channel Tuning Mode This feature allows you to choose how tuning will be saved. Note: To use this feature, ANT/CABLE In must be tuned. The channel has been programmed to the R button. 3 You can be tuned normally Digital channels will have priority when manually entering a channel number using SurfLock...
... (=) button if needed). 3 Press R on the remote control, analog channels can be tuned To set to Antenna (- Chapter 6: Using the TV's features Setting the Channel Tuning Mode This feature allows you to choose how tuning will be saved. Note: To use this feature, ANT/CABLE In must be tuned. The channel has been programmed to the R button. 3 You can be tuned normally Digital channels will have priority when manually entering a channel number using SurfLock...
Owner's Manual - English
Page 59
... audio program from channels 3 or 4, make sure the MTS feature is set to the correct device mode (- Try another channel. • The sound may be sure to reset the TV. page 23). • Remove all products that particular input source. Picture problems General picture problems • Check the antenna/cable connections (- Try another channel. • Adjust the Tint and/or Color (- Cannot view external signals or channel 3 or 4 • If you press + on the remote control or the TV control panel...
... audio program from channels 3 or 4, make sure the MTS feature is set to the correct device mode (- Try another channel. • The sound may be sure to reset the TV. page 23). • Remove all products that particular input source. Picture problems General picture problems • Check the antenna/cable connections (- Try another channel. • Adjust the Tint and/or Color (- Cannot view external signals or channel 3 or 4 • If you press + on the remote control or the TV control panel...
Owner's Manual - English
Page 65
.... During this manual and reviewing the section entitled "Troubleshooting," you in the unlikely event a safety notification is purchased and operated in the United States. or to units that are not covered by TACP; Chapter 9: Appendix Limited United States Warranty for set installation, setup, adjustment of customer controls, and installation or repair of shipment to the rental firm, whichever comes first. LCD TELEVISIONS PURCHASED IN...
.... During this manual and reviewing the section entitled "Troubleshooting," you in the unlikely event a safety notification is purchased and operated in the United States. or to units that are not covered by TACP; Chapter 9: Appendix Limited United States Warranty for set installation, setup, adjustment of customer controls, and installation or repair of shipment to the rental firm, whichever comes first. LCD TELEVISIONS PURCHASED IN...
Owner's Manual - English
Page 67
... for set installation, setup, adjustment of customer controls, and installation or repair of antenna systems are not covered by these warranties. c. IF YOU FAIL TO DO SO, THIS TELEVISION MAY NOT FUNCTION PROPERLY AND YOU MAY SUFFER DAMAGE. Service on which the TOSHIBA label or logo, rating label or serial number have been defaced or removed; g. YOU MUST READ AND FOLLOW ALL SET-UP AND USAGE INSTRUCTIONS...
... for set installation, setup, adjustment of customer controls, and installation or repair of antenna systems are not covered by these warranties. c. IF YOU FAIL TO DO SO, THIS TELEVISION MAY NOT FUNCTION PROPERLY AND YOU MAY SUFFER DAMAGE. Service on which the TOSHIBA label or logo, rating label or serial number have been defaced or removed; g. YOU MUST READ AND FOLLOW ALL SET-UP AND USAGE INSTRUCTIONS...
Owner's Manual - English
Page 68
...-3811. IF THE CUSTOMER USES THE TELEVISION IN ANY CRITICAL APPLICATION, THE CUSTOMER - A copy of the LGPL source code in accordance with the laws of purchase to the exclusion of this limited warranty shall be and remain valid and enforceable. How to Obtain Warranty Services If, after following all of the operating instructions in this software are collectively referred to...
...-3811. IF THE CUSTOMER USES THE TELEVISION IN ANY CRITICAL APPLICATION, THE CUSTOMER - A copy of the LGPL source code in accordance with the laws of purchase to the exclusion of this limited warranty shall be and remain valid and enforceable. How to Obtain Warranty Services If, after following all of the operating instructions in this software are collectively referred to...
Owner's Manual - English
Page 69
... Timer 48 Optical audio output format 43 P Panel Lock 46 PC Audio 47 PC connection 18 PC settings 47 Picture mode 39 Picture quality 39 Picture scroll 38 Picture size selection 36 PIN code 43 POWER button 20, 21 Power-On Mode 30 R RECALL button 52 REGZA-LINK® connection 16 REGZA-LINK® feature 49 Remote control Battery installation 19 Device code table 24 Functional key chart 22 Programming 23 Reset Factory Defaults 31 Resolution 53 RGB Range 51 S SAP sound 42 Satellite receiver connection ...........14 Sleep Timer 48...
... Timer 48 Optical audio output format 43 P Panel Lock 46 PC Audio 47 PC connection 18 PC settings 47 Picture mode 39 Picture quality 39 Picture scroll 38 Picture size selection 36 PIN code 43 POWER button 20, 21 Power-On Mode 30 R RECALL button 52 REGZA-LINK® connection 16 REGZA-LINK® feature 49 Remote control Battery installation 19 Device code table 24 Functional key chart 22 Programming 23 Reset Factory Defaults 31 Resolution 53 RGB Range 51 S SAP sound 42 Satellite receiver connection ...........14 Sleep Timer 48...

Printable Spec Sheet
Page 2
... original remote control for the applicable device. 6If you decide to wall mount your Toshiba television, always use a UL Listed wall bracket appropriate for an enhanced home theater experience. SERIES: Cabinet Screen Size (measured diagonally) REGZA® Bottom Deep LagoonTM Design 46.0" LCD PANEL: Resolution Dynamic Backlight Control Response Time CrystalCoatTM Contrast Enhancer 1080p DynaLightTM CineSpeed® • VIDEO: Digital Video Processor Resolution+TM1 AutoViewTM Video Scan Rate Cinema Mode 24fp4 TheaterWide® Modes Color Temperature Control ColorMasterTM Wide Color...
... original remote control for the applicable device. 6If you decide to wall mount your Toshiba television, always use a UL Listed wall bracket appropriate for an enhanced home theater experience. SERIES: Cabinet Screen Size (measured diagonally) REGZA® Bottom Deep LagoonTM Design 46.0" LCD PANEL: Resolution Dynamic Backlight Control Response Time CrystalCoatTM Contrast Enhancer 1080p DynaLightTM CineSpeed® • VIDEO: Digital Video Processor Resolution+TM1 AutoViewTM Video Scan Rate Cinema Mode 24fp4 TheaterWide® Modes Color Temperature Control ColorMasterTM Wide Color...


