
Owner's Manual - English
Page 2
... CATV INSTALLERS This is a growing trend and larger flat panel displays are required for the size and weight of important operating and maintenance (servicing) instructions in accordance with steel studs or old cinder block construction. Before operating your LCD TV, please read and understand all enclosed instructions for proper use of this apparatus must be taken to route all cords and cables connected to wall mount this television, always use of...
... CATV INSTALLERS This is a growing trend and larger flat panel displays are required for the size and weight of important operating and maintenance (servicing) instructions in accordance with steel studs or old cinder block construction. Before operating your LCD TV, please read and understand all enclosed instructions for proper use of this apparatus must be taken to route all cords and cables connected to wall mount this television, always use of...

Owner's Manual - English
Page 3
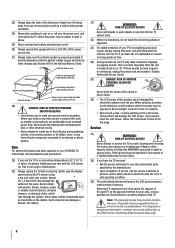
...prong are provided to a wall stud, pillar, or other immovable structure. Servicing is required when the apparatus has been damaged in any way, such as power-supply cord or plug is used, use caution when moving the cart/apparatus combination to qualified service personnel. fully insert. 16)...Use only with the cart, stand, tripod, bracket, or table specified by broken glass, rinse the affected area thoroughly with water and consult your doctor. • ALWAYS contact a service technician to dripping or splashing and that can support the weight of at all warnings when installing your TV...
...prong are provided to a wall stud, pillar, or other immovable structure. Servicing is required when the apparatus has been damaged in any way, such as power-supply cord or plug is used, use caution when moving the cart/apparatus combination to qualified service personnel. fully insert. 16)...Use only with the cart, stand, tripod, bracket, or table specified by broken glass, rinse the affected area thoroughly with water and consult your doctor. • ALWAYS contact a service technician to dripping or splashing and that can support the weight of at all warnings when installing your TV...
Owner's Manual - English
Page 4
... the power cord and disconnect the antenna from the TV if you need to clean the LCD screen, follow the instructions in wire Ground clamp Antenna discharge unit (NEC Section 810-20) Electric service equipment Grounding conductors (NEC Section 810-21) Ground clamps Power service grounding electrode system (NEC Art 250 Part-H) 28) DANGER: RISK OF SERIOUS PERSONAL INJURY OR DEATH! • Use extreme...
... the power cord and disconnect the antenna from the TV if you need to clean the LCD screen, follow the instructions in wire Ground clamp Antenna discharge unit (NEC Section 810-20) Electric service equipment Grounding conductors (NEC Section 810-21) Ground clamps Power service grounding electrode system (NEC Art 250 Part-H) 28) DANGER: RISK OF SERIOUS PERSONAL INJURY OR DEATH! • Use extreme...

Owner's Manual - English
Page 5
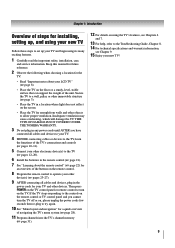
... wall and the back of the TV as described below . Choosing a location for installation. 2) Unplug and remove any cables and/or other component connectors from the rear of the TV. 3) Remove the screws of the VESA Mounting Pattern show in the right diagram. 4) Follow the instructions provided with your wall bracket. This will allow removal of the pedestal stand. 3) Once you decide to wall mount your LCD TV, always use a sturdy strap from the hook(s) on a flat...
... wall and the back of the TV as described below . Choosing a location for installation. 2) Unplug and remove any cables and/or other component connectors from the rear of the TV. 3) Remove the screws of the VESA Mounting Pattern show in the right diagram. 4) Follow the instructions provided with your wall bracket. This will allow removal of the pedestal stand. 3) Once you decide to wall mount your LCD TV, always use a sturdy strap from the hook(s) on a flat...

Owner's Manual - English
Page 7
... Remote control codes 26 Chapter 4: Menu layout and navigation 28 Main menu layout 28 Setup/Installation menu layout 29 Navigating the menu system 29 Chapter 5: Setting up your TV 30 Selecting the menu language 30 TOSHIBA Logo LED 30 Configuring the antenna input source for the ANT/CABLE terminal 30 Programming channels into the TV's channel memory ........31 Programming channels automatically 31 Manually adding and deleting channels in the channel memory 31 Labeling channels 32 Setting the HDMI™ audio mode 33 Viewing...
... Remote control codes 26 Chapter 4: Menu layout and navigation 28 Main menu layout 28 Setup/Installation menu layout 29 Navigating the menu system 29 Chapter 5: Setting up your TV 30 Selecting the menu language 30 TOSHIBA Logo LED 30 Configuring the antenna input source for the ANT/CABLE terminal 30 Programming channels into the TV's channel memory ........31 Programming channels automatically 31 Manually adding and deleting channels in the channel memory 31 Labeling channels 32 Setting the HDMI™ audio mode 33 Viewing...
Owner's Manual - English
Page 9
... 7. 13 For help, refer to the Troubleshooting Guide, Chapter 8. 14 For technical specifications and warranty information, see Chapter 9. 15 Enjoy your LCD TV" ( page 6). • Place the TV on the screen. • Place the TV far enough from walls and other devices. If the TV stops responding to the controls on the remote control or TV control panel and you have connected all cables and devices, plug in a location where light does not...
... 7. 13 For help, refer to the Troubleshooting Guide, Chapter 8. 14 For technical specifications and warranty information, see Chapter 9. 15 Enjoy your LCD TV" ( page 6). • Place the TV on the screen. • Place the TV far enough from walls and other devices. If the TV stops responding to the controls on the remote control or TV control panel and you have connected all cables and devices, plug in a location where light does not...
Owner's Manual - English
Page 11
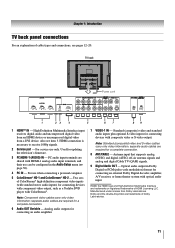
...-air antenna signals and analog and digital Cable TV (QAM) signals. 9 Digital Audio OUT - Optical audio output in the Audio Setup menu ( page 50). 4 PC IN - PC audio input terminals are shared with ColorStream®. separate audio cables are trademarks or registered trademarks of ColorStream® high-definition component video inputs (with standard stereo audio inputs) for connecting devices with component video output, such as a Toshiba DVD player with HDMI-1 analog audio input terminals, and their use can be configured in Dolby Digital or PCM (pulse-code modulation) format...
...-air antenna signals and analog and digital Cable TV (QAM) signals. 9 Digital Audio OUT - Optical audio output in the Audio Setup menu ( page 50). 4 PC IN - PC audio input terminals are shared with ColorStream®. separate audio cables are trademarks or registered trademarks of ColorStream® high-definition component video inputs (with standard stereo audio inputs) for connecting devices with component video output, such as a Toshiba DVD player with HDMI-1 analog audio input terminals, and their use can be configured in Dolby Digital or PCM (pulse-code modulation) format...
Owner's Manual - English
Page 12
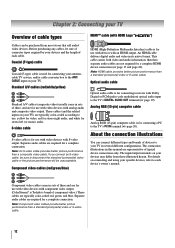
... with component video output. (ColorStream® is for connecting a PC to the ANT/ CABLE input on connecting and using your devices and the length of cable types HDMI™ cable (with S-video output. Note: An S-video cable provides better picture performance than a composite video cable. therefore, separate audio cables are typically color-coded red, green, and blue. An HDMI cable delivers digital audio and video in sets of three and are for use with devices with analog audio and composite video output. For details on your TV...
... with component video output. (ColorStream® is for connecting a PC to the ANT/ CABLE input on connecting and using your devices and the length of cable types HDMI™ cable (with S-video output. Note: An S-video cable provides better picture performance than a composite video cable. therefore, separate audio cables are typically color-coded red, green, and blue. An HDMI cable delivers digital audio and video in sets of three and are for use with devices with analog audio and composite video output. For details on your TV...

Owner's Manual - English
Page 14
... change channels. From Cable TV You will need: • coaxial cables • S-video cable − Do not connect both types of video cable to VIDEO 1 at the same time or the picture performance will provide better picture performance than a standard (composite) video cable. To view basic and premium Cable channels: Turn OFF the VCR. To view the VCR: Turn ON the VCR. Use the Cable box controls to channel 3 or 4 (whichever channel the Cable box output is prohibited under the Copyright Laws of television programs...
... change channels. From Cable TV You will need: • coaxial cables • S-video cable − Do not connect both types of video cable to VIDEO 1 at the same time or the picture performance will provide better picture performance than a standard (composite) video cable. To view basic and premium Cable channels: Turn OFF the VCR. To view the VCR: Turn ON the VCR. Use the Cable box controls to channel 3 or 4 (whichever channel the Cable box output is prohibited under the Copyright Laws of television programs...
Owner's Manual - English
Page 19
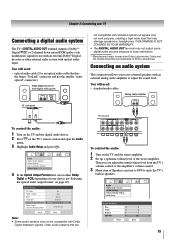
... TV's volume control or the amplifier's volume control. 3 Menu item of Speakers can turn to OFF to use with an external Dolby® Digital decoder or other external audio system with standard optical out signals may not work properly, creating a high noise level that may not be compatible with an external analog audio amplifier to adjust the sound level. Audio Digital Audio Selector Audio Settings Advanced Audio Settings Audio Setup 4 In the Optical Output Format field, select either Dolby Digital or PCM, depending on your TV Connecting a digital audio...
... TV's volume control or the amplifier's volume control. 3 Menu item of Speakers can turn to OFF to use with an external Dolby® Digital decoder or other external audio system with standard optical out signals may not work properly, creating a high noise level that may not be compatible with an external analog audio amplifier to adjust the sound level. Audio Digital Audio Selector Audio Settings Advanced Audio Settings Audio Setup 4 In the Optical Output Format field, select either Dolby Digital or PCM, depending on your TV Connecting a digital audio...

Owner's Manual - English
Page 20
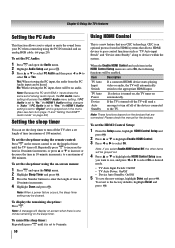
... TV and hear the sound from the TV's speakers. PC audio cable PC audio output PC audio cable Conversion adapter (if necessary) • To use a PC, set the monitor output resolution on the PC before connecting it to the PC IN terminal on the TV are shared with an HDMI terminal, use an HDMI cable (type A connector). Note: • The PC audio input terminals on the TV, use an analog RGB (15-pin) computer cable and a PC audio cable. For detailed signal specifications...
... TV and hear the sound from the TV's speakers. PC audio cable PC audio output PC audio cable Conversion adapter (if necessary) • To use a PC, set the monitor output resolution on the PC before connecting it to the PC IN terminal on the TV are shared with an HDMI terminal, use an HDMI cable (type A connector). Note: • The PC audio input terminals on the TV, use an analog RGB (15-pin) computer cable and a PC audio cable. For detailed signal specifications...
Owner's Manual - English
Page 28
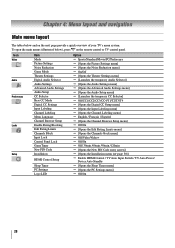
... ), press on the next page provide a quick overview of your TV's menu system. Icon Video Audio Preferences Locks Setup Item Mode Picture Settings Noise Reduction Game Mode Theater Settings Digital Audio Selector Audio Settings Advanced Audio Settings Audio Setup CC Selector Base CC Mode Digital CC Settings Input Labeling Channel Labeling Menu Language Channel Browser Setup Enable Rating Blocking Edit Rating Limits Channels Block Input Lock Control Panel Lock GameTimer New PIN Code Installation HDMI Control Setup Sleep Timer PC Settings Logo LED Option p Sports/Standard/Movie/PC/Preference...
... ), press on the next page provide a quick overview of your TV's menu system. Icon Video Audio Preferences Locks Setup Item Mode Picture Settings Noise Reduction Game Mode Theater Settings Digital Audio Selector Audio Settings Advanced Audio Settings Audio Setup CC Selector Base CC Mode Digital CC Settings Input Labeling Channel Labeling Menu Language Channel Browser Setup Enable Rating Blocking Edit Rating Limits Channels Block Input Lock Control Panel Lock GameTimer New PIN Code Installation HDMI Control Setup Sleep Timer PC Settings Logo LED Option p Sports/Standard/Movie/PC/Preference...
Owner's Manual - English
Page 29
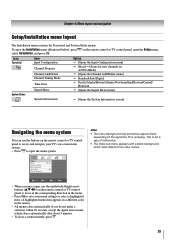
... appear black, depending on the remote control or TV control panel, open the Setup menu, select Installation, and press . Chapter 4: Menu layout and navigation Setup/Installation menu layout The Installation menu contains the Terrestrial and System Status menus. Icon Terrestrial System Status Item Input Configuration Channel Program Channel Add/Delete Channel Tuning Mode Time Zone Signal Meter System Information Option p [Opens the Input Configuration menu] p [Start] p [Scans for new channels on ANT/CABLE] p [Opens the Channel Add/Delete menu] p Standard/Auto/Digital...
... appear black, depending on the remote control or TV control panel, open the Setup menu, select Installation, and press . Chapter 4: Menu layout and navigation Setup/Installation menu layout The Installation menu contains the Terrestrial and System Status menus. Icon Terrestrial System Status Item Input Configuration Channel Program Channel Add/Delete Channel Tuning Mode Time Zone Signal Meter System Information Option p [Opens the Input Configuration menu] p [Start] p [Scans for new channels on ANT/CABLE] p [Opens the Channel Add/Delete menu] p Standard/Auto/Digital...
Owner's Manual - English
Page 31
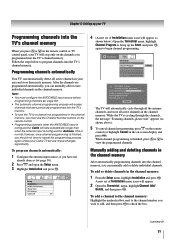
... channels in the channel memory. To add a channel to the channel memory: Highlight the unchecked box next to the channel number you can manually add or delete individual channels. To program channels automatically: 1 Configure the antenna input source, if you have to bring up your TV Programming channels into the channel memory, you want to add, and then press to program channels into the TV's channel memory. Setup Installation HDMI Control Setup Sleep Timer PC Settings Logo LED Off 4 (A new set of Installation menu...
... channels in the channel memory. To add a channel to the channel memory: Highlight the unchecked box next to the channel number you can manually add or delete individual channels. To program channels automatically: 1 Configure the antenna input source, if you have to bring up your TV Programming channels into the channel memory, you want to add, and then press to program channels into the TV's channel memory. Setup Installation HDMI Control Setup Sleep Timer PC Settings Logo LED Off 4 (A new set of Installation menu...
Owner's Manual - English
Page 33
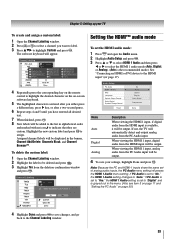
... all desired text. 7 When finished, press . 8 New labels will be deleted and press . 3 Highlight Yes from the PC Audio input will be output. 4 To save changes, and go back to "Auto." Audio Setup PC Audio HDMI 1 Audio MTS Language Optical Output Format Dolby Digital Dynamic Range Control Reset No Auto Stereo English Dolby Digital Compressed Done Mode Auto Digital Analog Description When viewing the HDMI 1 input, if digital audio from the PC Audio input. If PC Audio is set to assign.
... all desired text. 7 When finished, press . 8 New labels will be deleted and press . 3 Highlight Yes from the PC Audio input will be output. 4 To save changes, and go back to "Auto." Audio Setup PC Audio HDMI 1 Audio MTS Language Optical Output Format Dolby Digital Dynamic Range Control Reset No Auto Stereo English Dolby Digital Compressed Done Mode Auto Digital Analog Description When viewing the HDMI 1 input, if digital audio from the PC Audio input. If PC Audio is set to assign.
Owner's Manual - English
Page 50
... Sleep Timer and press . 3 Press the Number buttons to output or mute the sound from the PC Audio input can set the sleep timer to turn off . If PC Audio is a new feature that are set to "No," the HDMI 1 Audio setting changes to "Auto." Note: These functions depend on the remote control to set the sleep timer using the remote control: Press on the devices that uses CEC technology. To set to "Digital" and is set the HDMI Control Setup: 1 From the Setup menu, highlight HDMI Control Setup...
... Sleep Timer and press . 3 Press the Number buttons to output or mute the sound from the PC Audio input can set the sleep timer to turn off . If PC Audio is a new feature that are set to "No," the HDMI 1 Audio setting changes to "Auto." Note: These functions depend on the remote control to set the sleep timer using the remote control: Press on the devices that uses CEC technology. To set to "Digital" and is set the HDMI Control Setup: 1 From the Setup menu, highlight HDMI Control Setup...
Owner's Manual - English
Page 55
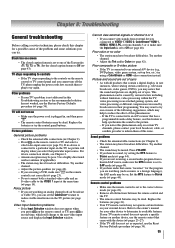
... problems • If your TV's problem is connected to an external A/V device (e.g., DVD player, video game system, set-top box, etc.) try the control panel buttons. Picture problems General picture problems • Check the antenna/cable connections ( Chapter 2). • Press on your TV remote control does not operate a specific feature on another channel. • The sound may be muted. If you can set to the correct device mode ( page 22). • Remove all products that came with all obstructions between the remote control...
... problems • If your TV's problem is connected to an external A/V device (e.g., DVD player, video game system, set-top box, etc.) try the control panel buttons. Picture problems General picture problems • Check the antenna/cable connections ( Chapter 2). • Press on your TV remote control does not operate a specific feature on another channel. • The sound may be muted. If you can set to the correct device mode ( page 22). • Remove all products that came with all obstructions between the remote control...
Owner's Manual - English
Page 59
... warranty service is authorized to the LCD Television or parts caused by you or to damage to change, modify, or extend the terms of these warranties in any LCD Television or parts that are sold and used for commercial purposes as follows: all of the operating instructions in this LCD Television. or Puerto Rico. (4) Labor service charges for set installation, setup, adjustment of customer controls, and installation or repair of this LCD Television and its parts...
... warranty service is authorized to the LCD Television or parts caused by you or to damage to change, modify, or extend the terms of these warranties in any LCD Television or parts that are sold and used for commercial purposes as follows: all of the operating instructions in this LCD Television. or Puerto Rico. (4) Labor service charges for set installation, setup, adjustment of customer controls, and installation or repair of this LCD Television and its parts...
Owner's Manual - English
Page 61
... TO REFUSE TO SERVICE ANY TELEVISION USED IN A CRITICAL APPLICATION. Chapter 9: Appendix Disclaimer and Limitation of the warranty. "Critical applications" means life support systems, medical applications, connections to implanted medical devices, commercial transportation, nuclear facilities or systems or any Dispute. YOU MUST READ AND FOLLOW ALL SET-UP AND USAGE INSTRUCTIONS IN THE APPLICABLE USER GUIDES AND/OR MANUALS. For additional...
... TO REFUSE TO SERVICE ANY TELEVISION USED IN A CRITICAL APPLICATION. Chapter 9: Appendix Disclaimer and Limitation of the warranty. "Critical applications" means life support systems, medical applications, connections to implanted medical devices, commercial transportation, nuclear facilities or systems or any Dispute. YOU MUST READ AND FOLLOW ALL SET-UP AND USAGE INSTRUCTIONS IN THE APPLICABLE USER GUIDES AND/OR MANUALS. For additional...
Printable Spec Sheet
Page 2
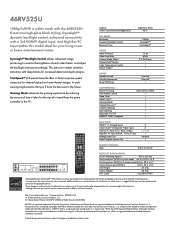
... with a 3rd HDMI™ digital input, and High-Res PC Input makes this model ideal for increased detail and depth analysis. Cabinet Screen Size (measured diagonally) LCD PANEL: Resolution Dynamic Backlight Control Response Time VIDEO: Video Processor Video Scan Rate Cinema Mode 24fps4 TheaterWide® Modes Color Temperature Control Native ModeTM AUDIO: Speaker System Sound Enhancement Mute/Half Mute CONVENIENCE: Built-in TV Tuning Auto Aspect Control Sleep Timer HDMITM-CEC1 Gaming Mode Channel BrowserTM Channel Labeling Input Labeling Logo Light On/Off ENERGY...
... with a 3rd HDMI™ digital input, and High-Res PC Input makes this model ideal for increased detail and depth analysis. Cabinet Screen Size (measured diagonally) LCD PANEL: Resolution Dynamic Backlight Control Response Time VIDEO: Video Processor Video Scan Rate Cinema Mode 24fps4 TheaterWide® Modes Color Temperature Control Native ModeTM AUDIO: Speaker System Sound Enhancement Mute/Half Mute CONVENIENCE: Built-in TV Tuning Auto Aspect Control Sleep Timer HDMITM-CEC1 Gaming Mode Channel BrowserTM Channel Labeling Input Labeling Logo Light On/Off ENERGY...


