Printable Spec Sheet
Page 2
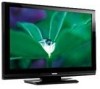
...Screen Size (measured diagonally) High- 40RV525R The RV525 series combines a 1080p Full HD CineSpeed™ LCD Display with deep blacks for increased detail and incredible depth. In the world of Toshiba... or certain features of such devices, in . (without notice. Gloss Black 40.0" LCD PANEL: Resolution Dynamic Backlight Control Response Time 1080p DynaLightTM CineSpeedTM VIDEO: Video Processor...Sound Enhancement Mute/Half Mute Thin-Line QSound® • CONVENIENCE: Built-in TV Tuning Auto Aspect Control Sleep Timer HDMITM-CEC2 Gaming Mode Channel BrowserTM Channel Labeling ...
...Screen Size (measured diagonally) High- 40RV525R The RV525 series combines a 1080p Full HD CineSpeed™ LCD Display with deep blacks for increased detail and incredible depth. In the world of Toshiba... or certain features of such devices, in . (without notice. Gloss Black 40.0" LCD PANEL: Resolution Dynamic Backlight Control Response Time 1080p DynaLightTM CineSpeedTM VIDEO: Video Processor...Sound Enhancement Mute/Half Mute Thin-Line QSound® • CONVENIENCE: Built-in TV Tuning Auto Aspect Control Sleep Timer HDMITM-CEC2 Gaming Mode Channel BrowserTM Channel Labeling ...
Owners Manual
Page 4
... the service technician to use the TV in death or serious injury. Care For better performance and safer operation of your body (or any item you are in contact with a sharp or heavy object. 36) • The LCD screen of this manual to a Toshiba Authorized Service Center. 38) If ..., avoid locations where the screen may damage or discolor the cabinet. 31) WARNING: RISK OF ELECTRIC SHOCK! Disposal may vary until the LCD warms up static charges (see Section 810 of the National Electric Code). Antenna lead-in a position where your TOSHIBA TV, follow these sounds become ...
... the service technician to use the TV in death or serious injury. Care For better performance and safer operation of your body (or any item you are in contact with a sharp or heavy object. 36) • The LCD screen of this manual to a Toshiba Authorized Service Center. 38) If ..., avoid locations where the screen may damage or discolor the cabinet. 31) WARNING: RISK OF ELECTRIC SHOCK! Disposal may vary until the LCD warms up static charges (see Section 810 of the National Electric Code). Antenna lead-in a position where your TOSHIBA TV, follow these sounds become ...
Owners Manual
Page 6
... a long period of time. ENERGY STAR® qualified TV. Products that interference will disappear in a short period of time. 2) The LCD panel contained in a particular installation. Environmental Protection Agency. marks. therefore, Toshiba is not responsible for perceived issues resulting from that involve .... • Increase the separation between the equipment and the receiver. • Connect the equipment into an outlet on the screen if a fixed, nonmoving image is viewed from Dolby Laboratories. Wayne, NJ 07470. ENERGY STAR® User Information ENERGY STAR...
... a long period of time. ENERGY STAR® qualified TV. Products that interference will disappear in a short period of time. 2) The LCD panel contained in a particular installation. Environmental Protection Agency. marks. therefore, Toshiba is not responsible for perceived issues resulting from that involve .... • Increase the separation between the equipment and the receiver. • Connect the equipment into an outlet on the screen if a fixed, nonmoving image is viewed from Dolby Laboratories. Wayne, NJ 07470. ENERGY STAR® User Information ENERGY STAR...
Owners Manual
Page 8
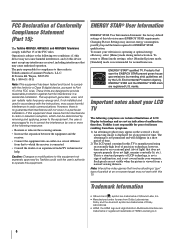
... following are just a few of the many exciting features of your new Toshiba widescreen, integrated HD, LCD TV: • Integrated digital tuning (8VSB ATSC and QAM) eliminates the need for a separate digital converter set-top box (in most cases). • 1080p output ...-Sync Latency activates an audio/video display timing adjustment function that allows HDMI source devices to put the Call Letters (e.g. ABC, HBO, etc.) on the screen along with Dolby® Digital optical output format ( page 45). • CableClear® digital picture noise reduction ( page 53). • PC IN (Analog ...
... following are just a few of the many exciting features of your new Toshiba widescreen, integrated HD, LCD TV: • Integrated digital tuning (8VSB ATSC and QAM) eliminates the need for a separate digital converter set-top box (in most cases). • 1080p output ...-Sync Latency activates an audio/video display timing adjustment function that allows HDMI source devices to put the Call Letters (e.g. ABC, HBO, etc.) on the screen along with Dolby® Digital optical output format ( page 45). • CableClear® digital picture noise reduction ( page 53). • PC IN (Analog ...
Owners Manual
Page 9
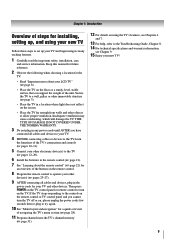
...overview of navigating the TV's menu system ( page 28). 11 Program channels into the TV's channel memory ( page 31). 12 For details on the screen. • Place the TV far enough from walls...TOSHIBA WARRANTY. 3 Do not plug in any power cords until AFTER you cannot turn on the floor or a sturdy, level, stable surface that can support the weight of the unit. Secure the TV...your LCD TV" ( page 6). • Place the TV on the TV. Chapter 1: Introduction Overview of steps for installing, setting up, and using your new TV Follow these steps to set up your TV and begin using the TV's features...
...overview of navigating the TV's menu system ( page 28). 11 Program channels into the TV's channel memory ( page 31). 12 For details on the screen. • Place the TV far enough from walls...TOSHIBA WARRANTY. 3 Do not plug in any power cords until AFTER you cannot turn on the floor or a sturdy, level, stable surface that can support the weight of the unit. Secure the TV...your LCD TV" ( page 6). • Place the TV on the TV. Chapter 1: Introduction Overview of steps for installing, setting up, and using your new TV Follow these steps to set up your TV and begin using the TV's features...
Owners Manual
Page 10
... buttons function as up/down/left/right menu navigation buttons. 6 MENU (ENTER) - When a menu is on-screen, the MENU button on the TV's control panel functions as "VIDEO 2" and include standard A/V connections. 4 POWER - page 31). 9 VOLUME WX - Press to turn off . Press to ...VIDEO-2 IN - When no menu is on-screen, these buttons change the source you cannot turn the TV on -screen menu. 8 CHANNEL ST - When a menu is on the TV control panel for illustration purposes. 1 Green LED and TOSHIBA Logo LED Power LED(Green) = Power indicator TOSHIBA Logo LED= On or Off ( page ...
... buttons function as up/down/left/right menu navigation buttons. 6 MENU (ENTER) - When a menu is on-screen, the MENU button on the TV's control panel functions as "VIDEO 2" and include standard A/V connections. 4 POWER - page 31). 9 VOLUME WX - Press to turn off . Press to ...VIDEO-2 IN - When no menu is on-screen, these buttons change the source you cannot turn the TV on -screen menu. 8 CHANNEL ST - When a menu is on the TV control panel for illustration purposes. 1 Green LED and TOSHIBA Logo LED Power LED(Green) = Power indicator TOSHIBA Logo LED= On or Off ( page ...
Owners Manual
Page 20
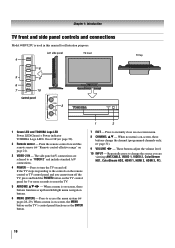
...angle scenes. • Signal names for computers with a compatible mini D-sub15-pin terminal. • Depending on the DVD's title and the specifications of the screen (i.e. The PC IN terminal can accept and display VGA, SVGA, XGA, WXGA, SXGA, 480i (60Hz), 480p (60Hz), 720p (60Hz), 1080i (60Hz), and...8226; To display the optimum picture, use the PC setting feature ( "Using the PC settings feature" on the PC before connecting it to the TV. Signal name Pin No. Separate analog cables are shared with an HDMI terminal, use an HDMI cable (type A connector). Chapter 2: Connecting your ...
...angle scenes. • Signal names for computers with a compatible mini D-sub15-pin terminal. • Depending on the DVD's title and the specifications of the screen (i.e. The PC IN terminal can accept and display VGA, SVGA, XGA, WXGA, SXGA, 480i (60Hz), 480p (60Hz), 720p (60Hz), 1080i (60Hz), and...8226; To display the optimum picture, use the PC setting feature ( "Using the PC settings feature" on the PC before connecting it to the TV. Signal name Pin No. Separate analog cables are shared with an HDMI terminal, use an HDMI cable (type A connector). Chapter 2: Connecting your ...

Owners Manual
Page 22
... 15 Arrow buttons (STWX) When a menu is on-screen, these buttons select or adjust programming menus. (Also see the remote control functional key chart ( page 24). 1 POWER turns the TV on and off the sound ( page 44). 13 INFO displays TV status information as well as program details, when available ( ...level. 9 FAV BROWSER accesses the Favorites List in the main menu system. 17 MENU accesses the main TV menu system ( pages 28 and 29). 18 EXIT closes on-screen menus. 19 MODE SELECT switch switches between TV, CABLE/SAT, AUX 1, and AUX 2 modes ( page 23). Note: The error message "NOT AVAILABLE...
... 15 Arrow buttons (STWX) When a menu is on-screen, these buttons select or adjust programming menus. (Also see the remote control functional key chart ( page 24). 1 POWER turns the TV on and off the sound ( page 44). 13 INFO displays TV status information as well as program details, when available ( ...level. 9 FAV BROWSER accesses the Favorites List in the main menu system. 17 MENU accesses the main TV menu system ( pages 28 and 29). 18 EXIT closes on-screen menus. 19 MODE SELECT switch switches between TV, CABLE/SAT, AUX 1, and AUX 2 modes ( page 23). Note: The error message "NOT AVAILABLE...
Owners Manual
Page 23
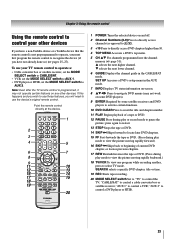
T selects the next lower channel. 6 GUIDE Displays the channel guide in the AUX mode. 7 INFO Displays TV status information on-screen. 8 STWX Press to navigate DVD menus (may not operate certain features on and off. 2 Channel Numbers (0-9) Press to directly access channels (as opposed to ). 3 ...remote control directly at the device. 16 17 18 19 1 POWER Turns the selected device on any other devices If you have a non-Toshiba device or a Toshiba device that the remote control is programmed, it may not work on some DVD players). 9 ENTER Required by some satellite receivers and DVD players...
T selects the next lower channel. 6 GUIDE Displays the channel guide in the AUX mode. 7 INFO Displays TV status information on-screen. 8 STWX Press to navigate DVD menus (may not operate certain features on and off. 2 Channel Numbers (0-9) Press to directly access channels (as opposed to ). 3 ...remote control directly at the device. 16 17 18 19 1 POWER Turns the selected device on any other devices If you have a non-Toshiba device or a Toshiba device that the remote control is programmed, it may not work on some DVD players). 9 ENTER Required by some satellite receivers and DVD players...
Owners Manual
Page 28
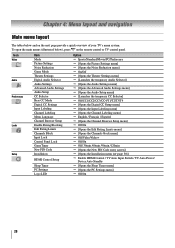
... layout The tables below ), press on the next page provide a quick overview of your TV's menu system. To open the main menus (illustrated below and on the remote control or TV control panel. Icon Video Audio Preferences Locks Setup Item Mode Picture Settings Noise Reduction Game Mode... p Off/Video/Video+ p Off/On p Off/ 30min /60min /90min /120min p [Opens the New PIN Code entry screen] p [Opens the Installation menu ( page 30)] p Enable HDMI Control / TV Auto Input Switch / TV Auto Power/ Device Auto Standby p [Opens the Sleep Timer menu] p [Opens the PC Settings menu] p Off/On 28
... layout The tables below ), press on the next page provide a quick overview of your TV's menu system. To open the main menus (illustrated below and on the remote control or TV control panel. Icon Video Audio Preferences Locks Setup Item Mode Picture Settings Noise Reduction Game Mode... p Off/Video/Video+ p Off/On p Off/ 30min /60min /90min /120min p [Opens the New PIN Code entry screen] p [Opens the Installation menu ( page 30)] p Enable HDMI Control / TV Auto Input Switch / TV Auto Power/ Device Auto Standby p [Opens the Sleep Timer menu] p [Opens the PC Settings menu] p Off/On 28
Owners Manual
Page 29
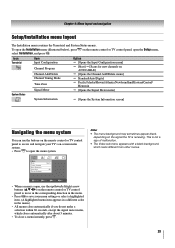
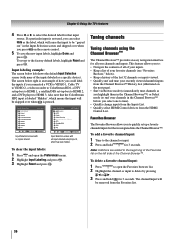
...contains the Terrestrial and System Status menus. Note: • The menu background may sometimes appear black, depending on the remote control or TV control panel, open the menu system. Icon Terrestrial System Status Item Input Configuration Channel Program Channel Add/Delete Channel Tuning Mode Time Zone ... the menu system You can use the up/down/left/right arrow buttons (STWX) on -screen menu system. • Press to save your TV's on the remote control or TV control panel to move in the corresponding direction in the menu. • Press to open the Setup menu, select Installation...
...contains the Terrestrial and System Status menus. Note: • The menu background may sometimes appear black, depending on the remote control or TV control panel, open the menu system. Icon Terrestrial System Status Item Input Configuration Channel Program Channel Add/Delete Channel Tuning Mode Time Zone ... the menu system You can use the up/down/left/right arrow buttons (STWX) on -screen menu system. • Press to save your TV's on the remote control or TV control panel to move in the corresponding direction in the menu. • Press to open the Setup menu, select Installation...
Owners Manual
Page 30
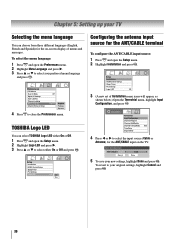
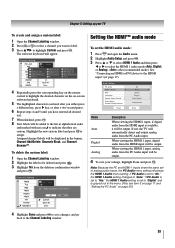
...your new settings, highlight Done and press . To revert to select the input source (Cable or Antenna) for the ANT/CABLE input on -screen display of Installation menu icons will appear, as shown below.) Open the Terrestrial menu, highlight Input Configuration, and press . Setup Installation HDMI ... and open the Setup menu. 2 Highlight Logo LED and press X. 3 Press S or T to close the Preferences menu. Chapter 5: Setting up your TV Selecting the menu language You can select TOSHIBA Logo LED either On or Off and press . Configuring the antenna input source for the on the...
...your new settings, highlight Done and press . To revert to select the input source (Cable or Antenna) for the ANT/CABLE input on -screen display of Installation menu icons will appear, as shown below.) Open the Terrestrial menu, highlight Input Configuration, and press . Setup Installation HDMI ... and open the Setup menu. 2 Highlight Logo LED and press X. 3 Press S or T to close the Preferences menu. Chapter 5: Setting up your TV Selecting the menu language You can select TOSHIBA Logo LED either On or Off and press . Configuring the antenna input source for the on the...
Owners Manual
Page 31
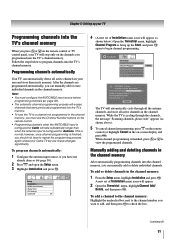
...memory. To program channels automatically: 1 Configure the antenna input source, if you can manually add or delete individual channels. The TV will take substantially longer than when the antenna input is configured for Antenna. Manually adding and deleting channels in the on the... process will appear. 2 Open the Terrestrial menu, highlightChannel Add/ Delete, and then press . While the TV is finished, you must use the Channel Number buttons on -screen display and press ). Setup Installation HDMI Control Setup Sleep Timer PC Settings Logo LED Off 4 (A new set...
...memory. To program channels automatically: 1 Configure the antenna input source, if you can manually add or delete individual channels. The TV will take substantially longer than when the antenna input is configured for Antenna. Manually adding and deleting channels in the on the... process will appear. 2 Open the Terrestrial menu, highlightChannel Add/ Delete, and then press . While the TV is finished, you must use the Channel Number buttons on -screen display and press ). Setup Installation HDMI Control Setup Sleep Timer PC Settings Logo LED Off 4 (A new set...
Owners Manual
Page 32
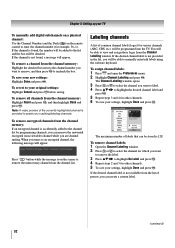
... channels. 6 To save your settings, highlight Done and press . The maximum number of the currently highlighted channel is 128. To save your TV To manually add digital subchannels on a physical channel: Use the Channel Numbers and the Dash ( ) on the remote control to uncheck the ... highlight the desired channel label and press . 5 Repeat steps 3 and 4 for various channels (ABC, CBS, etc.) will be programmed into the TV. Press 1 on the screen to highlight No Label and press . 4 Repeat steps 2 and 3 for example, 56-1). Labeling channels A list of presets, you want to label...
... channels. 6 To save your settings, highlight Done and press . The maximum number of the currently highlighted channel is 128. To save your TV To manually add digital subchannels on a physical channel: Use the Channel Numbers and the Dash ( ) on the remote control to uncheck the ... highlight the desired channel label and press . 5 Repeat steps 3 and 4 for various channels (ABC, CBS, etc.) will be programmed into the TV. Press 1 on the screen to highlight No Label and press . 4 Repeat steps 2 and 3 for example, 56-1). Labeling channels A list of presets, you want to label...
Owners Manual
Page 33
... input is available, it will be added to the list in the menu. (Also see item 3 on page 11 and "Setting the PC Audio" on -screen software keyboard. 5 The highlighted character is grayed out in alphabetical order and marked with an icon to the HDMI input" ( page 17). If PC Audio... press the corresponding key on the remote control to highlight the desired character on the on page 50.) 4 Highlight Done and press to save your TV To create and assign a custom label: 1 Open the Channel Labeling window. 2 Press or to select a channel you have entered all desired text. 7 When finished, press...
... input is available, it will be added to the list in the menu. (Also see item 3 on page 11 and "Setting the PC Audio" on -screen software keyboard. 5 The highlighted character is grayed out in alphabetical order and marked with an icon to the HDMI input" ( page 17). If PC Audio... press the corresponding key on the remote control to highlight the desired character on the on page 50.) 4 Highlight Done and press to save your TV To create and assign a custom label: 1 Open the Channel Labeling window. 2 Press or to select a channel you have entered all desired text. 7 When finished, press...

Owners Manual
Page 34
...does not change between virtual channels on the same physical channel. To close the screen and return to complete the reset process. To return to a virtual TV channel number. The TV will turn off , unplug the TV power cord and then plug it in again to the Installation menu: Highlight ... and press . A new set , you to select Factory Defaults. 5 Enter your TV Viewing the digital signal meter Viewing the system status You can view the digital signal meter in the Signal Meter screen may not correspond to normal viewing: Press . After the time zone has been set of...
...does not change between virtual channels on the same physical channel. To close the screen and return to complete the reset process. To return to a virtual TV channel number. The TV will turn off , unplug the TV power cord and then plug it in again to the Installation menu: Highlight ... and press . A new set , you to select Factory Defaults. 5 Enter your TV Viewing the digital signal meter Viewing the system status You can view the digital signal meter in the Signal Meter screen may not correspond to normal viewing: Press . After the time zone has been set of...
Owners Manual
Page 35
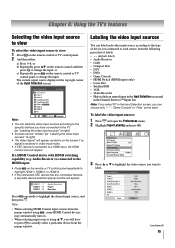
... • Video Recorder • Hide (to hide an unused input in the Input Selection screen and in the Channel Browser™ Inputs list) Note: If you select PC in the Input Selection screen, you have connected to the TV ( "Labeling the video input sources" at right). • "No Video Signal" will... HDMI switching capability (e.g. Labeling the video input sources You can label each video input source according to the type of the Input Selection screen. Chapter 6: Using the TV's features Selecting the video input source to view To select the video input source to view: 1 Press on the...
... • Video Recorder • Hide (to hide an unused input in the Input Selection screen and in the Channel Browser™ Inputs list) Note: If you select PC in the Input Selection screen, you have connected to the TV ( "Labeling the video input sources" at right). • "No Video Signal" will... HDMI switching capability (e.g. Labeling the video input sources You can label each video input source according to the type of the Input Selection screen. Chapter 6: Using the TV's features Selecting the video input source to view To select the video input source to view: 1 Press on the...
Owners Manual
Page 36
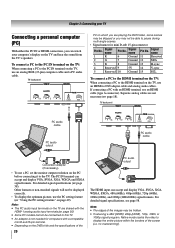
...are added to the beginning of the Favorites list on the left shows the default Input Selection screen (with none of how you could label the inputs if you connected a VCR to VIDEO 1, Cable TV to VIDEO 2, a video recorder to ColorStream HD1, a DTV settop box to HDMI 1, ...ANT/CABLE 1 Video 1 2 Video 2 3 ColorStream HD1 4 ColorStream HD2 5 HDMI 1 6 HDMI 2 7 HDMI 3 8 PC ANT/CABLE 0 - 8 / INPUT to Select Navigation Input Selection screen with all your recently viewed channels/inputs from the Channel Browser™ History List (illustrated on the remote control. 5 To save the new input labels...
...are added to the beginning of the Favorites list on the left shows the default Input Selection screen (with none of how you could label the inputs if you connected a VCR to VIDEO 1, Cable TV to VIDEO 2, a video recorder to ColorStream HD1, a DTV settop box to HDMI 1, ...ANT/CABLE 1 Video 1 2 Video 2 3 ColorStream HD1 4 ColorStream HD2 5 HDMI 1 6 HDMI 2 7 HDMI 3 8 PC ANT/CABLE 0 - 8 / INPUT to Select Navigation Input Selection screen with all your recently viewed channels/inputs from the Channel Browser™ History List (illustrated on the remote control. 5 To save the new input labels...

Owners Manual
Page 39
...Return, by switching back and forth between the last two channels that channel quickly from a non-antenna input, the TV will vary depending on the remote control. 2 While the Picture Size screen is open , you can then change the picture size (i.e., changing the height/ width ratio) for each time. 1... to the button, so you can save separate picture size preferences for any other than your TV. Note: If you press from any purpose other channel by Dot (available in the Picture Size screen). The format of the image (in Full or Natural picture size. 39 Note: The "...
...Return, by switching back and forth between the last two channels that channel quickly from a non-antenna input, the TV will vary depending on the remote control. 2 While the Picture Size screen is open , you can then change the picture size (i.e., changing the height/ width ratio) for each time. 1... to the button, so you can save separate picture size preferences for any other than your TV. Note: If you press from any purpose other channel by Dot (available in the Picture Size screen). The format of the image (in Full or Natural picture size. 39 Note: The "...
Owners Manual
Page 40
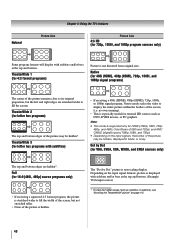
...HDMI), 720p, 1080i, and 1080p signal programs) The center of the picture remains close to fill the screen. no overscanning). • This is supported only for HDMI (1080p,1080i, 720p, 480p, and ...useful for external HD sources such as subtitles or captions), see "Scrolling the TheaterWide® picture" ( page 41). 40 TheaterWide 2 (for letter box programs) A B C D E F G The top and bottom edges of the ...Dot" picture is not distorted from original size. Natural Picture Size Chapter 6: Using the TV's features Picture Size 4:3 HD (for 720p, 1080i, and 1080p program sources only)...
...HDMI), 720p, 1080i, and 1080p signal programs) The center of the picture remains close to fill the screen. no overscanning). • This is supported only for HDMI (1080p,1080i, 720p, 480p, and ...useful for external HD sources such as subtitles or captions), see "Scrolling the TheaterWide® picture" ( page 41). 40 TheaterWide 2 (for letter box programs) A B C D E F G The top and bottom edges of the ...Dot" picture is not distorted from original size. Natural Picture Size Chapter 6: Using the TV's features Picture Size 4:3 HD (for 720p, 1080i, and 1080p program sources only)...


