User Guide
Page 2
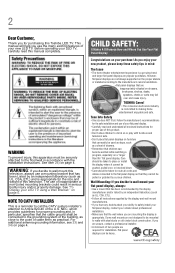
...To Display your new LED TV. WARNING To prevent injury, this product. • Don't allow children to walls with furniture and television sets. • Don't place flat panel displays on furniture that can be pulled or grabbed by an independent laboratory (such as a chest of... are required for installation. However, flat panel displays are not always supported on the proper stands or installed according to wall mount this Toshiba LED TV. 2 Dear Customer, Thank you for purchasing this television, always use a mounting bracket that are inappropriately situated on dressers,...
...To Display your new LED TV. WARNING To prevent injury, this product. • Don't allow children to walls with furniture and television sets. • Don't place flat panel displays on furniture that can be pulled or grabbed by an independent laboratory (such as a chest of... are required for installation. However, flat panel displays are not always supported on the proper stands or installed according to wall mount this Toshiba LED TV. 2 Dear Customer, Thank you for purchasing this television, always use a mounting bracket that are inappropriately situated on dressers,...
User Guide
Page 7
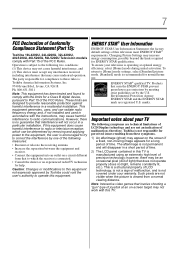
.... Note: Interactive video games that earn the ENERGY STAR prevent green house gas emissions by meeting strict guidelines set by Toshiba could void the user's authority to provide reasonable protection against harmful interference in accordance with the instructions, may ... are technical limitations of LCD Display technology and are registered U.S. 7 FCC Declaration of Conformity Compliance Statement (Part 15): Toshiba 19L4200U, 24L4200U, 32L4200U, 40L5200U, 46L5200U, 50L5200U Television models comply with this TV. This is a structural property of LCD technology, is not a ...
.... Note: Interactive video games that earn the ENERGY STAR prevent green house gas emissions by meeting strict guidelines set by Toshiba could void the user's authority to provide reasonable protection against harmful interference in accordance with the instructions, may ... are technical limitations of LCD Display technology and are registered U.S. 7 FCC Declaration of Conformity Compliance Statement (Part 15): Toshiba 19L4200U, 24L4200U, 32L4200U, 40L5200U, 46L5200U, 50L5200U Television models comply with this TV. This is a structural property of LCD technology, is not a ...
User Guide
Page 10
.../Installation menu layout 48 Navigating the menu system 48 Chapter 5: Setting up your TV 50 Initial Setup 50 Storing channels in memory (optional 52 Auto Tuning 52 Setting channel skip 55 Setting the AV input mode 56 Setting the HDMI® audio mode 56 Viewing the digital signal meter... 57 Setting the time zone 58 Viewing the system status 58 Resetting Factory Defaults 59 Chapter...
.../Installation menu layout 48 Navigating the menu system 48 Chapter 5: Setting up your TV 50 Initial Setup 50 Storing channels in memory (optional 52 Auto Tuning 52 Setting channel skip 55 Setting the AV input mode 56 Setting the HDMI® audio mode 56 Viewing the digital signal meter... 57 Setting the time zone 58 Viewing the system status 58 Resetting Factory Defaults 59 Chapter...
User Guide
Page 11
... 78 Adjusting the picture 79 Selecting the picture mode 79 Adjusting the picture quality 80 Using closed captions 81 Base closed captions 81 Digital CC settings 82 CC Selector 83 Adjusting the audio 84 Muting the sound 84 Using the digital audio selector 84
... 78 Adjusting the picture 79 Selecting the picture mode 79 Adjusting the picture quality 80 Using closed captions 81 Base closed captions 81 Digital CC settings 82 CC Selector 83 Adjusting the audio 84 Muting the sound 84 Using the digital audio selector 84
User Guide
Page 12
... temporarily 97 Using the input lock feature 97 Locking channels 98 Using the GameTimer 99 Using the panel lock feature 99 Using the PC settings feature 100 Setting the PC Audio 101 Using the Media Player 102 Auto Start function 103 To open the Media Player 103 Viewing photo files 105 Playing... music files 106 Viewing photo files and playing music files at the same time 107 Sorting photo or music files 108 Setting the sleep timer 109 Automatic Power Down 110
... temporarily 97 Using the input lock feature 97 Locking channels 98 Using the GameTimer 99 Using the panel lock feature 99 Using the PC settings feature 100 Setting the PC Audio 101 Using the Media Player 102 Auto Start function 103 To open the Media Player 103 Viewing photo files 105 Playing... music files 106 Viewing photo files and playing music files at the same time 107 Sorting photo or music files 108 Setting the sleep timer 109 Automatic Power Down 110
User Guide
Page 13
...Using HDMI® CEC 111 HDMI® CEC playback device (DVD player, etc.) control 111 Other HDMI® CEC functions 113 Setting up HDMI® CEC 114 Displaying TV status information 114 Understanding the last mode memory feature ......115 Chapter 7: Using the TV's ...Advanced Features 116 Using the advanced picture settings 116 Dynamic Contrast 116 Static Gamma 117 Color temperature 117 ClearFrame™ (L5200U Series 118 Film Stabilization (L5200U Series 119 CableClear®...
...Using HDMI® CEC 111 HDMI® CEC playback device (DVD player, etc.) control 111 Other HDMI® CEC functions 113 Setting up HDMI® CEC 114 Displaying TV status information 114 Understanding the last mode memory feature ......115 Chapter 7: Using the TV's ...Advanced Features 116 Using the advanced picture settings 116 Dynamic Contrast 116 Static Gamma 117 Color temperature 117 ClearFrame™ (L5200U Series 118 Film Stabilization (L5200U Series 119 CableClear®...
User Guide
Page 16
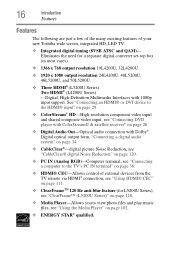
...10070; Media Player-Allows you to the TV's PC IN terminal" on page 36. ❖ HDMI® CEC-Allows control of your new Toshiba wide screen, integrated HD, LED TV: ❖ Integrated digital tuning (8VSB ATSC and QAM)- See "Connecting an HDMI® or DVI ...CEC" on page 111. ❖ ClearFrameTM 120 Hz anti-blur feature (for a separate digital converter set-top box (in most cases). ❖ 1366 x 768 output resolution 19L4200U, 32L4200U. ❖ 1920 x 1080 output resolution 24L4200U, 40L5200U, 46L5200U, and 50L5200U. ❖ Three HDMI® (L5200U Series) Two HDMI® (L4200U...
...10070; Media Player-Allows you to the TV's PC IN terminal" on page 36. ❖ HDMI® CEC-Allows control of your new Toshiba wide screen, integrated HD, LED TV: ❖ Integrated digital tuning (8VSB ATSC and QAM)- See "Connecting an HDMI® or DVI ...CEC" on page 111. ❖ ClearFrameTM 120 Hz anti-blur feature (for a separate digital converter set-top box (in most cases). ❖ 1366 x 768 output resolution 19L4200U, 32L4200U. ❖ 1920 x 1080 output resolution 24L4200U, 40L5200U, 46L5200U, and 50L5200U. ❖ Three HDMI® (L5200U Series) Two HDMI® (L4200U...
User Guide
Page 17
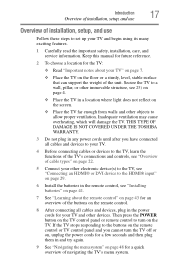
... many exciting features. 1 Carefully read the important safety, installation, care, and service information. THIS TYPE OF DAMAGE IS NOT COVERED UNDER THE TOSHIBA WARRANTY. 3 Do not plug in any power cords until after you cannot turn on the TV. Inadequate ventilation may cause overheating, which will...other objects to allow proper ventilation. Introduction 17 Overview of installation, setup, and use Overview of installation, setup, and use Follow these steps to set up your TV" on page 7. ❖ Place the TV on the floor or a sturdy, level, stable surface that can support the ...
... many exciting features. 1 Carefully read the important safety, installation, care, and service information. THIS TYPE OF DAMAGE IS NOT COVERED UNDER THE TOSHIBA WARRANTY. 3 Do not plug in any power cords until after you cannot turn on the TV. Inadequate ventilation may cause overheating, which will...other objects to allow proper ventilation. Introduction 17 Overview of installation, setup, and use Overview of installation, setup, and use Follow these steps to set up your TV" on page 7. ❖ Place the TV on the floor or a sturdy, level, stable surface that can support the ...
User Guide
Page 20
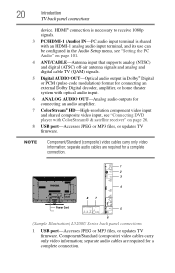
... connection. separate audio cables are required for connecting an audio amplifier. 7 ColorStream® HD-High-resolution component video input and shared composite video input, see "Setting the PC Audio" on page 101. 4 ANT/CABLE-Antenna input that supports analog (NTSC) and digital (ATSC) off-air antenna signals and analog and digital...
... connection. separate audio cables are required for connecting an audio amplifier. 7 ColorStream® HD-High-resolution component video input and shared composite video input, see "Setting the PC Audio" on page 101. 4 ANT/CABLE-Antenna input that supports analog (NTSC) and digital (ATSC) off-air antenna signals and analog and digital...
User Guide
Page 21
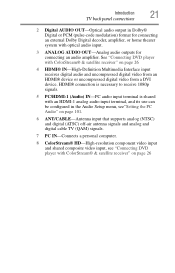
Introduction 21 TV back panel connections 2 Digital AUDIO OUT-Optical audio output in the Audio Setup menu, see"Setting the PC Audio" on page 101. 6 ANT/CABLE-Antenna input that supports analog (NTSC) and digital (ATSC) off-air antenna signals and analog and digital ...
Introduction 21 TV back panel connections 2 Digital AUDIO OUT-Optical audio output in the Audio Setup menu, see"Setting the PC Audio" on page 101. 6 ANT/CABLE-Antenna input that supports analog (NTSC) and digital (ATSC) off-air antenna signals and analog and digital ...

User Guide
Page 23
...HDMI® cable HDMI® (High-Definition Multimedia Interface) cable connects to video devices with component video output. (ColorStream® is Toshiba's brand of component video.) These cables are required for stereo left (or mono) audio. Connecting Your TV 23 Overview of cable ...types Standard A/V cables (red/white/yellow) (Sample Illustration) Standard AV cables Standard A/V cables (composite video) usually come in sets of three and connects with video devices with analog audio and composite video output. Component video cables (red/green/blue) (Sample Illustration...
...HDMI® cable HDMI® (High-Definition Multimedia Interface) cable connects to video devices with component video output. (ColorStream® is Toshiba's brand of component video.) These cables are required for stereo left (or mono) audio. Connecting Your TV 23 Overview of cable ...types Standard A/V cables (red/white/yellow) (Sample Illustration) Standard AV cables Standard A/V cables (composite video) usually come in sets of three and connects with video devices with analog audio and composite video output. Component video cables (red/green/blue) (Sample Illustration...
User Guide
Page 26
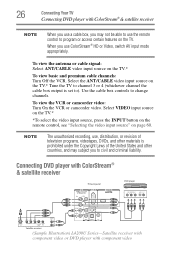
... not be able to program or access certain features on the TV.* Tune the TV to channel 3 or 4 (whichever channel the cable box output is set to change channels. Connecting DVD player with ColorStream® & satellite receiver TV back panel DVD player COMPONENT VIDEO Y PB PR AUDIO OUT L R Y PB PR AUDIO...
... not be able to program or access certain features on the TV.* Tune the TV to channel 3 or 4 (whichever channel the cable box output is set to change channels. Connecting DVD player with ColorStream® & satellite receiver TV back panel DVD player COMPONENT VIDEO Y PB PR AUDIO OUT L R Y PB PR AUDIO...
User Guide
Page 29
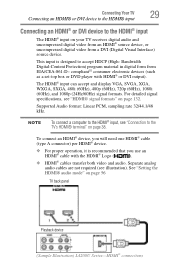
... HDMI® cable with HDMI® or DVI output). For detailed signal specifications, see illustration). compliant[1] consumer electronic devices (such as a set-top box or DVD player with the HDMI® Logo ( ). ❖ HDMI® cables transfer both video and audio. Separate analog ...to the TV's HDMI® terminal" on page 56 TV back panel Playback device (Sample Illustration) L4200U Series-HDMI® connections See "Setting the HDMI® audio mode" on page 38. Supported Audio format: Linear PCM, sampling rate 32/44.1/48 kHz. Bandwidth Digital-Content ...
... HDMI® cable with HDMI® or DVI output). For detailed signal specifications, see illustration). compliant[1] consumer electronic devices (such as a set-top box or DVD player with the HDMI® Logo ( ). ❖ HDMI® cables transfer both video and audio. Separate analog ...to the TV's HDMI® terminal" on page 56 TV back panel Playback device (Sample Illustration) L4200U Series-HDMI® connections See "Setting the HDMI® audio mode" on page 38. Supported Audio format: Linear PCM, sampling rate 32/44.1/48 kHz. Bandwidth Digital-Content ...
User Guide
Page 31
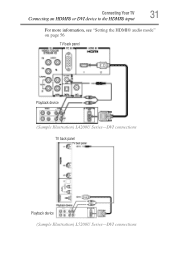
Connecting Your TV 31 Connecting an HDMI® or DVI device to the HDMI® input For more information, see "Setting the HDMI® audio mode" on page 56 TV back panel Playback device (Sample Illustration) L4200U Series-DVI connections TV back panel Playback device (Sample Illustration) L5200U Series-DVI connections
Connecting Your TV 31 Connecting an HDMI® or DVI device to the HDMI® input For more information, see "Setting the HDMI® audio mode" on page 56 TV back panel Playback device (Sample Illustration) L4200U Series-DVI connections TV back panel Playback device (Sample Illustration) L5200U Series-DVI connections

User Guide
Page 33
...; CEC. NOTE This feature may not operate properly. ❖ For proper operation, it is not liable for compatibility information. However, Toshiba is recommended that are connected, HDMI® CEC Control feature may not work properly depending on the devices that you will need one ...-HDMI® CEC compatible audio receiver and playback device connections To connect an HDMI® device, you use an HDMI® cable with the desired settings, see "HDMI® CEC input source selection" on page 113. ❖ The connected devices must also be configured. NOTE ❖ If several...
...; CEC. NOTE This feature may not operate properly. ❖ For proper operation, it is not liable for compatibility information. However, Toshiba is recommended that are connected, HDMI® CEC Control feature may not work properly depending on the devices that you will need one ...-HDMI® CEC compatible audio receiver and playback device connections To connect an HDMI® device, you use an HDMI® cable with the desired settings, see "HDMI® CEC input source selection" on page 113. ❖ The connected devices must also be configured. NOTE ❖ If several...

User Guide
Page 35
... select Digital Output Format. 5 Press the ( / arrow) buttons to the factory defaults, highlight Reset, and then press the ENTER button. Done 6 To save the new settings, highlight Done, and then press the ENTER button. To revert to select either Dolby Digital or PCM, depending on your device, see "Audyssey Premium Television...
... select Digital Output Format. 5 Press the ( / arrow) buttons to the factory defaults, highlight Reset, and then press the ENTER button. Done 6 To save the new settings, highlight Done, and then press the ENTER button. To revert to select either Dolby Digital or PCM, depending on your device, see "Audyssey Premium Television...
User Guide
Page 38
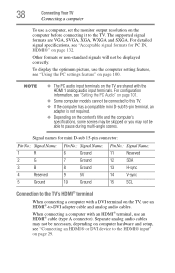
... during multi-angle scenes. 38 Connecting Your TV Connecting a computer To use a computer, set the monitor output resolution on page 100. To display the optimum picture, use the computer setting feature, see "Setting the PC Audio" on page 101. ❖ Some computer models cannot be able to ...a computer with a DVI terminal on the TV, use an HDMI® cable (type A connector). For configuration information, see "Using the PC settings feature" on the computer before connecting it to -DVI adapter cable and analog audio cables. Signal names for PC IN, HDMI®" on page 29...
... during multi-angle scenes. 38 Connecting Your TV Connecting a computer To use a computer, set the monitor output resolution on page 100. To display the optimum picture, use the computer setting feature, see "Setting the PC Audio" on page 101. ❖ Some computer models cannot be able to ...a computer with a DVI terminal on the TV, use an HDMI® cable (type A connector). For configuration information, see "Using the PC settings feature" on the computer before connecting it to -DVI adapter cable and analog audio cables. Signal names for PC IN, HDMI®" on page 29...

User Guide
Page 44
... present), see "Using the FREEZE feature" on page 109. 6 The FREEZE button freezes the picture. Press again to the last viewed channel or source, see "Setting the sleep timer" on page 78. 7 The Channel Number buttons (0-9, and Dash 100) directly tune channels. The (Dash 100) button allows you to enter two...
... present), see "Using the FREEZE feature" on page 109. 6 The FREEZE button freezes the picture. Press again to the last viewed channel or source, see "Setting the sleep timer" on page 78. 7 The Channel Number buttons (0-9, and Dash 100) directly tune channels. The (Dash 100) button allows you to enter two...

User Guide
Page 46
... Picture Sound Item Mode Picture Settings Noise Reduction Game Mode Theater Settings Digital Audio Selector Audio Settings Audio Setup Option Dynamic/Standard/Movie/PC/Preference Opens the Picture Settings menu Opens the Noise Reduction menu Off/On Opens the Theater Settings menu Launches the temporary Audio ...Selector Opens the Audio Settings menu Opens the Audio Setup menu 46 Chapter 4 Menu Layout and ...
... Picture Sound Item Mode Picture Settings Noise Reduction Game Mode Theater Settings Digital Audio Selector Audio Settings Audio Setup Option Dynamic/Standard/Movie/PC/Preference Opens the Picture Settings menu Opens the Noise Reduction menu Off/On Opens the Theater Settings menu Launches the temporary Audio ...Selector Opens the Audio Settings menu Opens the Audio Setup menu 46 Chapter 4 Menu Layout and ...

User Guide
Page 47
... Rating Blocking Edit Rating Limits Input Lock Panel Lock GameTimer® New PIN Code Installation HDMI® CEC Setup Sleep Timer PC Settings Media Player Option Launches the temporary CC Selector Off/CC1/CC2/CC3/CC4/T1/T2/T3/T4 Opens the Digital CC Setup menu Opens the ... English/Français/Español Opens the Channel Browser Setup menu Opens the HDMI® CEC Player Control menu Opens the Energy Saving Settings menu Off/On (for USA region) Opens the Edit Rating Limits menu (for USA region) Off/Video/Video+ Off/On Off/30 min/60 min...
... Rating Blocking Edit Rating Limits Input Lock Panel Lock GameTimer® New PIN Code Installation HDMI® CEC Setup Sleep Timer PC Settings Media Player Option Launches the temporary CC Selector Off/CC1/CC2/CC3/CC4/T1/T2/T3/T4 Opens the Digital CC Setup menu Opens the ... English/Français/Español Opens the Channel Browser Setup menu Opens the HDMI® CEC Player Control menu Opens the Energy Saving Settings menu Off/On (for USA region) Opens the Edit Rating Limits menu (for USA region) Off/Video/Video+ Off/On Off/30 min/60 min...


