Brochure
Page 2
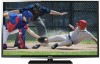
... should be taken to wall mount your display/peripheral device is HDMI® w/ CEC compatible. 4. and/or Toshiba Corporation. All rights reserved. ABX Remote Control (CT-90325) Back L5200U Series - While every effort has been made at the time of publication to ensure the...; Ready Blu-ray Disc™ Player Wi-Fi® Built-in the box • Remote Control (CT-90325) • Batteries (AA x 2) • Resource Guide • Quick Start Guide • Warranty UPC Code: 022265054604 Country of their respective owners. 40L5200U S P E C I F I C AT I O N S1 Screen Size: 40" • ...
... should be taken to wall mount your display/peripheral device is HDMI® w/ CEC compatible. 4. and/or Toshiba Corporation. All rights reserved. ABX Remote Control (CT-90325) Back L5200U Series - While every effort has been made at the time of publication to ensure the...; Ready Blu-ray Disc™ Player Wi-Fi® Built-in the box • Remote Control (CT-90325) • Batteries (AA x 2) • Resource Guide • Quick Start Guide • Warranty UPC Code: 022265054604 Country of their respective owners. 40L5200U S P E C I F I C AT I O N S1 Screen Size: 40" • ...
User Guide
Page 10
... Connecting a computer to the TV's PC IN terminal 36 Connection to the TV's HDMI® terminal...........38 Chapter 3: Using the Remote Control 41 Installing batteries 41 Remote control effective range 42 Learning about the remote control 43 Chapter 4: Menu Layout and Navigation 46 Main menu layout 46 Setup/Installation menu layout 48 Navigating the menu system...
... Connecting a computer to the TV's PC IN terminal 36 Connection to the TV's HDMI® terminal...........38 Chapter 3: Using the Remote Control 41 Installing batteries 41 Remote control effective range 42 Learning about the remote control 43 Chapter 4: Menu Layout and Navigation 46 Main menu layout 46 Setup/Installation menu layout 48 Navigating the menu system...
User Guide
Page 13
Contents 13 No Signal Power Down 110 Using HDMI® CEC 111 HDMI® CEC playback device (DVD player, etc.) control 111 Other HDMI® CEC functions 113 Setting up HDMI® CEC 114 Displaying TV status information 114 Understanding the last ... digital Noise Reduction 120 MPEG Noise Reduction 120 Game Mode 121 Chapter 8: Troubleshooting 122 General troubleshooting 122 Picture problems 123 Sound problems 125 Remote control problems 125 Channel tuning problems 126 Closed caption problems 126 Rating blocking (V-Chip) problems 126 No HDMI® CEC operation 127 HDMI®...
Contents 13 No Signal Power Down 110 Using HDMI® CEC 111 HDMI® CEC playback device (DVD player, etc.) control 111 Other HDMI® CEC functions 113 Setting up HDMI® CEC 114 Displaying TV status information 114 Understanding the last ... digital Noise Reduction 120 MPEG Noise Reduction 120 Game Mode 121 Chapter 8: Troubleshooting 122 General troubleshooting 122 Picture problems 123 Sound problems 125 Remote control problems 125 Channel tuning problems 126 Closed caption problems 126 Rating blocking (V-Chip) problems 126 No HDMI® CEC operation 127 HDMI®...
User Guide
Page 17
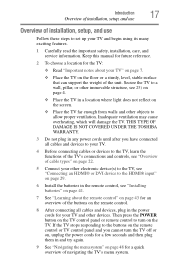
... device(s) to the TV, see "Connecting an HDMI® or DVI device to the HDMI® input" on page 29. 6 Install the batteries in the remote control, see 25) on page 4. ❖ Place the TV in a location where light does not reflect on the screen. ❖ Place the TV far enough from... cause overheating, which will damage the TV. THIS TYPE OF DAMAGE IS NOT COVERED UNDER THE TOSHIBA WARRANTY. 3 Do not plug in and try again. 9 See "Navigating the menu system" on the TV control panel or remote control to allow proper ventilation. If the TV stops responding to set up your TV" on page...
... device(s) to the TV, see "Connecting an HDMI® or DVI device to the HDMI® input" on page 29. 6 Install the batteries in the remote control, see 25) on page 4. ❖ Place the TV in a location where light does not reflect on the screen. ❖ Place the TV far enough from... cause overheating, which will damage the TV. THIS TYPE OF DAMAGE IS NOT COVERED UNDER THE TOSHIBA WARRANTY. 3 Do not plug in and try again. 9 See "Navigating the menu system" on the TV control panel or remote control to allow proper ventilation. If the TV stops responding to set up your TV" on page...
User Guide
Page 18
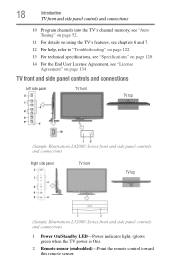
...Agreement, see "License Agreement" on page 134 TV front and side panel controls and connections Left side panel TV front TV top (Sample Illustration) L4200U Series front and side panel controls and connections Right side panel TV front TV top (Sample Illustration) L5200U ...Series front and side panel controls and connections 1 Power On/Standby LED-Power indicator light, (glows green when the TV power is On). 2 Remote sensor (embedded)-Point the remote control toward this remote sensor.
...Agreement, see "License Agreement" on page 134 TV front and side panel controls and connections Left side panel TV front TV top (Sample Illustration) L4200U Series front and side panel controls and connections Right side panel TV front TV top (Sample Illustration) L5200U ...Series front and side panel controls and connections 1 Power On/Standby LED-Power indicator light, (glows green when the TV power is On). 2 Remote sensor (embedded)-Point the remote control toward this remote sensor.
User Guide
Page 19
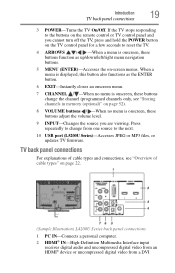
If the TV stops responding to the buttons on the remote control or TV control panel and you are viewing. Press repeatedly to the next. 10 USB port (L5200U Series)-Accesses JPEG or MP3 files, or updates TV firmware. TV ... menu. 7 CHANNEL / -When no menu is onscreen, these buttons function as up/down/left/right menu navigation buttons. 5 MENU (ENTER)-Accesses the on the TV control panel for a few seconds to reset the TV. 4 ARROWS / / / -When a menu is onscreen, these buttons change from a DVI Introduction 19 TV back panel connections 3 POWER...
If the TV stops responding to the buttons on the remote control or TV control panel and you are viewing. Press repeatedly to the next. 10 USB port (L5200U Series)-Accesses JPEG or MP3 files, or updates TV firmware. TV ... menu. 7 CHANNEL / -When no menu is onscreen, these buttons function as up/down/left/right menu navigation buttons. 5 MENU (ENTER)-Accesses the on the TV control panel for a few seconds to reset the TV. 4 ARROWS / / / -When a menu is onscreen, these buttons change from a DVI Introduction 19 TV back panel connections 3 POWER...
User Guide
Page 26
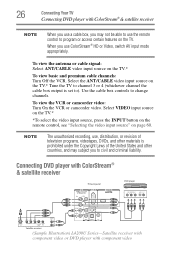
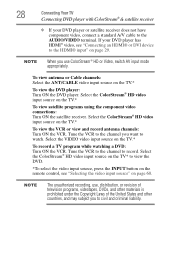
...camcorder video. NOTE The unauthorized recording, use, distribution, or revision of television programs, videotapes, DVDs, and other countries, and may subject you use the remote control to program or access certain features on the TV.* Tune the TV to channel 3 or 4 (whichever channel the cable box output is prohibited under the... ). Select VIDEO input source on the TV.* *To select the video input source, press the INPUT button on the remote control, see "Selecting the video input source" on the TV.* To view basic and premium cable channels: Turn Off the VCR. 26 Connecting Your ...
...camcorder video. NOTE The unauthorized recording, use, distribution, or revision of television programs, videotapes, DVDs, and other countries, and may subject you use the remote control to program or access certain features on the TV.* Tune the TV to channel 3 or 4 (whichever channel the cable box output is prohibited under the... ). Select VIDEO input source on the TV.* *To select the video input source, press the INPUT button on the remote control, see "Selecting the video input source" on the TV.* To view basic and premium cable channels: Turn Off the VCR. 26 Connecting Your ...
User Guide
Page 28
... receiver does not have component video, connect a standard A/V cable to view the DVD. *To select the video input source, press the INPUT button on the remote control, see "Connecting an HDMI® or DVI device to watch. NOTE When you to record. Tune the VCR to the channel to civil and criminal...
... receiver does not have component video, connect a standard A/V cable to view the DVD. *To select the video input source, press the INPUT button on the remote control, see "Connecting an HDMI® or DVI device to watch. NOTE When you to record. Tune the VCR to the channel to civil and criminal...
User Guide
Page 30
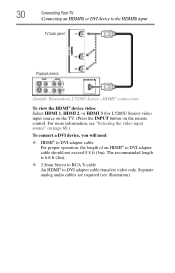
... HDMI® to DVI adapter cable should not exceed 9.8 ft (3m). Separate analog audio cables are required (see "Selecting the video input source" on the remote control. 30 Connecting Your TV Connecting an HDMI® or DVI device to the HDMI® input TV back panel Playback device (Sample Illustration) L5200U Series...
... HDMI® to DVI adapter cable should not exceed 9.8 ft (3m). Separate analog audio cables are required (see "Selecting the video input source" on the remote control. 30 Connecting Your TV Connecting an HDMI® or DVI device to the HDMI® input TV back panel Playback device (Sample Illustration) L5200U Series...
User Guide
Page 32
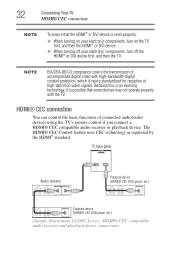
..., it is possible that the HDMI® or DVI device is being standardized for reception of connected audio/video devices using the TV's remote control if you connect a HDMI® CEC compatible audio receiver or playback device. HDMI® CEC connection You can... control the basic functions of high-definition video signals. The HDMI® CEC Control feature uses CEC technology as regulated by the HDMI® standard. NOTE EIA/CEA-861-D compliance covers the transmission...
..., it is possible that the HDMI® or DVI device is being standardized for reception of connected audio/video devices using the TV's remote control if you connect a HDMI® CEC compatible audio receiver or playback device. HDMI® CEC connection You can... control the basic functions of high-definition video signals. The HDMI® CEC Control feature uses CEC technology as regulated by the HDMI® standard. NOTE EIA/CEA-861-D compliance covers the transmission...
User Guide
Page 34
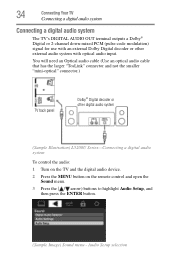
... Dolby Digital decoder or other digital audio system (Sample Illustration) L5200U Series-Connecting a digital audio system To control the audio: 1 Turn on the TV and the digital audio device. 2 Press the MENU button on the remote control and open the Sound menu. 3 Press the ( / arrow) buttons to highlight Audio Setup, and then press...
... Dolby Digital decoder or other digital audio system (Sample Illustration) L5200U Series-Connecting a digital audio system To control the audio: 1 Turn on the TV and the digital audio device. 2 Press the MENU button on the remote control and open the Sound menu. 3 Press the ( / arrow) buttons to highlight Audio Setup, and then press...

User Guide
Page 41
Squeeze tab and lift cover (Sample Illustration) Removing the remote back cover 2 Insert two AAA batteries, corresponding to excessive heat such as sunshine, fire, etc. 41 Do not expose batteries to the (+) and (-) markings on the battery compartment. (Sample Illustration) Installing the batteries 3 Replace the battery cover. Chapter 3 Using the Remote Control Installing batteries To install batteries: 1 Remove the battery cover from the back of the remote control.
Squeeze tab and lift cover (Sample Illustration) Removing the remote back cover 2 Insert two AAA batteries, corresponding to excessive heat such as sunshine, fire, etc. 41 Do not expose batteries to the (+) and (-) markings on the battery compartment. (Sample Illustration) Installing the batteries 3 Replace the battery cover. Chapter 3 Using the Remote Control Installing batteries To install batteries: 1 Remove the battery cover from the back of the remote control.
User Guide
Page 42
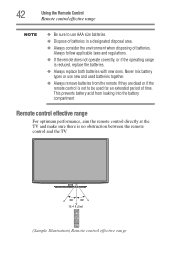
... or if the operating range is no obstruction between the remote control and the TV. 16.4 ft (5m) (Sample Illustration) Remote control effective range This prevents battery acid from the remote if they are dead or if the remote control is not to use new and used batteries together. ❖...; Always remove batteries from leaking into the battery compartment Remote control effective range For optimum performance, aim the remote control directly at the TV and make sure there is reduced, replace the batteries. ❖ Always replace both ...
... or if the operating range is no obstruction between the remote control and the TV. 16.4 ft (5m) (Sample Illustration) Remote control effective range This prevents battery acid from the remote if they are dead or if the remote control is not to use new and used batteries together. ❖...; Always remove batteries from leaking into the battery compartment Remote control effective range For optimum performance, aim the remote control directly at the TV and make sure there is reduced, replace the batteries. ❖ Always replace both ...

User Guide
Page 43
Using the Remote Control 43 Learning about the remote control Learning about the remote control The buttons used for a function that is not available. For the HDMI® CEC remote control functions, see "HDMI® CEC playback device (DVD player, etc.) control" on page 111. (Sample Illustration) Remote control overview NOTE The error message "NOT AVAILABLE" may appear if you press a button for operating the TV are described below.
Using the Remote Control 43 Learning about the remote control Learning about the remote control The buttons used for a function that is not available. For the HDMI® CEC remote control functions, see "HDMI® CEC playback device (DVD player, etc.) control" on page 111. (Sample Illustration) Remote control overview NOTE The error message "NOT AVAILABLE" may appear if you press a button for operating the TV are described below.

User Guide
Page 44
... between two channels using the Channel Browser" on page 78. 7 The Channel Number buttons (0-9, and Dash 100) directly tune channels. 44 Using the Remote Control Learning about the remote control 1 The POWER button turns the TV On/Off. The (Dash 100) button allows you to enter two part channel numbers, see "Storing channels in...
... between two channels using the Channel Browser" on page 78. 7 The Channel Number buttons (0-9, and Dash 100) directly tune channels. 44 Using the Remote Control Learning about the remote control 1 The POWER button turns the TV On/Off. The (Dash 100) button allows you to enter two part channel numbers, see "Storing channels in...
User Guide
Page 45
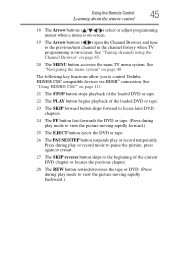
See "Tuning channels using the Channel Browser" on page 48 The following key functions allow you to control Toshiba HDMI® CEC compatible devices via HDMI® connection. Press during play or record mode to view the picture moving rapidly backward.). See "Using ....) 25 The EJECT button ejects the DVD or tape. 26 The PAUSE/STEP button suspends play mode to pause the picture; Using the Remote Control 45 Learning about the remote control 18 The Arrow buttons ( / / / ) select or adjust programming menus when a menu is on-screen. See "Navigating the menu system" on page 65. ...
See "Tuning channels using the Channel Browser" on page 48 The following key functions allow you to control Toshiba HDMI® CEC compatible devices via HDMI® connection. Press during play or record mode to view the picture moving rapidly backward.). See "Using ....) 25 The EJECT button ejects the DVD or tape. 26 The PAUSE/STEP button suspends play mode to pause the picture; Using the Remote Control 45 Learning about the remote control 18 The Arrow buttons ( / / / ) select or adjust programming menus when a menu is on-screen. See "Navigating the menu system" on page 65. ...

User Guide
Page 46
... temporary Audio Selector Opens the Audio Settings menu Opens the Audio Setup menu 46 To open the Installation menus (illustrated below and on the remote control or TV control panel. Chapter 4 Menu Layout and Navigation Main menu layout The tables below ), press MENU on the next pages provide a quick overview of your TV...
... temporary Audio Selector Opens the Audio Settings menu Opens the Audio Setup menu 46 To open the Installation menus (illustrated below and on the remote control or TV control panel. Chapter 4 Menu Layout and Navigation Main menu layout The tables below ), press MENU on the next pages provide a quick overview of your TV...
User Guide
Page 48
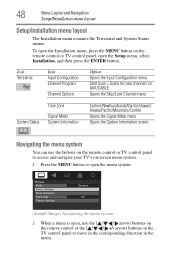
...Opens the Signal Meter menu Opens the System Information screen Navigating the menu system You can use the ( / / / arrow) buttons on the remote control or the arrow) buttons on -screen menu system. 1 Press the MENU button to move in the corresponding direction in the menu. 48 Menu Layout... Status menus. To open the Installation menu, press the MENU button on the remote control or TV control panel, open , use the buttons on the remote control or TV control panel to access and navigate your TV's on the TV control panel to open the menu system. (Sample Image) Navigating the menu system 2...
...Opens the Signal Meter menu Opens the System Information screen Navigating the menu system You can use the ( / / / arrow) buttons on the remote control or the arrow) buttons on -screen menu system. 1 Press the MENU button to move in the corresponding direction in the menu. 48 Menu Layout... Status menus. To open the Installation menu, press the MENU button on the remote control or TV control panel, open , use the buttons on the remote control or TV control panel to access and navigate your TV's on the TV control panel to open the menu system. (Sample Image) Navigating the menu system 2...

User Guide
Page 52
... the ENTER button. Auto Tuning You can manually add or erase individual channels from memory. Then you press the CH arrow buttons on the remote control or the control panel, store those channels in the TV's memory. Input Configuration selection 4 Highlight ANT/CABLE In and press the ( / arrow) buttons to select the input...
... the ENTER button. Auto Tuning You can manually add or erase individual channels from memory. Then you press the CH arrow buttons on the remote control or the control panel, store those channels in the TV's memory. Input Configuration selection 4 Highlight ANT/CABLE In and press the ( / arrow) buttons to select the input...
User Guide
Page 53
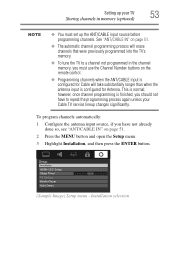
... will take substantially longer than when the antenna input is finished, you should not have not already done so, see "ANT/CABLE IN" on the remote control. ❖ Programming channels when the ANT/CABLE input is configured for Antenna. however, once channel programming is configured for Cable will erase channels that were...
... will take substantially longer than when the antenna input is finished, you should not have not already done so, see "ANT/CABLE IN" on the remote control. ❖ Programming channels when the ANT/CABLE input is configured for Antenna. however, once channel programming is configured for Cable will erase channels that were...


