Brochure
Page 2
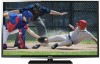
... device. All other trademarks are subject to change without notice. 2. 1080p/24 fps encoded content and an HD display capable of Toshiba America Information Systems, Inc. Dynamic Volume® • Ported Speakers • Speaker Output: 14W Connectivity • HDMI®...174; w/ CEC compatible. 4. ABX Remote Control (CT-90325) Back L5200U Series - Care should be pushed, pulled over, or knocked down. © 2012 Toshiba America Information Systems, Inc. With Stand • Dimensions: 36.5"x24"x10.1" • Weight: 36.4 lbs. - and/or Toshiba Corporation. 40L5200U S P E C I F I...
... device. All other trademarks are subject to change without notice. 2. 1080p/24 fps encoded content and an HD display capable of Toshiba America Information Systems, Inc. Dynamic Volume® • Ported Speakers • Speaker Output: 14W Connectivity • HDMI®...174; w/ CEC compatible. 4. ABX Remote Control (CT-90325) Back L5200U Series - Care should be pushed, pulled over, or knocked down. © 2012 Toshiba America Information Systems, Inc. With Stand • Dimensions: 36.5"x24"x10.1" • Weight: 36.4 lbs. - and/or Toshiba Corporation. 40L5200U S P E C I F I...
User Guide
Page 10
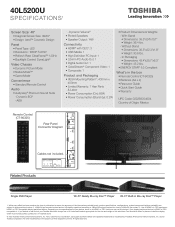
... a computer to the TV's PC IN terminal 36 Connection to the TV's HDMI® terminal...........38 Chapter 3: Using the Remote Control 41 Installing batteries 41 Remote control effective range 42 Learning about the remote control 43 Chapter 4: Menu Layout and Navigation 46 Main menu layout 46 Setup/Installation menu layout 48 Navigating the...
... a computer to the TV's PC IN terminal 36 Connection to the TV's HDMI® terminal...........38 Chapter 3: Using the Remote Control 41 Installing batteries 41 Remote control effective range 42 Learning about the remote control 43 Chapter 4: Menu Layout and Navigation 46 Main menu layout 46 Setup/Installation menu layout 48 Navigating the...
User Guide
Page 13
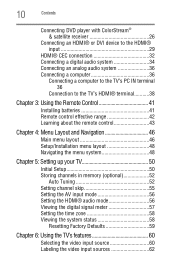
... CableClear® digital Noise Reduction 120 MPEG Noise Reduction 120 Game Mode 121 Chapter 8: Troubleshooting 122 General troubleshooting 122 Picture problems 123 Sound problems 125 Remote control problems 125 Channel tuning problems 126 Closed caption problems 126 Rating blocking (V-Chip) problems 126 No HDMI® CEC operation 127 HDMI® problems...
... CableClear® digital Noise Reduction 120 MPEG Noise Reduction 120 Game Mode 121 Chapter 8: Troubleshooting 122 General troubleshooting 122 Picture problems 123 Sound problems 125 Remote control problems 125 Channel tuning problems 126 Closed caption problems 126 Rating blocking (V-Chip) problems 126 No HDMI® CEC operation 127 HDMI® problems...
User Guide
Page 16
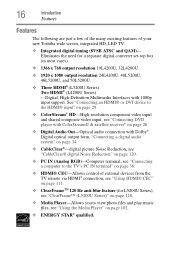
...The following are just a few of the many exciting features of external devices from the TV remote via HDMI® connection, see "Using the Media Player" on page 111. ❖... most cases). ❖ 1366 x 768 output resolution 19L4200U, 32L4200U. ❖ 1920 x 1080 output resolution 24L4200U, 40L5200U, 46L5200U, and 50L5200U. ❖ Three HDMI® (L5200U Series) Two HDMI® (L4200U Series) -Digital...'s PC IN terminal" on page 36. ❖ HDMI® CEC-Allows control of your new Toshiba wide screen, integrated HD, LED TV: ❖ Integrated digital tuning (8VSB ATSC and QAM)- See...
...The following are just a few of the many exciting features of external devices from the TV remote via HDMI® connection, see "Using the Media Player" on page 111. ❖... most cases). ❖ 1366 x 768 output resolution 19L4200U, 32L4200U. ❖ 1920 x 1080 output resolution 24L4200U, 40L5200U, 46L5200U, and 50L5200U. ❖ Three HDMI® (L5200U Series) Two HDMI® (L4200U Series) -Digital...'s PC IN terminal" on page 36. ❖ HDMI® CEC-Allows control of your new Toshiba wide screen, integrated HD, LED TV: ❖ Integrated digital tuning (8VSB ATSC and QAM)- See...
User Guide
Page 17
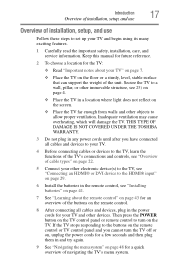
... where light does not reflect on the TV. Then press the POWER button on the TV control panel or remote control to turn the TV off or on, unplug the power cords for a few seconds and then plug ...See "Navigating the menu system" on page 48 for the TV: ❖ Read "Important notes about the remote control" on page 43 for an overview of the buttons on the floor or a sturdy, level, stable ... If the TV stops responding to allow proper ventilation. THIS TYPE OF DAMAGE IS NOT COVERED UNDER THE TOSHIBA WARRANTY. 3 Do not plug in any power cords until after you cannot turn on the screen. &#...
... where light does not reflect on the TV. Then press the POWER button on the TV control panel or remote control to turn the TV off or on, unplug the power cords for a few seconds and then plug ...See "Navigating the menu system" on page 48 for the TV: ❖ Read "Important notes about the remote control" on page 43 for an overview of the buttons on the floor or a sturdy, level, stable ... If the TV stops responding to allow proper ventilation. THIS TYPE OF DAMAGE IS NOT COVERED UNDER THE TOSHIBA WARRANTY. 3 Do not plug in any power cords until after you cannot turn on the screen. &#...
User Guide
Page 18
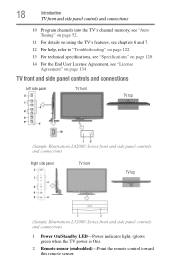
... Illustration) L5200U Series front and side panel controls and connections 1 Power On/Standby LED-Power indicator light, (glows green when the TV power is On). 2 Remote sensor (embedded)-Point the remote control toward this...
... Illustration) L5200U Series front and side panel controls and connections 1 Power On/Standby LED-Power indicator light, (glows green when the TV power is On). 2 Remote sensor (embedded)-Point the remote control toward this...
User Guide
Page 19
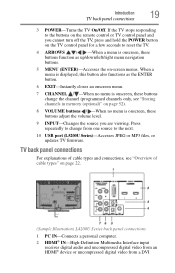
...). 8 VOLUME buttons / -When no menu is displayed, this button also functions as up/down/left/right menu navigation buttons. 5 MENU (ENTER)-Accesses the on the remote control or TV control panel and you are viewing. If the TV stops responding to the buttons on -screen menus. When a menu is onscreen, these...
...). 8 VOLUME buttons / -When no menu is displayed, this button also functions as up/down/left/right menu navigation buttons. 5 MENU (ENTER)-Accesses the on the remote control or TV control panel and you are viewing. If the TV stops responding to the buttons on -screen menus. When a menu is onscreen, these...
User Guide
Page 26
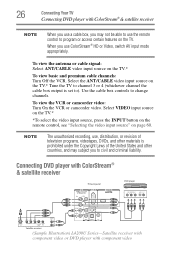
...VCR. NOTE The unauthorized recording, use, distribution, or revision of the United States and other countries, and may not be able to use the remote control to program or access certain features on page 60. Select VIDEO input source on the TV.* *To select the video input source, press the... INPUT button on the remote control, see "Selecting the video input source" on the TV. 26 Connecting Your TV Connecting DVD player with component video Use the cable box ...
...VCR. NOTE The unauthorized recording, use, distribution, or revision of the United States and other countries, and may not be able to use the remote control to program or access certain features on page 60. Select VIDEO input source on the TV.* *To select the video input source, press the... INPUT button on the remote control, see "Selecting the video input source" on the TV. 26 Connecting Your TV Connecting DVD player with component video Use the cable box ...
User Guide
Page 28
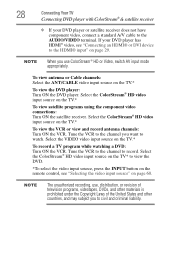
... ColorStream® HD video input source on the TV* to view the DVD. *To select the video input source, press the INPUT button on the remote control, see "Connecting an HDMI® or DVI device to the HDMI® input" on the TV.* To record a TV program while watching a DVD: Turn...
... ColorStream® HD video input source on the TV* to view the DVD. *To select the video input source, press the INPUT button on the remote control, see "Connecting an HDMI® or DVI device to the HDMI® input" on the TV.* To record a TV program while watching a DVD: Turn...
User Guide
Page 30
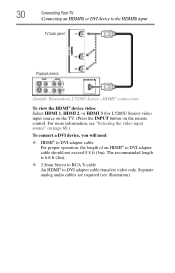
... of an HDMI® to DVI adapter cable transfers video only. Separate analog audio cables are required (see "Selecting the video input source" on the remote control. For more information, see illustration).
... of an HDMI® to DVI adapter cable transfers video only. Separate analog audio cables are required (see "Selecting the video input source" on the remote control. For more information, see illustration).
User Guide
Page 32
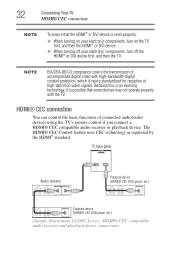
... evolving technology, it is possible that the HDMI® or DVI device is being standardized for reception of connected audio/video devices using the TV's remote control if you connect a HDMI® CEC compatible audio receiver or playback device. HDMI® CEC connection You can control the basic functions of high...
... evolving technology, it is possible that the HDMI® or DVI device is being standardized for reception of connected audio/video devices using the TV's remote control if you connect a HDMI® CEC compatible audio receiver or playback device. HDMI® CEC connection You can control the basic functions of high...
User Guide
Page 34
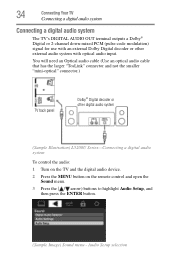
...) L5200U Series-Connecting a digital audio system To control the audio: 1 Turn on the TV and the digital audio device. 2 Press the MENU button on the remote control and open the Sound menu. 3 Press the ( / arrow) buttons to highlight Audio Setup, and then press the ENTER button. (Sample Image) Sound menu - Audio...
...) L5200U Series-Connecting a digital audio system To control the audio: 1 Turn on the TV and the digital audio device. 2 Press the MENU button on the remote control and open the Sound menu. 3 Press the ( / arrow) buttons to highlight Audio Setup, and then press the ENTER button. (Sample Image) Sound menu - Audio...

User Guide
Page 41
Chapter 3 Using the Remote Control Installing batteries To install batteries: 1 Remove the battery cover from the back of the remote control. Squeeze tab and lift cover (Sample Illustration) Removing the remote back cover 2 Insert two AAA batteries, corresponding to excessive heat such as sunshine, fire, etc. 41 Do not expose batteries to the (+) and (-) markings on the battery compartment. (Sample Illustration) Installing the batteries 3 Replace the battery cover.
Chapter 3 Using the Remote Control Installing batteries To install batteries: 1 Remove the battery cover from the back of the remote control. Squeeze tab and lift cover (Sample Illustration) Removing the remote back cover 2 Insert two AAA batteries, corresponding to excessive heat such as sunshine, fire, etc. 41 Do not expose batteries to the (+) and (-) markings on the battery compartment. (Sample Illustration) Installing the batteries 3 Replace the battery cover.
User Guide
Page 42
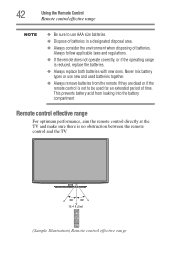
... designated disposal area. ❖ Always consider the environment when disposing of time. This prevents battery acid from the remote if they are dead or if the remote control is not to use new and used for an extended period of batteries. Always follow applicable laws and regulations...; Be sure to be used batteries together. ❖ Always remove batteries from leaking into the battery compartment Remote control effective range For optimum performance, aim the remote control directly at the TV and make sure there is reduced, replace the batteries. ❖ Always replace both...
... designated disposal area. ❖ Always consider the environment when disposing of time. This prevents battery acid from the remote if they are dead or if the remote control is not to use new and used for an extended period of batteries. Always follow applicable laws and regulations...; Be sure to be used batteries together. ❖ Always remove batteries from leaking into the battery compartment Remote control effective range For optimum performance, aim the remote control directly at the TV and make sure there is reduced, replace the batteries. ❖ Always replace both...

User Guide
Page 43
Using the Remote Control 43 Learning about the remote control Learning about the remote control The buttons used for a function that is not available. For the HDMI® CEC remote control functions, see "HDMI® CEC playback device (DVD player, etc.) control" on page 111. (Sample Illustration) Remote control overview NOTE The error message "NOT AVAILABLE" may appear if you press a button for operating the TV are described below.
Using the Remote Control 43 Learning about the remote control Learning about the remote control The buttons used for a function that is not available. For the HDMI® CEC remote control functions, see "HDMI® CEC playback device (DVD player, etc.) control" on page 111. (Sample Illustration) Remote control overview NOTE The error message "NOT AVAILABLE" may appear if you press a button for operating the TV are described below.

User Guide
Page 44
44 Using the Remote Control Learning about the remote control 1 The POWER button turns the TV On/Off. CAPTION button accesses closed captions, see "Using closed captions" on page 81. 12 The MUTE button ...
44 Using the Remote Control Learning about the remote control 1 The POWER button turns the TV On/Off. CAPTION button accesses closed captions, see "Using closed captions" on page 81. 12 The MUTE button ...
User Guide
Page 45
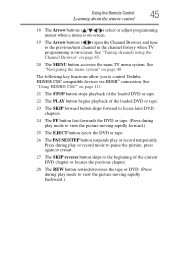
...the previous chapter. 28 The REW button rewinds/reverses the tape or DVD. (Press during play mode to pause the picture; Using the Remote Control 45 Learning about the remote control 18 The Arrow buttons ( / / / ) select or adjust programming menus when a menu is on-screen. 19 The Arrow ...buttons ( / ) open the Channel Browser and tune to control Toshiba HDMI® CEC compatible devices via HDMI® connection. See "Tuning channels using ...
...the previous chapter. 28 The REW button rewinds/reverses the tape or DVD. (Press during play mode to pause the picture; Using the Remote Control 45 Learning about the remote control 18 The Arrow buttons ( / / / ) select or adjust programming menus when a menu is on-screen. 19 The Arrow ...buttons ( / ) open the Channel Browser and tune to control Toshiba HDMI® CEC compatible devices via HDMI® connection. See "Tuning channels using ...

User Guide
Page 46
... the temporary Audio Selector Opens the Audio Settings menu Opens the Audio Setup menu 46 To open the Installation menus (illustrated below and on the remote control or TV control panel.
... the temporary Audio Selector Opens the Audio Settings menu Opens the Audio Setup menu 46 To open the Installation menus (illustrated below and on the remote control or TV control panel.
User Guide
Page 48
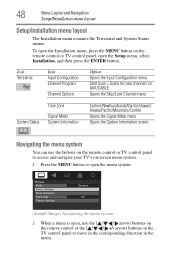
...Pacific/Mountain/Central Opens the Signal Meter menu Opens the System Information screen Navigating the menu system You can use the ( / / / arrow) buttons on the remote control or the arrow) buttons on -screen menu system. 1 Press the MENU button to open the menu system. (Sample Image) Navigating the menu system 2... contains the Terrestrial and System Status menus. To open the Installation menu, press the MENU button on the remote control or TV control panel, open , use the buttons on the remote control or TV control panel to access and navigate your TV's on the TV control panel to move in...
...Pacific/Mountain/Central Opens the Signal Meter menu Opens the System Information screen Navigating the menu system You can use the ( / / / arrow) buttons on the remote control or the arrow) buttons on -screen menu system. 1 Press the MENU button to open the menu system. (Sample Image) Navigating the menu system 2... contains the Terrestrial and System Status menus. To open the Installation menu, press the MENU button on the remote control or TV control panel, open , use the buttons on the remote control or TV control panel to access and navigate your TV's on the TV control panel to move in...

User Guide
Page 52
... the Terrestrial menu, highlight Input Configuration, and then press the ENTER button. (Sample Image) Terrestrial menu - Then you press the CH arrow buttons on the remote control or the control panel, store those channels in the TV's memory. Input Configuration selection 4 Highlight ANT/CABLE In and press the ( / arrow) buttons to...
... the Terrestrial menu, highlight Input Configuration, and then press the ENTER button. (Sample Image) Terrestrial menu - Then you press the CH arrow buttons on the remote control or the control panel, store those channels in the TV's memory. Input Configuration selection 4 Highlight ANT/CABLE In and press the ( / arrow) buttons to...


