
Brochure
Page 1
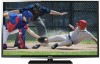
...picture clarity without impacting brightness or adding flicker. ClearFrame™ 120Hz for Clear, Fast Motion Doubles the normal frame rate to pop off the screen! Easily connect to your personal playlists with this feature. The new Dynamic Mode enhances color, sharpness, brightness and contrast to your favorite tunes and...True Home Theater Quality Full HD2 provides more detail. New Audyssey® Sound Enhancement A suite of advanced audio technologies that really stands out. 40L5200U LED HDTV Get a premier picture at a matinee price Ultrathin LED with 1080p Full HD2 resolution.
...picture clarity without impacting brightness or adding flicker. ClearFrame™ 120Hz for Clear, Fast Motion Doubles the normal frame rate to pop off the screen! Easily connect to your personal playlists with this feature. The new Dynamic Mode enhances color, sharpness, brightness and contrast to your favorite tunes and...True Home Theater Quality Full HD2 provides more detail. New Audyssey® Sound Enhancement A suite of advanced audio technologies that really stands out. 40L5200U LED HDTV Get a premier picture at a matinee price Ultrathin LED with 1080p Full HD2 resolution.
Brochure
Page 2
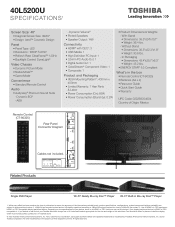
...Warranty UPC Code: 022265054604 Country of your device, some or all HDMI® w/ CEC functions may not work even if your Toshiba television, always use a UL Listed wall bracket appropriate for viewing 1080p/24 fps content. 3. Depending on the specifications of Origin: ...Mode are registered trademarks or trademarks of HDMI® w/ CEC requires an HDMI® w/ CEC compatible display/peripheral device. 40L5200U S P E C I F I C AT I O N S1 Screen Size: 40" • Diagonal Screen Size: 39.69" • Design: Aero™ Cosmetic Design Panel • Panel Type: LED • Resolution: ...
...Warranty UPC Code: 022265054604 Country of your device, some or all HDMI® w/ CEC functions may not work even if your Toshiba television, always use a UL Listed wall bracket appropriate for viewing 1080p/24 fps content. 3. Depending on the specifications of Origin: ...Mode are registered trademarks or trademarks of HDMI® w/ CEC requires an HDMI® w/ CEC compatible display/peripheral device. 40L5200U S P E C I F I C AT I O N S1 Screen Size: 40" • Diagonal Screen Size: 39.69" • Design: Aero™ Cosmetic Design Panel • Panel Type: LED • Resolution: ...
User Guide
Page 4
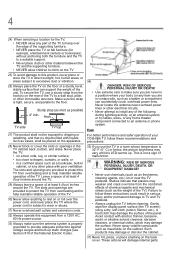
...theater component connected to the floor. Never spray volatile compounds such as possible) 4" min. The slots and openings are never in a position where your TOSHIBA TV, follow these recommendations and precautions: 35) If you are provided to protect the TV from a 120V AC, 60 Hz power source. 33) Always... provide adequate protection against voltage surges and built-up . Avoid contact with poor ventilation. Gently wipe the display panel surface (the TV screen) using a dry, soft cloth (cotton, flannel, etc.). Never locate the antenna near the TV pedestal.
...theater component connected to the floor. Never spray volatile compounds such as possible) 4" min. The slots and openings are never in a position where your TOSHIBA TV, follow these recommendations and precautions: 35) If you are provided to protect the TV from a 120V AC, 60 Hz power source. 33) Always... provide adequate protection against voltage surges and built-up . Avoid contact with poor ventilation. Gently wipe the display panel surface (the TV screen) using a dry, soft cloth (cotton, flannel, etc.). Never locate the antenna near the TV pedestal.
User Guide
Page 5
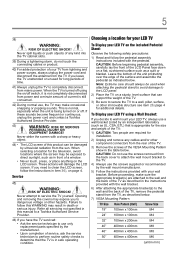
...become frequent or continuous, unplug the power cord and contact a Toshiba Authorized Service Provider. 43) WARNING: RISK OF SERIOUS PERSONAL INJURY OR EQUIPMENT DAMAGE! These actions will damage the LCD screen. If you need to clean the LCD screen, follow this WARNING may expose you decide to determine that ... a sharp or heavy object. 44) • The LCD screen of the surface and assemble the pedestal as described below . Leave the bottom of the unit protruding over the edge of this manual to a Toshiba Authorized Service Provider. 46) If you leave the TV unattended or unused for ...
...become frequent or continuous, unplug the power cord and contact a Toshiba Authorized Service Provider. 43) WARNING: RISK OF SERIOUS PERSONAL INJURY OR EQUIPMENT DAMAGE! These actions will damage the LCD screen. If you need to clean the LCD screen, follow this WARNING may expose you decide to determine that ... a sharp or heavy object. 44) • The LCD screen of the surface and assemble the pedestal as described below . Leave the bottom of the unit protruding over the edge of this manual to a Toshiba Authorized Service Provider. 46) If you leave the TV unattended or unused for ...
User Guide
Page 7
... antenna. • Increase the separation between the equipment and receiver. • Connect the equipment into an outlet on the screen if a fixed, non-moving image appears for compliance to radio or television reception, which the receiver is manufactured using an ... may appear on a circuit different from a normal viewing distance. 7 FCC Declaration of Conformity Compliance Statement (Part 15): Toshiba 19L4200U, 24L4200U, 32L4200U, 40L5200U, 46L5200U, 50L5200U Television models comply with Part 15 of precision technology; The party responsible for a long period of joystick...
... antenna. • Increase the separation between the equipment and receiver. • Connect the equipment into an outlet on the screen if a fixed, non-moving image appears for compliance to radio or television reception, which the receiver is manufactured using an ... may appear on a circuit different from a normal viewing distance. 7 FCC Declaration of Conformity Compliance Statement (Part 15): Toshiba 19L4200U, 24L4200U, 32L4200U, 40L5200U, 46L5200U, 50L5200U Television models comply with Part 15 of precision technology; The party responsible for a long period of joystick...
User Guide
Page 16
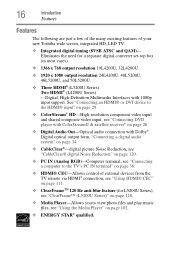
... "Connecting a computer to the TV's PC IN terminal" on page 36. ❖ HDMI® CEC-Allows control of your new Toshiba wide screen, integrated HD, LED TV: ❖ Integrated digital tuning (8VSB ATSC and QAM)- Eliminates the need for L5200U Series), see "ClearFrame™...digital converter set-top box (in most cases). ❖ 1366 x 768 output resolution 19L4200U, 32L4200U. ❖ 1920 x 1080 output resolution 24L4200U, 40L5200U, 46L5200U, and 50L5200U. ❖ Three HDMI® (L5200U Series) Two HDMI® (L4200U Series) -Digital, High-Definition Multimedia Interfaces with ...
... "Connecting a computer to the TV's PC IN terminal" on page 36. ❖ HDMI® CEC-Allows control of your new Toshiba wide screen, integrated HD, LED TV: ❖ Integrated digital tuning (8VSB ATSC and QAM)- Eliminates the need for L5200U Series), see "ClearFrame™...digital converter set-top box (in most cases). ❖ 1366 x 768 output resolution 19L4200U, 32L4200U. ❖ 1920 x 1080 output resolution 24L4200U, 40L5200U, 46L5200U, and 50L5200U. ❖ Three HDMI® (L5200U Series) Two HDMI® (L4200U Series) -Digital, High-Definition Multimedia Interfaces with ...
User Guide
Page 17
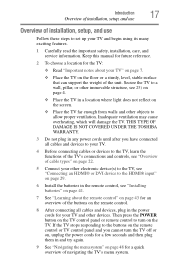
... its many exciting features. 1 Carefully read the important safety, installation, care, and service information. THIS TYPE OF DAMAGE IS NOT COVERED UNDER THE TOSHIBA WARRANTY. 3 Do not plug in the power cords for your other immovable structure, see "Overview of cable types" on page 22. 5 Connect ...control or TV control panel and you have connected all cables and devices, plug in any power cords until after you cannot turn on the screen. ❖ Place the TV far enough from walls and other devices. Introduction 17 Overview of installation, setup, and use Overview of installation...
... its many exciting features. 1 Carefully read the important safety, installation, care, and service information. THIS TYPE OF DAMAGE IS NOT COVERED UNDER THE TOSHIBA WARRANTY. 3 Do not plug in the power cords for your other immovable structure, see "Overview of cable types" on page 22. 5 Connect ...control or TV control panel and you have connected all cables and devices, plug in any power cords until after you cannot turn on the screen. ❖ Place the TV far enough from walls and other devices. Introduction 17 Overview of installation, setup, and use Overview of installation...
User Guide
Page 19
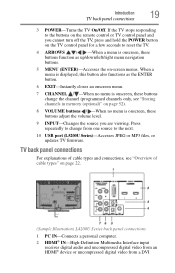
... onscreen menu. 7 CHANNEL / -When no menu is displayed, this button also functions as up/down/left/right menu navigation buttons. 5 MENU (ENTER)-Accesses the on-screen menus. Press repeatedly to change the channel (programmed channels only, see "Overview of cable types and connections, see "Storing channels in memory (optional)" on page...
... onscreen menu. 7 CHANNEL / -When no menu is displayed, this button also functions as up/down/left/right menu navigation buttons. 5 MENU (ENTER)-Accesses the on-screen menus. Press repeatedly to change the channel (programmed channels only, see "Overview of cable types and connections, see "Storing channels in memory (optional)" on page...

User Guide
Page 35
.... To revert to select either Dolby Digital or PCM, depending on your device, see "Audyssey Premium Television™" on page 87. (Sample Image) Audio Setup screen -
.... To revert to select either Dolby Digital or PCM, depending on your device, see "Audyssey Premium Television™" on page 87. (Sample Image) Audio Setup screen -

User Guide
Page 40
NOTE ❖ The edges of the picture may be hidden. ❖ If receiving a 480i (HDMI®), 480p (HDMI®), 720p, 1080i, or 1080p signal program, Native mode scales the video to display the entire picture within the borders of the screen (i.e. no overscanning). 40 Connecting Your TV Connecting a computer The supported signal formats are VGA, SVGA, XGA, WXGA, SXGA, 480i (60Hz), 480p (60Hz), 720p (60Hz), 1080i (60Hz), and 1080p (24Hz/60Hz). For signal specifications, see "Acceptable signal formats for PC IN, HDMI®" on page 132.
NOTE ❖ The edges of the picture may be hidden. ❖ If receiving a 480i (HDMI®), 480p (HDMI®), 720p, 1080i, or 1080p signal program, Native mode scales the video to display the entire picture within the borders of the screen (i.e. no overscanning). 40 Connecting Your TV Connecting a computer The supported signal formats are VGA, SVGA, XGA, WXGA, SXGA, 480i (60Hz), 480p (60Hz), 720p (60Hz), 1080i (60Hz), and 1080p (24Hz/60Hz). For signal specifications, see "Acceptable signal formats for PC IN, HDMI®" on page 132.

User Guide
Page 44
...TV status information as well as program details, when available, see "Displaying TV status information" on page 114. 15 The EXIT button closes on-screen menus. 16 The ENTER button activates highlighted items in the main menu system. 17 The CH RTN button returns to the last viewed channel or... "Favorites browser" on page 66. 9 The RECALL button displays TV status information. 10 The CH ( / arrow) buttons cycle through programmed channels (when no on-screen menu is on, the power LED indicator on the TV front glows green. 2 The PIC SIZE button cycles through the picture sizes, see "Selecting the...
...TV status information as well as program details, when available, see "Displaying TV status information" on page 114. 15 The EXIT button closes on-screen menus. 16 The ENTER button activates highlighted items in the main menu system. 17 The CH RTN button returns to the last viewed channel or... "Favorites browser" on page 66. 9 The RECALL button displays TV status information. 10 The CH ( / arrow) buttons cycle through programmed channels (when no on-screen menu is on, the power LED indicator on the TV front glows green. 2 The PIC SIZE button cycles through the picture sizes, see "Selecting the...
User Guide
Page 45
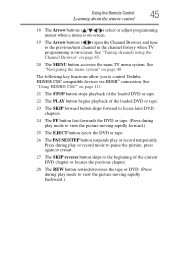
...menu system" on page 48 The following key functions allow you to the previous/next channel in the channel history when TV programming is on-screen. Press during play or record temporarily. See "Using HDMI® CEC" on page 111 21 The STOP button stops playback of the loaded...about the remote control 18 The Arrow buttons ( / / / ) select or adjust programming menus when a menu is on-screen. 19 The Arrow buttons ( / ) open the Channel Browser and tune to control Toshiba HDMI® CEC compatible devices via HDMI® connection. See "Tuning channels using the Channel Browser" on page 65...
...menu system" on page 48 The following key functions allow you to the previous/next channel in the channel history when TV programming is on-screen. Press during play or record temporarily. See "Using HDMI® CEC" on page 111 21 The STOP button stops playback of the loaded...about the remote control 18 The Arrow buttons ( / / / ) select or adjust programming menus when a menu is on-screen. 19 The Arrow buttons ( / ) open the Channel Browser and tune to control Toshiba HDMI® CEC compatible devices via HDMI® connection. See "Tuning channels using the Channel Browser" on page 65...

User Guide
Page 47
... Limits menu (for USA region) Off/Video/Video+ Off/On Off/30 min/60 min/90 min/120 min Opens the New PIN Code entry screen Opens the Installation menu Enable HDMI® CEC/TV Auto Input Switch/TV Auto Power/Device Auto Standby/Speaker Preference 10-minute increments, from 0 min...
... Limits menu (for USA region) Off/Video/Video+ Off/On Off/30 min/60 min/90 min/120 min Opens the New PIN Code entry screen Opens the Installation menu Enable HDMI® CEC/TV Auto Input Switch/TV Auto Power/Device Auto Standby/Speaker Preference 10-minute increments, from 0 min...
User Guide
Page 48
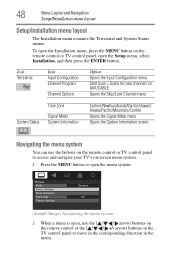
...System Status Time Zone Signal Meter System Information Eastern/Newfoundland/Atlantic/Hawaii/ Alaska/Pacific/Mountain/Central Opens the Signal Meter menu Opens the System Information screen Navigating the menu system You can use the buttons on the remote control or TV control panel to access and navigate your TV's on...-screen menu system. 1 Press the MENU button to open the menu system. (Sample Image) Navigating the menu system 2 When a menu is open, use the ( / / / arrow) ...
...System Status Time Zone Signal Meter System Information Eastern/Newfoundland/Atlantic/Hawaii/ Alaska/Pacific/Mountain/Central Opens the Signal Meter menu Opens the System Information screen Navigating the menu system You can use the buttons on the remote control or TV control panel to access and navigate your TV's on...-screen menu system. 1 Press the MENU button to open the menu system. (Sample Image) Navigating the menu system 2 When a menu is open, use the ( / / / arrow) ...

User Guide
Page 51
Installation selection A new set of menus and messages. ANT/CABLE IN This setting configures the input source for the on-screen display of Installation menu icons appears. Setting up your TV 51 Initial Setup Menu language You can choose from three different menu language settings (English, ...
Installation selection A new set of menus and messages. ANT/CABLE IN This setting configures the input source for the on-screen display of Installation menu icons appears. Setting up your TV 51 Initial Setup Menu language You can choose from three different menu language settings (English, ...

User Guide
Page 52
...'s memory. Input Configuration selection 4 Highlight ANT/CABLE In and press the ( / arrow) buttons to select the input source (Cable or Antenna). (Sample Image) Input Configuration screen 5 To save your original settings, highlight Cancel, and then press the ENTER button. 52 Setting up the TV to detect all active channels in your...
...'s memory. Input Configuration selection 4 Highlight ANT/CABLE In and press the ( / arrow) buttons to select the input source (Cable or Antenna). (Sample Image) Input Configuration screen 5 To save your original settings, highlight Cancel, and then press the ENTER button. 52 Setting up the TV to detect all active channels in your...
User Guide
Page 54
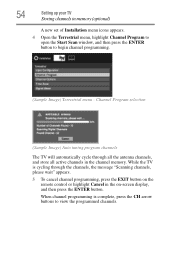
..., the message "Scanning channels, please wait" appears. 5 To cancel channel programming, press the EXIT button on the remote control or highlight Cancel in the on-screen display, and then press the ENTER button. While the TV is complete, press the CH arrow buttons to begin channel programming. (Sample Image) Terrestrial menu...
..., the message "Scanning channels, please wait" appears. 5 To cancel channel programming, press the EXIT button on the remote control or highlight Cancel in the on-screen display, and then press the ENTER button. While the TV is complete, press the CH arrow buttons to begin channel programming. (Sample Image) Terrestrial menu...

User Guide
Page 58
... input and digital channel signal you to the Terrestrial menu: ❖ Highlight Done, and then press the ENTER button. To close the screen and return to specify the correct time zone for your TV Setting the time zone 2 Highlight Installation, and then press the ENTER button.... allows the TV status information to a virtual TV channel number. NOTE ❖ The physical digital channel number listed in the Signal Meter screen may not correspond to display the correct time zone information for your local digital stations. ❖ The signal strength does not change between ...
... input and digital channel signal you to the Terrestrial menu: ❖ Highlight Done, and then press the ENTER button. To close the screen and return to specify the correct time zone for your TV Setting the time zone 2 Highlight Installation, and then press the ENTER button.... allows the TV status information to a virtual TV channel number. NOTE ❖ The physical digital channel number listed in the Signal Meter screen may not correspond to display the correct time zone information for your local digital stations. ❖ The signal strength does not change between ...
User Guide
Page 59
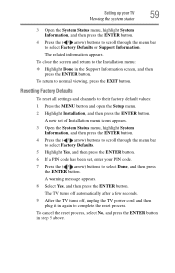
... button. The related information appears. To cancel the reset process, select No, and press the ENTER button in the Support Information screen, and then press the ENTER button. To close the screen and return to select Factory Defaults or Support Information. A new set of Installation menu icons appears. 3 Open the System Status...
... button. The related information appears. To cancel the reset process, select No, and press the ENTER button in the Support Information screen, and then press the ENTER button. To close the screen and return to select Factory Defaults or Support Information. A new set of Installation menu icons appears. 3 Open the System Status...

User Guide
Page 61
Using the TV's features 61 Selecting the video input source ❖ Repeatedly press the INPUT button on the screen if no signal is received in video input mode. ❖ If a CEC device is connected to change the input setting. The current signal ...source displays in the top right corner of the Input Selection screen. (Sample Image) L4200U Series Input Selection screen HDMI 3 5 5 (Sample Image) L5200U Series Input Selection screen NOTE ❖ You can label the video input sources according to the specific devices you have connected to...
Using the TV's features 61 Selecting the video input source ❖ Repeatedly press the INPUT button on the screen if no signal is received in video input mode. ❖ If a CEC device is connected to change the input setting. The current signal ...source displays in the top right corner of the Input Selection screen. (Sample Image) L4200U Series Input Selection screen HDMI 3 5 5 (Sample Image) L5200U Series Input Selection screen NOTE ❖ You can label the video input sources according to the specific devices you have connected to...


