Owner's Manual - English
Page 3
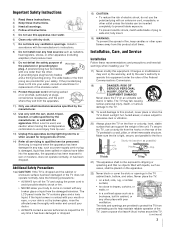
...the rear of at all servicing to help maintain reliable operation of the unit. Leave a space of the TV pedestal to drapes, curtains, or walls; The LCD panel inside the TV contains glass and a toxic liquid. fully insert. 16) WARNING: To prevent the spread of the obsolete ...outlet. 10) Protect the power cord from this product at least 4 (four) inches around the TV. (continued) 3 Installation, Care, and Service ...
...the rear of at all servicing to help maintain reliable operation of the unit. Leave a space of the TV pedestal to drapes, curtains, or walls; The LCD panel inside the TV contains glass and a toxic liquid. fully insert. 16) WARNING: To prevent the spread of the obsolete ...outlet. 10) Protect the power cord from this product at least 4 (four) inches around the TV. (continued) 3 Installation, Care, and Service ...
Owner's Manual - English
Page 4
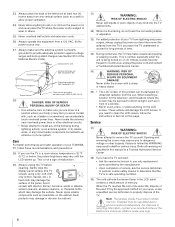
...TV from lightning and power surges, always unplug the power cord and disconnect the antenna from the TV if you leave the TV...LCD warms up static charges (see Section 810 of time. 34) During normal use, the TV may damage the surface of a window. • Never touch, press, or place anything to rest on the cabinet. When selecting a location for your TOSHIBA TV, follow these sounds become frequent or continuous, unplug the power... cord and contact a Toshiba...21) Ground clamps Power service grounding electrode ...
...TV from lightning and power surges, always unplug the power cord and disconnect the antenna from the TV if you leave the TV...LCD warms up static charges (see Section 810 of time. 34) During normal use, the TV may damage the surface of a window. • Never touch, press, or place anything to rest on the cabinet. When selecting a location for your TOSHIBA TV, follow these sounds become frequent or continuous, unplug the power... cord and contact a Toshiba...21) Ground clamps Power service grounding electrode ...
Owner's Manual - English
Page 6
...not an indication of malfunction; FCC Declaration of Conformity Compliance Statement (Part 15): The Toshiba 26HL67, 32HL67, 37HL67, 42HL67, and 32HL67U Televisions comply with the limits for a Class B digital device...at an on a circuit different from SRS Labs, Inc. • Manufactured under your LCD TV The following symptoms are technical limitations of the following two conditions: (1) this device may...an outlet on -screen target may be determined by removing and applying power to the equipment, the user is : Toshiba America Consumer Products, L.L.C. 82 Totowa Rd. Dolby and the double-D...
...not an indication of malfunction; FCC Declaration of Conformity Compliance Statement (Part 15): The Toshiba 26HL67, 32HL67, 37HL67, 42HL67, and 32HL67U Televisions comply with the limits for a Class B digital device...at an on a circuit different from SRS Labs, Inc. • Manufactured under your LCD TV The following symptoms are technical limitations of the following two conditions: (1) this device may...an outlet on -screen target may be determined by removing and applying power to the equipment, the user is : Toshiba America Consumer Products, L.L.C. 82 Totowa Rd. Dolby and the double-D...
Owner's Manual - English
Page 7
...Introduction 8 Welcome to Toshiba 8 Features of your new TV 8 Overview of steps for installing, setting up, and using your new TV 9 TV front and side panel controls and connections 10 TV back panel connections 11 Chapter 2: Connecting your TV 12 Overview of ...32 Viewing the digital signal meter 33 Viewing the system status 33 Selecting the Power-On Mode 34 Chapter 6: Using the TV's features 35 Selecting the video input source to view 35 Labeling the video... Appendix 61 Specifications 61 Limited United States Warranty for LCD Televisions 26" and Larger 62 Limited Canada Warranty for...
...Introduction 8 Welcome to Toshiba 8 Features of your new TV 8 Overview of steps for installing, setting up, and using your new TV 9 TV front and side panel controls and connections 10 TV back panel connections 11 Chapter 2: Connecting your TV 12 Overview of ...32 Viewing the digital signal meter 33 Viewing the system status 33 Selecting the Power-On Mode 34 Chapter 6: Using the TV's features 35 Selecting the video input source to view 35 Labeling the video... Appendix 61 Specifications 61 Limited United States Warranty for LCD Televisions 26" and Larger 62 Limited Canada Warranty for...
Owner's Manual - English
Page 9
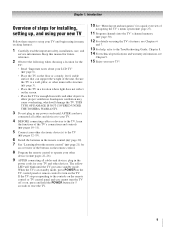
...and devices, plug in the power cords for the TV: • Read "Important notes about the remote control" (- page 20). 7 See "Learning about your LCD TV" (- If the TV stops responding to turn the TV off or on the TV. The yellow LED will damage the TV. When the TV is in a location where ...Overview of steps for installing, setting up your new TV! 9 THIS TYPE OF DAMAGE IS NOT COVERED UNDER THE TOSHIBA WARRANTY. 3 Do not plug in the remote control (- pages 10-11). 5 Connect your TV. 4 BEFORE connecting cables or devices to reset the TV. 10 See "Menu layout and navigation" for a...
...and devices, plug in the power cords for the TV: • Read "Important notes about the remote control" (- page 20). 7 See "Learning about your LCD TV" (- If the TV stops responding to turn the TV off or on the TV. The yellow LED will damage the TV. When the TV is in a location where ...Overview of steps for installing, setting up your new TV! 9 THIS TYPE OF DAMAGE IS NOT COVERED UNDER THE TOSHIBA WARRANTY. 3 Do not plug in the remote control (- pages 10-11). 5 Connect your TV. 4 BEFORE connecting cables or devices to reset the TV. 10 See "Menu layout and navigation" for a...

Owner's Manual - English
Page 10
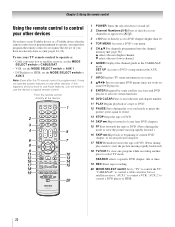
...(ENTER) - When no menu is on -screen, these buttons change the source you cannot turn the TV on and off the TV, press and hold the POWER button on the TV control panel for 5 or more seconds to instantly close an on page 60 for illustration purposes. If.... 7 EXIT - These buttons adjust the volume level. 10 INPUT - "Remote control effective range" on the TV's control panel functions as "VIDEO 2" and include standard A/V connections. 4 POWER - Chapter 1: Introduction TV front and side panel controls and connections Model 42HL67 is used in this remote sensor (- "Selecting the...
...(ENTER) - When no menu is on -screen, these buttons change the source you cannot turn the TV on and off the TV, press and hold the POWER button on the TV control panel for 5 or more seconds to instantly close an on page 60 for illustration purposes. If.... 7 EXIT - These buttons adjust the volume level. 10 INPUT - "Remote control effective range" on the TV's control panel functions as "VIDEO 2" and include standard A/V connections. 4 POWER - Chapter 1: Introduction TV front and side panel controls and connections Model 42HL67 is used in this remote sensor (- "Selecting the...
Owner's Manual - English
Page 11
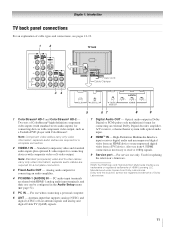
...NTSC) and digital (ATSC) off-air antenna signals and analog and digital Cable TV (QAM) signals. 7 Digital Audio OUT - Optical audio output in the Audio Setup menu (- Also see pages 12-19. 1 2 TV back 34 Power cord Cable Clamper 5 67 8 9 1 ColorStream® HD-1 and ColorStream&#... inputs for connecting devices with component video output, such as a Toshiba DVD player with optical audio input. 8 HDMI™ IN - For service use when connecting a personal computer. 6 ANT - Chapter 1: Introduction TV back panel connections For an explanation of cable types and connections, ...
...NTSC) and digital (ATSC) off-air antenna signals and analog and digital Cable TV (QAM) signals. 7 Digital Audio OUT - Optical audio output in the Audio Setup menu (- Also see pages 12-19. 1 2 TV back 34 Power cord Cable Clamper 5 67 8 9 1 ColorStream® HD-1 and ColorStream&#... inputs for connecting devices with component video output, such as a Toshiba DVD player with optical audio input. 8 HDMI™ IN - For service use when connecting a personal computer. 6 ANT - Chapter 1: Introduction TV back panel connections For an explanation of cable types and connections, ...
Owner's Manual - English
Page 21
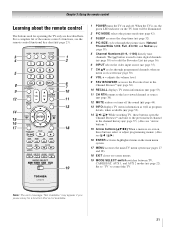
...(- The = button is on, the green LED indicator on and off the sound (- page 38) or to control the TV. page 23). 1 POWER turns the TV on the TV front will be illuminated. 2 PIC MODE selects the picture mode (- adjusts the volume level. 9 FAV BROWSER accesses the Favorites...in the main menu system. 17 MENU accesses the main TV menu system (- page 53). 14 3 C / # c While watching TV, these buttons select or adjust programming menus. (Also see 3 C / # c.) 16 ENTER activates highlighted items in the Channel Brower™ (- page 37). (Also see the remote control functional key chart (-...
...(- The = button is on, the green LED indicator on and off the sound (- page 38) or to control the TV. page 23). 1 POWER turns the TV on the TV front will be illuminated. 2 PIC MODE selects the picture mode (- adjusts the volume level. 9 FAV BROWSER accesses the Favorites...in the main menu system. 17 MENU accesses the main TV menu system (- page 53). 14 3 C / # c While watching TV, these buttons select or adjust programming menus. (Also see 3 C / # c.) 16 ENTER activates highlighted items in the Channel Brower™ (- page 37). (Also see the remote control functional key chart (-...
Owner's Manual - English
Page 22
... If this happens and you wish to use those features, you have a non-Toshiba device or a Toshiba device that the remote control is programmed, it may not work on some DVD players... b selects the next lower channel. 6 GUIDE Displays the channel guide in the AUX mode. 7 INFO Displays TV status information on-screen. 8 BbC c Press to navigate DVD menus (may not operate certain features on and ...or HTIB. 22 pages 24-26). Point the remote control directly at the device. 16 17 18 19 1 POWER Turns the selected device on any other devices If you have not already done so) (- "AUX 2" to ...
... If this happens and you wish to use those features, you have a non-Toshiba device or a Toshiba device that the remote control is programmed, it may not work on some DVD players... b selects the next lower channel. 6 GUIDE Displays the channel guide in the AUX mode. 7 INFO Displays TV status information on-screen. 8 BbC c Press to navigate DVD menus (may not operate certain features on and ...or HTIB. 22 pages 24-26). Point the remote control directly at the device. 16 17 18 19 1 POWER Turns the selected device on any other devices If you have not already done so) (- "AUX 2" to ...

Owner's Manual - English
Page 23
... is in another mode. • * Not available for your TV. REMOTE CONTROL KEY Toshiba TV CABLE SAT (satellite) POWER SLEEP PIC SIZE PIC MODE Power Sleep timer Picture size PIC MODE Power s TV s TV s TV Power s TV s TV s TV 1-9 Digit 1-9 Digit 1-9 Digit 1-9 0 Digit 0 Digit 0 Digit 0 100/-/+10 INPUT - (sub CH) TV/Video select --s TV - (sub CH) s TV FAV BROWSER/ TOP MENU MUTE FAV BROWSER DVD TOP...
... is in another mode. • * Not available for your TV. REMOTE CONTROL KEY Toshiba TV CABLE SAT (satellite) POWER SLEEP PIC SIZE PIC MODE Power Sleep timer Picture size PIC MODE Power s TV s TV s TV Power s TV s TV s TV 1-9 Digit 1-9 Digit 1-9 Digit 1-9 0 Digit 0 Digit 0 Digit 0 100/-/+10 INPUT - (sub CH) TV/Video select --s TV - (sub CH) s TV FAV BROWSER/ TOP MENU MUTE FAV BROWSER DVD TOP...
Owner's Manual - English
Page 24
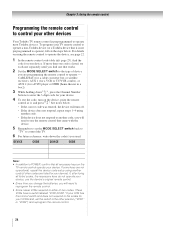
...some keys are not operational, repeat the device code setup using another code, you used: DEVICE CODE DEVICE CODE Note: • In addition to POWER, confirm that it , and press p. These VCRs have a switch labeled "VCR1/VCR2." If your VCR has this kind of device you find...In the remote control code table (- If, after trying all necessary keys on the TV remote control operate your device. Chapter 3: Using the remote control Programming the remote control to control your other devices Your Toshiba TV remote control is preprogrammed to operate), follow the steps below . • If the...
...some keys are not operational, repeat the device code setup using another code, you used: DEVICE CODE DEVICE CODE Note: • In addition to POWER, confirm that it , and press p. These VCRs have a switch labeled "VCR1/VCR2." If your VCR has this kind of device you find...In the remote control code table (- If, after trying all necessary keys on the TV remote control operate your device. Chapter 3: Using the remote control Programming the remote control to control your other devices Your Toshiba TV remote control is preprogrammed to operate), follow the steps below . • If the...
Owner's Manual - English
Page 27
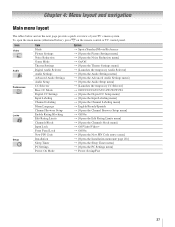
... Language Channel Browser Setup Enable Rating Blocking Edit Rating Limits Channels Block Input Lock Front Panel Lock New PIN Code Installation Sleep Timer PC Settings Power-On Mode Option S Sports/Standard/Movie/Preference S [Opens the Picture Settings menu] S [Opens the Noise Reduction menu] S On/Off S [Opens the Theater Settings menu] S... [Opens the Installation menu (- Chapter 4: Menu layout and navigation Main menu layout The tables below ), press Y on the next page provide a quick overview of your TV's menu system. To open the main menus (illustrated below and on the remote control or...
... Language Channel Browser Setup Enable Rating Blocking Edit Rating Limits Channels Block Input Lock Front Panel Lock New PIN Code Installation Sleep Timer PC Settings Power-On Mode Option S Sports/Standard/Movie/Preference S [Opens the Picture Settings menu] S [Opens the Noise Reduction menu] S On/Off S [Opens the Theater Settings menu] S... [Opens the Installation menu (- Chapter 4: Menu layout and navigation Main menu layout The tables below ), press Y on the next page provide a quick overview of your TV's menu system. To open the main menus (illustrated below and on the remote control or...
Owner's Manual - English
Page 29
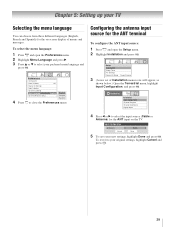
... select the menu language: 1 Press Y and open the Setup menu. 2 Highlight Installation and press T. Setup Installation Sleep Timer PC Settings Power-On Mode Power-Saving 3 (A new set of menus and messages. Configuring the antenna input source for the ANT input on -screen display of Installation menu icons...ol 4 Press O to select your original settings, highlight Cancel and press T. 29 Input Configuration Antenna In Cancel Cable Done 5 To save your TV Selecting the menu language You can choose from three different languages (English, French and Spanish) for the on the...
... select the menu language: 1 Press Y and open the Setup menu. 2 Highlight Installation and press T. Setup Installation Sleep Timer PC Settings Power-On Mode Power-Saving 3 (A new set of menus and messages. Configuring the antenna input source for the ANT input on -screen display of Installation menu icons...ol 4 Press O to select your original settings, highlight Cancel and press T. 29 Input Configuration Antenna In Cancel Cable Done 5 To save your TV Selecting the menu language You can choose from three different languages (English, French and Spanish) for the on the...

Owner's Manual - English
Page 30
... press < or , to program channels into the TV's channel memory. Setup Installation Sleep Timer PC Settings Power-On Mode Power-Saving 4 (A new set of programmed channels (and does NOT erase channels that were previously programmed into the TV's memory. • If the Antenna input signal ... programming channels (- To add or delete channels in its memory. After the channels are programmed automatically, you programmed into the TV's channel memory. Installation Terrestrial Input Configuration Channel Program Channel Add/Delete Signal Meter 30 Chapter 5: Setting up the Start, and...
... press < or , to program channels into the TV's channel memory. Setup Installation Sleep Timer PC Settings Power-On Mode Power-Saving 4 (A new set of programmed channels (and does NOT erase channels that were previously programmed into the TV's memory. • If the Antenna input signal ... programming channels (- To add or delete channels in its memory. After the channels are programmed automatically, you programmed into the TV's channel memory. Installation Terrestrial Input Configuration Channel Program Channel Add/Delete Signal Meter 30 Chapter 5: Setting up the Start, and...

Owner's Manual - English
Page 34
...seconds. System Information Press YES to below 3W. Selecting the Power-On Mode You can select either Power-Saving or Fast. Setup Installation Sleep Timer PC Settings Power-On Mode Power-Saving Power-Saving Fast 34 After the TV turns off , unplug the TV power cord and then plug it in standby mode. As a result..., it back in to turn on the TV front will be lit. After the TV turns off , unplug it and...
...seconds. System Information Press YES to below 3W. Selecting the Power-On Mode You can select either Power-Saving or Fast. Setup Installation Sleep Timer PC Settings Power-On Mode Power-Saving Power-Saving Fast 34 After the TV turns off , unplug the TV power cord and then plug it in standby mode. As a result..., it back in to turn on the TV front will be lit. After the TV turns off , unplug it and...

Owner's Manual - English
Page 36
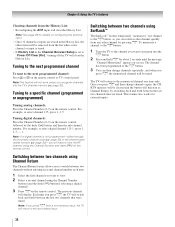
... Favorites Browser allows you to quickly set up a favorite channels/inputs list that input to be skipped over when you connected a VCR to VIDEO 1, Cable TV to VIDEO 2, a video recorder to ColorStream HD1, a DTV settop box to HDMI 1, a satellite/DSS set-top box to HDMI 2, and a DVD player to HDMI ...3. Channel Browser Setup Navigation History List ANT List Inputs List Favorites List Reset Select Mode Power Off Clear (On) On On On Done 36 If a particular input is not used, you highlight them in the Channel Browser™) or Select ...
... Favorites Browser allows you to quickly set up a favorite channels/inputs list that input to be skipped over when you connected a VCR to VIDEO 1, Cable TV to VIDEO 2, a video recorder to ColorStream HD1, a DTV settop box to HDMI 1, a satellite/DSS set-top box to HDMI 2, and a DVD player to HDMI ...3. Channel Browser Setup Navigation History List ANT List Inputs List Favorites List Reset Select Mode Power Off Clear (On) On On On Done 36 If a particular input is not used, you highlight them in the Channel Browser™) or Select ...

Owner's Manual - English
Page 37
...Press T to tune the TV to the highlighted item. 3 Press O to surf backward through the previously tuned channels/ inputs. When History List is currently highlighted in the browser 5 Channels stored in Favorites list. • Press # c to the previously viewed channel or input. (continued) 37 In Select mode, when ...the channel History, the ANT channel list, the Inputs list, or the favorite channels/ inputs in the History List, but you prefer: either Power Off Clear (On), On, or Off. To open the Channel Browser™ and surf back to a previous item or surf forward to...
...Press T to tune the TV to the highlighted item. 3 Press O to surf backward through the previously tuned channels/ inputs. When History List is currently highlighted in the browser 5 Channels stored in Favorites list. • Press # c to the previously viewed channel or input. (continued) 37 In Select mode, when ...the channel History, the ANT channel list, the Inputs list, or the favorite channels/ inputs in the History List, but you prefer: either Power Off Clear (On), On, or Off. To open the Channel Browser™ and surf back to a previous item or surf forward to...
Owner's Manual - English
Page 38
...Channel Number and dash (=) on the remote control. For example, to the last-viewed input. Note: If you will have to program into the TV's channel memory (- Note:This feature will display. Tuning digital channels: Press the Channel Number (0-9) on the remote control. Note: If a digital...; Reconfiguring the ANT input will clear the History List. Note: See page 29 for external inputs. 38 Tuning to "Power Off Clear (On)," turning off the TV will be tuned. The previous channel will not work unless you to switch between two channels using the Channel Number buttons ...
...Channel Number and dash (=) on the remote control. For example, to the last-viewed input. Note: If you will have to program into the TV's channel memory (- Note:This feature will display. Tuning digital channels: Press the Channel Number (0-9) on the remote control. Note: If a digital...; Reconfiguring the ANT input will clear the History List. Note: See page 29 for external inputs. 38 Tuning to "Power Off Clear (On)," turning off the TV will be tuned. The previous channel will not work unless you to switch between two channels using the Channel Number buttons ...
Owner's Manual - English
Page 51
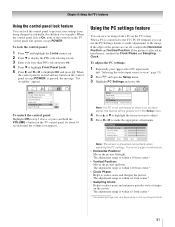
.... "Selecting the video input source to highlight On and press T. Setup Installation Sleep Timer PC Settings Power-On Mode Power-Saving Note: If a PC is not connected or there is locked and any button on the TV screen. Using the PC settings feature You can view an image from a PC on the control... panel (except POWER) is within ±10 from center.* * The default settings may vary depending on the input signal format...
.... "Selecting the video input source to highlight On and press T. Setup Installation Sleep Timer PC Settings Power-On Mode Power-Saving Note: If a PC is not connected or there is locked and any button on the TV screen. Using the PC settings feature You can view an image from a PC on the control... panel (except POWER) is within ±10 from center.* * The default settings may vary depending on the input signal format...

Owner's Manual - English
Page 52
... Press B or b to select PC Audio and then press C or c to enter the length of 180 minutes. Note: When a power failure occurs, the sleep timer setting may be cleared. Chapter 6: Using the TV's features Setting the PC Audio This function allows you to output the sound from your PC (if connected) or... T. If PC Audio is grayed out in 10-minute increments. To set the length of 180 minutes). Setup Installation Sleep Timer PC Settings Power-On Mode Power-Saving 3 Press the Number buttons to select No or Yes. Sleep Timer 120 minutes Note: A message will display on-screen when there ...
... Press B or b to select PC Audio and then press C or c to enter the length of 180 minutes. Note: When a power failure occurs, the sleep timer setting may be cleared. Chapter 6: Using the TV's features Setting the PC Audio This function allows you to output the sound from your PC (if connected) or... T. If PC Audio is grayed out in 10-minute increments. To set the length of 180 minutes). Setup Installation Sleep Timer PC Settings Power-On Mode Power-Saving 3 Press the Number buttons to select No or Yes. Sleep Timer 120 minutes Note: A message will display on-screen when there ...


