
Owner's Manual - English
Page 2
... Where You Use Your Flat Panel Display Congratulations on page 5. The lightning flash with the installation instructions. See "Removing the Pedestal Stand" (- Tune Into Safety • One size does NOT fit all enclosed instructions for future reference. This manual will help you decide to wall mount this Toshiba LCD TV. NO USER-SERVICEABLE PARTS INSIDE. Follow the manufacturer's recommendations for installation. WARNING: If you use a UL Listed wall bracket appropriate for purchasing this television, always use the many...
... Where You Use Your Flat Panel Display Congratulations on page 5. The lightning flash with the installation instructions. See "Removing the Pedestal Stand" (- Tune Into Safety • One size does NOT fit all enclosed instructions for future reference. This manual will help you decide to wall mount this Toshiba LCD TV. NO USER-SERVICEABLE PARTS INSIDE. Follow the manufacturer's recommendations for installation. WARNING: If you use a UL Listed wall bracket appropriate for purchasing this television, always use the many...
Owner's Manual - English
Page 4
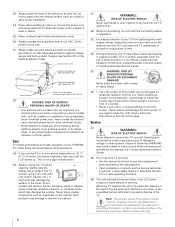
... off. Service 37) WARNING: RISK OF ELECTRIC SHOCK! Refer all servicing not specified in this manual to a Toshiba Authorized Service Center. 38) If you have the TV serviced: • Ask the service technician to use , the TV may make sure you are in the LCD panel contains a small amount of your TOSHIBA TV, follow these sounds become frequent or continuous, unplug the power cord and contact a Toshiba Authorized Service Center...
... off. Service 37) WARNING: RISK OF ELECTRIC SHOCK! Refer all servicing not specified in this manual to a Toshiba Authorized Service Center. 38) If you have the TV serviced: • Ask the service technician to use , the TV may make sure you are in the LCD panel contains a small amount of your TOSHIBA TV, follow these sounds become frequent or continuous, unplug the power cord and contact a Toshiba Authorized Service Center...
Owner's Manual - English
Page 5
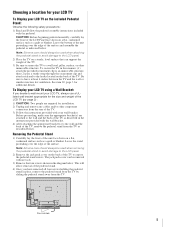
... the TV. 3) Follow the instructions provided with the pedestal. The jack pack cover can support the weight of the surface and assemble the pedestal as a quilt or blanket. Four screws 5 To Display your LCD TV, always use a ULlisted wall bracket appropriate for additional details. Removing the Pedestal Stand 1) Carefully lay the front of the LCD TV (- CAUTION: Before beginning pedestal assembly, carefully lay the front of the LCD Panel...
... the TV. 3) Follow the instructions provided with the pedestal. The jack pack cover can support the weight of the surface and assemble the pedestal as a quilt or blanket. Four screws 5 To Display your LCD TV, always use a ULlisted wall bracket appropriate for additional details. Removing the Pedestal Stand 1) Carefully lay the front of the LCD TV (- CAUTION: Before beginning pedestal assembly, carefully lay the front of the LCD Panel...

Owner's Manual - English
Page 7
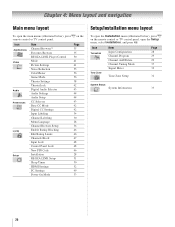
... 23 Remote control codes 24 Chapter 4: Menu layout and navigation 26 Main menu layout 26 Setup/Installation menu layout 26 Navigating the menu system 27 Chapter 5: Setting up your TV 28 Selecting the menu language 28 Configuring the antenna input source for the ANT/CABLE terminal 28 Programming channels into the TV's channel memory . . . . 29 Programming channels automatically 29 Manually adding and deleting channels in the channel memory 29 Labeling channels 30 Setting the HDMI™ audio mode 31 Viewing the digital signal...
... 23 Remote control codes 24 Chapter 4: Menu layout and navigation 26 Main menu layout 26 Setup/Installation menu layout 26 Navigating the menu system 27 Chapter 5: Setting up your TV 28 Selecting the menu language 28 Configuring the antenna input source for the ANT/CABLE terminal 28 Programming channels into the TV's channel memory . . . . 29 Programming channels automatically 29 Manually adding and deleting channels in the channel memory 29 Labeling channels 30 Setting the HDMI™ audio mode 31 Viewing the digital signal...

Owner's Manual - English
Page 9
... set -top box (in a proper location (- pages 12-18). 5 See "Chapter 3: Using the remote control" (- page 26). 8 Program channels into the TV's channel memory (- page 15). • HDMI capabilities Lip-Sync Latency feature activates an auto audio/video display timing adjustment function that allows HDMI source devices to the TV (- The menu for this feature has a unique "black" design to enhance contrast while you have connected all cables and devices, plug in the power cords for your TV...
... set -top box (in a proper location (- pages 12-18). 5 See "Chapter 3: Using the remote control" (- page 26). 8 Program channels into the TV's channel memory (- page 15). • HDMI capabilities Lip-Sync Latency feature activates an auto audio/video display timing adjustment function that allows HDMI source devices to the TV (- The menu for this feature has a unique "black" design to enhance contrast while you have connected all cables and devices, plug in the power cords for your TV...
Owner's Manual - English
Page 10
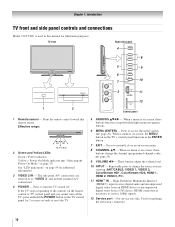
... menu system (- Press to reset the TV. Press to receive 1080p signals. 12 Service port - These buttons adjust the volume level. 10 INPUT - Press to instantly close an on page 59 for 5 or more seconds to turn off . HDMI connection is on and off the TV, press and hold the POWER button on the TV control panel for additional information. 3 VIDEO 2 IN - Effective range: 16.4 ft (5m) 2 Green and Yellow LEDs Green = Power indicator Yellow = Power-On Mode...
... menu system (- Press to reset the TV. Press to receive 1080p signals. 12 Service port - These buttons adjust the volume level. 10 INPUT - Press to instantly close an on page 59 for 5 or more seconds to turn off . HDMI connection is on and off the TV, press and hold the POWER button on the TV control panel for additional information. 3 VIDEO 2 IN - Effective range: 16.4 ft (5m) 2 Green and Yellow LEDs Green = Power indicator Yellow = Power-On Mode...
Owner's Manual - English
Page 11
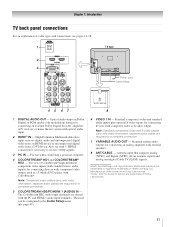
..., A/V receiver, or home theater system with the PC and HDMI 1 audio input terminals. For use can be configured in Dolby Digital or PCM (pulse-code modulation) format for connecting an analog amplifier with composite video or S-video output. separate audio cables are trademarks or registered trademarks of Dolby Laboratories. 11 Also see pages 12-18. 1 TV back 2 3 Power cord Cable Strap 4 5 67 8 1 DIGITAL AUDIO OUT - Two sets of cable types and connections, see item 5. Note: Component video cables...
..., A/V receiver, or home theater system with the PC and HDMI 1 audio input terminals. For use can be configured in Dolby Digital or PCM (pulse-code modulation) format for connecting an analog amplifier with composite video or S-video output. separate audio cables are trademarks or registered trademarks of Dolby Laboratories. 11 Also see pages 12-18. 1 TV back 2 3 Power cord Cable Strap 4 5 67 8 1 DIGITAL AUDIO OUT - Two sets of cable types and connections, see item 5. Note: Component video cables...
Owner's Manual - English
Page 12
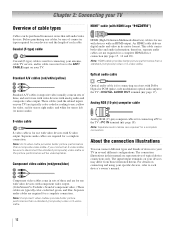
...-code modulation) optical audio input to the TV's DIGITAL AUDIO OUT terminal (- Note: An S-video cable provides better picture performance than a standard (composite) video or S-video cable. 12 Component video cables (red/green/blue) Analog RGB (15-pin) computer cable is for stereo left (or mono) audio. Standard A/V cables (red/white/yellow) Standard A/V cables (composite video) usually come in sets of three and are typically color-coded according to use: yellow for video, red for stereo right audio, and white for connecting receivers with an HDMI output. The input/output...
...-code modulation) optical audio input to the TV's DIGITAL AUDIO OUT terminal (- Note: An S-video cable provides better picture performance than a standard (composite) video or S-video cable. 12 Component video cables (red/green/blue) Analog RGB (15-pin) computer cable is for stereo left (or mono) audio. Standard A/V cables (red/white/yellow) Standard A/V cables (composite video) usually come in sets of three and are typically color-coded according to use: yellow for video, red for stereo right audio, and white for connecting receivers with an HDMI output. The input/output...
Owner's Manual - English
Page 13
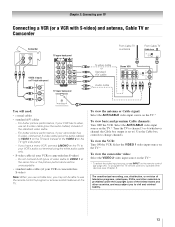
... same time or the picture performance will need: • coaxial cables • standard A/V cables - Select the VIDEO 1 video input source on the TV.* To view the camcorder video: Select the VIDEO 2 video input source on the TV.* * To select the video input source, press INPUT on the TV.* To view basic and premium Cable channels: Turn OFF the VCR. Do not connect both types of video cable to program or access certain features on the TV.* Tune the TV to channel 3 or 4 (whichever channel the Cable box output is...
... same time or the picture performance will need: • coaxial cables • standard A/V cables - Select the VIDEO 1 video input source on the TV.* To view the camcorder video: Select the VIDEO 2 video input source on the TV.* * To select the video input source, press INPUT on the TV.* To view basic and premium Cable channels: Turn OFF the VCR. Do not connect both types of video cable to program or access certain features on the TV.* Tune the TV to channel 3 or 4 (whichever channel the Cable box output is...

Owner's Manual - English
Page 17
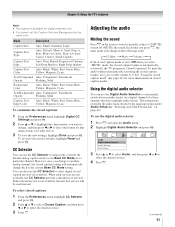
... will need : • standard audio cables Analog audio amplifier To control the audio: 1 Turn on the TV and the digital audio device. 2 Press Y on your TV Connecting a digital audio system The TV's DIGITAL AUDIO OUT terminal outputs a Dolby®* Digital g or 2-channel down-mixed PCM (pulse-code modulation) signal for use external speakers with standard optical out signals may not work properly, creating a high noise level that may damage speakers or headphones. LINE IN LR TV upper back panel Audio Digital Audio Selector Audio Settings Audio Setup 4 In the Optical Output Format...
... will need : • standard audio cables Analog audio amplifier To control the audio: 1 Turn on the TV and the digital audio device. 2 Press Y on your TV Connecting a digital audio system The TV's DIGITAL AUDIO OUT terminal outputs a Dolby®* Digital g or 2-channel down-mixed PCM (pulse-code modulation) signal for use external speakers with standard optical out signals may not work properly, creating a high noise level that may damage speakers or headphones. LINE IN LR TV upper back panel Audio Digital Audio Selector Audio Settings Audio Setup 4 In the Optical Output Format...
Owner's Manual - English
Page 18
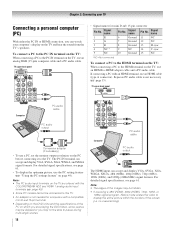
... display the optimum picture, use the PC setting feature (- Signal name 11 NC 12 NC 13 H-sync 14 V-sync 15 NC *NC=Not connected To connect a PC to the HDMI terminal on the TV: When connecting a PC to the HDMI terminal on the PC before connecting it to -HDMI adapter cable and a PC audio cable. TV upper back panel Computer PC audio cable PC audio output Conversion adapter (if necessary) • To use a PC, set the monitor output resolution...
... display the optimum picture, use the PC setting feature (- Signal name 11 NC 12 NC 13 H-sync 14 V-sync 15 NC *NC=Not connected To connect a PC to the HDMI terminal on the TV: When connecting a PC to the HDMI terminal on the PC before connecting it to -HDMI adapter cable and a PC audio cable. TV upper back panel Computer PC audio cable PC audio output Conversion adapter (if necessary) • To use a PC, set the monitor output resolution...
Owner's Manual - English
Page 26
... Information 33 26 Icon Applications Video Audio Preferences Locks Setup Item Channel Browser™ Favorites Browser REGZA-LINK Player Control Mode Picture Settings Noise Reduction ColorMaster Game Mode Theater Settings TheaterLock Digital Audio Selector Audio Settings Audio Setup CC Selector Base CC Mode Digital CC Settings Input Labeling Channel Labeling Menu Language Channel Browser Setup Enable Rating Blocking Edit Rating Limits Channels Block Input Lock Control Panel Lock New PIN Code Installation REGZA-LINK Setup Sleep Timer HDMI Settings PC Settings Power-On Mode Page 35 35 50 41...
... Information 33 26 Icon Applications Video Audio Preferences Locks Setup Item Channel Browser™ Favorites Browser REGZA-LINK Player Control Mode Picture Settings Noise Reduction ColorMaster Game Mode Theater Settings TheaterLock Digital Audio Selector Audio Settings Audio Setup CC Selector Base CC Mode Digital CC Settings Input Labeling Channel Labeling Menu Language Channel Browser Setup Enable Rating Blocking Edit Rating Limits Channels Block Input Lock Control Panel Lock New PIN Code Installation REGZA-LINK Setup Sleep Timer HDMI Settings PC Settings Power-On Mode Page 35 35 50 41...
Owner's Manual - English
Page 29
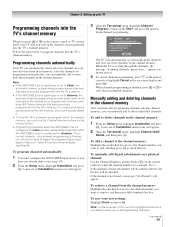
... manually add or delete individual channels. A new set of Installation menu icons will appear. Manually adding and deleting channels in the channel memory. Programming channels automatically Your TV can manually add or erase individual channels in the channel memory After automatically programming channels into the TV's channel memory When you press < or , on the remote control or TV control panel, your Cable TV service lineup changes significantly. To program channels automatically: 1 You must use the Channel Number buttons on the channels you want to remove...
... manually add or delete individual channels. A new set of Installation menu icons will appear. Manually adding and deleting channels in the channel memory. Programming channels automatically Your TV can manually add or erase individual channels in the channel memory After automatically programming channels into the TV's channel memory When you press < or , on the remote control or TV control panel, your Cable TV service lineup changes significantly. To program channels automatically: 1 You must use the Channel Number buttons on the channels you want to remove...

Owner's Manual - English
Page 31
... go back to highlight Custom and press T. Audio Setup Shared Analog Audio HDMI 1 Audio MTS Language Speakers Optical Output Format Dolby Digital Dynamic Range Control HDMI 1 Auto Stereo English On Dolby Digital Compressed Reset Done Mode Description Auto When viewing the HDMI 1 input, if digital audio from the shared analog audio input. Analog When viewing the HDMI 1 input, analog audio from the deletion confirmation window and press T. Chapter 5: Setting up your settings, highlight Done and press T. The software keyboard will appear. 11 4 GH I g h i 4 7 PQRSp q r s 7 _ 100...
... go back to highlight Custom and press T. Audio Setup Shared Analog Audio HDMI 1 Audio MTS Language Speakers Optical Output Format Dolby Digital Dynamic Range Control HDMI 1 Auto Stereo English On Dolby Digital Compressed Reset Done Mode Description Auto When viewing the HDMI 1 input, if digital audio from the shared analog audio input. Analog When viewing the HDMI 1 input, analog audio from the deletion confirmation window and press T. Chapter 5: Setting up your settings, highlight Done and press T. The software keyboard will appear. 11 4 GH I g h i 4 7 PQRSp q r s 7 _ 100...
Owner's Manual - English
Page 43
..., once you select "MUTE" mode, the closed caption setting will change in Base CC Mode) for digital channels only. • You cannot set the volume to another analog channel, the closed caption feature is automatically activated if the TV program is Closed Captioned. When such services are not available, the CC Selector presents a default list of services. Each time you want to change back to select the format for those channels that characteristic (see table above). 3 To save...
..., once you select "MUTE" mode, the closed caption setting will change in Base CC Mode) for digital channels only. • You cannot set the volume to another analog channel, the closed caption feature is automatically activated if the TV program is Closed Captioned. When such services are not available, the CC Selector presents a default list of services. Each time you want to change back to select the format for those channels that characteristic (see table above). 3 To save...
Owner's Manual - English
Page 57
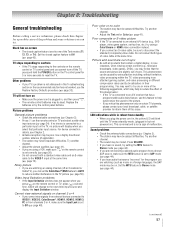
... the TV enters standby mode, (plugged in the TV picture (- Replace the batteries or try using a VCR, make sure the MTS feature is connected to an A/V receiver that contain a digital display, in , the yellow LED will change to the VIDEO 1 input at the same time. If no picture will not turn off -air broadcast or Cable TV), you can set the CableClear®/DNR feature to AUTO to an external A/V device (e.g., DVD player, video game system, set correctly (- Video Input Selection problems...
... the TV enters standby mode, (plugged in the TV picture (- Replace the batteries or try using a VCR, make sure the MTS feature is connected to an A/V receiver that contain a digital display, in , the yellow LED will change to the VIDEO 1 input at the same time. If no picture will not turn off -air broadcast or Cable TV), you can set the CableClear®/DNR feature to AUTO to an external A/V device (e.g., DVD player, video game system, set correctly (- Video Input Selection problems...
Owner's Manual - English
Page 62
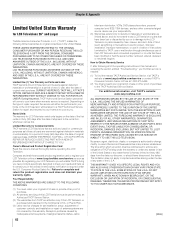
... workmanship for set installation, setup, adjustment of customer controls, and installation or repair of the U.S.A. DURING THIS PERIOD, TACP WILL, AT TACP'S OPTION, REPAIR OR REPLACE A DEFECTIVE PART WITH A NEW OR REFURBISHED PART WITHOUT CHARGE TO YOU FOR PARTS OR LABOR. Consumer Product Safety Act. How to Obtain Warranty Service If, after following limited warranties to ninety (90) days from TACP are your LCD Television online at 1-800...
... workmanship for set installation, setup, adjustment of customer controls, and installation or repair of the U.S.A. DURING THIS PERIOD, TACP WILL, AT TACP'S OPTION, REPAIR OR REPLACE A DEFECTIVE PART WITH A NEW OR REFURBISHED PART WITHOUT CHARGE TO YOU FOR PARTS OR LABOR. Consumer Product Safety Act. How to Obtain Warranty Service If, after following limited warranties to ninety (90) days from TACP are your LCD Television online at 1-800...
Owner's Manual - English
Page 63
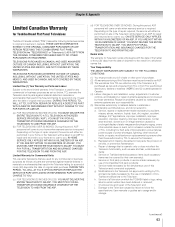
... TO YOU. (c) FOR TELEVISIONS 32 INCHES OR LESS: YOU MUST DELIVER THE ENTIRE TELEVISION TO AN ASP. Reception problems caused by inadequate antenna systems are not covered by prolonged display of this period, ASP personnel will be performed in materials or workmanship as set installation, setup, adjustment of customer controls, and installation or repair of antenna systems are your home when warranty service is cosmetic only...
... TO YOU. (c) FOR TELEVISIONS 32 INCHES OR LESS: YOU MUST DELIVER THE ENTIRE TELEVISION TO AN ASP. Reception problems caused by inadequate antenna systems are not covered by prolonged display of this period, ASP personnel will be performed in materials or workmanship as set installation, setup, adjustment of customer controls, and installation or repair of antenna systems are your home when warranty service is cosmetic only...
Owner's Manual - English
Page 64
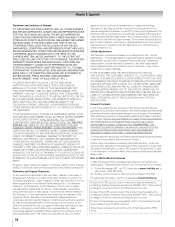
... to: (i) this warranty; (ii) the Television; (iii) any oral or written representations, statements, brochures, press releases, advertising, announcement, point of the Independent JPEG Group. How to Obtain Warranty Services If, after following all of the operating instructions in this manual and checking the "Troubleshooting" section, you further 64 agree to persons or loss of the LGPL source code in this...
... to: (i) this warranty; (ii) the Television; (iii) any oral or written representations, statements, brochures, press releases, advertising, announcement, point of the Independent JPEG Group. How to Obtain Warranty Services If, after following all of the operating instructions in this manual and checking the "Troubleshooting" section, you further 64 agree to persons or loss of the LGPL source code in this...
Owner's Manual - English
Page 65
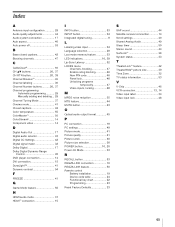
... Panel lock 48 Unlocking programs temporarily 47 Video inputs, locking 48 M MPEG noise reduction 55 MTS feature 44 MUTE button 43 O Optical audio output format 45 P PC connection 18 PC settings 49 Picture mode 41 Picture quality 41 Picture scroll 40 Picture size selection 38 POWER button 10, 20 Power-On Mode 33 R RECALL button 53 REGZA-LINK connection 16 REGZA-LINK feature 50 Remote control Battery installation 19 Device code table 24 Functional key chart 22 Programming 23 Reset Factory Defaults 33 S SAP sound 44 Satellite receiver connection...
... Panel lock 48 Unlocking programs temporarily 47 Video inputs, locking 48 M MPEG noise reduction 55 MTS feature 44 MUTE button 43 O Optical audio output format 45 P PC connection 18 PC settings 49 Picture mode 41 Picture quality 41 Picture scroll 40 Picture size selection 38 POWER button 10, 20 Power-On Mode 33 R RECALL button 53 REGZA-LINK connection 16 REGZA-LINK feature 50 Remote control Battery installation 19 Device code table 24 Functional key chart 22 Programming 23 Reset Factory Defaults 33 S SAP sound 44 Satellite receiver connection...


