User Manual
Page 2
... wall mount this television, always use of two people are not always supported on your retailer about your ability to the manufacturer's recommendations. • Flat panel displays that they cannot be heavy. 2 Wall Mounting: If you decide to route all . NO USER-SERVICEABLE PARTS INSIDE. See "Removing the Pedestal Stand" ( page 6). However, flat panel displays are required for future reference. This manual will help you are unsure, contact a professional installer...
... wall mount this television, always use of two people are not always supported on your retailer about your ability to the manufacturer's recommendations. • Flat panel displays that they cannot be heavy. 2 Wall Mounting: If you decide to route all . NO USER-SERVICEABLE PARTS INSIDE. See "Removing the Pedestal Stand" ( page 6). However, flat panel displays are required for future reference. This manual will help you are unsure, contact a professional installer...
User Manual
Page 4
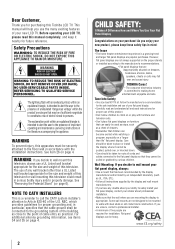
...) Never overload wall outlets and extension cords. 33) Always operate this product, never place or store the TV in households with a dry, (continued) Care For better performance and safer operation of your TV, please first remove any of the following during lightning activity: a) an antenna system; Gently wipe the cabinet and the display panel surface (the TV screen) with...
...) Never overload wall outlets and extension cords. 33) Always operate this product, never place or store the TV in households with a dry, (continued) Care For better performance and safer operation of your TV, please first remove any of the following during lightning activity: a) an antenna system; Gently wipe the cabinet and the display panel surface (the TV screen) with...
User Manual
Page 5
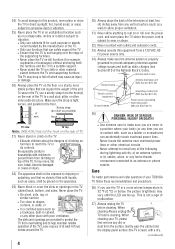
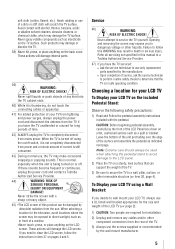
... pedestal assembly instructions included with the pedestal. This is normal, especially when the unit is still consumed. 43) During normal use a UL listed wall bracket appropriate for installation. 2) Unplug and remove any kind into the TV cabinet slots. 40) While it is turned off switch, it is thundering, do not touch the connecting cables or apparatus. 41) For added protection of the LCD Panel...
... pedestal assembly instructions included with the pedestal. This is normal, especially when the unit is still consumed. 43) During normal use a UL listed wall bracket appropriate for installation. 2) Unplug and remove any kind into the TV cabinet slots. 40) While it is turned off switch, it is thundering, do not touch the connecting cables or apparatus. 41) For added protection of the LCD Panel...
User Manual
Page 10
... video input to view 35 Using closed captions 36 Analog CC mode 36 Digital CC settings 36 Setting the PIN code 37 10 Entering a new PIN code 37 Changing or deleting your PIN code 37 Forgotten PIN code 37 Using parental controls 37 Blocking TV programs and movies by rating (V-Chip)........37 Downloading an additional rating system 38 Displaying ratings 39 Unlocking programs 39 Locking specific channels 39 Locking video input 39 Setting a time limit for games 40 Locking the control panel 40 Using HDMI® CEC Control 40 Controlling HDMI...
... video input to view 35 Using closed captions 36 Analog CC mode 36 Digital CC settings 36 Setting the PIN code 37 10 Entering a new PIN code 37 Changing or deleting your PIN code 37 Forgotten PIN code 37 Using parental controls 37 Blocking TV programs and movies by rating (V-Chip)........37 Downloading an additional rating system 38 Displaying ratings 39 Unlocking programs 39 Locking specific channels 39 Locking video input 39 Setting a time limit for games 40 Locking the control panel 40 Using HDMI® CEC Control 40 Controlling HDMI...

User Manual
Page 12
... a quick overview of external devices from the TV remote via an HDMI cable. HDMI INSTAPORT™ technology reduces lag time when switching HDMI sources. Four HDMI® digital, High-Definition Multimedia Interfaces 1080p input support (32SL415U). • HDMI capabilities ARC (Audio Return Channel) enables the audio signal of the TV to be sent to an AV amplifier via HDMI connection ( page 40) • ColorStream® HD high-resolution component video inputs. • Digital Audio Out optical audio connection with Dolby® Digital optical output format...
... a quick overview of external devices from the TV remote via an HDMI cable. HDMI INSTAPORT™ technology reduces lag time when switching HDMI sources. Four HDMI® digital, High-Definition Multimedia Interfaces 1080p input support (32SL415U). • HDMI capabilities ARC (Audio Return Channel) enables the audio signal of the TV to be sent to an AV amplifier via HDMI connection ( page 40) • ColorStream® HD high-resolution component video inputs. • Digital Audio Out optical audio connection with Dolby® Digital optical output format...

User Manual
Page 18
... not work properly. −− HDMI cables transfer both video and audio. Supported Audio format: Linear PCM, sampling rate 32/44.1/ 48 kHz Note: •• To connect a PC to the HDMI input, see illustration). For detailed signal specifications, see illustration). To program the TV remote control to the adoption of high-definition video signals. To connect an HDMI device, you will need a High Speed HDMI cable. HDMI device HDMI cable 18 Chapter 2: Connecting your TV Connecting an HDMI...
... not work properly. −− HDMI cables transfer both video and audio. Supported Audio format: Linear PCM, sampling rate 32/44.1/ 48 kHz Note: •• To connect a PC to the HDMI input, see illustration). For detailed signal specifications, see illustration). To program the TV remote control to the adoption of high-definition video signals. To connect an HDMI device, you will need a High Speed HDMI cable. HDMI device HDMI cable 18 Chapter 2: Connecting your TV Connecting an HDMI...
User Manual
Page 19
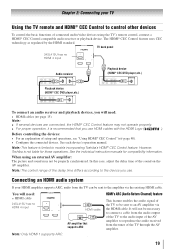
... To control the basic functions of connected audio/video devices using an external AV amplifier: The picture and sound may not operate properly. •• For proper operation, it is recommended that supports ARC Note: Only HDMI 1 supports ARC. Chapter 2: Connecting your HDMI amplifier supports ARC, audio from the TV can be necessary to connect a cable from the audio output of the TV to the audio input of the AV amplifier to reproduce the audio received from the tuner...
... To control the basic functions of connected audio/video devices using an external AV amplifier: The picture and sound may not operate properly. •• For proper operation, it is recommended that supports ARC Note: Only HDMI 1 supports ARC. Chapter 2: Connecting your HDMI amplifier supports ARC, audio from the TV can be necessary to connect a cable from the audio output of the TV to the audio input of the AV amplifier to reproduce the audio received from the tuner...

User Manual
Page 20
... playing the DVD-Video, some digital audio sources because of Dolby Laboratories. 20 Conversion adapter (if necessary) • To use a PC, set the monitor output resolution on the TV, use the PC setting feature ( "Using your PC with the TV" on the TV and hear the sound from Dolby Laboratories. TV back panel PC audio cable PC/HDMI 3 (AUDIO) TV back panel Optical audio cable Computer PC audio output Analog RGB computer cable Before controlling the audio: See "Selecting the optical audio output format...
... playing the DVD-Video, some digital audio sources because of Dolby Laboratories. 20 Conversion adapter (if necessary) • To use a PC, set the monitor output resolution on the TV, use the PC setting feature ( "Using your PC with the TV" on the TV and hear the sound from Dolby Laboratories. TV back panel PC audio cable PC/HDMI 3 (AUDIO) TV back panel Optical audio cable Computer PC audio output Analog RGB computer cable Before controlling the audio: See "Selecting the optical audio output format...
User Manual
Page 29
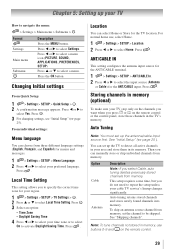
... or on the remote control. 29 ANT/CABLE IN This setting configures the antenna input source for the ANT/CABLE input. You can manually store or skip individual channels from memory. Auto tuning retains stored channels and stores newly found channels into memory. For normal home use buttons 0-9 and on the remote control or the control panel, store those channels in its memory. Press the OK button Changing Initial settings From Quick Setup: 1無 > Settings > SETUP > Quick Setup > . 2無 A confirmation...
... or on the remote control. 29 ANT/CABLE IN This setting configures the antenna input source for the ANT/CABLE input. You can manually store or skip individual channels from memory. Auto tuning retains stored channels and stores newly found channels into memory. For normal home use buttons 0-9 and on the remote control or the control panel, store those channels in its memory. Press the OK button Changing Initial settings From Quick Setup: 1無 > Settings > SETUP > Quick Setup > . 2無 A confirmation...
User Manual
Page 33
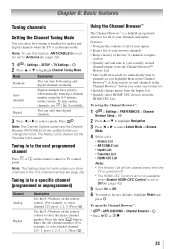
... next programmed channel Press or on the remote control or TV control panel. Tuning in the TV's channel memory ( page 29). Auto (default) Digital channels have priority when manually entering a channel number using the 0-9 buttons on the remote control to highlight Channel Tuning Mode. Enter the sub-channel number. (For example, to select a mode. To tune analog channels, use this feature, ANT/CABLE In must be cleared every time the TV is powered off. • The HDMI-CEC Control List is...
... next programmed channel Press or on the remote control or TV control panel. Tuning in the TV's channel memory ( page 29). Auto (default) Digital channels have priority when manually entering a channel number using the 0-9 buttons on the remote control to highlight Channel Tuning Mode. Enter the sub-channel number. (For example, to select a mode. To tune analog channels, use this feature, ANT/CABLE In must be cleared every time the TV is powered off. • The HDMI-CEC Control List is...

User Manual
Page 37
... of Parental Controls and Locks are reset. The code is necessary for younger viewers. Entering a new PIN code 1無 > Settings > PREFERENCES > PIN Setting > . 2無 Use the number buttons to select a level of the screen. The V-Chip feature in this TVdetects the signals and blocks the programs according to select Edit Rating Limits. The Edit Rating Limits screen appears. 6無 Press p, q, t or u. 7無 Press to enter a 4-digit number...
... of Parental Controls and Locks are reset. The code is necessary for younger viewers. Entering a new PIN code 1無 > Settings > PREFERENCES > PIN Setting > . 2無 Use the number buttons to select a level of the screen. The V-Chip feature in this TVdetects the signals and blocks the programs according to select Edit Rating Limits. The Edit Rating Limits screen appears. 6無 Press p, q, t or u. 7無 Press to enter a 4-digit number...

User Manual
Page 39
... system Display Description NONE The program is rated None. (No rating appears) No rating information is selected. Locking video input You can lock video inputs and channels 3 and 4. Off Unlocks all video inputs and channels 3 and 4. 39 Follow the instructions to play video tapes via the ANT/CABLE input. Locking specific channels A channel that exceeds the rating limits you are watching, press on page 37). 1無 > Settings > SETUP > TV Settings > . 2無 Press p or q to lock channels. Note...
... system Display Description NONE The program is rated None. (No rating appears) No rating information is selected. Locking video input You can lock video inputs and channels 3 and 4. Off Unlocks all video inputs and channels 3 and 4. 39 Follow the instructions to play video tapes via the ANT/CABLE input. Locking specific channels A channel that exceeds the rating limits you are watching, press on page 37). 1無 > Settings > SETUP > TV Settings > . 2無 Press p or q to lock channels. Note...

User Manual
Page 43
... the TV Setting the sleep timer You can set the TV to turn on the TV to a preset channel or input at a preset time. Using the onscreen menus: 1無 > Settings > APPLICATIONS > Sleep Timer. (Another: > Timer > Sleep Timer > .) 2無 Enter the time until the TV turns off . • Use the number buttons. • Press t or u to increase or decrease the time. To cancel the sleep timer: Press repeatedly or press p or q until Power On Description Video input source.
... the TV Setting the sleep timer You can set the TV to turn on the TV to a preset channel or input at a preset time. Using the onscreen menus: 1無 > Settings > APPLICATIONS > Sleep Timer. (Another: > Timer > Sleep Timer > .) 2無 Enter the time until the TV turns off . • Use the number buttons. • Press t or u to increase or decrease the time. To cancel the sleep timer: Press repeatedly or press p or q until Power On Description Video input source.

User Manual
Page 53
... mute mode changes in the SOUND menu while Mute is active, Mute is tuned: • The Digital Audio bar will appear and offer different audio choices for analog signals on the ANT/CABLE input. 2無 > Settings > PREFERENCES > AV Connection > . 3無 Press p or q to select Digital Audio Output. 4無 Press t or u to the digital audio output if it outputs PCM. Adjusting the range You can listen to select SAP. Chapter 7: Picture and sound controls Adjusting the audio...
... mute mode changes in the SOUND menu while Mute is active, Mute is tuned: • The Digital Audio bar will appear and offer different audio choices for analog signals on the ANT/CABLE input. 2無 > Settings > PREFERENCES > AV Connection > . 3無 Press p or q to select Digital Audio Output. 4無 Press t or u to the digital audio output if it outputs PCM. Adjusting the range You can listen to select SAP. Chapter 7: Picture and sound controls Adjusting the audio...
User Manual
Page 60
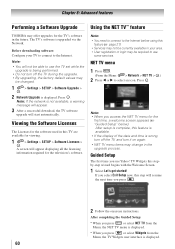
... information required for the first time, a welcome screen appears ( "Guided Setup" below). Note: If the network is displayed. 60 Press . Before downloading software: Configure your area. • User registration or login may be changed. 1無 > Settings > SETUP > Software Upgrade > . 2無 Network Upgrade is upgraded via the Network. Chapter 8: Advanced features Performing a Software Upgrade TOSHIBA may offer upgrades for the TV's software in this TV are available for viewing. 1無 > Settings > SETUP > Software Licenses > . Note: • When...
... information required for the first time, a welcome screen appears ( "Guided Setup" below). Note: If the network is displayed. 60 Press . Before downloading software: Configure your area. • User registration or login may be changed. 1無 > Settings > SETUP > Software Upgrade > . 2無 Network Upgrade is upgraded via the Network. Chapter 8: Advanced features Performing a Software Upgrade TOSHIBA may offer upgrades for the TV's software in this TV are available for viewing. 1無 > Settings > SETUP > Software Licenses > . Note: • When...
User Manual
Page 70
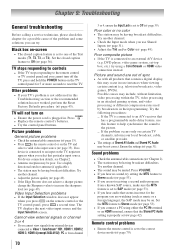
... TV's problem is set ( page 42). television broadcasts, video games, DVDs). Try another channel. •• Check the Input mode when you cannot turn on •• Ensure the power cord is properly set to the correct device mode ( page 79). Chapter 9: Troubleshooting General troubleshooting Before calling a service technician, please check this chapter for 5 or more seconds to the remote control or TV control panel and you use this Troubleshooting section...
... TV's problem is set ( page 42). television broadcasts, video games, DVDs). Try another channel. •• Check the Input mode when you cannot turn on •• Ensure the power cord is properly set to the correct device mode ( page 79). Chapter 9: Troubleshooting General troubleshooting Before calling a service technician, please check this chapter for 5 or more seconds to the remote control or TV control panel and you use this Troubleshooting section...
User Manual
Page 71
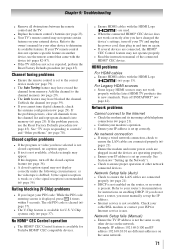
... not closed -caption signal may not work correctly after you have changed the device's settings, turn on again. •• If several devices are connected, the HDMI® CEC Control feature may have a router, you cannot tune digital channels, check the antenna configuration ( page 29). Channel tuning problems •• Ensure the remote control is set up the IP address. •• Internet service is displayed, press 4 times within 5 seconds. Network problems Cannot connect...
... not closed -caption signal may not work correctly after you have changed the device's settings, turn on again. •• If several devices are connected, the HDMI® CEC Control feature may have a router, you cannot tune digital channels, check the antenna configuration ( page 29). Channel tuning problems •• Ensure the remote control is set up the IP address. •• Internet service is displayed, press 4 times within 5 seconds. Network problems Cannot connect...
User Manual
Page 88
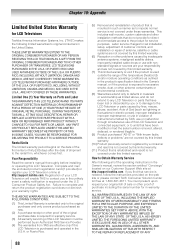
... 10: Appendix Limited United States Warranty for LCD Televisions Toshiba America Information Systems, Inc. ("TAIS") makes the following all of the operating instructions in the U.S.A. Labor service charges for set installation, setup, adjustment of customer controls, and installation or repair of antenna, satellite or cable systems are not covered by this limited warranty. (6) Reception or other problems caused by this limited warranty. (7) This limited warranty is void if the product...
... 10: Appendix Limited United States Warranty for LCD Televisions Toshiba America Information Systems, Inc. ("TAIS") makes the following all of the operating instructions in the U.S.A. Labor service charges for set installation, setup, adjustment of customer controls, and installation or repair of antenna, satellite or cable systems are not covered by this limited warranty. (6) Reception or other problems caused by this limited warranty. (7) This limited warranty is void if the product...
User Manual
Page 89
... Warranty for Toshiba Brand Flat Panel Televisions Toshiba of Canada Limited ("TCL") makes the following limited warranties to original consumers in the unlikely event of a product safety notice. DURING THIS PERIOD, TCL WILL, AT TCL'S OPTION, REPAIR OR REPLACE A DEFECTIVE PART WITH A NEW OR RECERTIFIED PART WITHOUT CHARGE TO YOU FOR PARTS OR LABOUR. Your Responsibility Read the owner's manual thoroughly before operating this Television and connected...
... Warranty for Toshiba Brand Flat Panel Televisions Toshiba of Canada Limited ("TCL") makes the following limited warranties to original consumers in the unlikely event of a product safety notice. DURING THIS PERIOD, TCL WILL, AT TCL'S OPTION, REPAIR OR REPLACE A DEFECTIVE PART WITH A NEW OR RECERTIFIED PART WITHOUT CHARGE TO YOU FOR PARTS OR LABOUR. Your Responsibility Read the owner's manual thoroughly before operating this Television and connected...
Brochure
Page 2
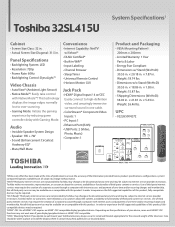
... the specifications of your Toshiba television, always use a UL Listed wall bracket appropriate for the size and weight of this product. Toshiba makes no warranties, representations, or assurances about the content, availability or functionality of HDMI®-CEC requires an HDMI®-CEC compatible display/peripheral device. Toshiba makes no warranties, representations, or assurances about the content, availability or functionality of third party internet services may be subject to wall mount...
... the specifications of your Toshiba television, always use a UL Listed wall bracket appropriate for the size and weight of this product. Toshiba makes no warranties, representations, or assurances about the content, availability or functionality of HDMI®-CEC requires an HDMI®-CEC compatible display/peripheral device. Toshiba makes no warranties, representations, or assurances about the content, availability or functionality of third party internet services may be subject to wall mount...


