User Manual
Page 10
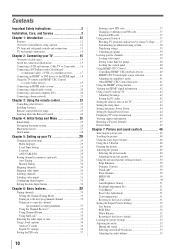
... video), a VCR, or a satellite receiver 17 Connecting an HDMI® or DVI device to the HDMI input........18 Using the TV remote and HDMI® CEC Control to control other devices 19 Connecting an HDMI audio system 19 Connecting a digital audio system 20 Connecting a ...personal computer (PC 20 Connecting a home network 21 Chapter 3: Using the remote control 23 Controlling other devices 23 Installing batteries 23 Remote control effective range 23 Learning about the Remote Control 24 Chapter 4: Initial Setup and Menu 25 Initial Setup 25 Navigating the menu system...
... video), a VCR, or a satellite receiver 17 Connecting an HDMI® or DVI device to the HDMI input........18 Using the TV remote and HDMI® CEC Control to control other devices 19 Connecting an HDMI audio system 19 Connecting a digital audio system 20 Connecting a ...personal computer (PC 20 Connecting a home network 21 Chapter 3: Using the remote control 23 Controlling other devices 23 Installing batteries 23 Remote control effective range 23 Learning about the Remote Control 24 Chapter 4: Initial Setup and Menu 25 Initial Setup 25 Navigating the menu system...
User Manual
Page 11
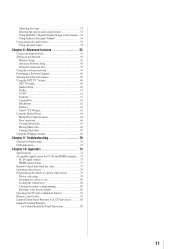
...signal formats for PC IN and HDMI terminals......75 PC IN signal formats 75 HDMI signal formats 76 Remote Control functional key chart 77 Operating other devices 79 Programming the remote to operate other devices 79 Device code setup 79 Searching for a device code 80 Locking the volume... keys 80 Clearing the remote's programming 80 Resetting to the factory default 80 Operating the TV with combination buttons 81 Remote control codes 82 Limited United States Warranty for LCD Televisions 88 Limited Canadian Warranty for...
...signal formats for PC IN and HDMI terminals......75 PC IN signal formats 75 HDMI signal formats 76 Remote Control functional key chart 77 Operating other devices 79 Programming the remote to operate other devices 79 Device code setup 79 Searching for a device code 80 Locking the volume... keys 80 Clearing the remote's programming 80 Resetting to the factory default 80 Operating the TV with combination buttons 81 Remote control codes 82 Limited United States Warranty for LCD Televisions 88 Limited Canadian Warranty for...

User Manual
Page 12
...• Place the TV in an appropriate location ( page 4) 2 Do not plug in most cases). • 1366 x 768 output resolution (32SL415U), 1920 x 1080 output resolution (24SL415U). • Three HDMI® digital, High-Definition Multimedia Interfaces 1080p input support (24SL415U). RGB Range adjusts RGB ...full range signal automatically. • HDMI® CEC Control allows control of external devices from the TV remote via HDMI connection ( page 40) • ColorStream® HD high-resolution component video inputs. • Digital Audio Out ...
...• Place the TV in an appropriate location ( page 4) 2 Do not plug in most cases). • 1366 x 768 output resolution (32SL415U), 1920 x 1080 output resolution (24SL415U). • Three HDMI® digital, High-Definition Multimedia Interfaces 1080p input support (24SL415U). RGB Range adjusts RGB ...full range signal automatically. • HDMI® CEC Control allows control of external devices from the TV remote via HDMI connection ( page 40) • ColorStream® HD high-resolution component video inputs. • Digital Audio Out ...
User Manual
Page 13
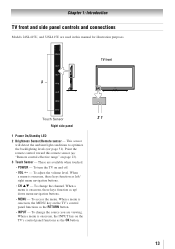
...TV front 3 Touch Sensor 21 Right side panel 1無 Power On/Standby LED 2無 Brightness Sensor/Remote sensor - To turn the TV on and off. - Point the remote control toward this manual for illustration purposes. To adjust the volume level. When a menu is onscreen, ... POWER - To access the menu. Chapter 1: Introduction TV front and side panel controls and connections Models 24SL415U, and 32SL415U are used in this remote sensor ( "Remote control effective range" on page 23). 3無 Touch Sensor - This sensor will detect the ambient light conditions to ...
...TV front 3 Touch Sensor 21 Right side panel 1無 Power On/Standby LED 2無 Brightness Sensor/Remote sensor - To turn the TV on and off. - Point the remote control toward this manual for illustration purposes. To adjust the volume level. When a menu is onscreen, ... POWER - To access the menu. Chapter 1: Introduction TV front and side panel controls and connections Models 24SL415U, and 32SL415U are used in this remote sensor ( "Remote control effective range" on page 23). 3無 Touch Sensor - This sensor will detect the ambient light conditions to ...
User Manual
Page 16
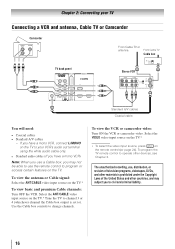
To view the VCR or camcorder video: Turn ON the VCR or camcorder video. To program the TV remote control to operate other materials is set to). Use the Cable box controls to use , distribution, or revision of television programs, videotapes, DVDs, and other ... input source on the TV. To view the antenna or Cable signal: Select the ANT/CABLE video input source on the remote control ( page 24). The unauthorized recording, use the remote control to program or access certain features on the TV.* Tune the TV to channel 3 or 4 (whichever channel the Cable...
To view the VCR or camcorder video: Turn ON the VCR or camcorder video. To program the TV remote control to operate other materials is set to). Use the Cable box controls to use , distribution, or revision of television programs, videotapes, DVDs, and other ... input source on the TV. To view the antenna or Cable signal: Select the ANT/CABLE video input source on the remote control ( page 24). The unauthorized recording, use the remote control to program or access certain features on the TV.* Tune the TV to channel 3 or 4 (whichever channel the Cable...

User Manual
Page 17
...: Select the ANT/CABLE video input source on the TV.* To record a TV program while watching a DVD: Turn ON the VCR. To program the TV remote control to operate other countries, and may subject you to civil and criminal liability. 17 Select the VIDEO video input source on the TV.* To... From antenna Stereo VCR VIDEO AUDIO L R IN CH 3 CH 4 OUT L R IN from the DVD player or satellite receiver to the ColorStream HD terminal on the remote control ( page 24).
...: Select the ANT/CABLE video input source on the TV.* To record a TV program while watching a DVD: Turn ON the VCR. To program the TV remote control to operate other countries, and may subject you to civil and criminal liability. 17 Select the VIDEO video input source on the TV.* To... From antenna Stereo VCR VIDEO AUDIO L R IN CH 3 CH 4 OUT L R IN from the DVD player or satellite receiver to the ColorStream HD terminal on the remote control ( page 24).

User Manual
Page 18
...HDMI 2, HDMI 3, or HDMI 4 (except 24SL415U) video input source on the TV.* ** To select the video input source, press on the remote control ( page 24). For detailed signal specifications, see Chapter 3. Separate analog audio cables are not required (see illustration). Because this is an ... an 1080i/60Hz signal format, you will need : • HDMI-to the HDMI input, see illustration). To program the TV remote control to accept HDCP (HighBandwidth Digital-Content Protection) program material in digital form from a DVI (Digital Visual Interface) source device.
...HDMI 2, HDMI 3, or HDMI 4 (except 24SL415U) video input source on the TV.* ** To select the video input source, press on the remote control ( page 24). For detailed signal specifications, see Chapter 3. Separate analog audio cables are not required (see illustration). Because this is an ... an 1080i/60Hz signal format, you will need : • HDMI-to the HDMI input, see illustration). To program the TV remote control to accept HDCP (HighBandwidth Digital-Content Protection) program material in digital form from a DVI (Digital Visual Interface) source device.
User Manual
Page 19
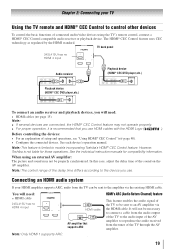
... device you use HDMI cables with the HDMI Logo ( ). Note: This feature is not liable for compatibility information. However, Toshiba is limited to models incorporating Toshiba's HDMI® CEC Control feature. See the individual instruction manuals for those operations. Note: The control range of setup and ...audio from the tuner of the TV to be sent to an AV amplifier via the existing HDMI cable. When using the TV's remote control, connect a HDMI® CEC Control compatible audio receiver or playback device. The HDMI® CEC Control feature uses CEC technology...
... device you use HDMI cables with the HDMI Logo ( ). Note: This feature is not liable for compatibility information. However, Toshiba is limited to models incorporating Toshiba's HDMI® CEC Control feature. See the individual instruction manuals for those operations. Note: The control range of setup and ...audio from the tuner of the TV to be sent to an AV amplifier via the existing HDMI cable. When using the TV's remote control, connect a HDMI® CEC Control compatible audio receiver or playback device. The HDMI® CEC Control feature uses CEC technology...

User Manual
Page 23
...the remote ( page 79). Non-Toshiba devices or Toshiba devices that the remote control is programmed to be used batteries together. •• Always remove batteries from leaking into the battery compartment. 23 Always follow applicable laws and regulations. •• If the remote ...;• Always replace both batteries with new ones. Note: •• Every time you change the batteries, you must reprogram the remote. •• Dispose of batteries in a box). Installing batteries 1無 Pull up to excessive heat such as cable converter boxes,...
...the remote ( page 79). Non-Toshiba devices or Toshiba devices that the remote control is programmed to be used batteries together. •• Always remove batteries from leaking into the battery compartment. 23 Always follow applicable laws and regulations. •• If the remote ...;• Always replace both batteries with new ones. Note: •• Every time you change the batteries, you must reprogram the remote. •• Dispose of batteries in a box). Installing batteries 1無 Pull up to excessive heat such as cable converter boxes,...
User Manual
Page 24
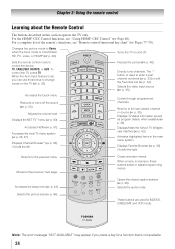
...Widgets user interface ( p. 62). Moves to the last viewed channel or source ( p. 35). Chapter 3: Using the remote control Learning about the Remote Control The buttons described in the main menu system. Selects the video input source ( p. 35). Adjusts the volume level. ...61483; p. 33) or edit the Favorites List ( p. 34). Displays/hides the Yahoo! Closes onscreen menus. For a complete list of the remote's functions, see "Using HDMI® CEC Control" ( Page 40). Displays Favorite Browser ( p. 33). / Scrolls the right. These ...
...Widgets user interface ( p. 62). Moves to the last viewed channel or source ( p. 35). Chapter 3: Using the remote control Learning about the Remote Control The buttons described in the main menu system. Selects the video input source ( p. 35). Adjusts the volume level. ...61483; p. 33) or edit the Favorites List ( p. 34). Displays/hides the Yahoo! Closes onscreen menus. For a complete list of the remote's functions, see "Using HDMI® CEC Control" ( Page 40). Displays Favorite Browser ( p. 33). / Scrolls the right. These ...
User Manual
Page 26
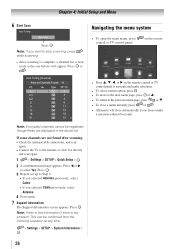
...; Press p, q, t, or u on the remote control or TV control panel to the previous menu page, press or q. • To close automatically if you selected Cable previously, select Antenna. 4無 Scan ...
...; Press p, q, t, or u on the remote control or TV control panel to the previous menu page, press or q. • To close automatically if you selected Cable previously, select Antenna. 4無 Scan ...

User Manual
Page 27
Chapter 4: Initial Setup and Menu Main menu layout To open the main menus (illustrated below), press on the remote control or TV control panel. 1st Layer 2nd Layer 3nd Layer Page Network Media Player NET TV 60 Network Setup 56 Wireless Information 57 Photo (...
Chapter 4: Initial Setup and Menu Main menu layout To open the main menus (illustrated below), press on the remote control or TV control panel. 1st Layer 2nd Layer 3nd Layer Page Network Media Player NET TV 60 Network Setup 56 Wireless Information 57 Photo (...
User Manual
Page 29
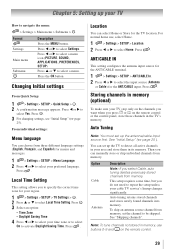
...setting allows you do not need to select Local Time Setting. See "Initial Setup" ( page 25 ). Then you press or on the remote control. 29 Storing channels in memory (optional) To make sure your TV stop only on the channels you want when you can select Home or... all active channels in your area and store them in its memory. You can choose from memory. For normal home use buttons 0-9 and on the remote control or the control panel, store those channels in memory, use , select Home. 1無 > Settings > SETUP > Location. 2無 Press t or u to select Yes. ...
...setting allows you do not need to select Local Time Setting. See "Initial Setup" ( page 25 ). Then you press or on the remote control. 29 Storing channels in memory (optional) To make sure your TV stop only on the channels you want when you can select Home or... all active channels in your area and store them in its memory. You can choose from memory. For normal home use buttons 0-9 and on the remote control or the control panel, store those channels in memory, use , select Home. 1無 > Settings > SETUP > Location. 2無 Press t or u to select Yes. ...
User Manual
Page 30
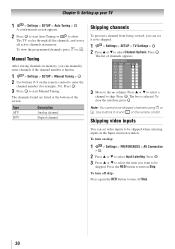
.... 30 Press . 3無 Press to the column. The list of the screen. Press p or q to select a channel to turn on the remote control. Note: You cannot tune skipped channels using or . Use buttons 0-9 and on skip: 1無 > Settings > PREFERENCES > AV Connection > .... 2無 Press p or q to be skipped. To turn on the remote control to be skipped. 1無 > Settings > SETUP > TV Settings > . 2無 Press p or q to abort. Press . 3無 Press p or...
.... 30 Press . 3無 Press to the column. The list of the screen. Press p or q to select a channel to turn on the remote control. Note: You cannot tune skipped channels using or . Use buttons 0-9 and on skip: 1無 > Settings > PREFERENCES > AV Connection > .... 2無 Press p or q to be skipped. To turn on the remote control to be skipped. 1無 > Settings > SETUP > TV Settings > . 2無 Press p or q to abort. Press . 3無 Press p or...
User Manual
Page 32
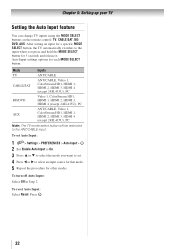
... Step 2. Press . 32 Chapter 5: Setting up your TV Setting the Auto Input feature You can change TV inputs using the MODE SELECT buttons on the remote control: TV, CABLE/SAT, BD/ DVD, AUX.
... Step 2. Press . 32 Chapter 5: Setting up your TV Setting the Auto Input feature You can change TV inputs using the MODE SELECT buttons on the remote control: TV, CABLE/SAT, BD/ DVD, AUX.
User Manual
Page 33
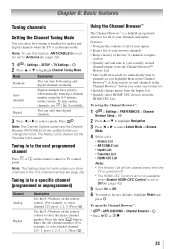
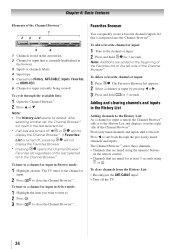
... channel 125- 1, press 1, 2, 5, -, 1.) Press . Enter the sub-channel number. (For example, to the next programmed channel Press or on the remote control to select a mode. To set up the Channel Browser™: 1無 > Settings > PREFERENCES > Channel Browser Setup > . 2無 Press p ... open the Channel Browser™: • > APPLICATIONS > Channel Browser > . • Press or . 33 Use the 0-9 buttons on the remote control or TV control panel. Digital You can only tune digital channels. 3無 Press t or u to enter the major channel number. Chapter ...
... channel 125- 1, press 1, 2, 5, -, 1.) Press . Enter the sub-channel number. (For example, to the next programmed channel Press or on the remote control to select a mode. To set up the Channel Browser™: 1無 > Settings > PREFERENCES > Channel Browser Setup > . 2無 Press p ... open the Channel Browser™: • > APPLICATIONS > Channel Browser > . • Press or . 33 Use the 0-9 buttons on the remote control or TV control panel. Digital You can only tune digital channels. 3無 Press t or u to enter the major channel number. Chapter ...
User Manual
Page 34
...: 1無 Press . Note: • The History List opens by pressing t or u. 3無 Press and hold for at least 5 seconds using the numeric buttons on the remote control. • Channels that are turned off the TV. 34 The TV tunes to the channel or input. 2無 Press to the beginning of the...
...: 1無 Press . Note: • The History List opens by pressing t or u. 3無 Press and hold for at least 5 seconds using the numeric buttons on the remote control. • Channels that are turned off the TV. 34 The TV tunes to the channel or input. 2無 Press to the beginning of the...

User Manual
Page 35
... for external inputs. 1無 Select the first channel you want to the button. 3無 You can select a video input source with the remote control by repeatedly pressing or p or q. • If one channel to the button so it can switch between the last two channels that input...channel using the Channel Number buttons (and the dash ( ) button if needed). 3無 Each time you press , the memorized channel will not appear on the remote control or TV control 2無 Change the input: • Press 0-6 (for 24"), 0-7 (for that were tuned. on the input selector. • ...
... for external inputs. 1無 Select the first channel you want to the button. 3無 You can select a video input source with the remote control by repeatedly pressing or p or q. • If one channel to the button so it can switch between the last two channels that input...channel using the Channel Number buttons (and the dash ( ) button if needed). 3無 Each time you press , the memorized channel will not appear on the remote control or TV control 2無 Change the input: • Press 0-6 (for 24"), 0-7 (for that were tuned. on the input selector. • ...

User Manual
Page 39
... The program is rated None. (No rating appears) No rating information is selected. Programs that is entered first ( "Setting the PIN code" on the remote control. Locking video input You can lock video inputs and channels 3 and 4. Displaying ratings To display the rating of channels appears. 3無 Press u and then...
... The program is rated None. (No rating appears) No rating information is selected. Programs that is entered first ( "Setting the PIN code" on the remote control. Locking video input You can lock video inputs and channels 3 and 4. Displaying ratings To display the rating of channels appears. 3無 Press u and then...
User Manual
Page 40
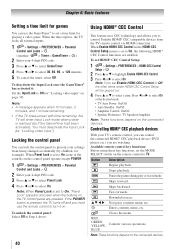
...> GameTimer > .) 2無 Enter your 4-digit PIN code. 3無 Press p or q to select Panel Lock. 4無 Press t or u to control Toshiba HDMI® CEC compatible devices from being changed accidentally (by children, for example). When Panel Lock is set to On, none of the controls on...set a time limit for playing a video game. Skips forward. Controlling HDMI® CEC playback devices With your settings from the TV remote control via HDMI connection. Stops playback. Skips backward. pq t u Navigates contents menu, etc. Closes the menu. Button Description Begins ...
...> GameTimer > .) 2無 Enter your 4-digit PIN code. 3無 Press p or q to select Panel Lock. 4無 Press t or u to control Toshiba HDMI® CEC compatible devices from being changed accidentally (by children, for example). When Panel Lock is set to On, none of the controls on...set a time limit for playing a video game. Skips forward. Controlling HDMI® CEC playback devices With your settings from the TV remote control via HDMI connection. Stops playback. Skips backward. pq t u Navigates contents menu, etc. Closes the menu. Button Description Begins ...


