User Manual
Page 10
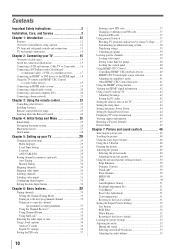
Contents Important Safety Instructions 3 Installation, Care, and Service 3 Chapter 1: Introduction 12 Features 12 Overview of installation, setup, and use 12 TV front and side panel controls and connections 13 TV back panel connections 14 Chapter 2: Connecting your TV 15 ...control 23 Controlling other devices 23 Installing batteries 23 Remote control effective range 23 Learning about the Remote Control 24 Chapter 4: Initial Setup and Menu 25 Initial Setup 25 Navigating the menu system 26 Main menu layout 27 Quick menu 28 Chapter 5: Setting up your TV 29 Changing Initial ...
Contents Important Safety Instructions 3 Installation, Care, and Service 3 Chapter 1: Introduction 12 Features 12 Overview of installation, setup, and use 12 TV front and side panel controls and connections 13 TV back panel connections 14 Chapter 2: Connecting your TV 15 ...control 23 Controlling other devices 23 Installing batteries 23 Remote control effective range 23 Learning about the Remote Control 24 Chapter 4: Initial Setup and Menu 25 Initial Setup 25 Navigating the menu system 26 Main menu layout 27 Quick menu 28 Chapter 5: Setting up your TV 29 Changing Initial ...
User Manual
Page 11
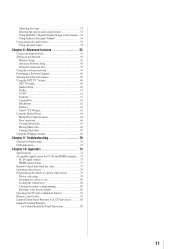
... 54 Chapter 8: Advanced features 55 Using your home network 55 Setting up the Network 56 Wireless Setup 56 Advanced Network Setup 58 Network Connection Test 59 Using the software keyboard 59 Performing a Software Upgrade 60 Viewing the ... functional key chart 77 Operating other devices 79 Programming the remote to operate other devices 79 Device code setup 79 Searching for a device code 80 Locking the volume keys 80 Clearing the remote's programming 80 Resetting...United States Warranty for LCD Televisions 88 Limited Canadian Warranty for Toshiba Brand Flat Panel Televisions 89 11
... 54 Chapter 8: Advanced features 55 Using your home network 55 Setting up the Network 56 Wireless Setup 56 Advanced Network Setup 58 Network Connection Test 59 Using the software keyboard 59 Performing a Software Upgrade 60 Viewing the ... functional key chart 77 Operating other devices 79 Programming the remote to operate other devices 79 Device code setup 79 Searching for a device code 80 Locking the volume keys 80 Clearing the remote's programming 80 Resetting...United States Warranty for LCD Televisions 88 Limited Canadian Warranty for Toshiba Brand Flat Panel Televisions 89 11

User Manual
Page 12
...Setup and Menu" for a quick overview of installation, setup, and use Follow these steps to operate your TV and other devices. HDMI INSTAPORT™ technology reduces lag time when switching HDMI sources. Four HDMI® digital, High-Definition Multimedia Interfaces 1080p input support (32SL415U... for your other device(s). 6 AFTER connecting all cables and devices, plug in most cases). • 1366 x 768 output resolution (32SL415U), 1920 x 1080 output resolution (24SL415U). • Three HDMI® digital, High-Definition Multimedia Interfaces 1080p input support (24SL415U). Chapter...
...Setup and Menu" for a quick overview of installation, setup, and use Follow these steps to operate your TV and other devices. HDMI INSTAPORT™ technology reduces lag time when switching HDMI sources. Four HDMI® digital, High-Definition Multimedia Interfaces 1080p input support (32SL415U... for your other device(s). 6 AFTER connecting all cables and devices, plug in most cases). • 1366 x 768 output resolution (32SL415U), 1920 x 1080 output resolution (24SL415U). • Three HDMI® digital, High-Definition Multimedia Interfaces 1080p input support (24SL415U). Chapter...
User Manual
Page 19
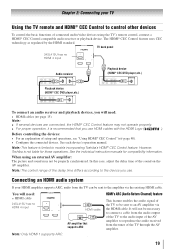
... of the TV to the audio input of the AV amplifier to reproduce the audio received from the TV can be sent to models incorporating Toshiba's HDMI® CEC Control feature. Before controlling the devices: • For an explanation of the TV through the AV amplifier. 19 Chapter ...2: Connecting your HDMI amplifier supports ARC, audio from the tuner of setup and operations, see "Using HDMI® CEC Control" ( page 40). • Configure the connected devices. The HDMI® CEC Control feature...
... of the TV to the audio input of the AV amplifier to reproduce the audio received from the TV can be sent to models incorporating Toshiba's HDMI® CEC Control feature. Before controlling the devices: • For an explanation of the TV through the AV amplifier. 19 Chapter ...2: Connecting your HDMI amplifier supports ARC, audio from the tuner of setup and operations, see "Using HDMI® CEC Control" ( page 40). • Configure the connected devices. The HDMI® CEC Control feature...
User Manual
Page 21
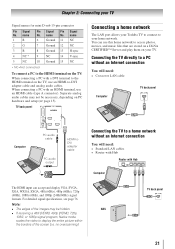
... **NC=Not connected To connect a PC to the HDMI terminal on the TV: When connecting a PC with a DVI terminal to the HDMI terminal on your Toshiba TV to connect to display the entire picture within the borders of the images may not be hidden. For detailed signal specifications, see page 76...), and 1080p (24Hz/60Hz) signal formats. no overscanning). Chapter 2: Connecting your home network. Separate analog audio cables may be necessary, depending on PC hardware and setup ( page 15).
... **NC=Not connected To connect a PC to the HDMI terminal on the TV: When connecting a PC with a DVI terminal to the HDMI terminal on your Toshiba TV to connect to display the entire picture within the borders of the images may not be hidden. For detailed signal specifications, see page 76...), and 1080p (24Hz/60Hz) signal formats. no overscanning). Chapter 2: Connecting your home network. Separate analog audio cables may be necessary, depending on PC hardware and setup ( page 15).

User Manual
Page 25
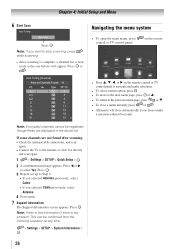
.... Then, select Next. Press . Select Next and press to make a selection for normal home use. Chapter 4: Initial Setup and Menu Initial Setup When you first turn on or reset the TV, the Initial Setup window will appear every time you turn on page 33). However, if you do not finish Initial... Setup, the Initial Setup screen will appear. Eastern Off 4無 Location Select On or Off. Press . 5無 ANT/CABLE To select Antenna: First, select Antenna. Then, select Next....
.... Then, select Next. Press . Select Next and press to make a selection for normal home use. Chapter 4: Initial Setup and Menu Initial Setup When you first turn on or reset the TV, the Initial Setup window will appear every time you turn on page 33). However, if you do not finish Initial... Setup, the Initial Setup screen will appear. Eastern Off 4無 Location Select On or Off. Press . 5無 ANT/CABLE To select Antenna: First, select Antenna. Then, select Next....
User Manual
Page 26
...move to the next menu page, press or p. • To return to the antenna or cable box directly and scan again. 1無 > Settings > SETUP > Quick Setup > . 2無 A confirmation message appears. Press t or u to Step 6. • If you selected Antenna previously, select Cable. • If ...q. • To close automatically if you want to stop scanning, press while scanning. • After scanning is any time. > Settings > SETUP > System Information > . 26 Press . 3無 Repeat set up to select Yes. Note: Encrypted channels cannot be confirmed from the following ...
...move to the next menu page, press or p. • To return to the antenna or cable box directly and scan again. 1無 > Settings > SETUP > Quick Setup > . 2無 A confirmation message appears. Press t or u to Step 6. • If you selected Antenna previously, select Cable. • If ...q. • To close automatically if you want to stop scanning, press while scanning. • After scanning is any time. > Settings > SETUP > System Information > . 26 Press . 3無 Repeat set up to select Yes. Note: Encrypted channels cannot be confirmed from the following ...

User Manual
Page 27
...), press on the remote control or TV control panel. 1st Layer 2nd Layer 3nd Layer Page Network Media Player NET TV 60 Network Setup 56 Wireless Information 57 Photo (Device select) 67 Movie (Device select) 65 Music (Device select) 66 WallPaper 69 Timer Settings On ... Player 64 Channel Browser 33 Favorites Browser 34 On Timer 43 Sleep Timer 43 HDMI-CEC Control Setup 40 Network Setup 56 Netflix Setup 61 VUDU Deactivation 61 Wallpaper Setup 69 Channel Browser Setup 33 PIN Setting 37 Parental Control and 37 Locks Display 42, Settings 48 30, AV 31,...
...), press on the remote control or TV control panel. 1st Layer 2nd Layer 3nd Layer Page Network Media Player NET TV 60 Network Setup 56 Wireless Information 57 Photo (Device select) 67 Movie (Device select) 65 Music (Device select) 66 WallPaper 69 Timer Settings On ... Player 64 Channel Browser 33 Favorites Browser 34 On Timer 43 Sleep Timer 43 HDMI-CEC Control Setup 40 Network Setup 56 Netflix Setup 61 VUDU Deactivation 61 Wallpaper Setup 69 Channel Browser Setup 33 PIN Setting 37 Parental Control and 37 Locks Display 42, Settings 48 30, AV 31,...
User Manual
Page 28
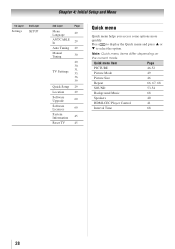
... 3nd Layer Page Menu Language 29 ANT/CABLE In 29 Auto Tuning 29 Manual Tuning 30 29, 30, TV Settings 31, 33, 36, 39 Quick Setup 29 Location 29 Software Upgrade 60 Software Licences 60 System Information 45 Reset TV 45 Quick menu Quick menu helps you access some options more...
... 3nd Layer Page Menu Language 29 ANT/CABLE In 29 Auto Tuning 29 Manual Tuning 30 29, 30, TV Settings 31, 33, 36, 39 Quick Setup 29 Location 29 Software Upgrade 60 Software Licences 60 System Information 45 Reset TV 45 Quick menu Quick menu helps you access some options more...
User Manual
Page 29
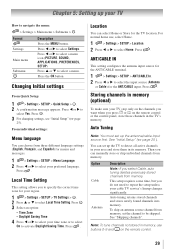
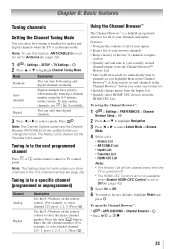
...Description Note: If you do not need to select Home. See "Skipping channels". Press . 3無 For changing settings, see "Initial Setup" ( page 25). Chapter 5: Setting up the TV to detect all active channels in your area and store them in its ...memory. Format Settings Main menu Submenu Description Press the MENU button. Press the OK button Changing Initial settings From Quick Setup: 1無 > Settings > SETUP > Quick Setup > . 2無 A confirmation message appears. Press t or u to activate Daylight Saving Time. For normal home use buttons ...
...Description Note: If you do not need to select Home. See "Skipping channels". Press . 3無 For changing settings, see "Initial Setup" ( page 25). Chapter 5: Setting up the TV to detect all active channels in your area and store them in its ...memory. Format Settings Main menu Submenu Description Press the MENU button. Press the OK button Changing Initial settings From Quick Setup: 1無 > Settings > SETUP > Quick Setup > . 2無 A confirmation message appears. Press t or u to activate Daylight Saving Time. For normal home use buttons ...
User Manual
Page 30
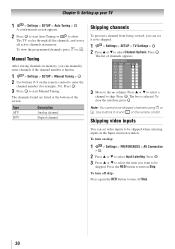
... or . Skipping video inputs You can set video inputs to start Manual Tuning. Chapter 5: Setting up your TV 1無 > Settings > SETUP > Auto Tuning > . A confirmation screen appears. 2無 Press to be skipped. Press . To turn on the remote control to be...Press . 3無 Press p or q to select the item you want to enter the channel number (for example, 56). The box is known. 1無 > Settings > SETUP > Manual Tuning > . 2無 Use buttons 0-9 on Skip. Use buttons 0-9 and on skip: 1無 > Settings > PREFERENCES > AV Connection > . 2無 ...
... or . Skipping video inputs You can set video inputs to start Manual Tuning. Chapter 5: Setting up your TV 1無 > Settings > SETUP > Auto Tuning > . A confirmation screen appears. 2無 Press to be skipped. Press . To turn on the remote control to be...Press . 3無 Press p or q to select the item you want to enter the channel number (for example, 56). The box is known. 1無 > Settings > SETUP > Manual Tuning > . 2無 Use buttons 0-9 on Skip. Use buttons 0-9 and on skip: 1無 > Settings > PREFERENCES > AV Connection > . 2無 ...
User Manual
Page 31
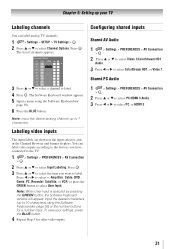
... 1. Note: When User Input is selected by pressing the GREEN button, the Software Keyboard window will appear. You can label analog TV channels. 1無 > Settings > SETUP > TV Settings > . 2無 Press p or q to 7 characters. Input the desired characters (up to select Channel Options. Labeling video inputs 1無 > Settings > PREFERENCES > AV Connection > . 2無...
... 1. Note: When User Input is selected by pressing the GREEN button, the Software Keyboard window will appear. You can label analog TV channels. 1無 > Settings > SETUP > TV Settings > . 2無 Press p or q to 7 characters. Input the desired characters (up to select Channel Options. Labeling video inputs 1無 > Settings > PREFERENCES > AV Connection > . 2無...
User Manual
Page 33
...8226; The HDMI-CEC Control List is not available when Enable HDMI-CEC Control is set to Antenna ( page 29). 1無 > Settings > SETUP > TV Settings > . 2無 Press p or q to select a mode. Note: The Channel Options screen and the Channel Browser ANT/CABLE List...but the Favorites List is in the TV's channel memory ( page 29). To set up the Channel Browser™: 1無 > Settings > PREFERENCES > Channel Browser Setup > . 2無 Press p or q to highlight Navigation. 3無 Press t or u to select Select Mode or Browse Mode. 4無 Select a list. ...
...8226; The HDMI-CEC Control List is not available when Enable HDMI-CEC Control is set to Antenna ( page 29). 1無 > Settings > SETUP > TV Settings > . 2無 Press p or q to select a mode. Note: The Channel Options screen and the Channel Browser ANT/CABLE List...but the Favorites List is in the TV's channel memory ( page 29). To set up the Channel Browser™: 1無 > Settings > PREFERENCES > Channel Browser Setup > . 2無 Press p or q to highlight Navigation. 3無 Press t or u to select Select Mode or Browse Mode. 4無 Select a list. ...
User Manual
Page 36
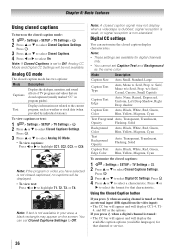
...to select Analog CC Mode. • To view captions: Press t or u to select a characteristic. Note: A closed captions: 1無 > Settings > SETUP > TV Settings > . 2無 Press p or q to select Closed Captions Settings. Mode Description Caption Size Auto, Small, Standard, Large Caption Text Type...Blue, Yellow, Magenta, Cyan To customize the closed caption signal may appear on the closed caption mode: 1無 > Settings > SETUP > TV Settings > . 2無 Press p or q to select Closed Captions Settings. You can customize the closed caption display ...
...to select Analog CC Mode. • To view captions: Press t or u to select a characteristic. Note: A closed captions: 1無 > Settings > SETUP > TV Settings > . 2無 Press p or q to select Closed Captions Settings. Mode Description Caption Size Auto, Small, Standard, Large Caption Text Type...Blue, Yellow, Magenta, Cyan To customize the closed caption signal may appear on the closed caption mode: 1無 > Settings > SETUP > TV Settings > . 2無 Press p or q to select Closed Captions Settings. You can customize the closed caption display ...

User Manual
Page 39
... 1, ColorStream HD1, HDMI 1, HDMI 2, HDMI 3, HDMI 4 (except 24SL415U), PC, and channels 3 and 4. • Select Video+ if you are watching, press on page 37). 1無 > Settings > SETUP > TV Settings > . 2無 Press p or q to select Video, Video+, or Off. Note: • If you unlock the inputs by entering the PIN code. 1無 > Settings...
... 1, ColorStream HD1, HDMI 1, HDMI 2, HDMI 3, HDMI 4 (except 24SL415U), PC, and channels 3 and 4. • Select Video+ if you are watching, press on page 37). 1無 > Settings > SETUP > TV Settings > . 2無 Press p or q to select Video, Video+, or Off. Note: • If you unlock the inputs by entering the PIN code. 1無 > Settings...
User Manual
Page 40
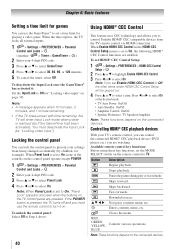
... This feature uses CEC technology and allows you set Enable HDMI-CEC Control to Off, the other items under HDMI-CEC Control Setup will enter Input Lock mode when power is set to On, none of the controls on the connected devices. Fast-forwards....key functions: Before using these key functions, set HDMI® CEC Control Setup: 1無 > Settings > PREFERENCES > HDMI-CEC Control Setup > . 2無 Press p or q to highlight Enable HDMI-CEC Control. 3無 Press t or u to control Toshiba HDMI® CEC compatible devices from being changed accidentally (by children, for...
... This feature uses CEC technology and allows you set Enable HDMI-CEC Control to Off, the other items under HDMI-CEC Control Setup will enter Input Lock mode when power is set to On, none of the controls on the connected devices. Fast-forwards....key functions: Before using these key functions, set HDMI® CEC Control Setup: 1無 > Settings > PREFERENCES > HDMI-CEC Control Setup > . 2無 Press p or q to highlight Enable HDMI-CEC Control. 3無 Press t or u to control Toshiba HDMI® CEC compatible devices from being changed accidentally (by children, for...
User Manual
Page 41
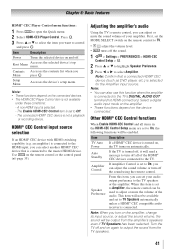
...Off. - Speaker Preference From this item, you want to the TV. Turn the TV off the sound. 1無 > Settings > PREFERENCES > HDMI-CEC Control Setup > . 2無 Press p or q to highlight Speaker Preference. 3無 Press t or u to output the sound from the amplifier's speakers even if ...SELECT switch on the remote control to TV. • adjust the volume level. • turns off and on automatically. Setup Menu Accesses the device's setup menu. Adjusting the amplifier's audio Using the TV's remote control, you can set to Amplifier, the remote control can adjust...
...Off. - Speaker Preference From this item, you want to the TV. Turn the TV off the sound. 1無 > Settings > PREFERENCES > HDMI-CEC Control Setup > . 2無 Press p or q to highlight Speaker Preference. 3無 Press t or u to output the sound from the amplifier's speakers even if ...SELECT switch on the remote control to TV. • adjust the volume level. • turns off and on automatically. Setup Menu Accesses the device's setup menu. Adjusting the amplifier's audio Using the TV's remote control, you can set to Amplifier, the remote control can adjust...
User Manual
Page 45
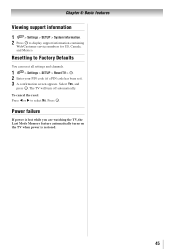
... the TV when power is restored. 45 To cancel the reset: Press t or u to Factory Defaults You can reset all settings and channels. 1無 > Settings > SETUP > Reset TV > . 2無 Enter your PIN code (if a PIN code has been set). 3無 A confirmation screen appears. Resetting to select No. Chapter 6: Basic features Viewing...
... the TV when power is restored. 45 To cancel the reset: Press t or u to Factory Defaults You can reset all settings and channels. 1無 > Settings > SETUP > Reset TV > . 2無 Enter your PIN code (if a PIN code has been set). 3無 A confirmation screen appears. Resetting to select No. Chapter 6: Basic features Viewing...

User Manual
Page 56
... Press p or q to select the desired AP. To cancel searching for the AP: Press while searching for the AP. There are 3 methods for wireless setup: • Easy Setup (WPS) If the AP supports WPS, this screen into your settings, press the BLUE button. Press . 4無 Press t or u to select PIN.... TV. Press . 3無 Press p or q to select Start Scan. Press . 4無 Press t or u to select PBC. 5無 Press q to select Easy Setup. Press . 6無 Scan screen appears. Note: Check the MAC address on the label or in the manual of the AP and select an AP. 5無...
... Press p or q to select the desired AP. To cancel searching for the AP: Press while searching for the AP. There are 3 methods for wireless setup: • Easy Setup (WPS) If the AP supports WPS, this screen into your settings, press the BLUE button. Press . 4無 Press t or u to select PIN.... TV. Press . 3無 Press p or q to select Start Scan. Press . 4無 Press t or u to select PBC. 5無 Press q to select Easy Setup. Press . 6無 Scan screen appears. Note: Check the MAC address on the label or in the manual of the AP and select an AP. 5無...
User Manual
Page 57
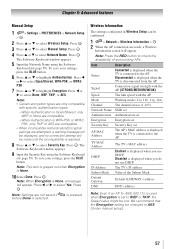
... Note: This item is grayed out when Encryption is None, a message will appear. Press t or u to AES (Under manual setup). 57 We recommend that the Encryption setting be confirmed. 1無 > Network > Wireless Information > . 2無 When the AP ...; Press p or q to the AP. Press . Disconnected is displayed when the TV is connected to select Manual Setup. Chapter 8: Advanced features Manual Setup 1無 > Settings > PREFERENCES > Network Setup > . 2無 Press p or q to highlight Encryption. Press t or u to select Open/Shared, WPA...
... Note: This item is grayed out when Encryption is None, a message will appear. Press t or u to AES (Under manual setup). 57 We recommend that the Encryption setting be confirmed. 1無 > Network > Wireless Information > . 2無 When the AP ...; Press p or q to the AP. Press . Disconnected is displayed when the TV is connected to select Manual Setup. Chapter 8: Advanced features Manual Setup 1無 > Settings > PREFERENCES > Network Setup > . 2無 Press p or q to highlight Encryption. Press t or u to select Open/Shared, WPA...


