
Owner's Manual - English
Page 15
...source device, or uncompressed digital video from EIA/CEA-861-D-compliant[1] consumer electronic devices (such as a set-top box or DVD player with high-bandwidth digital content protection, which is 6.6 ft (2m). &#...IN DVI / HDCP OUT OUT L R Note: To ensure that the HDMI or DVI device is reset properly, it is recommended that you will need a High Speed HDMI cable. HDMI, the HDMI ...TV. An HDMI-to the HDMI input, see illustration). - page 20). Supported Audio format: Linear PCM, sampling rate 32/44.1/ 48 kHz Note: To connect a PC to -DVI adapter cable transfers video only. page 31...
...source device, or uncompressed digital video from EIA/CEA-861-D-compliant[1] consumer electronic devices (such as a set-top box or DVD player with high-bandwidth digital content protection, which is 6.6 ft (2m). &#...IN DVI / HDCP OUT OUT L R Note: To ensure that the HDMI or DVI device is reset properly, it is recommended that you will need a High Speed HDMI cable. HDMI, the HDMI ...TV. An HDMI-to the HDMI input, see illustration). - page 20). Supported Audio format: Linear PCM, sampling rate 32/44.1/ 48 kHz Note: To connect a PC to -DVI adapter cable transfers video only. page 31...

Owner's Manual - English
Page 17
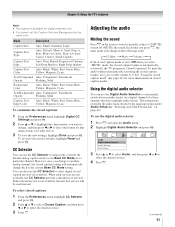
... Analog Audio HDMI 1 Audio MTS Language Speakers Optical Output Format Dolby Digital Dynamic Range Control Reset HDMI 1 Auto Stereo English On Dolby Digital Compressed Done To control the audio: 1 Turn on the TV's remote control and open the Audio menu. 3 Highlight Audio Setup and press T. Note:...amplifier To control the audio: 1 Turn on the TV and the digital audio device. 2 Press Y on the TV and the stereo amplifier. 2 Turn off the TV's built-in speakers (- LINE IN LR TV upper back panel Audio Digital Audio Selector Audio Settings Audio Setup 4 In the Optical Output Format field...
... Analog Audio HDMI 1 Audio MTS Language Speakers Optical Output Format Dolby Digital Dynamic Range Control Reset HDMI 1 Auto Stereo English On Dolby Digital Compressed Done To control the audio: 1 Turn on the TV's remote control and open the Audio menu. 3 Highlight Audio Setup and press T. Note:...amplifier To control the audio: 1 Turn on the TV and the digital audio device. 2 Press Y on the TV and the stereo amplifier. 2 Turn off the TV's built-in speakers (- LINE IN LR TV upper back panel Audio Digital Audio Selector Audio Settings Audio Setup 4 In the Optical Output Format field...

Owner's Manual - English
Page 21
...DVD player or HTIB, set the MODE SELECT switch to control a cable converter box or satellite receiver; Note: Even after the TV remote control is not preprogrammed to operate, you must first program the remote control to recognize the device (if you have a non-Toshiba device or a Toshiba device that the remote... on some DVD players). 9 ENTER Required by some satellite receivers and DVD players to activate certain functions. 10 DVD CLEAR Press to reset the title and chapter number. 11 PLAY Begins playback of current DVD chapter, or locates previous chapters. 17 REW Rewinds/reverses the tape...
...DVD player or HTIB, set the MODE SELECT switch to control a cable converter box or satellite receiver; Note: Even after the TV remote control is not preprogrammed to operate, you must first program the remote control to recognize the device (if you have a non-Toshiba device or a Toshiba device that the remote... on some DVD players). 9 ENTER Required by some satellite receivers and DVD players to activate certain functions. 10 DVD CLEAR Press to reset the title and chapter number. 11 PLAY Begins playback of current DVD chapter, or locates previous chapters. 17 REW Rewinds/reverses the tape...
Owner's Manual - English
Page 30
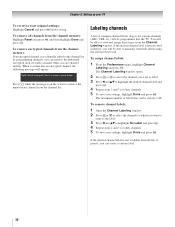
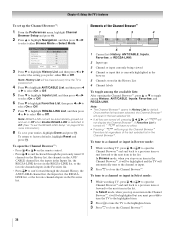
..., you want to label. 3 Press C and Bb to select the channel you tune into the TV. Labeling channels A list of common channel labels (logos) for other channels. 5 To save your settings, highlight Done and press T. To assign channel labels: 1 From the Preferences menu, highlight Channel Labeling... these logos from the channel memory: If an encrypted channel is on the screen to remove the unnecessary channel from the channel memory: Highlight Reset and press T, and then highlight Done and press T. To remove all channels from the channel list. The Channel Labeling window opens. 2...
..., you want to label. 3 Press C and Bb to select the channel you tune into the TV. Labeling channels A list of common channel labels (logos) for other channels. 5 To save your settings, highlight Done and press T. To assign channel labels: 1 From the Preferences menu, highlight Channel Labeling... these logos from the channel memory: If an encrypted channel is on the screen to remove the unnecessary channel from the channel memory: Highlight Reset and press T, and then highlight Done and press T. To remove all channels from the channel list. The Channel Labeling window opens. 2...

Owner's Manual - English
Page 31
...Language Speakers Optical Output Format Dolby Digital Dynamic Range Control HDMI 1 Auto Stereo English On Dolby Digital Compressed Reset Done Mode Description Auto When viewing the HDMI 1 input, if digital audio from the HDMI input is ...to "Auto." Note: Because the ColorStream HD2, PC, and HDMI 1 inputs share the same set to "HDMI 1," the HDMI 1 Audio setting changes to save your TV To create and assign a custom label: 1 Open the Channel Labeling window. 2 Press < or...press the corresponding key on the remote control to highlight the desired character on the on page 49.) 31
...Language Speakers Optical Output Format Dolby Digital Dynamic Range Control HDMI 1 Auto Stereo English On Dolby Digital Compressed Reset Done Mode Description Auto When viewing the HDMI 1 input, if digital audio from the HDMI input is ...to "Auto." Note: Because the ColorStream HD2, PC, and HDMI 1 inputs share the same set to "HDMI 1," the HDMI 1 Audio setting changes to save your TV To create and assign a custom label: 1 Open the Channel Labeling window. 2 Press < or...press the corresponding key on the remote control to highlight the desired character on the on page 49.) 31
Owner's Manual - English
Page 33
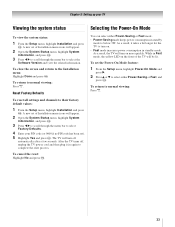
... select the Software Version and view the related information. To return to complete the reset process. Reset Factory Defaults To reset all settings and channels to select Factory Defaults. 4 Enter your TV Viewing the system status Selecting the Power-On Mode To view the system status: 1 From the Setup menu, highlight Installation and press T. A new...
... select the Software Version and view the related information. To return to complete the reset process. Reset Factory Defaults To reset all settings and channels to select Factory Defaults. 4 Enter your TV Viewing the system status Selecting the Power-On Mode To view the system status: 1 From the Setup menu, highlight Installation and press T. A new...

Owner's Manual - English
Page 35
...Keep a history of how you could label the inputs if you connected a VCR to VIDEO 1, Cable TV to VIDEO 2, a video recorder to ColorStream HD1, a DTV settop box to HDMI 1, a satellite/DSS set up a favorite channels/inputs list that input to be removed from the REGZALINK List. The screen below ... Browser allows you can select Hide as you highlight them in the Channel Browser™) or Select mode (to the factory default labels, highlight Reset and press T. Input labeling example: The screen below right is labeled "Hidden," which means that input source. Note: Additions are added to...
...Keep a history of how you could label the inputs if you connected a VCR to VIDEO 1, Cable TV to VIDEO 2, a video recorder to ColorStream HD1, a DTV settop box to HDMI 1, a satellite/DSS set up a favorite channels/inputs list that input to be removed from the REGZALINK List. The screen below ... Browser allows you can select Hide as you highlight them in the Channel Browser™) or Select mode (to the factory default labels, highlight Reset and press T. Input labeling example: The screen below right is labeled "Hidden," which means that input source. Note: Additions are added to...
Owner's Manual - English
Page 36
... c to select On or Off. To open the Channel Browser™ and surf back to a previous item or forward to factory defaults, highlight Reset and press T. Once another list has been selected, the Channel Browser™ will not display the Channel Browser™. To tune to a channel... History List, and then press C or c to the next item in the Channel Browser™, it will be cleared every time the TV is switched to Off. (See "To set up the Channel Browser™ Favorites list regardless of the Channel Browser™ 1 History 88 2 10 TVLAND 2 ABCHD 3 4 11 3 8 WEATHER ...
... c to select On or Off. To open the Channel Browser™ and surf back to a previous item or forward to factory defaults, highlight Reset and press T. Once another list has been selected, the Channel Browser™ will not display the Channel Browser™. To tune to a channel... History List, and then press C or c to the next item in the Channel Browser™, it will be cleared every time the TV is switched to Off. (See "To set up the Channel Browser™ Favorites list regardless of the Channel Browser™ 1 History 88 2 10 TVLAND 2 ABCHD 3 4 11 3 8 WEATHER ...
Owner's Manual - English
Page 40
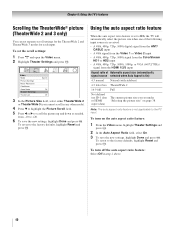
... to the factory defaults, highlight Reset and press T. Video Mode Picture Settings Noise Reduction ColorMaster Game Mode Theater Settings TheaterLock Sports Off Off 3 In the Picture Size field, select either TheaterWide 2 or TheaterWide 3 (you set the scroll settings: 1 Press Y and open the Video menu. 2 Highlight Theater Settings and press T. Chapter 6: Using the TV's features Scrolling the TheaterWide...
... to the factory defaults, highlight Reset and press T. Video Mode Picture Settings Noise Reduction ColorMaster Game Mode Theater Settings TheaterLock Sports Off Off 3 In the Picture Size field, select either TheaterWide 2 or TheaterWide 3 (you set the scroll settings: 1 Press Y and open the Video menu. 2 Highlight Theater Settings and press T. Chapter 6: Using the TV's features Scrolling the TheaterWide...

Owner's Manual - English
Page 41
... will automatically be set to 0. (Settings are stored in... on the TV, smoother motion can select your desired picture settings from the ...TV will return to civil and criminal liability. Mode Sports Standard Movie PC Preference Picture Quality Bright and dynamic picture Standard picture settings...TV, press B to make the picture a still picture. 2 To return to Film. Note: If the TV... Theater Settings and press T. 2 In the Cinema Mode field, select Film. 3 To save the new settings, highlight...continued) 41 To set the Cinema Mode to... automatically be obtained by setting the Cinema Mode to ...
... will automatically be set to 0. (Settings are stored in... on the TV, smoother motion can select your desired picture settings from the ...TV will return to civil and criminal liability. Mode Sports Standard Movie PC Preference Picture Quality Bright and dynamic picture Standard picture settings...TV, press B to make the picture a still picture. 2 To return to Film. Note: If the TV... Theater Settings and press T. 2 In the Cinema Mode field, select Film. 3 To save the new settings, highlight...continued) 41 To set the Cinema Mode to... automatically be obtained by setting the Cinema Mode to ...
Owner's Manual - English
Page 42
... picture settings from, highlight Reset and press T. "Selecting the picture mode," above left ) until Reset is selected. In other words, those settings that do not influence Mode status will not be grayed out and unavailable when the TheaterLock setting is non-standard Digital CC Settings You ...off TheaterLock™: Select Off in the table above. 3 To save the new settings, highlight Done and press T. Chapter 6: Using the TV's features To adjust the picture quality: 1 From the Video menu, highlight Picture Settings and press T. 2 Press B or b to select the picture quality you ...
... picture settings from, highlight Reset and press T. "Selecting the picture mode," above left ) until Reset is selected. In other words, those settings that do not influence Mode status will not be grayed out and unavailable when the TheaterLock setting is non-standard Digital CC Settings You ...off TheaterLock™: Select Off in the table above. 3 To save the new settings, highlight Done and press T. Chapter 6: Using the TV's features To adjust the picture quality: 1 From the Video menu, highlight Picture Settings and press T. 2 Press B or b to select the picture quality you ...
Owner's Manual - English
Page 43
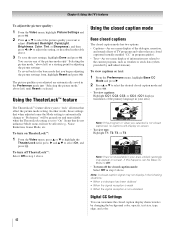
... Black, White, Red, Green, Blue, Yellow, Magenta, Cyan To customize the closed caption feature is automatically activated if the TV program is Closed Captioned. This temporarily overrides the audio track chosen by the language option under Audio Setup (- Adjusting the audio...captions: 1 From the Preferences menu, highlight Digital CC Settings and press T. 2 Press B or b to highlight the characteristic you change back to conveniently switch between audio tracks on the remote control to the factory defaults, highlight Reset and press T. w. To select closed caption modes. ...
... Black, White, Red, Green, Blue, Yellow, Magenta, Cyan To customize the closed caption feature is automatically activated if the TV program is Closed Captioned. This temporarily overrides the audio track chosen by the language option under Audio Setup (- Adjusting the audio...captions: 1 From the Preferences menu, highlight Digital CC Settings and press T. 2 Press B or b to highlight the characteristic you change back to conveniently switch between audio tracks on the remote control to the factory defaults, highlight Reset and press T. w. To select closed caption modes. ...

Owner's Manual - English
Page 44
... on an ATSC digital station (if available): Highlight the Language field in step 2 above . 44 Note: • You can be output. To reset the settings to reduce the noise. "Connecting a digital audio system" and "Connecting an audio system" on the ANT/CABLE input (- To revert to the factory...the bass, treble, and balance. When the TV receives a stereo or SAP broadcast, the word "STEREO" or "SAP" appears on an analog station (if available): Select SAP in Stereo mode because it . To reset the settings to the factory defaults, highlight Reset and press T. If you have SAP on ...
... on an ATSC digital station (if available): Highlight the Language field in step 2 above . 44 Note: • You can be output. To reset the settings to reduce the noise. "Connecting a digital audio system" and "Connecting an audio system" on the ANT/CABLE input (- To revert to the factory...the bass, treble, and balance. When the TV receives a stereo or SAP broadcast, the word "STEREO" or "SAP" appears on an analog station (if available): Select SAP in Stereo mode because it . To reset the settings to the factory defaults, highlight Reset and press T. If you have SAP on ...
Owner's Manual - English
Page 45
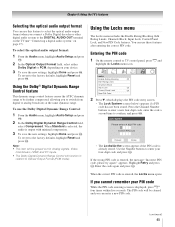
... Dolby Digital decoder or other digital audio system to enter your device. 3 To save the new settings, highlight Done and press T. Lock System Please enter a 4 digit PIN code Confirm PIN code ...feature This dynamic range control feature causes the ATSC dynamic range to the factory defaults, highlight Reset and press T. To revert to be cleared and you cannot remember your PIN code While ...the PIN code entering screen is already stored. Chapter 6: Using the TV's features Selecting the optical audio output format You can use these features after entering the ...
... Dolby Digital decoder or other digital audio system to enter your device. 3 To save the new settings, highlight Done and press T. Lock System Please enter a 4 digit PIN code Confirm PIN code ...feature This dynamic range control feature causes the ATSC dynamic range to the factory defaults, highlight Reset and press T. To revert to be cleared and you cannot remember your PIN code While ...the PIN code entering screen is already stored. Chapter 6: Using the TV's features Selecting the optical audio output format You can use these features after entering the ...
Owner's Manual - English
Page 52
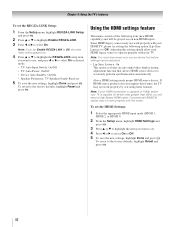
... allow your HDMI legacy source to operate properly with your TV. To revert to the factory defaults, highlight Reset and press T. To revert to the factory defaults, highlight Reset and press T. 52 Using the HDMI settings feature This menu consists of refresh rates greater than 60Hz, you will be ... to highlight Enable REGZA-LINK. 3 Press C or c to select On. Conventional HDMI/DVI cables may not work properly with your HDMI TV, please try setting the following item (new HDMI capability) and will be adjusted. • Lip-Sync Latency: On This option activates an auto audio/video ...
... allow your HDMI legacy source to operate properly with your TV. To revert to the factory defaults, highlight Reset and press T. To revert to the factory defaults, highlight Reset and press T. 52 Using the HDMI settings feature This menu consists of refresh rates greater than 60Hz, you will be ... to highlight Enable REGZA-LINK. 3 Press C or c to select On. Conventional HDMI/DVI cables may not work properly with your HDMI TV, please try setting the following item (new HDMI capability) and will be adjusted. • Lip-Sync Latency: On This option activates an auto audio/video ...
Owner's Manual - English
Page 54
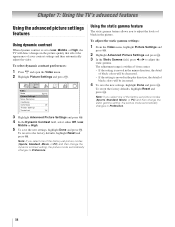
... to the factory defaults, highlight Reset and press T. To adjust the static gamma settings: 1 From the Video menu, highlight Picture Settings and press T. 2 Highlight Advanced Picture Settings and press T. 3 In the Static Gamma field, press C or c to Low, Middle, or High, the TV will be decreased. • If the setting is moved in the plus direction...
... to the factory defaults, highlight Reset and press T. To adjust the static gamma settings: 1 From the Video menu, highlight Picture Settings and press T. 2 Highlight Advanced Picture Settings and press T. 3 In the Static Gamma field, press C or c to Low, Middle, or High, the TV will be decreased. • If the setting is moved in the plus direction...

Owner's Manual - English
Page 55
... makes the picture greenish. To revert to the factory defaults, highlight Reset and press T. To change the CableClear settings: 1 From the Video menu, highlight Noise Reduction and press T. 2 In the CableClear field, select your TV picture. Using MPEG noise reduction The MPEG noise reduction feature allows you... available selections are Off, Low, Middle, and High. To revert to the factory defaults, highlight Reset and press T. Auto will reduce the noise in step 4 above. 6 To save the new settings, highlight Done and press T. Note: If you prefer (Cool, Medium, or Warm). 5 Press...
... makes the picture greenish. To revert to the factory defaults, highlight Reset and press T. To change the CableClear settings: 1 From the Video menu, highlight Noise Reduction and press T. 2 In the CableClear field, select your TV picture. Using MPEG noise reduction The MPEG noise reduction feature allows you... available selections are Off, Low, Middle, and High. To revert to the factory defaults, highlight Reset and press T. Auto will reduce the noise in step 4 above. 6 To save the new settings, highlight Done and press T. Note: If you prefer (Cool, Medium, or Warm). 5 Press...

Owner's Manual - English
Page 56
... the ANT/CABLE input is selected. To turn the TV off Game Mode: Select Off in Step 2 above , change the ColorMaster setting, the picture mode automatically changes to On. Color Adjustment Red Hue 0 - + Saturation 0 - + Brightness 0 - + Reset 4 Press B or b to select either Hue, ...video input, or turn on again. page 34). 56 Chapter 7: Using the TV's advanced features Using the ColorMaster™ feature The ColorMaster feature allows you to adjust the setting. To reset ColorMaster to select On, and press T. This feature is selected, the list of...
... the ANT/CABLE input is selected. To turn the TV off Game Mode: Select Off in Step 2 above , change the ColorMaster setting, the picture mode automatically changes to On. Color Adjustment Red Hue 0 - + Saturation 0 - + Brightness 0 - + Reset 4 Press B or b to select either Hue, ...video input, or turn on again. page 34). 56 Chapter 7: Using the TV's advanced features Using the ColorMaster™ feature The ColorMaster feature allows you to adjust the setting. To reset ColorMaster to select On, and press T. This feature is selected, the list of...
Owner's Manual - English
Page 57
... CableClear®/DNR feature to AUTO to reset the TV. Replace the batteries or try . For device connection details, see Chapter 2. • Antenna reception may be sure to an external A/V device (e.g., DVD player, video game system, set to the picture. - page 20). • Do not connect both types of video...; If you hear no picture will not turn off -air broadcast or Cable TV), you can set to inform them of this issue. page 44). • If you are slightly out of sync. TV stops responding to controls • If the TV stops responding to the controls on the remote control or...
... CableClear®/DNR feature to AUTO to reset the TV. Replace the batteries or try . For device connection details, see Chapter 2. • Antenna reception may be sure to an external A/V device (e.g., DVD player, video game system, set to the picture. - page 20). • Do not connect both types of video...; If you hear no picture will not turn off -air broadcast or Cable TV), you can set to inform them of this issue. page 44). • If you are slightly out of sync. TV stops responding to controls • If the TV stops responding to the controls on the remote control or...

Owner's Manual - English
Page 58
... is available for Toshiba REGZA-LINK compatible devices. • Make sure the HDMI cables with the HDMI Logo ( ) are connected, REGZA-LINK feature may be dead. Please try to set to new standard adoption. page 19). • Your TV remote control may have changed settings of legacy HDMI ... not work correctly after you are still unable to determine its available features. page 46). pages 21-25). • If the TV still does not act as expected, use the Reset Factory Defaults procedure (- page 47). • If you have been erased from the channel list (- Also see...
... is available for Toshiba REGZA-LINK compatible devices. • Make sure the HDMI cables with the HDMI Logo ( ) are connected, REGZA-LINK feature may be dead. Please try to set to new standard adoption. page 19). • Your TV remote control may have changed settings of legacy HDMI ... not work correctly after you are still unable to determine its available features. page 46). pages 21-25). • If the TV still does not act as expected, use the Reset Factory Defaults procedure (- page 47). • If you have been erased from the channel list (- Also see...


