Brochure
Page 2
...all HDMI® w/ CEC functions may not work even if your Toshiba television, always use a UL Listed wall bracket appropriate for the ... 2 Ports • USB Media: 1 • High Definition PC Input: 1 • 3.5mm PC Audio Input: 1 • Analog Audio Output: 1 • ColorStream® Component Video: 1 • Composite: 1 Product and Packaging •...Dimensions: 31.2"x 21.8"x 9.6" • Weight: 19.8 lbs. - Packaging • Dimensions: 34.4"x 23"x 7.4" • Weight: 28.7 lbs. 32C120U S P E C I F I C AT I O N S1 Screen Size: 32" • Diagonal Screen Size: 31.5" Panel • ...
...all HDMI® w/ CEC functions may not work even if your Toshiba television, always use a UL Listed wall bracket appropriate for the ... 2 Ports • USB Media: 1 • High Definition PC Input: 1 • 3.5mm PC Audio Input: 1 • Analog Audio Output: 1 • ColorStream® Component Video: 1 • Composite: 1 Product and Packaging •...Dimensions: 31.2"x 21.8"x 9.6" • Weight: 19.8 lbs. - Packaging • Dimensions: 34.4"x 23"x 7.4" • Weight: 28.7 lbs. 32C120U S P E C I F I C AT I O N S1 Screen Size: 32" • Diagonal Screen Size: 31.5" Panel • ...
User Guide
Page 7
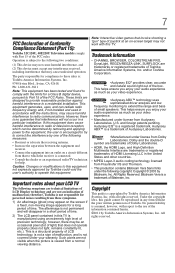
...not cause harmful interference, and (2) This device must accept any form without the prior written permission of Toshiba. This helps ensure you enjoy your audio experience as much as your video experience. • Manufactured under license from Fraunhofer IIS and Thomson. ...audio experience as much as your video experience. •Audyssey ABX™ technology uses sophisticated driver analysis and low frequency monitoring to these symptoms. 1) An afterimage (ghost) may cause undesired operation. 7 FCC Declaration of Conformity Compliance Statement (Part 15): Toshiba 32C120U...
...not cause harmful interference, and (2) This device must accept any form without the prior written permission of Toshiba. This helps ensure you enjoy your audio experience as much as your video experience. • Manufactured under license from Fraunhofer IIS and Thomson. ...audio experience as much as your video experience. •Audyssey ABX™ technology uses sophisticated driver analysis and low frequency monitoring to these symptoms. 1) An afterimage (ghost) may cause undesired operation. 7 FCC Declaration of Conformity Compliance Statement (Part 15): Toshiba 32C120U...
User Guide
Page 9
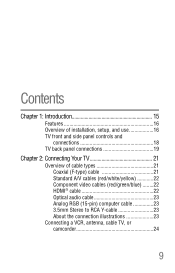
Contents Chapter 1: Introduction 15 Features 16 Overview of installation, setup, and use 16 TV front and side panel controls and connections 18 TV back panel connections 19 Chapter 2: Connecting Your TV 21 Overview of cable types 21 Coaxial (F-type) cable 21 Standard A/V cables (red/white/yellow 22 Component video cables (red/green/blue) ........22 HDMI® cable 22 Optical audio cable 23 Analog RGB (15-pin) computer cable 23 3.5mm Stereo to RCA Y-cable 23 About the connection illustrations 23 Connecting a VCR, antenna, cable TV, or camcorder 24 9
Contents Chapter 1: Introduction 15 Features 16 Overview of installation, setup, and use 16 TV front and side panel controls and connections 18 TV back panel connections 19 Chapter 2: Connecting Your TV 21 Overview of cable types 21 Coaxial (F-type) cable 21 Standard A/V cables (red/white/yellow 22 Component video cables (red/green/blue) ........22 HDMI® cable 22 Optical audio cable 23 Analog RGB (15-pin) computer cable 23 3.5mm Stereo to RCA Y-cable 23 About the connection illustrations 23 Connecting a VCR, antenna, cable TV, or camcorder 24 9
User Guide
Page 10
...VCR, and a satellite receiver 25 Connecting an HDMI® or DVI device to the HDMI® input 26 REGZA-LINK® connection 29 Connecting a digital audio system 30 Connecting a computer 32 Connecting a computer to the TV's PC IN terminal 32 Connection to the TV's HDMI® terminal............33 Chapter 3: Using the...44 Storing channels in memory (optional 46 Auto Tuning 46 Setting channel skip 48 Setting AV Input mode 50 Setting the HDMI® audio mode 50 Viewing the digital signal meter 51 Setting the time zone 52 Viewing the system status 52 Resetting Factory Defaults 53
...VCR, and a satellite receiver 25 Connecting an HDMI® or DVI device to the HDMI® input 26 REGZA-LINK® connection 29 Connecting a digital audio system 30 Connecting a computer 32 Connecting a computer to the TV's PC IN terminal 32 Connection to the TV's HDMI® terminal............33 Chapter 3: Using the...44 Storing channels in memory (optional 46 Auto Tuning 46 Setting channel skip 48 Setting AV Input mode 50 Setting the HDMI® audio mode 50 Viewing the digital signal meter 51 Setting the time zone 52 Viewing the system status 52 Resetting Factory Defaults 53

User Guide
Page 12
... Muting the sound 76 Using the digital audio selector 76 Selecting stereo/SAP broadcasts 77 Adjusting the audio quality 78 Audyssey ABX 79 Stable Sound 79 Selecting the optical audio output format .........79 Using the Dolby® Digital Dynamic Range Control feature 80 Using the Locks menu 80 Entering the PIN ... feature 87 Locking channels 87 Using the GameTimer 88 Using the panel lock feature 89 Using the PC settings feature 90 Setting the PC Audio 91 Using the Media Player 92 Auto Start function 93 To open the Media Player 93 Viewing photo files 95 Playing music files 96 ...
... Muting the sound 76 Using the digital audio selector 76 Selecting stereo/SAP broadcasts 77 Adjusting the audio quality 78 Audyssey ABX 79 Stable Sound 79 Selecting the optical audio output format .........79 Using the Dolby® Digital Dynamic Range Control feature 80 Using the Locks menu 80 Entering the PIN ... feature 87 Locking channels 87 Using the GameTimer 88 Using the panel lock feature 89 Using the PC settings feature 90 Setting the PC Audio 91 Using the Media Player 92 Auto Start function 93 To open the Media Player 93 Viewing photo files 95 Playing music files 96 ...
User Guide
Page 14
... 118 Channel coverage 118 Power source 119 Power maximum current 119 Power consumption 119 Audio power 119 Speaker type 119 Video/audio terminals 119 Video/audio input 119 ColorStream® (component video) HD input 120 HDMI® input 120 Digital audio output 120 PC input 120 Dimensions 120 Mass (weight 120 Operating conditions 121...
... 118 Channel coverage 118 Power source 119 Power maximum current 119 Power consumption 119 Audio power 119 Speaker type 119 Video/audio terminals 119 Video/audio input 119 ColorStream® (component video) HD input 120 HDMI® input 120 Digital audio output 120 PC input 120 Dimensions 120 Mass (weight 120 Operating conditions 121...
User Guide
Page 16
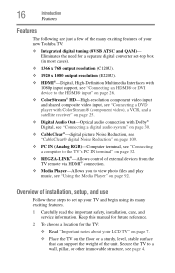
...view photo files and play music, see page 4. Eliminates the need for the TV: ❖ Read "Important notes about your new Toshiba TV: ❖ Integrated digital tuning (8VSB ATSC and QAM)- 16 Introduction Features Features The following are just a few of the ...player with ColorStream® (component video), a VCR, and a satellite receiver" on page 25. ❖ Digital Audio Out-Optical audio connection with Dolby® Digital, see "Connecting a digital audio system" on page 30. ❖ CableClear®-digital picture Noise Reduction, see "CableClear® digital Noise Reduction...
...view photo files and play music, see page 4. Eliminates the need for the TV: ❖ Read "Important notes about your new Toshiba TV: ❖ Integrated digital tuning (8VSB ATSC and QAM)- 16 Introduction Features Features The following are just a few of the ...player with ColorStream® (component video), a VCR, and a satellite receiver" on page 25. ❖ Digital Audio Out-Optical audio connection with Dolby® Digital, see "Connecting a digital audio system" on page 30. ❖ CableClear®-digital picture Noise Reduction, see "CableClear® digital Noise Reduction...
User Guide
Page 19
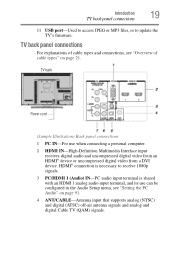
...and analog and digital Cable TV (QAM) signals. TV back panel connections For explanations of cable types and connections, see "Setting the PC Audio" on page 21. HDMI® connection is necessary to update the TV's firmware. Introduction 19 TV back panel connections 11 USB port-Used... to access JPEG or MP3 files, or to receive 1080p signals. 3 PC/HDMI 1 (Audio) IN-PC audio input terminal is shared with an HDMI 1 analog audio input terminal, and its use when connecting a personal computer. 2 HDMI IN-High-Definition Multimedia Interface input receives digital...
...and analog and digital Cable TV (QAM) signals. TV back panel connections For explanations of cable types and connections, see "Setting the PC Audio" on page 21. HDMI® connection is necessary to update the TV's firmware. Introduction 19 TV back panel connections 11 USB port-Used... to access JPEG or MP3 files, or to receive 1080p signals. 3 PC/HDMI 1 (Audio) IN-PC audio input terminal is shared with an HDMI 1 analog audio input terminal, and its use when connecting a personal computer. 2 HDMI IN-High-Definition Multimedia Interface input receives digital...
User Guide
Page 20
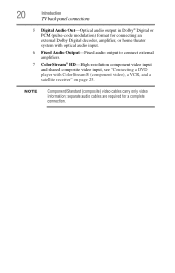
... are required for connecting an external Dolby Digital decoder, amplifier, or home theater system with optical audio input. 6 Fixed Audio Output-Fixed audio output to connect external amplifiers. 7 ColorStream® HD-High-resolution component video input and shared composite video input, see "Connecting a... receiver" on page 25. NOTE Component/Standard (composite) video cables carry only video information; 20 Introduction TV back panel connections 5 Digital Audio Out-Optical audio output in Dolby® Digital or PCM (pulse-code modulation) format for a complete connection.
... are required for connecting an external Dolby Digital decoder, amplifier, or home theater system with optical audio input. 6 Fixed Audio Output-Fixed audio output to connect external amplifiers. 7 ColorStream® HD-High-resolution component video input and shared composite video input, see "Connecting a... receiver" on page 25. NOTE Component/Standard (composite) video cables carry only video information; 20 Introduction TV back panel connections 5 Digital Audio Out-Optical audio output in Dolby® Digital or PCM (pulse-code modulation) format for a complete connection.
User Guide
Page 21
Chapter 2 Connecting Your TV Overview of cable types Before purchasing cables, know the connector types your TV. 21 Coaxial (F-type) cable (Sample Illustration) Coaxial cable Coaxial (F-type) cable connects to your antenna, cable TV service, and/or cable converter box to the ANT/CABLE input on your devices require. You can purchase cables from most stores that sell audio/video devices.
Chapter 2 Connecting Your TV Overview of cable types Before purchasing cables, know the connector types your TV. 21 Coaxial (F-type) cable (Sample Illustration) Coaxial cable Coaxial (F-type) cable connects to your antenna, cable TV service, and/or cable converter box to the ANT/CABLE input on your devices require. You can purchase cables from most stores that sell audio/video devices.
User Guide
Page 22
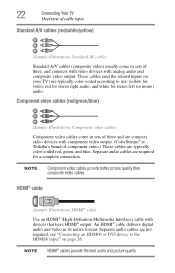
...) Component video cables Component video cables come in sets of component video.) These cables are required for stereo left (or mono) audio. NOTE Component video cables provide better picture quality than composite video cables. 22 Connecting Your TV Overview of cable types Standard A/V cables...three and are connects video devices with component video output. (ColorStream® is Toshiba's brand of three, and connects with video devices with devices that have HDMI® output. Separate audio cables are typically color-coded according to the HDMI® input" on your TV...
...) Component video cables Component video cables come in sets of component video.) These cables are required for stereo left (or mono) audio. NOTE Component video cables provide better picture quality than composite video cables. 22 Connecting Your TV Overview of cable types Standard A/V cables...three and are connects video devices with component video output. (ColorStream® is Toshiba's brand of three, and connects with video devices with devices that have HDMI® output. Separate audio cables are typically color-coded according to the HDMI® input" on your TV...
User Guide
Page 23
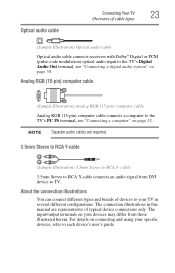
... Connecting Your TV 23 Overview of cable types (Sample Illustration) Optical audio cable Optical audio cable connects receivers with Dolby® Digital or PCM (pulse-code modulation) optical audio input to the TV's Digital Audio Out terminal, see "Connecting a computer" on page 30. The connection illustrations in this manual are required. 3.5mm Stereo to...
... Connecting Your TV 23 Overview of cable types (Sample Illustration) Optical audio cable Optical audio cable connects receivers with Dolby® Digital or PCM (pulse-code modulation) optical audio input to the TV's Digital Audio Out terminal, see "Connecting a computer" on page 30. The connection illustrations in this manual are required. 3.5mm Stereo to...
User Guide
Page 24
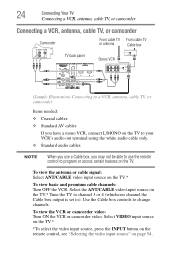
... L R VIDEO TV back panel From cable TV From cable TV or antenna Cable box Stereo VCR IN CH 3 CH 4 OUT VIDEO AUDIO L R IN CH 3 CH 4 OUT L R IN from ANT OUT to TV (Sample Illustration) Connecting to a VCR, antenna, cable TV, or camcorder Items needed: ❖ Coaxial cables &#...10070; Standard AV cables If you have a mono VCR, connect L/MONO on the TV to your VCR's audio out terminal using the white audio cable only. ❖ Standard audio cables NOTE When you use a Cable box, you may not be able to use the remote control to change channels. To...
... L R VIDEO TV back panel From cable TV From cable TV or antenna Cable box Stereo VCR IN CH 3 CH 4 OUT VIDEO AUDIO L R IN CH 3 CH 4 OUT L R IN from ANT OUT to TV (Sample Illustration) Connecting to a VCR, antenna, cable TV, or camcorder Items needed: ❖ Coaxial cables &#...10070; Standard AV cables If you have a mono VCR, connect L/MONO on the TV to your VCR's audio out terminal using the white audio cable only. ❖ Standard audio cables NOTE When you use a Cable box, you may not be able to use the remote control to change channels. To...
User Guide
Page 25
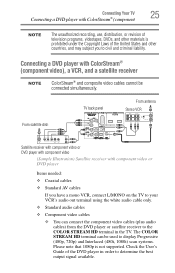
... DVDs, and other countries, and may subject you have a mono VCR, connect L/MONO on the TV to your VCR's audio out terminal using the white audio cable only. ❖ Standard audio cables ❖ Component video cables ❖ You can be connected simultaneously. Connecting a DVD player with component video or DVD ...'s Guide of the United States and other materials is not supported. From satellite dish TV back panel From antenna Stereo VCR VIDEO AUDIO L R IN CH 3 CH 4 OUT L R IN from ANT OUT to TV Y PB PR Satellite IN COMPONENT VIDEO S-VIDEO VIDEO OUT OUT...
... DVDs, and other countries, and may subject you have a mono VCR, connect L/MONO on the TV to your VCR's audio out terminal using the white audio cable only. ❖ Standard audio cables ❖ Component video cables ❖ You can be connected simultaneously. Connecting a DVD player with component video or DVD ...'s Guide of the United States and other materials is not supported. From satellite dish TV back panel From antenna Stereo VCR VIDEO AUDIO L R IN CH 3 CH 4 OUT L R IN from ANT OUT to TV Y PB PR Satellite IN COMPONENT VIDEO S-VIDEO VIDEO OUT OUT...
User Guide
Page 26
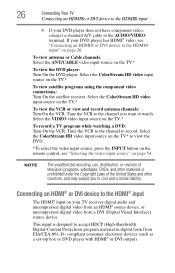
... 26. This input is prohibited under the Copyright Laws of the United States and other materials is designed to record. If your TV receives digital audio and uncompressed digital video from an HDMI® source device, or uncompressed digital video from EIA/CEA-861-D- Tune the VCR to the channel to... electronic devices (such as a set-top box or DVD player with HDMI® or DVI output). Connecting an HDMI® or DVI device to the AUDIO/VIDEO terminal. 26 Connecting Your TV Connecting an HDMI® or DVI device to the HDMI® input ❖ If your DVD player does not...
... 26. This input is prohibited under the Copyright Laws of the United States and other materials is designed to record. If your TV receives digital audio and uncompressed digital video from an HDMI® source device, or uncompressed digital video from EIA/CEA-861-D- Tune the VCR to the channel to... electronic devices (such as a set-top box or DVD player with HDMI® or DVI output). Connecting an HDMI® or DVI device to the AUDIO/VIDEO terminal. 26 Connecting Your TV Connecting an HDMI® or DVI device to the HDMI® input ❖ If your DVD player does not...
User Guide
Page 27
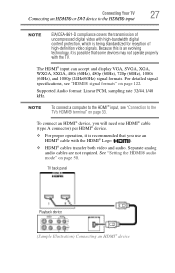
...can accept and display VGA, SVGA, XGA, WXGA, SXGA, 480i (60Hz), 480p (60Hz), 720p (60Hz), 1080i (60Hz), and 1080p (24Hz/60Hz) signal formats. Supported Audio format: Linear PCM, sampling rate 32/44.1/48 kHz. TV back panel Playback device (Sample Illustration) Connecting an HDMI® device Separate analog...page 33. NOTE To connect a computer to the HDMI® input, see "HDMI® signal formats" on page 50. See "Setting the HDMI® audio mode" on page 122. Connecting Your TV 27 Connecting an HDMI® or DVI device to the HDMI® input NOTE EIA/CEA-861-D compliance...
...can accept and display VGA, SVGA, XGA, WXGA, SXGA, 480i (60Hz), 480p (60Hz), 720p (60Hz), 1080i (60Hz), and 1080p (24Hz/60Hz) signal formats. Supported Audio format: Linear PCM, sampling rate 32/44.1/48 kHz. TV back panel Playback device (Sample Illustration) Connecting an HDMI® device Separate analog...page 33. NOTE To connect a computer to the HDMI® input, see "HDMI® signal formats" on page 50. See "Setting the HDMI® audio mode" on page 122. Connecting Your TV 27 Connecting an HDMI® or DVI device to the HDMI® input NOTE EIA/CEA-861-D compliance...
User Guide
Page 28
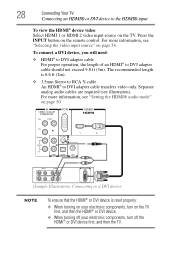
... on your electronic components, turn on the TV. Press the INPUT button on page 54. For more information, see "Setting the HDMI® audio mode" on page 50 VIDEO AUDIO L R IN IN DVI / HDCP OUT OUT L R (Sample Illustration) Connecting to the HDMI® input To view the HDMI® device video: Select... DVI device is 6.6 ft (2m). ❖ 3.5mm Stereo to RCA Y-cable An HDMI® to DVI adapter cable should not exceed 9.8 ft (3m). Separate analog audio cables are required (see "Selecting the video input source" on the remote control.
... on your electronic components, turn on the TV. Press the INPUT button on page 54. For more information, see "Setting the HDMI® audio mode" on page 50 VIDEO AUDIO L R IN IN DVI / HDCP OUT OUT L R (Sample Illustration) Connecting to the HDMI® input To view the HDMI® device video: Select... DVI device is 6.6 ft (2m). ❖ 3.5mm Stereo to RCA Y-cable An HDMI® to DVI adapter cable should not exceed 9.8 ft (3m). Separate analog audio cables are required (see "Selecting the video input source" on the remote control.
User Guide
Page 29
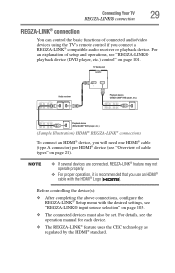
...connected, REGZA-LINK® feature may not operate properly. ❖ For proper operation, it is recommended that you connect a REGZA-LINK® compatible audio receiver or playback device. For an explanation of cable types" on page 21). For details, see "REGZA-LINK® playback device (DVD player,...if you use an HDMI® cable with the desired settings, see "REGZA-LINK® input source selection" on page 101. TV back panel Audio receiver Playback device (REGZA-LINK® DVD player, etc.) Playback device (REGZA-LINK® DVD player, etc.) (Sample Illustration) HDMI® ...
...connected, REGZA-LINK® feature may not operate properly. ❖ For proper operation, it is recommended that you connect a REGZA-LINK® compatible audio receiver or playback device. For an explanation of cable types" on page 21). For details, see "REGZA-LINK® playback device (DVD player,...if you use an HDMI® cable with the desired settings, see "REGZA-LINK® input source selection" on page 101. TV back panel Audio receiver Playback device (REGZA-LINK® DVD player, etc.) Playback device (REGZA-LINK® DVD player, etc.) (Sample Illustration) HDMI® ...
User Guide
Page 30
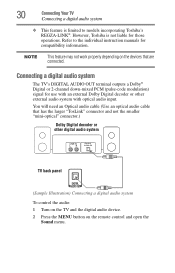
... and open the Sound menu. Connecting a digital audio system The TV's DIGITAL AUDIO OUT terminal outputs a Dolby® Digital or 2-channel down-mixed PCM (pulse-code modulation) signal for those operations. However, Toshiba is limited to the individual instruction manuals for compatibility... information. Refer to models incorporating Toshiba's REGZA-LINK®. You will need an Optical audio cable (Use an optical audio cable that are connected. 30 Connecting Your TV Connecting a digital audio system ❖ This feature is not liable for...
... and open the Sound menu. Connecting a digital audio system The TV's DIGITAL AUDIO OUT terminal outputs a Dolby® Digital or 2-channel down-mixed PCM (pulse-code modulation) signal for those operations. However, Toshiba is limited to the individual instruction manuals for compatibility... information. Refer to models incorporating Toshiba's REGZA-LINK®. You will need an Optical audio cable (Use an optical audio cable that are connected. 30 Connecting Your TV Connecting a digital audio system ❖ This feature is not liable for...

User Guide
Page 31
... terminal may damage speakers or headphones. To revert to select either Dolby Digital or PCM, depending on your device, see "Selecting the optical audio output format" on page 79. (Sample Image) Digital Output Format screen 6 To save the new settings, highlight Done, and then press the ... Optical Output Format. 5 Press the ( / arrow) buttons to the factory defaults, highlight Reset, and then press the ENTER button. NOTE ❖ Some audio systems may not be compatible with standard optical out signals may not work properly, creating a high noise level that may not output some digital...
... terminal may damage speakers or headphones. To revert to select either Dolby Digital or PCM, depending on your device, see "Selecting the optical audio output format" on page 79. (Sample Image) Digital Output Format screen 6 To save the new settings, highlight Done, and then press the ... Optical Output Format. 5 Press the ( / arrow) buttons to the factory defaults, highlight Reset, and then press the ENTER button. NOTE ❖ Some audio systems may not be compatible with standard optical out signals may not work properly, creating a high noise level that may not output some digital...


