
Owners Manual
Page 2
... side panel controls 9 TV back panel connections 10 Learning about the remote control 11 Turning the TV on ...12 Learning about the menu system 12 Watching TV programs 13 Programming channels into the TV's channel memory 14 Using the TV's features Picture adjustment 16 Sound adjustment 20 Using the bass boost (Using the remote control 21 Other features settings 22 Selecting the video input source to view 23 Teletext ...23 Connecting your TV Back connections ...26 Connecting an HDMI or a DVI device 26 Selecting the PC/HDMI audio mode 28 Setting the HDMI audio mode...
... side panel controls 9 TV back panel connections 10 Learning about the remote control 11 Turning the TV on ...12 Learning about the menu system 12 Watching TV programs 13 Programming channels into the TV's channel memory 14 Using the TV's features Picture adjustment 16 Sound adjustment 20 Using the bass boost (Using the remote control 21 Other features settings 22 Selecting the video input source to view 23 Teletext ...23 Connecting your TV Back connections ...26 Connecting an HDMI or a DVI device 26 Selecting the PC/HDMI audio mode 28 Setting the HDMI audio mode...
Owners Manual
Page 3
... earthing connection. • Never remove the earthing pin on a shaky table, incline or location subject to a main socket outlet with a three pin earthing-type power plug. Installation 2) Never insert or remove the power plug with E model: 220-240V, AC 50/60Hz, T model: 110-240V, AC 50/60Hz and Y model: 220240V, AC 50Hz. Never use the exciting features of your new TV. • Instructions in this plug is poor...
... earthing connection. • Never remove the earthing pin on a shaky table, incline or location subject to a main socket outlet with a three pin earthing-type power plug. Installation 2) Never insert or remove the power plug with E model: 220-240V, AC 50/60Hz, T model: 110-240V, AC 50/60Hz and Y model: 220240V, AC 50Hz. Never use the exciting features of your new TV. • Instructions in this plug is poor...
Owners Manual
Page 7
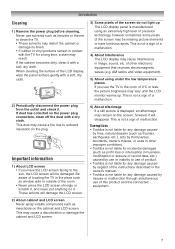
... LCD screen • If you use of the instructions described in other electronic equipment that receives electromagnetic waves (e.g. This may cause a discoloration or damage the cabinet and LCD screen. 3) Some pixels of the LCD display, wipe the panel surface gently with a soft, dry cloth. 2) Periodically disconnect the power plug from the outlet and check it with a soft, dry cloth. Exemptions • Toshiba is...
... LCD screen • If you use of the instructions described in other electronic equipment that receives electromagnetic waves (e.g. This may cause a discoloration or damage the cabinet and LCD screen. 3) Some pixels of the LCD display, wipe the panel surface gently with a soft, dry cloth. 2) Periodically disconnect the power plug from the outlet and check it with a soft, dry cloth. Exemptions • Toshiba is...
Owners Manual
Page 8
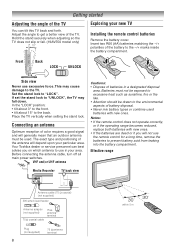
... compartment. Set the stand lock to the back. Place the TV vertically when setting the stand lock. Before connecting the antenna cable, turn off all main power switches. VHF and/or UHF antenna Cautions: • Dispose of the antenna will depend upon your new TV Installing the remote control batteries Remove the battery cover. The exact type and positioning of batteries in your area. Batteries must be drawn to use excessive force...
... compartment. Set the stand lock to the back. Place the TV vertically when setting the stand lock. Before connecting the antenna cable, turn off all main power switches. VHF and/or UHF antenna Cautions: • Dispose of the antenna will depend upon your new TV Installing the remote control batteries Remove the battery cover. The exact type and positioning of batteries in your area. Batteries must be drawn to use excessive force...
Owners Manual
Page 9
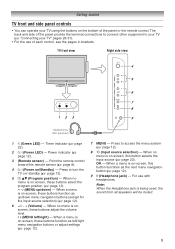
... menu is on -screen, this remote sensor (- OK - TV front view Right side view 4 5 6 7 8 123 9 Headphones (Not supplied) 1 4 (Green LED) - Power indicator (page 12). 3 (Remote sensor) - page 8). 4 ! (Power on screen, these buttons adjust the volume level. The back and side of the panel or the remote control. "Connecting your TV (- page 22). 2 ! (Power LED) - When no menu is being used, the sound from all speakers will be muted. 9 page 12). 9 D (Headphone jack) - page 12). 8 o (Input source selection) - Timer indicator (- page 12). 5 p Bb (Program...
... menu is on -screen, this remote sensor (- OK - TV front view Right side view 4 5 6 7 8 123 9 Headphones (Not supplied) 1 4 (Green LED) - Power indicator (page 12). 3 (Remote sensor) - page 8). 4 ! (Power on screen, these buttons adjust the volume level. The back and side of the panel or the remote control. "Connecting your TV (- page 22). 2 ! (Power LED) - When no menu is being used, the sound from all speakers will be muted. 9 page 12). 9 D (Headphone jack) - page 12). 8 o (Input source selection) - Timer indicator (- page 12). 5 p Bb (Program...
Owners Manual
Page 10
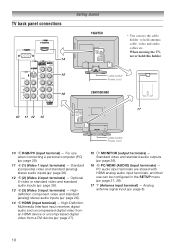
... audio outputs (- TV back panel connections Getting started 19AV550 14 * You can be configured in the SETUP menu (- For use the cable holder to hold this holder. 15 Cable holder* Power cord 16 26AV550/600 17 10 11 12 13 Cable holder* Power cord 10 o RGB/PC (input terminal) - Analog antenna signal input (- Optional S-video or standard video and standard audio inputs (- page 26). 13 o (3) (Video 3 input terminals) - page 26). 16 o PC/HDMI (AUDIO) (input terminals) - page 29). 11 o (1) (Video 1 input terminals) - page 26). 14 o HDMI (input...
... audio outputs (- TV back panel connections Getting started 19AV550 14 * You can be configured in the SETUP menu (- For use the cable holder to hold this holder. 15 Cable holder* Power cord 16 26AV550/600 17 10 11 12 13 Cable holder* Power cord 10 o RGB/PC (input terminal) - Analog antenna signal input (- Optional S-video or standard video and standard audio inputs (- page 26). 13 o (3) (Video 3 input terminals) - page 26). 16 o PC/HDMI (AUDIO) (input terminals) - page 29). 11 o (1) (Video 1 input terminals) - page 26). 14 o HDMI (input...
Owners Manual
Page 11
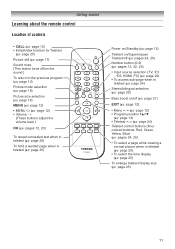
... 24, 25) Number button (0-9) (- Getting started Learning about the remote control Location of controls • CALL (- page 18) Picture size selection (- page 25) CALL TEXT 123 456 789 0 MENU EXIT P OK P CT-90323 Power on /Superimpose Teletext/off (- pages 13, 22, 24) • Input source selection (TV, o1 - page 24) Stereo/bilingual selection (- page 13) • Teletext U u (- page 24) Teletext control buttons (Four colored buttons: Red, Green, Yellow, Blue...
... 24, 25) Number button (0-9) (- Getting started Learning about the remote control Location of controls • CALL (- page 18) Picture size selection (- page 25) CALL TEXT 123 456 789 0 MENU EXIT P OK P CT-90323 Power on /Superimpose Teletext/off (- pages 13, 22, 24) • Input source selection (TV, o1 - page 24) Stereo/bilingual selection (- page 13) • Teletext U u (- page 24) Teletext control buttons (Four colored buttons: Red, Green, Yellow, Blue...
Owners Manual
Page 12
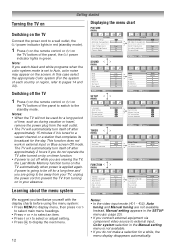
... to be off the TV 1 Press 1 on in the Manual setting menu is tuned to be used for the day. on the TV bottom of time, such as during vacation or travel, remove the power plug from turning on the remote control or ! page 23). • If you connect external equipment via component video source to external input, Color system selection in your TV, unplug the power cord to a wall outlet, the ! power indicator lights in the SETUP menu (-
... to be off the TV 1 Press 1 on in the Manual setting menu is tuned to be used for the day. on the TV bottom of time, such as during vacation or travel, remove the power plug from turning on the remote control or ! page 23). • If you connect external equipment via component video source to external input, Color system selection in your TV, unplug the power cord to a wall outlet, the ! power indicator lights in the SETUP menu (-
Owners Manual
Page 13
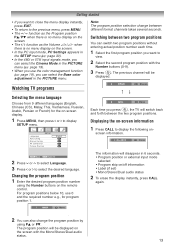
... Base color adjustment in the PICTURE menu (- The previous channel will disappear in the SETUP menu (- Displaying the on-screen information 1 Press CALL to display the following on the remote control. Watching TV programs Selecting the menu language Choose from 9 different languages (English, Chinese (CS), Malay, Thai, Vietnamese, Russian, Arabic, Persian or French) for program position 1. when there is no menu display on the screen. • In the PC input mode, PC Settings...
... Base color adjustment in the PICTURE menu (- The previous channel will disappear in the SETUP menu (- Displaying the on-screen information 1 Press CALL to display the following on the remote control. Watching TV programs Selecting the menu language Choose from 9 different languages (English, Chinese (CS), Malay, Thai, Vietnamese, Russian, Arabic, Persian or French) for program position 1. when there is no menu display on the screen. • In the PC input mode, PC Settings...
Owners Manual
Page 14
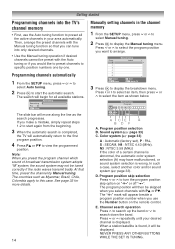
... color and/or sound system (- D. E. Press u or U repeatedly until your area automatically. When a station/satellite is completed, the TV will appear beside a program position number when you can tune into the TV's channel memory • First, use the Number button on "8" or off "(". Getting started Programming channels into only desired channels. • Use the Manual tuning operation if desired channels cannot be displayed. Program position selection B. page 33) A : Automatic (factory set...
... color and/or sound system (- D. E. Press u or U repeatedly until your area automatically. When a station/satellite is completed, the TV will appear beside a program position number when you can tune into the TV's channel memory • First, use the Number button on "8" or off "(". Getting started Programming channels into only desired channels. • Use the Manual tuning operation if desired channels cannot be displayed. Program position selection B. page 33) A : Automatic (factory set...
Owners Manual
Page 17
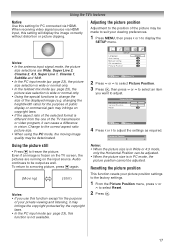
... antenna input signal mode, the picture size selections are running on the input source. Change to be deteriorated. Audio continues to the correct aspect ratio picture size. • When using the PC mode, the moving picture, press r again. (Moving) (Still) Notes: • If you want to display the SETUP menu. Picture Position Horizontal Position 0 Ver tical Position 0 Reset OK MENU Back EXIT Watch TV 4 Press I or i to adjust. page 23), this setting for PC connected...
... antenna input signal mode, the picture size selections are running on the input source. Change to be deteriorated. Audio continues to the correct aspect ratio picture size. • When using the PC mode, the moving picture, press r again. (Moving) (Still) Notes: • If you want to display the SETUP menu. Picture Position Horizontal Position 0 Ver tical Position 0 Reset OK MENU Back EXIT Watch TV 4 Press I or i to adjust. page 23), this setting for PC connected...
Owners Manual
Page 19
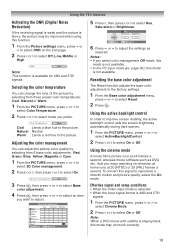
... input mode (- page 30), this mode is not available. Note: When a DVD movie with subtitle is playing back, this mode may be improved when using this signal to select Reset. 2 Press Q. Using the TV's features Activating the DNR (Digital Noise Reduction) If the receiving signal is weak and the picture is blurry, the picture may not work correctly. 19 Resetting the base color adjustment The Reset function adjusts the base color adjustment to the factory settings. 1 From the Base color adjustment menu...
... input mode (- page 30), this mode is not available. Note: When a DVD movie with subtitle is playing back, this mode may be improved when using this signal to select Reset. 2 Press Q. Using the TV's features Activating the DNR (Digital Noise Reduction) If the receiving signal is weak and the picture is blurry, the picture may not work correctly. 19 Resetting the base color adjustment The Reset function adjusts the base color adjustment to the factory settings. 1 From the Base color adjustment menu...
Owners Manual
Page 23
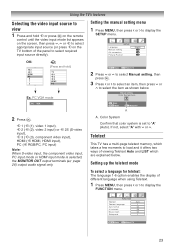
Setting the manual setting menu 1 Press MENU, then press I or i to display the FUNCTION menu. Color System Confirm that color system is selected, the MONITOR OUT output terminals (- SETUP Language Manual setting AV connection Picture Position English OK OK OK OK: 2 3 HDMI PC 0 1 2 (Press and hold o or press Q on the remote control until the video input mode list appears on the screen, then press u, U or o to select appropriate input source (or press o on the TV bottom...
Setting the manual setting menu 1 Press MENU, then press I or i to display the FUNCTION menu. Color System Confirm that color system is selected, the MONITOR OUT output terminals (- SETUP Language Manual setting AV connection Picture Position English OK OK OK OK: 2 3 HDMI PC 0 1 2 (Press and hold o or press Q on the remote control until the video input mode list appears on the screen, then press u, U or o to select appropriate input source (or press o on the TV bottom...
Owners Manual
Page 24
... colored button. In Auto mode, this chosen page, if there are sub-pages they will be cancelled. LIST will display FASTEXT, if available. To access any page simply by entering a 3-digit number, using the Number buttons on the remote control. When you first press TEXT to access the text service, the first page you wish to change between Auto and LIST, see 4 colored titles at the base of the TV screen...
... colored button. In Auto mode, this chosen page, if there are sub-pages they will be cancelled. LIST will display FASTEXT, if available. To access any page simply by entering a 3-digit number, using the Number buttons on the remote control. When you first press TEXT to access the text service, the first page you wish to change between Auto and LIST, see 4 colored titles at the base of the TV screen...
Owners Manual
Page 26
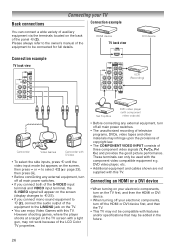
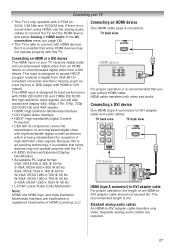
... the TV screen with S-Video • To select the side inputs, press o until the video input mode list appears on the screen, then press u or U to select o2 (- HDMI device TV back view DVI device Connection example TV back view VCR (Recording) Camcorder Video Games Camcorder with a light gun, may not work because of the panel o (2). Set Top Box DVD video player (with the component video compatible equipment e.g. These terminals can only be added in the future. 26 Please...
... the TV screen with S-Video • To select the side inputs, press o until the video input mode list appears on the screen, then press u or U to select o2 (- HDMI device TV back view DVI device Connection example TV back view VCR (Recording) Camcorder Video Games Camcorder with a light gun, may not work because of the panel o (2). Set Top Box DVD video player (with the component video compatible equipment e.g. These terminals can only be added in the future. 26 Please...
Owners Manual
Page 27
... connect the TV and the HDMI device, and select Analog in digital from a DVI device. Connecting your TV • This TV is only operable with L-PCM on your TV receives digital audio and uncompressed digital video from an HDMI device or uncompressed digital video from CEA-861-D compliant consumer electronic devices (such as a set top box or DVD player with the TV. • E-EDID: Enhanced-Extended Display Identification • Acceptable PC signal format: VGA: VESA...
... connect the TV and the HDMI device, and select Analog in digital from a DVI device. Connecting your TV • This TV is only operable with L-PCM on your TV receives digital audio and uncompressed digital video from an HDMI device or uncompressed digital video from CEA-861-D compliant consumer electronic devices (such as a set top box or DVD player with the TV. • E-EDID: Enhanced-Extended Display Identification • Acceptable PC signal format: VGA: VESA...
Owners Manual
Page 28
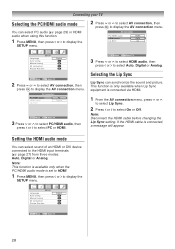
... connection PC/HDMI audio HDMI audio Lip Sync HDMI Auto On SETUP Language Auto tuning Manual tuning AV connection Picture Position English OK OK OK OK MENU Back EXIT Watch TV 2 Press u or U to select AV connection, then press Q to select On or Off. Note: Disconnect the HDMI cable before changing the Lip Sync setting. page 27) from three modes: Auto, Digital or Analog. Selecting the Lip Sync Lip Sync can synchronize the sound...
... connection PC/HDMI audio HDMI audio Lip Sync HDMI Auto On SETUP Language Auto tuning Manual tuning AV connection Picture Position English OK OK OK OK MENU Back EXIT Watch TV 2 Press u or U to select AV connection, then press Q to select On or Off. Note: Disconnect the HDMI cable before changing the Lip Sync setting. page 27) from three modes: Auto, Digital or Analog. Selecting the Lip Sync Lip Sync can synchronize the sound...
Owners Manual
Page 29
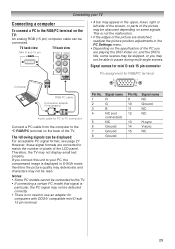
... cable Conversion adapter (if necessary) Audio cable for computers with DOS/V compatible mini D-sub 15 pin terminal. If you may not display small text properly. Connecting your PC, the compressed image is displayed in S-XGA mode, therefore the picture quality may deteriorate and characters may not be connected. However, these signal formats are playing the DVD-Video on some scenes may be skipped, or you connect this TV...
... cable Conversion adapter (if necessary) Audio cable for computers with DOS/V compatible mini D-sub 15 pin terminal. If you may not display small text properly. Connecting your PC, the compressed image is displayed in S-XGA mode, therefore the picture quality may deteriorate and characters may not be connected. However, these signal formats are playing the DVD-Video on some scenes may be skipped, or you connect this TV...

Owners Manual
Page 30
... Color, Tint, Sharpness, Black/White Level, MPEG NR and DNR in order to select the PC input mode (page 23). • This function may be detected correctly. For acceptable signal format, see page 27. Language AV connection PC Settings SETUP English OK OK MENU Back EXIT Watch TV 2 Press u or U to display the SETUP menu. If connecting a PC with an HDMI terminal, use an HDMI-to DVI adapter cable and analog audio cables. no signal...
... Color, Tint, Sharpness, Black/White Level, MPEG NR and DNR in order to select the PC input mode (page 23). • This function may be detected correctly. For acceptable signal format, see page 27. Language AV connection PC Settings SETUP English OK OK MENU Back EXIT Watch TV 2 Press u or U to display the SETUP menu. If connecting a PC with an HDMI terminal, use an HDMI-to DVI adapter cable and analog audio cables. no signal...
Owners Manual
Page 32
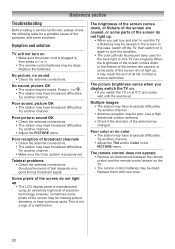
... used for a possible cause of the screen may be missing picture elements or have luminous spots. or 1. • The remote control batteries may be muted. Poor picture, sound OK • Check the antenna connections. • The station may have broadcast difficulties. Reference section Troubleshooting Before calling a service technician, please check the following table for the back light on the TV. • The remote control...
... used for a possible cause of the screen may be missing picture elements or have luminous spots. or 1. • The remote control batteries may be muted. Poor picture, sound OK • Check the antenna connections. • The station may have broadcast difficulties. Reference section Troubleshooting Before calling a service technician, please check the following table for the back light on the TV. • The remote control...


